
Report Related Attributes
Full Screen
It helps to control the display of command window/calculator pane. It is a logical type of attribute.
Syntax
Full Screen : Yes/No
If it is set to YES, the command window will be hidden, providing extra space when the report is displayed. The default value of this attribute is YES. In case of Sub-Report/AutoReport, if the value of this attribute is not specified, the default value is NO.
Example:
[Report: My Report]
Full Screen : Yes
Add/Delete/Replace
Static/Load Time modifiers like Add, Delete and Replace can be called as Delayed Attribute modifiers, as they are having least precedence among Delayed Static/Load Time modifiers.
Now these modifiers are generalized across all definitions. Earlier for definitions Report, Key, Color, Style, Border and Variable, the delayed attributes were applied in their sequence of appearance in the definition description. If more than one delayed attribute is used under any definition, then the attributes will be applied as they appear. This has been done to bring consistency across the definitions.
Example: 1
[Report : Test Report]
Form : Form1
Delete : Form
Form : Form2
The report Test Report won’t have any Form, as the attribute ‘Delete’, which is evaluated last, deletes all the existing forms.
Example: 2
[Report : Test Report1]
Form : Form1
Delete : Form
Add: Form : Form2
As a result of this code snippet, the report Test Report1 will have one form Form2 , since, on deletion of all the Forms, delayed attribute modifier Add is used to add a new form Form2.
Family
The value specified with the attribute Family is automatically added to the security list as a pop-up, while assigning the rights under Security Control Menu.
Syntax
[Report : <Report Name>]
Family : <String Value>
Example
[Report : Ledger]
Family : “Accounts Masters”
Here, Accounts Masters will get added to the Security list. Without the user rights for Accounts Masters in the Security controls, this report can neither be created, altered nor viewed.
Local
Delayed attribute modifier Local , which is used to locally modify the attributes of any child definition, is now enhanced to accept nested Locals.
Syntax
Local : <DefinitionType1> : <DefinitionName1> [: <DefinitionType2> : <Definition Name2> : … ] : <Attribute> : <Value>
Where,
< Definition Type > can be a Form, a Part, a Line or a Field.
< Definition name > is the name of the definition type.
< Attribute > is the attribute of the Definition of which, the value needs to be altered, and
< Value > is the value assigned to this attribute within the current Report or Form or Part or Line.
Example:
[Report: Custom Report]
Local : Line : TitleLine : Local : Field : AmtField :Set as : “Sales Amount”
The field Amt Field is localized at the report Custom Report , by using nested locals.
Plain XML
Tally provides the capability to export any report in XML format. The XML generated is in standard format for better readability, i.e., line ending characters after each closing tag, indentation for each sub tag, etc. Most of the applications can directly consume the data available in standard format. However, there are some legacy and non-standard applications which require an XML without formatting and applied styles. They consume the entire unformatted XML available as a single string, without even a new line character.
A new attribute Plain XML has been introduced in ‘Report’ definition. This attributes generates the XML without applying any formats and styles.
Syntax
Plain XML : <Logical Expression>
Where,
<Logical Expression> can be any expression which evaluates to logical value YES/NO.
Example
[Report : Simple Trial balance]
Form : Simple Trial balance
Title : “Trial Balance”
Plain XML : YES
Object
A Report is normally associated with a data object, which it gets from the previous Report and if not, will be associated with the anonymous object. From Release 3.0 onwards, the syntax for the association has been enhanced to override the default association as well. The Report attribute ‘Object’ has been enhanced to take an additional optional value as ‘Object Identifier Formula’.
Syntax
Object : <ObjectType> [: <ObjectIdentifierFormula>]
Where,
< ObjectType > is a Type of Primary Object.
< ObjectIdentifierFormula > is an optional value and refers to any formula which evaluates the name of Primary Object.
Example 1: Without the Object Identifier
[#Form : Sales Color]
Delete : Print
Add : Print : New Sales Format
[Report : New Sales Format]
Object : Voucher
Default Sales Color Form is modified to have a new print format ‘New Sales Format’. This Report gets the voucher object from the previous Report.
Example 2: With the Object Identifier
[Report: Sample Report]
Object : Ledger : “Cash”
The Ledger ‘Cash’ is associated to the Report ‘Sample Report’. Now components of a ‘Sample Report’ by default, inherit this ledger object association.
Fetch Values
This attribute allows the computation of user defined methods based on the current object Context.
Syntax
Fetch Values : <List of methods>
Where,
<List of methods>List of methods to be fetched from the Object.
Example
[Report : VAT Classification]
Object : Tax Classification
Fetch Values : MasterID, CanDelete
MultiObjects
This attribute MultiObjects is required to be specified in case multiple objects of the same collection are being added/modified in a Report. It is required specifically in case of multi master creation or alteration.
Currently, if multiple external data objects are selected for creating vouchers, the system processes them one by one. If it encounters an error while processing any object, it stops and shows the report with an error message. Objects created before the error remain, while the remaining ones are not processed.
The new requirement is to allow skipping objects with errors and continue processing the others without showing an error message.
Syntax
MultiObjects: <Collection Name>: <Logical Expression>
Where,
<Collection Name> is the name of the Collection for which modifications are to be done.
<Logical Expression> here means <Yes/No>
Example
MultiObjects : TSPL MO Stk Collection : Yes
So here in case there is an error while creating TSPL MO Stk Collection then the error will be skipped and the other collection will be created
-
Existing Behavior (Till Release 5.1)
By default, the system will follow the current behavior of stopping at the first error. -
New Behavior (From Release 6.0)
The new “skip errors and continue” behavior will be enabled only when explicitly instructed by the application.
Difference Between Previous and Updated MultiObjects Attribute Usage
| Scenario | Previous Capability | Updated Capability |
| Single Collection | Multiobjects:Coll1 | MultiObjects: Coll1 : Yes |
| Multiple Collections (Single Line) | MultiObjects: Coll1, Coll2 | MultiObjects: Coll1, Coll2 : Yes |
| Multiple Collections (Separate Lines |
MultiObjects: Coll1 MultiObjects: Coll2 |
MultiObjects: Coll1: Yes MultiObjects: Coll2: Yes |
| Error Handling | Not supported (Errors stop execution). | MultiObjects: Coll1 : Yes (enables skipping errors) |
| Multiobjects:Coll1 |
Backward Compatibility
- Existing configurations (without the second parameter) will continue to work as before. Collections can still be specified using a comma-separated list in the first parameter
Key Takeaways for Developers
- Add the optional second parameter (Yes/No) only when enabling skip errors.
- Without the second parameter, the system defaults to current behavior.
- Ensure the report processes all valid objects and skips errors only when explicitly instructed.
Disable Period on Tile
Disable Period on Tile is a new capability in TallyPrime Release 6.0 which allows customers whether to display/not display period on particular tile in dashboard. To bring this UI, we are adding an attribute within the Report definition.
This attribute will indicate whether to display period on particular tile in dashboard. This attribute is logical and will only take inputs of Yes/No.
By default, the value is set to “No,” meaning the period information will be displayed unless manually changed to “Yes.”
Syntax:
[Report : <Report Name>]
Disable Period on Tiles : <Logical Expression>
The <Logical Expression> here means <Yes/No>
Example:
[#Report : DBT Sales Trend]
Disable Period on Tile : Yes
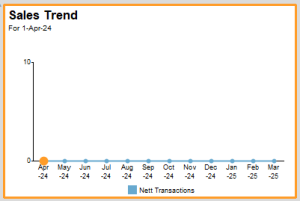
In the above mentioned image, we can see the tile for Sales Trend from the Dashboard in Tally Prime. Here we can see the period being shown as “For 1-Apr-24”. This is how it is shown by default.
Now here in the above mentioned example an attribute “Disable Period on Tile” has been used and the expression given for same is “Yes”. Now when we see the same dashboard we get to see the image below. Here the period has been disabled for this particular tile.


