
This topic lists the different TDL FAQs or frequently asked questions on TDL. It covers different capabilities of TDL and the responses to each of the TDL questions.
To avoid scrolling of lines in both vertical parts, set the value of the attribute Sync at the main part as No.
Example
[Part: Main Part]
Parts : Sub Part one, Sub Part two
Vertical : Yes
Sync : No
TallyPrime supports HTTP SOAP requests with the content-types ASCII, UTF-8 and UTF-16.
To extract the symbols like Indian Rupee, you need to send the HTTP SOAP request with content-type UTF-16. By default, TallyPrime responds in UTF-8 format, unless a specific content-type is specified in the HTTP SOAP request from Third Party Application (TPA).
Yes, it is possible to create a new folder in Windows using the system action Make Dir.
Example
[Function: Test Function]
11 : Make Dir: “D:\TestNew”
In order to use the option Version Compatability Check, you need to have .ddif file. By default, the DDIF file of the latest release is present in the TallyPrime Developer folder. DDIF file generated for any of the TallyPrime releases, is available in the respective folder. Repeated generation of the DDIF file is not required.
To load the Default TDL code of the base release
Go to Tools > Preferences > Compiler/Execution Options.
Browse and select the TallyPrime Exe Path field, for which the customisation project was created.
Check Load Default/Base TDL Reference from TallyPrime exe path check box. Click OK.
Right-click on the Default TDL project in the project browser, when the Default TDL code for the selected TallyPrime release is loaded.
Click Generate Compatibility Metadata.
tdlserver.ddif file will be created in the TallyPrime folder.
Yes, it is possible using the TDL Procedural File Input and Output capabilities. You have to open the file in write mode and truncate the content using the action TRUNCATE FILE.
Use the function $$IsDirectory to check whether the directory path is valid or not. This function returns logical value, Yes or No.
Example
[Function: Test Function]
00 : Log: $$IsDirectory:”D:\”
10 : Log: $$IsDirectory:”D:\TEST”
You can use $$DebugLog, which was introduced in Tally.ERP 9 Series A Rel. 5.4, to log all the completed parsing evaluation, when Tally is running in DevMode. The expression evaluation results can be viewed in Tally working directory with the excel filename starting with debug.
Yes, it is possible from Tally.ERP 9 Series A Release 5.3.8. The action Format Excel Sheet is used in function scope to allow the formatting of cell properties, Width and Text Wrap, while writing/updating to an Excel file using File I/O approach.
Syntax
Format Excel Sheet: :
Supported Properties : ColumnWidth and CellTextWrap
Column Width
Syntax
Format Excel Sheet : ColumnWidth : :
Example
[Function: Test Function]
10 : Format Excel Sheet: ColumnWidth:6:500
CellTextWrap
Syntax
Format Excel Sheet: CellTextWrap:::
where, Enable Wrapping is a logical value.
Example
[Function: Test Function]
20 : Format Excel Sheet: CellTextWrap:5:6:Yes
;; Here text wrap will be enabled as we mentioned YES
To retrieve the server port number, use the function $$ServerPort. When the port number does not have any value, it returns zero.
Every instance cannot have same port number. However, it can vary if they are executed from different folders with different settings, or modified after the instance is executed.
Yes, it is possible to import data from csv files using ODBC.
Syntax
ODBC: “Driver=Microsoft Access Text Driver (*.txt, *.csv); Dbq=; Extensions=asc,csv,tab,txt;”
Example
[Collection : Ledger SRCCollection]
ODBC : “Driver=Microsoft Access Text Driver (.txt,.csv);Dbq=C:\CSVImport\;Extensions=asc,csv,tab,txt;”
SQL : “Select * from SampleData.csv”
Is it possible to modify the InventoryEntriesIn values when voucher class Class for Inter Godown Transfers has been used in Stock Journal Voucher? Since the voucher class is handled at platform level, the method values cannot be modified, if voucher class Class for Inter Godown Transfers enabled for Stock journal vouchers
When we print from the voucher which is opened in Display mode, the report VCH Display is getting printed. Hence, need to add the customised print report in the form of VCH Display.
Example
[#Form: VCH Display]
Add : Switch : TestSalesPrint : TestCustomSales : $$IsSales:##SvVoucherType
[!Form: TestCustomSales]
Delete : Print : Voucher Print
Add : Print : TestCustomizedVCHPrint
Yes, it is possible to print the QR Code directly from TallyPrime. For more details refer to Printing QR Code in the Customisations.
To publish help file for Context Sensitive Help
Create MAP IDs and specify it at the TDL Definitions
[System: Formula]
Testfield : 25000
[#Field: test field]
Help : @@testField
Note: Map ID is a unique number ranging from 1 to 4,294,967. Suggested IDs for developers ranges from 25000 to 4,294,967.
Generate .chm file, using RoboHelp by providing Map IDs.
Display the newly generated .chm file by using the action DisplayHelp.
Example
[#Menu: Main Menu]
Add: Button: DIYHlp
[Button:DIYHlp]
Key : ALT + 4
Action : Call : DispHelp
[Function: DispHelp]
05 : DisplayHelp:””:”D:\Newhelp.chm”
To retrieve the ledger information from a group, use the SQL query in the below format:
Syntax
Select from where $Parent =
By using the above format, you can retrieve all ledger information from a specific group using the SQL query, Select * from Ledger where $Parent = “Sundry Debtors”. Similarly, the SQL query to retrieve the required information from a group is Select $Name, $Parent,$OpeningBalance from Ledger where $Parent = “Sundry Debtors”. By using this query, it returns the ledgers from the group Sundry Debtors, but not from the sub-groups. 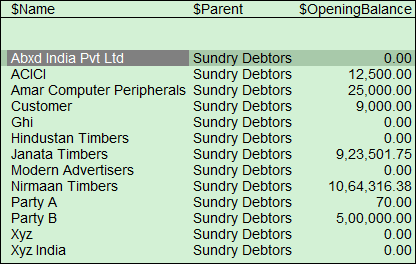
 In order to retrieve all the direct as well as indirect ledgers falling under the group Sundry Debtors, we can use an external method _PrimaryGroup which is available in default TDL. As a result, the revised SQL query is Select $Name, $Parent, $OpeningBalance from Ledger where $_PrimaryGroup = ”Sundry Debtors”. Underscore (_) is prefixed to the external method in order to expose the same to ODBC.
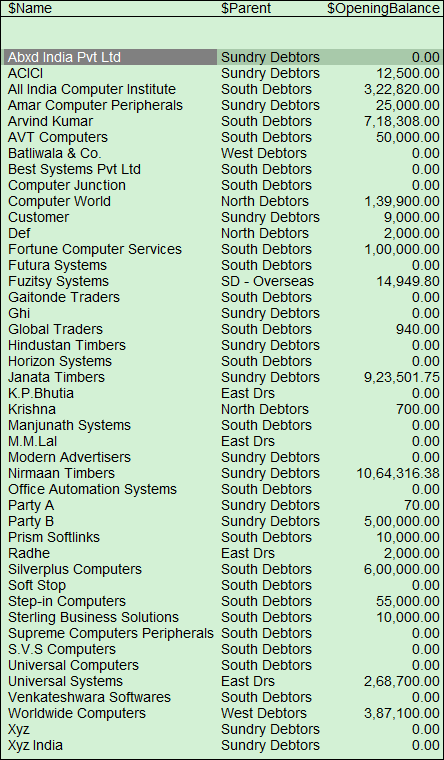
 The above mentioned query works for group created by TallyPrime during company creation, which are called Primary Groups. To retrieve the direct and indirect ledgers from a specified user created group as shown below:
Write a collection with the type Ledger.
Specify the attribute Child Of with the group name.
Set the value of the attributes Belongs To and IsODBCTable to Yes.
Example
[Collection: LedgersofSouthDebtors]
Type : Ledger
Child Of : “South Debtors”
Belongs To : Yes
IsODBCTable : Yes
The SQL query for retrieving the information from the above collection is Select $Name, $Parent, $OpeningBalance from LedgersofSouthDebtors.
How do I invoke SQL procedure from TallyPrime?
SQL procedure is a sequence of SQL statements that executed for specific purpose. Also, use variables within SQL procedures to make the SQL procedure generic. So, you can accept the parameters from the calling program.
To invoke SQL Procedure from TallyPrime
Create any third-party application or scripts, like VBScript file, by passing appropriate parameters.
Use the action Exec Command in TDL, and invoke the script file (VBScript file).
Sys Names are internal list names which are defined by Tally. These cannot be defined by partners. Partners can use Sys Names during customisation. Popular Sys Names are End of List and Not Applicable.
To gather TCP Addon information like expiry date in the report, write a collection using the methods AddonName and AddonDisplayDate.
- AddonName to get the TCP name.
- AddonDisplayDate to get the expiry date of the TCP file.
Example
[Collection: TCPInfo]
Type : Addon
Fetch: AddonName, AddonDisplayDate
The Batch object supports internal methods or UDFs in batch allocations. The Batch Allocations object stores UDF of only String data type as you cannot summarise other TDL data types to a Batch object.
Example
[Field: TSPLStorage]
Use : Short Name Field
Storage : TSPLGodownName
[System: UDF]
TSPLGodownName : String : 59875
Batch objects compute methods internally to fetch the values. In the case of UDFs, since the methods are not defined, the Batch object will not fetch any value. In order to fetch UDF values in Batch objects, you need to add a custom method for UDFs of type Quantity or Amount, by modifying the Batch object.
Example:
[#Object: Batch]
TSPLUserMethod: $$Number:$TSPLGodownName
[Field: TSPL_InvTot]
Use : Number Field
Set as : $BatchAllocations[1]. TSPLUserMethod
The object Summary Transactions is used for Triangulation report , from Release 5.0 onwards. This is not given for customisation.
Reason
When barcode is exported to .jpeg format, width is taken from the field defined in TDL and the barcode shrinks according to the length of the string. Due to this the barcode may not get scanned. Solution Avoid defining the field width. This will allow printing the barcodes with sufficient width as per the requirement.
Possible Reason If the required Object is not associated in the report definition then the report will be empty. Solution Associate the required Objects in the report definition to access the methods/sub-objects. For Example,
[#Form: Sales Color]
Object : Voucher
No. Account TDLs cannot be disabled through customisation as it will lead to breach of security. The Account TDLs are configured to have a control on its usage.
If you want to know the list of Account TDLs that has been configured, Go To F1:Help > TDL & Add-On to view the list of account and local TDLs
Cause This error occurs due to the unavailability of the SSL certificate while integrating TallyPrime with XML. Solution Collect the latest SSL certificate from the vendor and install in the system.
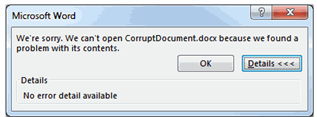
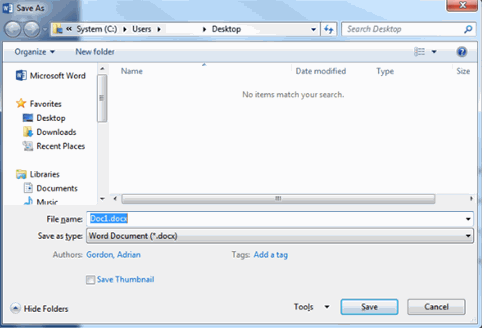
The corrupted Docx file can be retrieved using the following procedure.
 Solution
- Configure your computer to display extensions for all the known file types.
- Save a copy of the corrupted file in your computer.

- Save the corrupted file also in your computer.

- Rename the extension for both the file as .zip. For example, corruptdocument.docx.zip. This will enable windows to browse the file contents.
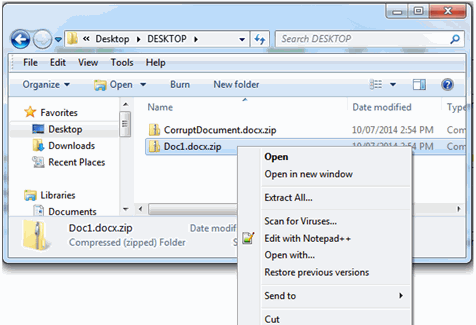

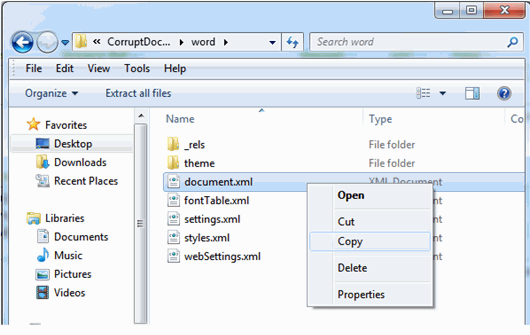
- Double click on the corrupt document then open the Word folder.
- Right-click on the document.xml file and choose Copy.
- Go back to your the folder where you have saved a copy of the file and choose Paste.
Note: This is a necessary step as you cannot directly copy and paste from one zip file to another using the built in ZIP file tool in Windows 7.
- Right-click on the document.xml file and choose Copy.
- Double-click on the new blank document and then open the Word folder.
- Right-click in an empty area and select Paste.
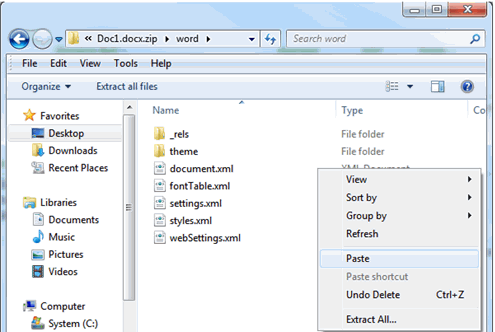

- Select Copy and Replace in the message box.
- Go back to the where you have saved the copy of the file and rename the blank document to .DOCX.
- Double-click on the blank document, it opens and the data from the corrupted document is now visible.
No. we do not have such library to communicate with Tally.Net Server to develop web application. Presently, only Tally Authentication Library is available for Android application development.
At present, TallyPrime platform doesn’t support to read XML with CDATA section.
No. Presently, no such attribute available in TDL to specify the XML Declaration when a report is exported into XML from TallyPrime. As a work around use the File IO approach to insert the required XML declaration into exported XML file.
Aggregation can be performed on compound data types but grouping can be performed only on simple data types. Consider a collection of vouchers where grouping needs to be done by Stock Item Name, Quantity and Rate etc. As Quantity and Rate are combination of two simple data types, that is, Number + String, they need to be converted into any of the simple data types while grouping over them.
Following code snippet can be referred for this: [Collection: Test Collection] Source Collection: Default Walk : Inventory Entries By : StockItemName: $StockItemName By : RateStr : $$String:$Rate Aggr Compute : Amount : SUM : $Amount
Scenario
I want to enter quantity as Alternate units and for that I am using “Type: Quantity: Secondary units” but it is getting converted as per conversion rate and then getting saved.
For e.g. Base Units: nos Alternate units: box such that 1 box = 10 nos Now if we enter 100 in quantity field then Tally would consider it as 100 nos and convert it to 10 box, however, we require the same to be saved as 100 box.
Solution
To achieve the required functionality, we need to explicitly set the value of Billed Qty field. Following snippet can be referred:
[#Line: EI InvInfo] Add: Right Fields: At Beginning : BAltQty [Field: BAltQty] Use: Name Field Validate: $$SetAltQty:$$EditData:@AltUnit AltUnit: $AdditionalUnits:StockItem:$StockItemName Inactive: $$IsEnd:$StockItemName [Function: SetAltQty] Parameter: pEditData: Number Parameter: pAltUnit: String Variable: AltUnits : String 00: SET: AltUnits: $$String:##pEditData + ” ” + ##pAltUnit 10: SET OBJECT VALUES: BilledQty: $$AsQty:##AltUnits 20: RETURN: True
It is possible to set the print orientation within TDL from Tally.ERP9 Series A Release 3.6 onwards. Variable SVPrintOrientation has been introduced to set the required Printer Orientation, that is, ‘Portrait’ or ‘Landscape’, within a Report.
It is recommended to declare a local variable within the function or report and set the variable value, to avoid the system Printer Configuration changes to be effected globally. This is useful where a Report needs to printed in a different orientation, e.g., Landscape. For e.g., if one needs to print the cheques in ‘Landscape’ mode and other reports in ‘Portrait’ mode, then there is no need to keep switching the printer settings from Portrait to Landscape, and vice versa, based on the report getting printed. For Cheque Printing Report, one can default Landscape Orientation. For example, [#Report: Balance Sheet] ;; Local Variable Declaration Variable : SVPrintOrientation : String Set : SVPrintOrientation : “Landscape” Since the variable is locally declared and updated within the Report Balance Sheet, the same will not affect the global printer settings. Multiple Orientation Support for Printing This will be very useful in scenarios where multiple forms are being printed from a single report. For example, from a Payment Voucher, one needs to print both Voucher and Payment Advice. However, the Payment Voucher needs to be printed in ‘Portrait’ form, and the Payment Advice in ‘Landscape’. To achieve this behaviour, the local declaration of the Variable ‘SVPrintOrientation’ at ‘Report’ level is mandatory, and its value must be set using the form level attribute ‘Set Always’ in individual forms.
Example:
[Report: TSPL Smp VarSVPrintOrientation Extended] Form:TSPLSmpVarSVPrintOrientationFrm,TSPLSmpVarSVPrintOrientationFrm2 ;; Mandatory Local declaration of Variable SV Print Orientation Variable : SV Print Orientation : String [Form: TSPL Smp VarSVPrintOrientation Frm1] ;; Orientation of this Form is set to ‘Portrait’ Set Always : SV Print Orientation : “Portrait” [Form: TSPL Smp VarSVPrintOrientation Frm2] Use : TSPL Smp VarSVPrintOrientation Frm1 ;; Orientation of this Form is set to ‘Landscape’ Set Always: SV Print Orientation: “Landscape” In this example, the report ‘TSPLSmpVarSVPrintOrientation Extended‘ has two forms, viz.TSPLSmpVarSVPrintOrientationFrm1 and TSPLSmpVarSVPrintOrientationFrm2. Based on the value set to the variable ‘SV Print Orientation’, both the forms will be printed in the respective orientation.
Cause
In comparison to Import of Data through XML/SDF Files, Updation of data through User Defined Functions takes a much longer time. A performance lag has been observed while updating data with User Defined Functions, as compared to updating data of a similar size by the Import method.
Solution
Importing of Data implicitly follows a Batch Posting approach, wherein the data to be incorporated in the database is updated in batches, thereby improving the performance. This approach has been extended to data updation through User Defined Functions from Tally.ERP9 Series A Release 4.8 onwards, with the introduction of two new Actions, namely START BATCH POST and END BATCH POST. Batch Posting Mode accumulates sets of Objects into batches, and pushes a whole batch of data into the database at a time, which optimizes the performance. The usage of these actions is documented comprehensively in TDL Reference Manual in the topic Batch Posting Actions – START BATCH POST and END BATCH POST.
You can drill down to the voucher level when the grouping is done on the methods Date/Master ID in the summary collection. Update the variable value with the master id and set the object context in the alter report.
Ensure that both Tally and MS Office are of the same bit-ness, that is, if both applications are of 32 bit or 64 bit then both can communicate without any problem.
If Tally application is 64 bit and acting as client and MS office (i.e Excel is 32 bit acting as Server) then ideally they cannot communicate with each other. However you can follow below steps to make both applications communicate with each other by using ODBC interface Install AccessDatabaseEngine_x64.exe by following the below steps:
Download the file – AccessDatabaseEngine_x64 to local system
Open Command prompt with administrative rights
Change Directory to exact file location. (Where the file AccessDatabaseEngine_x64 is located)
Type this command and Enter -> AccessDatabaseEngine_x64/passive
Once the Exe is installed. Re-start the Tally and proceed with the Import.
Further, to read an Excel File irrespective of the formats, one can use the following connection string: “Driver={Microsoft Excel Driver (*.xls, *.xlsx, *.xlsm, *.xlsb)};DBQ=;”
Open TallyPrime through Command Line Parameter from a Third Party Application and call the User Defined Function which you have written to create the vouchers through System Event Load Company.
Using the “Family” attribute of the Report Definition, we can add the report to the Security List.
Syntax:
[Report: ] Family : Where, is a string which will appear under Security Control For example: [Report:Balance Sheet] Family : $$Translate:”Balance Sheet” In this code snippet, the Balance Sheet is added to the Security list. The users having rights to display Balance sheet can only view the Report.
You can print Barcode from TallyPrime using the Barcode font. We need to write the style definition using the Barcode font and apply the style at the field level. Ensure that the barcode font is installed in windows font’s folder. Further go through the steps suggested by the barcode vendor to print the barcode and implement accordingly in TDL.
The action “HTTP POST” is a Report-Specific action. Hence, it will not work in User Defined Function.
Common title/string can be enabled in respective Productivity Suite resource file by enabling Header/Footeroption.
Excel does not support password protection if the file is saved in xml format. Protection happens only with blank password.
Currently, the statutory forms are available in productivity suites. The default resources are available in the Resources folder, inside the TallyPrime Developer installation folder. Other default reports are not available for print, using productivity suites.
TDL Names can be defined to add list to a table. TDL Names can help in string translation (multi-lingual support). However, customisation partners prefer to use List Name, if they do not intend to support the customisation with the revised language dictionary.
Yes, it will work in remote client if the required barcode font is installed in the remote system.
Example:
1 EXPORT FUNCTION $$LicenseInfo SerialNumber
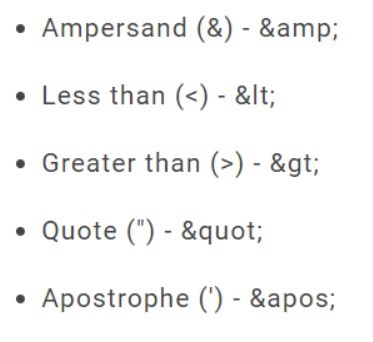
These characters can be represented using the following character substitutions:
You can get the closing balance of ledgers using the functions $$FromValue and $$Tovalue in SQL query.
For example:
Select $$FromValue:”01-04-2015″: $$ToValue:”30-04-2015″:$Closingbalance from LedgerColl.
Cause
This error may occur while accepting form. Report is associated to company object and opened in create mode.
Solution
Since the report is associated to company object and opened in create mode, it expects company name and other relevant method details. Since you want to store the values in UDF/Aggregate UDF associated with company object, open the report in alter mode to get the user inputs.
Since the event On: Form Accept overrides the default action Form Accept, it is mandatory to explicitly specify the action Form Accept.
For example: [#Form: Stock Journal Color] On: Form Accept : Yes : Call : Test Function On: Form Accept : Yes : Form Accept
Add a method at the object level and extract the value using the method name.
For example: [#Object: StockItem] Aliasname: $$Alias Use the method $Aliasname in the StockItem context to get the alias name.
The method IsDeemedPositive helps to identify whether the Amount needs to be debited or credited. Set this method to Yes, then the amount will be debited else the amount will be credited.
Creating primary objects, like Ledger, Voucher, and so on, through TDL is not possible in TallyPrime.
It is possible to delete the primary objects from Release 5.0 onwards using the procedural actionDelete Target.
For example, [Function: Emp Led Deletion] 00 : Walk Collection : Empty Ledgers 10 : Set Target 20 : Delete Target 30 : End Walk
It is not suggested to use the default indent voucher at present. We suggest you to create a voucher type Indentunder purchase order, and make it as optional by default. You can track the optional voucher with purchase order by writing User Defined Function.
Executing actions before deleting or cancelling objects is possible from Tally.ERP 9 Series A Release 4.8 onwards. The system eventsBefore Delete Object and After Delete Object get triggered whenever any of the primary objects defined in the deleted Tally Schema. For example, Object Company, Voucher, Ledger, and so on.
As the names suggest, the events Before Delete Object and After Delete Object are triggered before and after the deletion of the object. The current object context would be available in both these events. Triggering of the eventAfter Delete Object confirms the successful deletion of the object.
It is possible to retrieve the UDF index number from Tally.ERP 9 Release 4.8 onwards. Export the master/voucher in XML format. An XML attribute Index, within the UDF List Tag, helps to retrieve the original UDF number corresponding to the data available within the objects associated with it. This UDF number will be available in the Index attribute in the UDF List Tag, even when the TDL is not attached or is unavailable. The Index attribute will be available for Simple as well as Aggregate UDFs.
For example, Raam In the above tag, the UDF number, 1010, is displayed as the value of Index attribute in the UDF List Tag.
MSG Box: This procedural action displays the message and expect a key press from the user.
Start Msg Box and End Msg Box: These are asynchronous message boxes. The action Start Msg Box invokes the message box and retains it till the action End Msg Box is encountered. The message box continues to appear till the action End Msg Box is encountered or the function is terminated, whichever is earlier. Unlike action Msg Box, this action is executed asynchronously, that is, it does not expect a key press from user. When executed, it displays the message box, and continues to execute the subsequent actions.
For detailed explanation, please refer to TDL Reference Manual.
It is possible using the printing event After Print. The event After Print can be specified for Report, Form, Part, and Line definitions. It first prints the current interface object and then executes the specified actions for this event. A list of actions can be executed after printing the report based on some condition.
A logical UDF can be added at the voucher level and the value can be modified after print using After Print event. Based on the logical UDF value, the controls can be implemented.
It is possible to disable logging info in tallyhttp.log file from Tally.ERP 9 Series A Release 4.8 onwards. At times, programmers would not want to log certain sensitive HTTP Information, in spite of HTTP logs being enabled in developer mode.
In order to explicitly control the logs, the requestor can additionally send a Header DISABLELOG and set the value to Yes, which will disable the current log, irrespective of the configuration or the mode in which Tally is running.
The default value is NO, i.e., in the absence of this Header, the HTTP information will be logged to the file TallyHTTP.log, if TallyPrime Second is working in developer mode and HTTP log is enabled in configuration.
Since the event On: Accept overrides the default action Field Accept, it is mandatory to specify the action Field Accept.
For example, [#Field: Test Field] On : Accept : Yes : Call : Test Function On : Accept : Yes : Field Accept
It is possible to achieve this requirement using the import events introduced in Tally.ERP 9 Series A Release 3.0. For example, you can synchronise purchase voucher and at the other end, it will be imported as sales voucher.
The eventsStart Import, Import Object and End Import, gives the complete control to the programmers to manipulate the data prior to importing the same into the company. Please refer to the TDL Reference Manual for detailed explanation.
No. Only Select Statement in SQL Query is possible. Update or Delete queries is not supported. In order to update or delete any object within Tally, one can use XML SOAP request.
To fetch any value from Price List Object, you can use the dotted notation/method formulae syntax as shown below:
Example
[Field: VCH SplField] ;; from within InventoryEntries Object
Set As: $(StockItem,$StockItemName).FULLPRICELIST[1,@@CurrentPriceList].PRICELEVELLIST[1].PriceLisUDF
[System: Formula]
CurrentPriceList : $PriceLevel = #EIPriceLevel
While designing a Pre-printed Invoice, the following guidelines can be followed to ensure perfection:
- The entire Form Dimensions viz., Height, Width, Space Top, Space Left, etc. must be specified in Inches. If some preprinted and fixed information is available at the Top/Bottom of the pre-printed Invoice stationery, same can be included as part of the Space Top/Space Bottom.
- Maintain uniformity while specifying the Unit of Measurement across all other definitions from Part to Field, for e.g., all the dimensions can be specified in mms (Millimeters).
- Do not specify dimensions for every Part or Field to equate the Form Dimensions. Leave some variable portion for Tally to adjust accordingly.
Example
- Do not specify Width for the Particulars Field or we can enable FullWidth which can automatically adjust the available width.
- If Bottom Parts are not available in the Pre-printed Invoice Format, Height for Inventory/Taxes Part need not be specified that can be automatically adjusted by Tally else specifying Height is mandatory.
These are just guidelines to proceed with the pre-printed Invoice customization. Some variations to the above can also be done according to the need.
If the current mode of entry is Alter, then the Method MasterID returns properly. If the current mode of entry is Create, Duplicate, or Insert, where new voucher is being entered, Method MasterID will not bear any value prior to saving the current voucher. In such cases, the same can be identified using the Method CmpVchID of the Object Company which holds the subsequent Master ID of the last entered Voucher in the Company.
Hence, $CmpVchID:Company:##SVCurrentCompany returns the MasterID which will be assigned to the current Voucher. Ideally, this can be used along with the Event On: Form Accept, where the Voucher is being saved and MasterID is required to perform some further action like printing/exporting the voucher post saving using Action Print/Export by suppressing the Configuration screen.
Yes, it is possible to uniquely identify a voucher, similar to a master.
Procedure
- If the Object Voucher needs to be identified in a Report or a Function to set the current object context, then only the MasterID of the current Voucher can be used. MasterID must be used prefixed with ID:
Example
[Report: TSPL Sample Voucher Object]
Object : Voucher : @@TSPLVchID
[System: Formula]
TSPLVchID : “ID:27”
2. If the Object Voucher needs to be identified in the Action Modify Object, any methods can be used. a. If MasterID is used as an identifier, Date is not required and uniqueness of the Voucher is ensured. b. If any other identifier is specified, specifying Date becomes mandatory and first Voucher matching the given Method Value for the specified day will be taken up for alteration.
Example
[Function: Modify PO Narration]
VARIABLE : VarNarr : String
00 : SET : VarNarr : “This is modified Narration”
10 : MODIFY OBJECT : (Voucher,@@VID).Narration : ##VarNarr
[System: Formula]
VID : Date:”1-Apr-2008″:Reference:”abcd”
Similar to the Method Reference used above, any of the other Methods can be used as shown below:
VID: “Date:'” + $$String:$Date + “‘” + “:Reference:'” + $PurchaseOrderNo + “‘”
VID: “Date:'” + $$String:$Date + “‘” + “:Narration:’keshava madhava'”
VID: “Date:'” + $$String:$Date + “‘” + “:Narration:'” + $$Table:EIOrder:$Narration.
There is an error Incorrect Storage in Tally.ERP 9, but the same TDL was working perfectly fine in earlier releases.
Cause
A Computed Method within any Collection Definition in Default TDL or any of the associated TDL/TCP Files might be same as the UDF name which could have caused this error.
Solution
Alter the UDF Name specified within the custom TDL Files.
We can define a number field thereby converting the value being set into Number Type and using Format Specification.
Example
[Field: TSPL Sample Field]
Use: Number Field
Set as: $$Number:($$String:$BilledQty:Symbol,ShortFrom,Secondary)
Converting BilledQty into String is needed as Format Secondary will work only if the value is of Type String. Hence, converting Quantity into String and subsequently, into Number to extract only the Number component out of it.
Report Level attribute Keep XML Case must be enabled in order to maintain the case as specified in the TDL using XMLTag Attribute.
Example
[Report: TSPL Sample Report]
Keep XML Case : Yes
|
|
[Field: TSPL Sample Field]
XMLTAG : TSPL Sample Field
It is possible by writing a User Defined Function. To display Machine Time in 12 Hour Format
- Get the Machine Time using $$SysInfo:SystemTime.
- Separate the Hours and Minutes using the Function StringPart or Looping Construct within User Defined Function For Token.
- Calculate the Hours by subtracting the hours by 12 if Hour value is greater than 12.
- Display the above Hour Value and Minutes as is.
Deletion of Keys Page up and Page Down is not possible since they are part of the System Keys Definition. Hence, in order to disable the working of the same, we can change the action.
Below is the sample code for the same which changes the behavior of Page Down Key.
[#Form: Ledger]
Add : Option : MyLedgerForm : Not $$IsCmpOwner
[!Form: MyLedgerForm]
Add: Key : PgDn Display ReportNew
[Key: PgDn Display ReportNew]
Key: PgDn
Action: Field End
In the above code, the PgDn Key is altered to change the cursor to the end of the current field.
Field Name must contain the word Password which is meant for accepting Passwords
For example:
[Field: Login Password]
When the user enters any character in this field, only * will be displayed.
User Defined Fields (UDFs) are special data storage artifacts which hold multiple values, hence specifying an index is mandatory while altering the same using Action Modify Object.
For example, a UDF which is associated at the Voucher Object is required to be altered. The same can be done as shown below:
[#Form: Normal Day Book]
Add : Button : UDFAlterButton
[Button: UDFAlterButton]
Key : F8
Title : “UDF Alteration”
Action : Modify Object : TestUDF[1].TestUDF : “Test”
Scope : Selected Lines
The above code modifies the UDF Values of all the selected vouchers in the Daybook on clicking the Button titled UDF Alteration. Since the above code is meant to alter only the first value of the UDF, specifying index is optional. So, the same can also be specified as TestUDF[].TestUDF.
Bottom Parts, Height of the Inventory Part, and Page Breaks are not used, as a result of which POS Invoice Printing happens with variable Inventory part.
$$FileRead, ignore quotes, comments, spaces, etc., while reading the entire line from a text file.
$$FileReadRaw which is similar to the function $$FileRead except that $$FileReadRaw can read lines with: Quotes, Comment characters (; /* */), Spaces & Tabs, =
We can call C++/ VC++ DLLs using the function $$CallDllFunction. Further $$CallDllFunction can be used to call any function which returns a single value. For other DLLs and if the function returns an array of values, then it is advisable to use DLLCollection.
The method “IsDeemedPositive” is used to identify whether the Amount should be Debited or Credited. This method has to be set to “Yes” if the amount should be Debited and “No” if the amount should be credited.
Write a collection of Type: Company on Disk.
Code Snippet:
[Collection: TestCompaniesonDisk]
Type: Company on Disk
Format: $Name, 25
Align: Left
You can delete a file/folder using the action Delete File.
Cause
Tally shows the errors “Proper Pay Link name not given for … Bank ” and “Proper Payment mode not given for … Bank” while creating voucher through function in Tally.ERP 9 Release 4.8.
Solution
Due to the schema changes for the purpose of banking enhancements, setting value to the methods Name and Payment Mode at Bank Allocations level is mandatory from Tally.ERP9 Release 4.8 onwards. Refer to the below code snippet:
[Function: ReceiptVchCreate]
20 : INSERT COLLECTION OBJECT : BANKALLOCATIONS
21 : Set Value : Name : $$MakeUniqueID
22 : Set Value : Payment Mode : “Transacted”
The function $$MakeUniqueID generates the Unique GUID.
In order to invoke a Function with multiple Parameters from a Menu Item, we need to enclose all the Action Parameters within Round Brackets and the Logical Expression is mandatory.
Syntax
[Menu:
Item : : : :
Key Item : : : : :
Example:
[Menu: Display Menu]
Item : “Function with Parms”: Call : (Function with Parms:Parm1 :Parm2): Yes
Key Item : “Function with Parms with Key” : K : Call : +
(Function with Parms : Parm1 : Parm2) : NOT $$IsEmpty:$$SelectedCmps
[Function: Function with Parms]
Parameter : pParm1 : String
Parameter : pParm2 : String
:
:
:
100 : RETURN
To register a COM DLL, you need either Microsoft Visual Studio or .NET Framework installed on the system.
Scenario 1: When Microsoft Visual Studio 2010 is installed on the system
Perform the following steps:
Open the Visual Studio Command Prompt
Register the DLL in the Visual Studio Command Prompt as:
regasm /codebase
Scenario 2: When .NET Framework is installed on the system
Open Command Prompt in Administrator mode & then go to the directory where .NET Framework is installed i.e. to “C:WindowsMicrosoft.NETFramework” & register the DLL using: regasm /codebase “Location of the DLL in the system”
Note: Go to “C:WindowsMicrosoft.NETFramework” & make sure that .NET Framework (preferably 4.0) is installed on the system. If it is not installed, then install it & repeat Step 1.
You can delete the Sub Objects of a Primary Object using the Action Delete Collection Object. This Action is designed to work only in Target context which means that the object must be in Edit Mode. In order to delete Sub-Objects, one must switch the target context to the owner context of the object to be deleted.
For example, to delete a record of Inventory Entries, the current target context must be Voucher.
The Integrity of the Primary Object must be maintained while using this Action. For example, in a Voucher, deleting all the Ledger Entries without replacing with the correct ones will result in an invalid voucher.
Syntax
Delete Collection Object : [: : ]
where Sub-Collection Name is the name of the Sub Collection under Primary Object.
Index is the position of the object to be deleted. Default value of Index is -1 which points to the last object.
Logical Expression, if evaluated to be True, then only this action will be executed.
Example
Delete Collection Object : Full Price List : 1 : @@IsSamePriceList
The above example in default TDL is used in Price List where the availability of the specified Price List/Date is checked in the master. If found, the record is deleted prior to posting the new values as on date for a specified price list.
You can control the Negative Stock entry in a Voucher. In default Tally, we have used the Field Attribute Notify to notify the Negative Stock as a warning. In order to control the same, we need to use the Field Attribute Control.
Syntax
Control : :
Example
[#Field: VCH NrmlActualQty]
Option : NSC NrmlQty : @@IsSales Or @@IsDelNote
[#Field: VCH NrmlBilledQty]
Option : NSC NrmlQty : @@IsSales Or @@IsDelNote
[#Field: VCHBATCH NrmlAQty]
Option : NSC NrmlQty : @@IsSales Or @@IsDelNote
[#Field: VCHBATCH NrmlBQty]
Option : NSC NrmlQty : @@IsSales Or @@IsDelNote
[!Field : NSC NrmlQty]
Add :Control: NegativeStock : ##VCFGNegativeStock AND @@InvoiceInCreate AND+
$$IsNegative:@@FinalStockTotal
The above Negative Stock Control solution will not work in Alter Mode. A voucher, being a legal document must not be subjected to alteration. Imagine a scenario, where further entries have happened based on the Batch Name specified in one of the entries and later altered to a different Batch Name. Also, the Quantity, Tracking Number, Purchase Order and so on, if altered, can lead to chaos. To avoid this situation, alteration must be controlled and if required, only administrator must alter it. Normally, accounting practise is to reverse the entry and not alter the entry. By allowing to alter an entry, one is compromising on the accuracy of the information/ reports. Hence, with the help of default Security Control, one must prevent the alteration of Vouchers.
Currently, Amount Fields allow setting only non-zero values.
In order to force zero onto fields bearing empty values, the Type of the Field must be changed to either String or Number optionally (if the value is zero) and Zero can be set in the Field.
If the Field Type is set to Number, the Attribute Format must be set to Zero. For example, Following code sets zero in Debit and Credit Fields that are Empty within the default Trial Balance Report:
[#Field: DSPClDrAmtA]
Option : DSPClDrAmtA Number : $$IsEmpty:@FldValue
[!Field: DSPClDrAmtA Number]
Inactive: No
Type : Number
Format : “Zero”
[#Field: DSPClCrAmtA]
Option : DSPClDrAmtA Number : $$IsEmpty:@FldValue
You can determine the current voucher’s MasterID from the Company Object’s method CmpVchID which retains the Master ID of the subsequent voucher being created.
For a Single-User Environment, the above solution holds good, but in case of Multi-User Environment where multiple users are entering data simultaneously, it is hard to determine the Master ID of the current voucher since the MasterID from the Company Object will be assigned to the first person saving the voucher.
Therefore, to determine the MasterID of the current voucher, presently one needs to generate a unique value using $$MakeUniqueID which can be stored within the current Voucher’s UDF. Once the voucher is saved, one can find the MasterID of this Voucher from the Collection of Vouchers of this Voucher Type by filtering for the unique ID assigned to it. To narrow down the scope of search, one needs to set the Variable SVFromDate and SVToDate to the current date and find the MasterID from the Collection of Vouchers.
To determine the current voucher’s MasterID
Using $$MakeUniqueID, generate a Unique value and store it in the UDF within the Voucher object.
Set the value of the UDF within a global variable.
On saving the voucher, invoke a User Defined Function, wherein:
Set the SVFromDate and SVToDate to Current Date.
Create a Collection of Vouchers for this Voucher Type.
Using Function FilterValue, from the above Collection, find the MasterID of the Voucher by filtering for the UDF value within the variable.
Do the needful with the Master ID received above.
You might have tried to perform these operations using the web browsers other than Internet Explorer. At present, Surrender/TCP De-compilation is supported only in Internet Explorer Browser. Hence, please ensure that you are using Internet Explorer to perform these operations.
In case the difficulty still persists, please write to support.tallydeveloper@tallysolutions.com
To read an Excel File irrespective of the formats, one can use the following connection string:
“Driver={Microsoft Excel Driver (*.xls, *.xlsx, *.xlsm, *.xlsb)};DBQ=;”
For example:
[Collection: Excel Contents]
ODBC: “Driver={Microsoft Excel Driver (*.xls, *.xlsx, *.xlsm, *.xlsb)};DBQ=C:\Tally.ERP9\Ledgers.xlsx;”
SQL : Select * from [Sheet1$]
In order to extend user level controls to the remote end, it is necessary to validate the Remote User accessing the server company data. A Function RemoteUserId evaluates and returns the Remote User Name at the Server to validate based on which appropriate controls can be applied.
Please refer the sample code on the usage of $$RemoteUserId available with TallyPrime Developer and make necessary changes in your code.
To compare strings with Special characters one needs to use the Platform Function ExactMatch. The reason why we need to use Function ExactMatch is usually Tally ignores special characters which mean LT equals to L & T for simplicity.
Hence, when comparisons need to be done including special characters like spaces, slashes, ampersands, etc. one needs to use Function ExactMatch to compare each character exactly. Code Snippet:
$$ExactMatch:##VarInputString:” ”
In the above code snippet, VarInputString is a Variable which is compared with another string ” ” (Space). Function ExactMatch returns True if the value of the Variable VarInputString equals to ” “.
You can control the user input with a Field using Comparison Operators BETWEEN and AND. This helps in specifying the start and end range value either within an alphabet or number, as per the need.
Example
IF ##VarInputChar BETWEEN “A” and “Z” THEN True else False
Example
[Field: String Validation]
Use : Name Field
Control : Invalid Input Msg : Not ($$InputValidityCheck:$$Value)
[System: Formula]
Invalid Input Msg : “Please enter only alphabets”
[Function: Input Validity Check]
Parameter : pFieldInput : String
Variable : Character : String
Variable : Counter, String Count : Number
000 : SET : StringCount : ($$StringLength:##pFieldInput)
010 : WHILE : ##Counter < ##StringCount
020 : SET : Character : $$StringPart:##pFieldInput:##Counter:1
030 : INCREMENT : Counter
040 : IF : if ##Character BETWEEN “A” AND “Z” then TRUE else FALSE
050 : CONTINUE
060 : ELSE:
070 : RETURN : False
080 : END IF
090 : END WHILE
100 : RETURN : True
From the current voucher object, while setting Inventory Entries or Ledger Entries automatically from within a User Defined Function, a blank record gets inserted at the beginning.
When a voucher is being entered, automatically the first object of the sub-objects are already available even before we start entering any values. In such a scenario, when we try to insert a new object, the second object will be created leaving aside the first object. Hence, all the subsequent objects are filled with an empty row at the beginning of the object.
In such a scenario, verifying whether the first object is already available is important. Hence, within a User Defined Function, verify the following before setting values.
Label1 : if $$NumItems:InventoryEntries > 0 AND $$LoopIndex = 1
Label2 : SET TARGET: InventoryEntries[1] ;; if the first object already exists
Label3 : ELSE:
Label4 : INSERT COLLECTION OBJECT : Inventory Entries
Label5 : ENDIF
This ensures that in all modes i.e., create, alter, and so on. it works smoothly.
Prior to User Defined Functions and dynamic object concept, the default Price List Report had a database objects associated with it. Hence, the User Defined Field added by a TDL Programmer was persisting along with the default methods within the Stock Item Object.
Present behavioral change
Now, the default Price List Report design is changed which now associates dynamic memory object which does not persist to database as it is. On the acceptance of the Form, all the Price List values entered by the user are updated within the Stock Item Object.
Reason for the change
The reason for this change was to enhance the performance. Since all the Stock Items whether Price List was updated or not were getting saved consuming lot of time and memory unnecessarily. This approach has enhanced the performance drastically by allowing the user to choose and save only those Stock Items where the price list were required to be updated.
To update user defined field following needs to be done to save UDF within Stock Item:
- Alter the UI to add relevant Fields wherever required.
- Alter the default dynamic object to add relevant storages.
- Within the default UI Form, on Form Acceptance at end, call an User Defined Function to update only the UDF Values
Example
[System: UDF]
PLDiscAmt : Amount : 1000
[#Object: MPL Price Level List]
Storage : Discount Amt : Amount
[#Line: MPS Explode]
Add : Fields : PL Disc Amt
[Field: PL Disc Amt]
Use : Amount Field
Storage : Discount Amt
Set as : $(StockItem, #MPSStockItemName).FullPriceList[1,($PriceLevel = ##SVPriceLevel AND $Date = ##SVPriceLevelDate)].PriceLevelList[$$Line].PLDiscAmt
[#Form: Multi Price Set]
Add : On : Form Accept : Yes : CALL : PL Update UDF
[Function: PL Update UDF]
Variable: StockItem : String
Variable: FromQty : Quantity
Variable: ToQty : Quantity
Variable: DiscountAmt : Amount
00 : WALK COLLECTION : Full Price List
10 : SET : StockItem : $StockItemName
20 : WALK COLLECTION : Price Level List
30 : IF : NOT $$IsEmpty:$DiscountAmt
40 : SET : FromQty : $StartingFrom
50 : SET : ToQty : $EndingAt
60 : SET : DiscountAmt : $DiscountAmt
70 : MODIFY OBJECT : (Stock Item, ##StockItem).FullPriceList[1, ($PriceLevel = ##SVPriceLevel AND $Date = ##SVPriceLevelDate)].PriceLevelList[1, ($StartingFrom = ##FromQty AND $EndingAt = ##ToQty)].PLDiscAmt[1].PLDiscAmt : ##DiscountAmt
80 : ENDIF
90 : END WALK
100 : END WALK
The reason is that the default Sales Register uses Collections where only required methods including Inventory Entries Collection has been fetched. Hence, to include Batch Allocations or any other Sub Object, the same is required to be fetched as shown in the example below:
For example,
[#Form: Columnar Day Book]
Local : Collection : Default : Fetch : InventoryEntries.BatchAllocations.*
With the above Fetch, the Sub Object Batch Allocations and the Methods within would be available.
In order to effect the filters, Form has to refresh based on the altered variable values. Hence, in order to refresh the Form, we need to add a dummy option specifying the altered Variable value within the condition.
Example
[Form: FilteredFormRefresh]
Option: FilteredFormRefresh Filter: ##FilterVar
[!Form: FilteredFormRefresh Filter]
Create two collections of Type : Bill and enable the attribute Cleared in one collection and disable the attribute Cleared in another collection. Subsequently, create a Union of both these Collections.
Example
[Collection: List of Cleared Bills]
Type : Bill
Cleared: Yes
[Collection: List of UnCleared Bills]
Type : Bill
Cleared: No
[Collection: List of Bills]
Collection: List of Cleared Bills, List of UnCleared Bills
There is no difference between them. They are aliases to each other.
% Screen is designed to be used in Display Mode and % Page is designed to be used in Print Mode but the TDL Programmer need not worry about taking care in both the modes. Tally automatically assumes the unit based on the current mode.
This is possible using an inbuilt Function CmpUserLevel. Function $$CmpUserLevel returns the security level of the user currently logged in, i.e, either Owner, Data Entry or any other Security Level created by the administrator. While rendering the User Interface elements viz., Parts, Lines, etc. one can validate the security level using this Function. For example,
[Part: SecOper]
Option : Operator SecOper : $$CmpUserLevel = “Operator”
[!Part: Operator SecOper]
Add : Lines : Operator SecOper
At present, any Voucher, Invoice or Report will get printed in only one language i.e., the Language selected by the user. Hence, the dynamic informations i.e., Ledger Name, Stock Item Name, etc. that appears dynamically from the Tally Database will be printed in the selected language only.
However, there are cases when we require the prompts, i.e., the fixed messages like Title, Terms, etc. to be displayed in other than the selected language. In such a circumstance, one can choose to use the following work around:
Write the code in TallyPrime Developer and use (for example) Hindi Text Here, Tamil Text Here, and so on, in the fields where fixed text in different languages need to be printed.
Save the code in text format and open it in Notepad.
Include the multilingual text in the appropriate places using Windows Unicode Fonts and save the same as Encoding Type Unicode.
Configure the .txt file to TallyPrime and print the desired Report.
We need to ensure that the data type of the first row of data in Excel is same across all the subsequent rows in the respective columns. For example, if the first row of data for a particular column is of Type Number, the subsequent rows of this column must be Numeric and so on.
To eliminate an already selected Item from the Table, one needs to disable the Field Attribute Common Table. Also, the Collection Attribute Unique must contain the UDF being stored in the target Field.
Example
[Field: Unique Item Fld]
Use: Short Name Field
Table: CollOfStockGrp
Storage: Unique Item UDF
Common Table: No
[Table: CollOfStockGrp]
Type: Stock Group
Fetch: Name
Format: $Name, 20
Unique: $Name, $UniqueItemUDF
In the above Field Unique Item Fld, once any Item from the Table is selected in the previous Lines, the same will not appear in the list subsequently.
Note: Field Attribute Storage is mandatory to get unique Items in the List. In the absence of Field Attribute Storage, the above will not work.
You can make use of Part Attribute Scroll with value as Both in which the Lines and Fields get repeated.
Example
[Part: Scrollable Part]
Lines : Scrollable Line
Repeat: Scrollable Line : CollOfVch
Scroll : Both
The repeated Fields within the above Part Scrollable Part wil
Field Attribute Color is used to set the Field Contents in the specified Colour only in Display Mode. If the same needs to be printed in the specified colour, the Colour must be set using Field Attribute Print FG.
Example
[Field: Fld Color]
Use : Name Field
Set as : $Name
Color : Red ;; This renders the colour in Display Mode
Print FG: Blue ;; This renders the colour in Print Mode
Tip: If the Background Colour needs to be set during Printing, the same can be done using Field Attribute Print BG and Field Attribute Background sets the Background Colour in Display mode.
Cause
While importing data from Excel to Tally using User Defined Function, Quantity and Rate Fields do not get imported, resulting in this error.
Solution
In an User Defined Function, there can be 2 Object Contexts at a time viz., Source and Target such that Source Context Method value can be set to Target Context Methods. While importing data from Excel to Tally, data collected from Excel acts as a Source and Tally DB Object i.e., Stock Item, Ledger, Voucher, etc. where data is set acts as a Target Object. While setting value to Methods bearing data types, Quantity and Rate, Unit information set within the Stock Item is needed hence the Target context i.e., the Tally Inventory context is needed. There are 2 ways of switching the context while setting value from Source Context: 1. Using Function TGTObject – We can store the Quantity and Rate in a temporary Numeric Variable. Subsequently, using Function TGTObject, switch the context to Target Object Context and parameter can be the specified variable.
Example
[Function: Import from Excel]
00 : SET : QtyVar : $ExcelQtyNum
10 : SET : RateVar : $ExcelRateNum
20 : SET VALUE: BilledQty : $$TGTObject:$$AsQty:##QtyVar
30 : SET VALUE: Rate : $$TGTObject:$$AsRate:##RateVar
2. Using Start Block & End Block – We can also use Block Statements with Start Block and End Block which retains the object contexts which was available prior to entering this Block later. Similar to the above, we can retain the Quantity and Rate in a temporary Numeric Variable. Subsequently, within Start Block, change the object context and set value to the required methods.
Example:
[Function: Import from Excel]
00 : SET : QtyVar : $ExcelQtyNum
10 : SET : RateVar : $ExcelRateNum
20 : START BLOCK
30 : SET OBJECT
40 : SET VALUE : BilledQty : $$AsQty:##QtyVar
50 : SET VALUE : Rate : $$AsRate:##RateVar
60 : END BLOCK
Subsequent to the Block Statements, the Object context would be restored.
This is possible using Event On: After Print at the Report Definition being printed. Also, we need to confirm that the Report is actually printed and not just previewed. This can be controlled using Function $$InPreviewMode (introduced in Tally.ERP 9 Release 3.0) which returns the current mode i.e., if the Report is being printed or just previewed.
Example
[Report : Sales Invoice]
On: After Print : NOT $$InPreviewMode : CALL : Update Sales Printed Flag
The function Update Sales Printed Flag must update the Printed Flag (Logical UDF) within the current Voucher which is used to control printing of the Report.
Syntax
Storage : : :
This can be used in both edit and display modes. The purpose varies in both these modes.
This Syntax in Edit Mode can be used to store the current field contents in the Method Method Name as the nth element under the Sub Collection/Object.
Example
Storage : Name : Name : First
The above example indicates that the contents entered in the current field should be stored in the First Object’s Method Name under the Sub Collection Name.
This Syntax in Display Mode can be used to set the contents from the Method Method Name which is the nth element under the Sub Collection/Object. Also, this Object is removed from the Sub Object/Collection only for the current Report.
Example
Storage : LedgerName : LedgerEntries : First
The above example indicates that the Method LedgerName of the first Object from within the Sub Object/Collection LedgerEntries is set within the current Field. Subsequently, this Object is removed from the current Collection for this Report.
Both attributes are used to remove the line based on the specified condition. Attribute Empty If empties the contents of the line completely which means that the Line will not be considered for the Report Totals. Attribute Remove If removes the entire line but the values within the removed Line are considered for the Report Totals.
Form attribute Full Object is used to export a complete hierarchy object that is associated at the report level. Line attribute Full Object is used to export the entire object storages associated with the line including UDF values in XML Format . The default value for this Attribute is No. If Full Object is disabled, only the Report contents will be exported. If Full Object is enabled, the object associated with the line gets exported with all its methods and sub collections.
Environment Variable SVPrintCopies is used to denote the number of copies to be printed. This can be preset at the Report Level using the Report Attribute Print Set.
Example
[#Report : Printed Invoice]
Print Set : SVPrintCopies : 3
The report Printed Invoice will be printed thrice.
It is possible to print 2D Barcode in Tally.ERP 9. To achieve this, approach the bar code vendor for necessary supporting files and help documentation based on which this requirement can be extended.
This is possible through programmable configuration. We need to set the relevant environment variables prior to printing the Report. For example, preprinted Invoice can be printed in a Dot Matrix Printer and other reports can be printed in Laser Jet Printer.
Variable SVPrinterName is the variable which accepts the Printer Name and the content is redirected to the relevant printer.
Variable SVPreview is the variable which accepts a logical value denoting whether to display a print preview or not.
Once the Variables required for Printing are preset, there is no need to bring up the configuration
screen for the user. Hence, we need to add a logical value Yes subsequent to the Report Name which will skip the Configuration window.
Similarly, all other configuration variables for various actions need to be identified and preset prior to the necessary action.
Syntax
ACTION : :
Where, ACTION can be either PRINT, MAIL, UPLOAD, EXPORT, PRINT REPORT, MAIL REPORT, UPLOAD REPORT or EXPORT REPORT.
Report Name can be a Report to be rendered. If the Report Name is the current Report, then . (dot) can be used only for Report Specific actions
Logical Value if enabled, the configuration window will not appear to the user else will appear. Below is a sample code snippet to print Trial Balance in HP Universal Printing PCL 6 with Preview enabled:
[Function: Smp TB Print Config]
Variable : DSPShowClosing : Logical
00 : SET : SVPrinterName : “HP Universal Printing PCL 6”
05 : SET : SVPreview : No
06 : SET : DSPShowClosing : Yes
10 : Print : Trial Balance : Yes
Similarly, if the current Report needs to be printed, one needs to use the action Print Report and in the place of Report Name, one can use a dot (.).
That is, in the above code, Label 10 can be rewritten as
10 : PRINT REPORT : . : Yes
The strings are not prefixed with ‘$$LocaleString’ or ‘$$Translate’ in the .txt/tdl files. Prefix the strings with ‘$$LocaleString‘ or ‘$$Translate‘. In the Base dictionary creation Screen, in the field “Include Extenstion”, *.txt/*tdl is mentioned. Please specify the extensions as .txt/.tdl(without the *).
Date of Last Entry can be identified using Company Method EndingAt. So $EndingAt:Company: ##SVCurrentCompany would return the Date of Last Entry excluding the Post Dated Vouchers. Also, Default System Formula EndingDate can be used for the same.
Closing and Opening Page Totals for Reports can be achieved using Part level Page Breaks.
Example
Consider a Trial Balance Report of a company, where we may require the running page totals to
be printed at the end and beginning of each page.
[Part: My Trial Balance]
Page Break : Cl Page Break, Op Page Break
;; where both Cl Page Break and Op Page Break are Lines
Total : DrAmtFld, CrAmtFld, NetAmtFld
;; Declaring the Fields for whom Total needs to be accumulated
[Line: Cl Page Break]
Use : Detail Line
Local: Field: Particulars Fld : Set As: “Carried Forward”
Local: Field: DrAmt Fld : Set As: $$Total:DrAmtFld
Local: Field: CrAmt Fld : Set As: $$Total:CrAmtFld
Local: Field: NetAmt Fld : Set As: $$Total:NetAmtFld
Border : Full Thin Top
[Line: Op Page Break]
Use : Cl Page Break
Local: Field: Particulars Fld: Set As: “Brought Forward”
In the above example,
- Part Attribute Page Break declares the Closing and Opening Page Break Lines to be used.
- Part Attribute Total declares the required Fields for which Totals needs to be accumulated.
- The Line Cl Page Break uses the pre-defined Detail Line and the relevant fields are locally modified to set the respective Totals using Function Total.
- The Line Op Page Break uses the defined line Cl Page Break and locally modifies only the particulars Field to set Brought Forward instead of Carried Forward.
Data from these databases cannot be directly imported into TallyPrime. However, using Third Party Applications, database can be converted to the required Database Formats i.e., write a Bridge application using any third party software like VB, .Net etc., which collects the relevant data from SQL database, converts the same into Tally understandable XML and subsequently post the same to the IP and Port where Tally is currently active.
Alternatively, we can write a Collection in TDL using Connection Strings relevant to the database and import the same in Tally.ERP9 using User Defined Functions.
By default, the internal storages of Type Amounts like Opening Balance, Credit Limit, etc. are pre-set by the platform to automatically set Debit or Credit values based on the value of the Method IsDeemedPositive.
For instance, while creating a Ledger, the user selects Sundry Debtors as the Group, the Opening Balance entered by the user is defaulted to Debit. Similarly, if the user selects Sundry Creditors as the Group, the Opening Balance entered by the user is defaulted to Credit.
This happens since the Method IsDeemedPositive is fetched from the selected Group and set within the current Ledger Object context and all the Internal Storages i.e., Opening Balance, Credit Limit, etc. accepts Debit or Credit as per the selected Group.
But the same behaviour does not work for our UDFs. Hence, to achieve the behaviour, we need to write a User Defined Function and set the UDF Value accordingly.
Example
[Line: Final Led Report Alt Credit Limit]
Fields : Final Led Report IDP, Long Prompt, Final Led Additional Credit Limit
Local : Field : Long Prompt : Set as : “Addl Credit Limit:”
[Field: Final Led Report IDP]
Use : Logical Field
Storage : IsDeemedPositive
Set Always: Yes
Invisible : Yes
Skip : Yes
;; Setting the IsDeemedPositive from the user selected Parent or Group
Set as : if $$IsSysName:$Parent then No else $IsDeemedPositive:Group:$Parent
[Field: Final Led Additional Credit Limit]
Use : Amount Field
Storage: Final Led Addl CreditLimit
Format : (“AllSymbols,NoZero,DrCr”)
Width : if $$IsMultiCurrencyOn then @@AmountWidth + 15 else @@AmountWidth
;; Triggering the Function to set the Debit or Credit Flag to the UDF Final Led Addl CreditLimit
Validate : $$IsValidDrCr:$$Value
[Function: IsValidDrCr]
Parameter : pValue : Amount
10: SET TARGET
20: IF : $IsDeemedPositive
;; Setting the UDF Final Led Addl CreditLimit to Debit if the Method IsDeemedPositive is Yes
30: SET VALUE : Final Led Addl CreditLimit : ##pValue * -1
40: ELSE:
;; Setting the UDF Final Led Addl CreditLimit to Credit (default/as entered) if the Method IsDeemedPositive is No
50: SET VALUE : Final Led Addl CreditLimit : ##pValue
60: ENDIF
;; Returning Yes to the Attribute Validate to continue to the next Field.
70: RETURN : Yes
In the above code snippet, we are using Function IsValidDrCr to check the value of Method IsDeemedPositive and set the UDF Value Final Led Addl CreditLimit to either Debit or Credit as per the value of the Method IsDeemedPositive.
You can change the Date Format using the Format attribute at the Field Level. Formats can be Universal Date, Short Date, Long Date, Month Ending, Separator.
- Format Universal Date renders date as D-MMM-YYYY i.e., 1-Apr-2010, 11-May-2010, etc.
- Format Short Date renders date as D-M-YYYY i.e., 1-4-2010, 11-12-2010, etc.
- Format Long Date renders date as Week, D MMM, YYYY i.e., Friday, 31 Dec 2010.
- Format Month Ending renders date as MMM YYYY i.e., Dec 2010.
- Format Short Date, Separator renders short date with desired separator as D Sep M Sep YYYY i.e., Short Date, Separator:”/” is rendered as 30/4/2010
Example
[#Field: Plain VCH Date
Format : Short Date, Separator:”/”
This could be due to the bulky XML Data concatenated as a single string in a row. Hence, the same must be split into multiple lines. In other words, Line Feed must be provided between the XML Tags.
Currently, this is not possible using Functions FromValue and ToValue. A workaround for this is to create User Defined Functions and accumulate the values using Function CollectionFieldByKey and Search Key. Key Values for CollectionFieldByKey needs to be dynamically generated.
Example
[Function: ComputeUDFValue]
Parameter : PSVFromDate : Date
Parameter : PSVToDate : Date
Variable : TotalVal : Amount : 0
Variable : Temp Date : Date
Variable : SearchKey : String
Variable : SVFromDate : Date
Variable : SVToDate : Date
RETURNS : Amount
00 : SET : TempDate : ##PSVFromDate
10 : WHILE : (##TempDate <= ##PSVToDate)
20 : SET : SearchKey : #PartyName + $$String:##TempDate
30 : SET : TotalVal : +
$$ReportObject:$$CollectionFieldByKey:$CustomUDF:##SearchKey:ExtractVchColl + ##TotalVal
40 : SET : TempDate : ##TempDate + 1
50 : END WHILE
60 : RETURN : ##TotalVal
/* The Summary Collection needs to be defined with SearchKey Attribute which is a combination of Party Name Method and Voucher Date. */
/* To compute UDF value for a period, one needs to invoke function ComputeUDFValue with parameters for From Date and To Date. */
Field Attribute Fixed usually helps in Display Mode where multiple columns are available and few fields/columns must remain fixed or non-scrollable while moving the cursor to the right for viewing remaining fields. Usually, Particulars Column remains fixed while scrolling the remaining fields. While in Edit Mode, the cursor is not placed on the fixed fields.
Field Attribute Read Only is used to make the field non editable in Edit Mode. In other words, the contents of the Field will not be altered though the cursor is placed on this Field. This usually helps when a Sub Form is required to pop up from the current field but the field contents should not be edited.
The customized SDF Import TDL is showing an error “Voucher Totals do not match” while trying to import the data post Release 2.0 but the same was working fine earlier.
Cause
The reason may be that the sub-object All Ledger Entries would have been used within the Storage Fields under the Import Object Definition.
Solution
Ledger Entries must be used instead of All Ledger Entries, which will work fine.
This error may occur while importing data (for example, sales invoice) in XML Format, and hinder the process of importing.
Solution
A Mandatory Tag must be set with the required view name within the Voucher XML. For example: Sales Voucher XML must contain InvVchView
In our existing TDL, the filter applied to the Collection “Active Batches is not working since Tally.ERP 9 Releae 2.0 which was working in the earlier releases.
Many fields which were using simple collections as Tables are modified to use the Extract Collections now in order to enhance the performance. Collection/Table Active Batches which was used to display the Table in various Default TDL fields is now replaced with extract collections viz., Active Batches VchExtract. Hence the filters/changes have to be applied in the new extract collection
Example
[#Collection: Active Batches VchExtract]
Add : Filter : Custom Filter
By default, Collection when used as a Table within a Field gets sorted only on the First Column.
You can specify the Field Attribute Format with value as No Symbol.
Example
[Field: Test Field]
Use: Qty Field
Set as: $BilledQty
Format: “No Symbol, No Zero”
You can specify the Field Attribute Format with value as No Comma.
Example
[Field: Test Field]
Use : Number Field
Storage : Test
Format : “No comma”
Tally.ERP 9 Release 5.0 onwards, using the action Delete Target you can delete an object.
Currently, there is no such function available by default. However, this requirement can be achieved by writing a User Defined Function.
To print Date in words by an user-defined Function
- Accept an input from the user which can be passed as a parameter to the User Defined Function.
- Separate the string using Looping Construct For Token.
- Change the separated values into Amount Data Type using Function As Amount.
- Render the independent values in words using Function Inwords.
Currently, rendering a Subscript or Superscript character is not possible in Tally.
Some of the performance issues usually occur due to one of the reasons explained in this topic.
Multiple Collections gathered in a Report.
For every line item being repeated, other Collections participating in setting the field values get regathered for as many line items.
These issues can be addressed as shown below:
It is suggested to use Summary Collections if Non Repeated Collections are used in a Report and if possible, one can also use the Search Key along with corresponding function CollectionFieldByKey.
Note: $$CollectionFieldByKey will not work at menu level.
Also if possible, all the Non Repeated Summary Collections can retain the Source using Collection Attribute Keep Source, the entire Collection will be cached at the desired UI Level and the same will not be regathered for number of lines being repeated and thereby enhance the report performance.
Example:
Keep Source : ().
The above will retain the Source Collection at the topmost level in the current UI hierarchy.
Since UDF is a special container which can hold multiple values, we must specify the Index for storing the same. Hence, from a Report using the Field Attribute Storage, one can set the UDF Value as per the below syntax:
[Field: ]
Storage : : : Index
Example
[Field: Vch Test Field]
Storage : BasicShippedBy : BasicShippedBy : First
While traversing through the Default TDL, we have come across a Part MLV LedBody getting repeated over a Collection All Ledger within the Part MLV Body.
Similar to a Line, Part can also be repeated over a Collection and every new instance of the Part gets associated with subsequent Object in a Collection.
This can be useful at times when multiple Parts need to be rendered for every Object in a Collection.
This is implemented in Default TDL for Multi Ledger Printing where each ledger is associated with the Part MLV LedBody and Part MLV LedBody had earlier rendered two sub parts LV AccTitle and LV Body.
Part LV AccTitle renders the Ledger Name.
Part LV Body renders further ledger details i.e., Opening Balance, Vouchers and Closing Balance of the current Ledger.
Recently, the design in Default TDL is altered where:
Only Part LV AccTitle is rendered from the Part MLV LedBody.
Part LV Body is exploded from the Line LV AccTitle.
In TDL, there are many ways in which a requirement can be catered to. Based on the need, one needs to determine the best and the most optimum method from the available choices.
Yes, you need to make use of attribute Sub Title at Collection. The sequence of the subtitle would be same as the Format in Collection.
Example
[Collection : Ledgers]
Type : Ledger
Title : “List of Ledger”
Format : $Name, 20
Format : $Parent, 10
Sub Title : “Name”, “Parent”
You can control a Menu Item from the menu definition.
To control a Menu Item
At menu definition you can make use of an attribute ‘Control’ for controlling a menu display. This will not display menu item.
For example,
[Menu: Inventory Info.]
Control: @@locGodowns : $$IsMultiGodownOn AND @@IndianAccTerminology
In case you wish to display the item however would like the Item to be inactive you can give an additional Parameter at Key Item.
Example
[Menu: Accounts Info.]
Key Item: @@locCostCategories: O : Menu : Cost Categories : $$IsCostCategoryOn:$$CurrentSimpleCompany
Every font color/colour and style has its significance while writing code, hence we do not allow changing them in TallyPrime Developer.
Tally Search option is used to search for a string of text. It searches the string with/without spaces between them, prefixed or suffixed with other characters. But if Normal Search option is selected then it will search for the exact matching strings only.
The Form attribute Control can be used to validate the contents of the Form.
For example:
[!Form: Normal INV Voucher]
Control: BilledQtyNegative: $$IsNegative:$$CollQtyTotal:AllInventoryEntries: $BilledQty
All the system-related information like IP address, MAC Address, Serial Number, etc. can be retrieved from a built-in function SysInfo by specifying relevant parameters.
Syntax
$$SysInfo:
Where <Parameter> can be any one of the following: ApplicationPath, CurrentPath, SystemDate, SytemTime, SystemTimeHMS, SystemName, IsWindows, WindowsVersion, WindowsUser, IPAddress, MACAddress
Example
$$SysInfo:MachineName
For more information on details of each parameter, please refer to the document on TDL Enhancements.
A Client application can call a SQL Procedure which is declared as a Collection within Tally.ERP 9. Such Collection which acts as a SQL Procedure and accepts parameter input from the user during run time must be prefixed with an underscore.
The Collection attribute, SQLParms is used to pass parameters to procedures. This Collection takes the parameter from the Client application by using the Collection attribute SQL Parms. The Collection attributes SQL Values is used to return the values from procedure back to the client application.
Example
[Collection: _StkBatches]
Type : Batches
Childof : ##StkItemName
;; Batches of Stock Item StkItemName will be filtered in this collection/Procedure
SQLParms : StkItemName
;; Parameter Value is accepted as an input from an external Client Application
;; Method Name and Amount of all the Batches Object for the accepted Stock Item is sent back to the Client Application
SQLValues : Name : $Name
SQLValues : Amount : $ClosingBalance
[Variable: StkItemName]
Type : String
It is possible to accept a form without user confirmation using Form attribute No Confirm.
Example:
[Form: TSPL FFE Sample Frm]
No Confirm: Yes
Also, if Report Attribute Auto is enabled, automatically the Form does not prompt for user confirmation. Report Attribute Auto is generally used in Configuration Reports where changes in the variable is intended to alter the variables associated with the parent report and hence, an Auto Report cannot have variable association within itself.
Yes, it is possible to check if a Master exists in the current company while importing an external data using User Defined Functions, using one of the following ways:
Example
$$IsEmpty:$Name:Ledger:$ExcelLedgerName
Where
$ExcelLedgerName is the Reference Method in the current context.
The above Logical Function IsEmpty returns Yes if the Ledger $ExcelLedgerName does not exist and No if the Ledger $ExcelLedgerName exists.
Using one of the Collection/Object Functions like FilterCount which filters the objects matching the given condition.
Example
[System: Formula]
ExcelLedgerExistsinTally : $$FilterCount:Ledger:MatchesExcelLedger > 0
MatchesExcelLedger : $$FilterCount:Name:NameMatchesLedger > 0
NameMatchesLedger : $Name = $$ReqObject:$ExcelLedgerName
Call By Reference (first method) is the most economical way of validating the Object existence since it does not have to traverse and collect all the Objects and subsequently Filter only for the current Object Name from Excel.
Note: The function $$FilterCount will not work at menu level
It is possible to carry forward the Closing UDF values to subsequent year Company after splitting using an User Defined Function which can be triggered on acceptance of the Form Split Company and closing UDF values can be copied from source company (previous year company) to the List Variable and from the List Variable to the target company (subsequent year company) by swapping the companies.
To carry forward Closing UDF values
- In the Form Split Company, add the event On : Form Accept to invoke a User Defined Function.
- Write a User Defined Function.
- Walk over the Objects of the Source Company (Unsplit Company).
- Gather the Closing UDF values into the List Variable.
- Walk over the Objects of the Source Company again.
- Switch the current company to the Split Company (Subsequent Year Company) and set it as Target for updating and saving the UDF Value.
- Set the UDF value from List Variable.
- Save the Target Company Object.
- Switch the Company back to Source Company.
It is possible to retrieve the Stock Item Quantity in Secondary Units as shown below:
If the field is of Type Quantity, then we can use the in-built template available Qty Secondary Field which is of Type : Quantity : Secondary Units.
Example:
[Field: TSPL FFE SecQty Qty Field]
Use : Qty Secondary Field
Set As : $BilledQty
If the field needs to be of Type String, then we have to convert the Quantity into String and use the Format Secondary along with it to get Quantity in Secondary Units.
Example:
[Field: TSPL FFE SecQty Str Field]
Use : Name Field
Set As : $$String:$ActualQty:Symbol,Secondary
Where the Format Symbol specifies the symbol in units like kgs, nos, etc. and Format Secondary displays the Quantity in Alternate units.
Yes, it is possible to change the color of the message box by identifying and changing the corresponding System Formula in the Default TDL File BaseVal.500.
This would change effect all the message boxes. You cannot change for a specific message box. Similarly you can change for other objects like Table, Button, etc.
It is possible to set the print orientation within TDL from Tally.ERP9 Series A Release 3.6 onwards. Variable SVPrintOrientation has been introduced to set the required Printer Orientation, that is, ‘Portrait’ or ‘Landscape’, within a Report.
It is recommended to declare a local variable within the function or report and set the variable value, to avoid the system Printer Configuration changes to be effected globally. This is useful where a Report needs to printed in a different orientation, e.g., Landscape. For e.g., if one needs to print the cheques in ‘Landscape’ mode and other reports in ‘Portrait’ mode, then there is no need to keep switching the printer settings from Portrait to Landscape, and vice versa, based on the report getting printed. For Cheque Printing Report, one can default Landscape Orientation.
Example
[#Report: Balance Sheet]
;; Local Variable Declaration
Variable : SVPrintOrientation : String
Set : SVPrintOrientation : “Landscape”
Since the variable is locally declared and updated within the Report Balance Sheet, the same will not affect the global printer settings.
Multiple Orientation Support for Printing
This will be very useful in scenarios where multiple forms are being printed from a single report. For example, from a Payment Voucher, one needs to print both Voucher and Payment Advice. However, the Payment Voucher needs to be printed in ‘Portrait’ form, and the Payment Advice in ‘Landscape’. To achieve this behaviour, the local declaration of the Variable ‘SVPrintOrientation’ at ‘Report’ level is mandatory, and its value must be set using the form level attribute ‘Set Always’ in individual forms.
Example
[Report: TSPL Smp VarSVPrintOrientation Extended]
Form:TSPLSmpVarSVPrintOrientationFrm,TSPLSmpVarSVPrintOrientationFrm2
;; Mandatory Local declaration of Variable SV Print Orientation
Variable : SV Print Orientation : String
[Form: TSPL Smp VarSVPrintOrientation Frm1]
;; Orientation of this Form is set to ‘Portrait’
Set Always : SV Print Orientation : “Portrait”
[Form: TSPL Smp VarSVPrintOrientation Frm2]
Use : TSPL Smp VarSVPrintOrientation Frm1
;; Orientation of this Form is set to ‘Landscape’
Set Always: SV Print Orientation: “Landscape”
In this example, the report ‘TSPLSmpVarSVPrintOrientation Extended‘ has two forms, viz.TSPLSmpVarSVPrintOrientationFrm1 and TSPLSmpVarSVPrintOrientationFrm2. Based on the value set to the variable ‘SV Print Orientation’, both the forms will be printed in the respective orientation.
- Define a User defined function and make use of default Action “For Token” and pass the delimiter character as “ , ” and separate the bill names from single cell.
- Push above separated Bill names into List Variable
- Define a Collection using above List Variable with collection attribute “Data Source”
[Function: Separate BillNm]
Variable : VAR BillNmVal : String : $ExclBilNm
ListVariable : ExclBilNm : String
100 : For Token : ImportBillNm : ##VARBillNmVal : ,
200 : List Add Ex : ExclBilNm
300 : Set : ##ExclBilNm[$$LoopIndex].ExclBillNmVal: ##ImportBillNm
400 : End For
[Collection: Imp ListOfBills]
Data Source : Variable : ##ExclBilNm
Should associate relevant Object at report definition.
Example
[Report: New Report]
Object : Company
[Field: New Report Fld]
Type : String
Storage : NewStorageVal
Should make use of escape sequence, for ‘&’ symbol mention as “&”.
Example
To create a company name as “ABC & Co” XML tag value should be as below:


