
Set Up TallyPrime for VAT in GCC
If your business is in any of the GCC (Gulf Cooperation Council) countries and you have a statutory requirement to charge VAT while recording transactions, then you need to first activate the VAT feature in your company master. Along with that you also need to configure your inventory and accounting masters such as stock items, stock groups, service ledgers, sales, purchase, party, expense, and income ledgers with VAT details.
VAT (Value Added Tax) is a consumption tax that is charged on goods or services at each step from manufacturing to sale. The VAT amount paid by the consumer is based on the value of the goods or services that they have purchased. VAT was introduced in GCC countries to increase the revenue of the Government. The six GCC countries UAE, KSA, Bahrain, Oman, Qatar, and Kuwait signed the GCC Value Added Tax (VAT) Framework Agreement in June 2016.
VAT in KSA: VAT was introduced in January 2018 in KSA at a 5% rate for all goods and services but in 2023 the VAT rate was increased to 15%. If the total annual taxable supplies of your business surpass SAR 375,000, then you need to register for VAT.
VAT in UAE: VAT was introduced in January 2018 in UAE at a 5% rate. If the annual turnover of your business is AED 375,000 then you must register for VAT. However, if the annual turnover of your business is AED 187,500 then you can volunteer to register for VAT.
VAT in Bahrain: VAT in Bahrain was introduced in 2019 at a 5% rate but as of 2023, the VAT rate is 10%. If the annual turnover of your business is BHD 37,500 then you must register for VAT.
VAT in Oman: VAT in Oman was introduced in 2021 at a 5% rate. If the annual turnover of your business is OMR 38,500 then you must register for VAT.
Among the six GCC countries, Kuwait and Qatar are yet to implement VAT.
After the GCC Value Added Tax (VAT) Framework Agreement is signed, if your company is located in UAE, KSA, Bahrain or Oman then as per the statutory requirement you need to charge VAT while recording the transactions.
To record transactions with VAT in GCC, you need to enable the VAT feature for your company. If you are maintaining inventory in your business, then you need to create Stock Items as needed. In order to manage the Stock Items better, you can create Stock Groups and group the stock items accordingly. In case you are providing services, create ledgers for different services. You can update the VAT details at the company level with the VAT rate for all the stock items and services provided by you. In case, there is a stock item which is exempted or zero-rated, you can create the stock item and update the Taxability as Exempt or Zero Rated at the stock item level. Apart from creating stock items, stock groups and service ledgers, you also need to create Sales and Purchase ledgers, Party ledgers, and Expense and Income ledgers. To accumulate the tax amount to be paid to the government, create tax ledgers too.
While recording the sales or purchase transaction, you need to use the common sales or purchase ledger to account for goods sold or purchased and maintain the Nature of transaction as Not Applicable. Based on the party ledger you select and their location, the Nature of transaction will be system inferred. For example, if your business is registered in Dubai and the party is also registered in Dubai then the system will automatically consider Domestic Taxable Supplies as the Nature of transaction. Similarly, if the party is registered in Oman then the system will consider Intra GCC Supplies as the Nature of transaction. With this flexibility in TallyPrime you can easily record the transactions without creating multiple sales and purchase ledgers. Additionally, if you want to override the system inferred Nature of transaction, then you can do so at the time of recording the transaction by selecting manually the Nature of transaction.
If you incur any additional expenses then you can configure your expense ledgers to appropriate the expense based on the value or quantity of the goods or services sold. Also, remember to update your Party Ledgers for all your registered parties by specifying their VAT Registration details. You can update the VAT Registration details for multiple parties at one go too.
You can update the VAT details manually for each stock item. Additionally, in TallyPrime you have the option to update the VAT details of multiple stock items in one go from the Tax Rate Setup report. If the number of stock items is more for Exempted or Zero-rated goods, for ease of setup, you can use the Tax Rate Setup report to update the VAT details. In case you have not allocated your stock items under any group or you want to move your stock items to a more relevant stock group then you can do that easily from Tax Rate Setup. You also have the option to remove the VAT rate for an individual item or stock group.
Set Up Company Master for VAT
Depending on the GCC country in which you have a business, you can enable VAT and specify the VAT-related details including the VAT rate at the company level. As there is a single VAT rate to be maintained for all the stock items and services, you can maintain the same VAT rate at the company level. It is not required to maintain the VAT rates individually for all the stock items or service ledgers. You can also configure the company master to make sure that the mailing details are shown in the local language if required.
You can enable VAT and specify the details while creating a company or altering an existing one.
In this section
- Activate VAT for company in UAE
- Activate VAT for company in KSA
- Activate VAT for company in Bahrain
- Activate VAT for company in Oman
Activate VAT for company in UAE
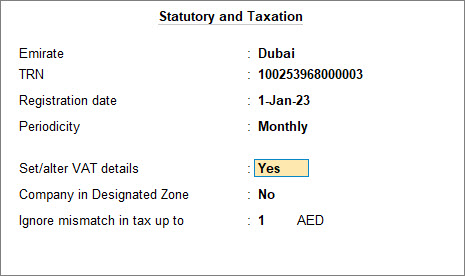
After you enable the VAT feature for your company in UAE, you need to update details like Emirate, TRN, Registration date, Periodicity and so on in the Company Statutory Reports screen. In UAE, the standard VAT return period applicable to most taxpayers is a quarterly return. The FTA may request a certain type of business (with an annual turnover of AED 150 million or more) to file the VAT return monthly.
The VAT return filing period applicable to each of the taxpayers will be available in the FTA portal. You can log in to the portal using your login credentials and check the applicable VAT return filing period.
- Open the company and enable VAT.
- Gateway of Tally > Alt+K (Company) > Alt+F3 (Select).
- Open the company created with UAE as country.
- Press F11 (Features) > set Enable Value added Tax (VAT) to Yes and press Enter.
The Company Statutory Returns screen appears.
- Update the Statutory and Taxation details.
- Select your business location in the Emirate field.
- Specify the TRN for your business. This can be printed in the invoices as required.
- Specify the Registration date. VAT will be applicable for your transactions from this date.
- Select the Periodicity as Monthly or Quarterly depending on the return period applicable to you.
- Enable the option Set/alter VAT details to specify tax rate details.
- If your company is located in a designated zone, set the option Company in Designated Zone to Yes.
- In the Ignore mismatch in tax up to field, specify the value up to which the mismatch in tax amount can be ignored. The mismatch in tax amount happens due to the decimal values in the tax amount while calculating VAT.
- Configure the company to view the mailing details in the local language in invoices and reports.
- In Company Statutory Returns screen, press F12 (Configure) > Show mailing details in local language > Yes and press Enter.
- In the Company Statutory Returns screen, set the option Show mailing details in local language to Yes to record and print the company address in Arabic in invoices and reports.
- Accept the screen. As always, you can press Ctrl+A to save.
You can create or update the required stock items/service ledgers, Sales and Purchase, Expenses, and income ledgers, create VAT ledgers, and start recording VAT compliant transactions.
Activate VAT for company in KSA
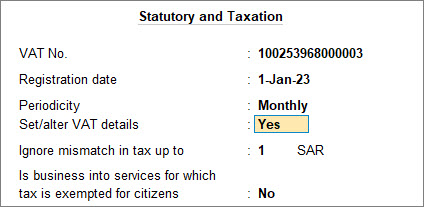
After you enable VAT for your company in KSA, you need to update the VAT No. and the Registration date, and Periodicity apart from other details in the Company Statutory Reports screen. Every taxable person registered under the KSA VAT law is mandatorily required to file the VAT returns in KSA either every month or every quarter, depending upon the annual turnover.
- Open the company and enable VAT.
- Gateway of Tally > Alt+K (Company) > Alt+F3 (Select).
- Open the company created with KSA as country.
- Press F11 (Features) > set Enable Value added Tax (VAT) to Yes and press Enter.
The Company Statutory Returns screen appears.
- Update the Statutory and Taxation details.
- Specify the VAT No. for the business. This can be printed in the invoices as required.
- Specify the Registration date. VAT will be applicable for your transactions from this date.
- Select the Periodicity as Monthly or Quarterly.
VAT returns will be generated based on the periodicity selected. - Enable the option Set/alter VAT details to specify tax rate details.
- In the Ignore mismatch in tax up to field, specify the value up to which the mismatch in tax amount can be ignored. The mismatch in tax amount happens due to the decimal values in the tax amount while calculating VAT.
- Set the option Is business into services for which tax is exempted for citizens to Yes, if you are a private sector institution providing healthcare, education and real estate services to Saudi citizens.
- Configure the company to view the mailing details in the local language in invoices and reports.
- In Company Statutory Returns screen, press F12 (Configure) > Show mailing details in local language > Yes and press Enter.
- In the Company Statutory Returns screen, set the option Show mailing details in local language to Yes to record and print the company address in Arabic in invoices and reports.
- Accept the screen. As always, you can press Ctrl+A to save.
You can create or update the required stock items/service ledgers, Sales and Purchase, Expenses, and income ledgers, create VAT ledgers, and start recording VAT compliant transactions.
Activate VAT for company in Bahrain
After you enable the VAT feature for your company in Bahrain, update TRN, Registration date, Periodicity and so on in the Company Statutory Reports screen. The timeline for VAT returns in Bahrain can either be semiannually or quarterly based on the annual turnovers of businesses.
- Open the company and enable VAT.
- Gateway of Tally > Alt+K (Company) > Alt+F3 (Select).
- Open the company created with Bahrain as country.
- Press F11 (Features) > set Enable Value added Tax (VAT) to Yes and press Enter.
The Company Statutory Returns screen appears.
- Update the Statutory and Taxation details.
- Specify the TRN for the business. This can be printed in the invoices as required.
- Specify the Registration date. VAT will be applicable for your transactions from this date.
- Select the Periodicity as Monthly or Quarterly.
VAT returns will be generated based on the periodicity selected. - Enable the option Set/alter VAT details to specify tax rate details.
- In the Ignore mismatch in tax up to field, specify the value up to which the mismatch in tax amount can be ignored. The mismatch in tax amount happens due to the decimal values in the tax amount while calculating VAT.

- Configure the company to view the mailing details in the local language in invoices and reports.
- In Company Statutory Returns screen, press F12 (Configure) > Show mailing details in local language > Yes and press Enter.
- In the Company Statutory Returns screen, set the option Show mailing details in local language to Yes to record and print the company address in Arabic in invoices and reports.
- Accept the screen. As always, you can press Ctrl+A to save.
You can create or update the required stock items/service ledgers, Sales and Purchase, Expenses, and income ledgers, create VAT ledgers, and start recording VAT compliant transactions.
Activate VAT for company in Oman
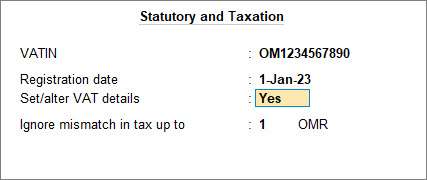
After you enable the VAT feature for your company in Oman, update VATIN, Registration date and so on in the Company Statutory Reports screen. Any business that is registered for VAT must submit the VAT return and make payment of VAT liability every quarter electronically to the Sultanate of Oman Tax Authority.
- Open the company and enable VAT.
- Gateway of Tally > Alt+K (Company) > Alt+F3 (Select).
- Open the company created with Oman as country.
- Press F11 (Features) > set Enable Value added Tax (VAT) to Yes and press Enter.
The Company Statutory Returns screen appears.
- Update the Statutory and Taxation details.
- Specify the VATIN for the business. This can be printed in the invoices as required.
- Specify the Registration date. VAT will be applicable for your transactions from this date.
- Enable the option Set/alter VAT details to specify tax rate details.
- In the Ignore mismatch in tax up to field, specify the value up to which the mismatch in tax amount can be ignored. The mismatch in tax amount happens due to the decimal values in the tax amount while calculating VAT.
- Configure the company to view the mailing details in the local language in invoices and reports.
- In Company Statutory Returns screen, press F12 (Configure) > Show mailing details in local language > Yes and press Enter.
- In the Company Statutory Returns screen, set the option Show mailing details in local language to Yes to record and print the company address in Arabic in invoices and reports.
- Accept the screen. As always, you can press Ctrl+A to save.
You can create or update the required stock items/service ledgers, Sales and Purchase, Expenses, and income ledgers, create VAT ledgers, and start recording VAT compliant transactions.
Set Up Inventory Masters for VAT
After you have set up the company master, if you are maintaining inventory in your business then you can start setting up inventory masters by creating stock items, as per your business need. You can create stock groups and group the required stock items under the appropriate stock groups. While your company master will have the VAT rate updated for all the stock items, in case you have any exempted or zero-rated stock items, you can update the same in your stock item.
In this section
- Configure Stock Items with VAT details
- Configure Stock Groups with VAT details
- Set up tax rates for multiple items | Tax rate Setup report
Configure Stock Items with VAT details
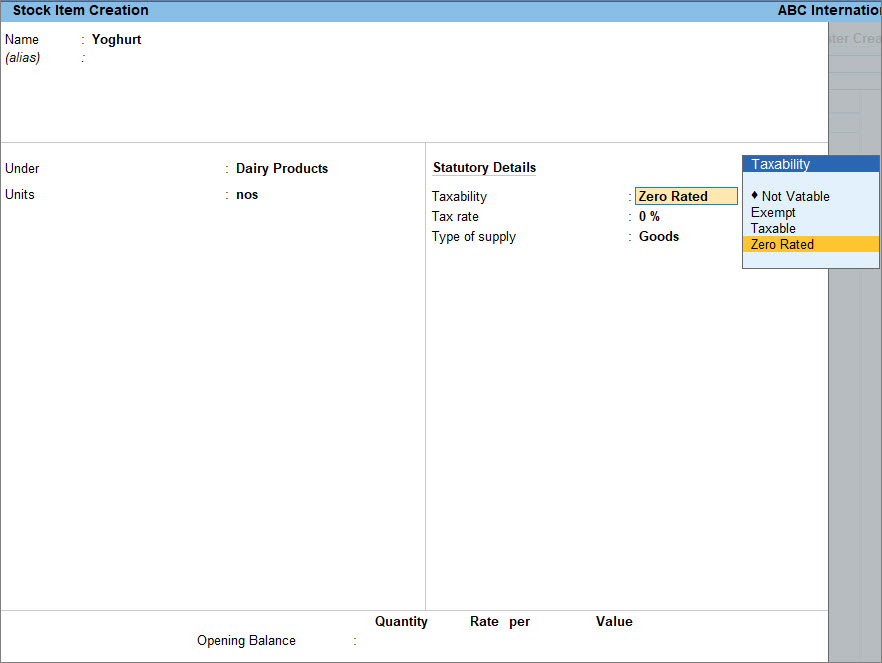
As you have already updated the VAT rate in the company master maintaining the Taxability as Taxable which is applied to all the stock items, if there are any stock item which is Exempt from tax or Zero Rated then at the time of creating the stock item, you can update the Taxability as Exempt or Zero Rated. As in the case of a company, you may update the details either at the time of creation or by altering existing stock items.
- Open the Stock Item.
- Press Alt+G (Go To) > Alter Master > Stock Item > and press Enter.
Alternatively, Gateway of Tally > Alter > type or select Stock Item > and press Enter. - Select the Stock Item.
- Press Alt+G (Go To) > Alter Master > Stock Item > and press Enter.
- Update VAT details in the Stock Item.
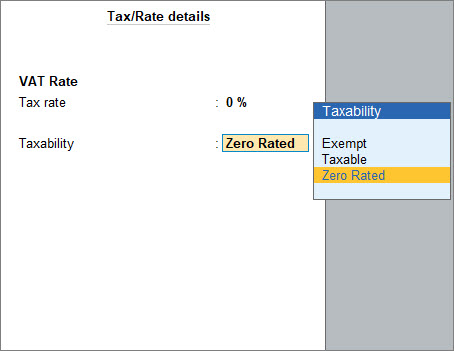
- Select the Taxability and Tax rate of the item in Statutory Details Field.
By default, the Taxability and Tax rate mirrors the details given at the company level. You can select Exempt or Zero Rated as the Taxability. - If you have modified the tax rates before, press Alt+W (Details) to view the history of tax rate changes.
- Update the Applicable from date.
- Select the Type of supply. For stock items, Type of supply is set to Goods by default.
The type of supply selected for a stock item applies only to that item.
- Select the Taxability and Tax rate of the item in Statutory Details Field.
- Accept the screen. As always, you can press Ctrl+A to save.
Similarly, you can update the other stock items with the Statutory Details or create stock items as required.
Configure Stock Groups with VAT details
If you have multiple stock items which are exempt from tax or are zero-rated that can be grouped under a stock group then you can create a stock group for such stock items and group the items accordingly which makes it easy to handle the VAT details. If the stock groups are already created then you can alter them and update the VAT details.
- Open the Stock Group.
- Press Alt+G (Go To) > Alter Master > Stock Group> and press Enter.
Alternatively, Gateway of Tally > Alter > type or select Stock Group> and press Enter. - Select the Stock Group.
- Press Alt+G (Go To) > Alter Master > Stock Group> and press Enter.
- Update VAT details in the Stock Group.
- In the Stock Group Alteration screen, press F12 (Configure) and enable Set VAT details.
- Enable Set/Alter VAT details in the Stock Group Alteration screen to specify the details in the VAT Details screen, and save.
- Select the Taxability and Tax rate of the item in Statutory Details Field.
By default, the Taxability and Tax rate mirrors the details given at the company level. You can select Exempt or Zero Rated as the Taxability. - Update the Applicable from date.
- Accept the screen. As always, you can press Ctrl+A to save.
You can now update the other stock group with the Statutory Details or create stock groups as required.
Set up tax rates for multiple items | Tax Rate Setup report
Tax Rate Setup report is for managing tax configuration for stock items and groups. If you have multiple stock items or groups then instead of updating the VAT details individually, you can update the VAT details for stock items and groups from the Tax Rate Setup tool. Apart from that, you can also alter the stock group for a stock item or move the stock item under sub-groups. In the Tax Rate Setup tool, you have the option to remove rate details from any group or item if required.
Set VAT rates for multiple stock items or groups
From the Tax Rate Setup tool in TallyPrime, you can set or alter the VAT rate for multiple stock items or groups from a single screen using Set Rate. If there are stock items which were taxable earlier and later were made zero rated, you can alter such stock items from the Tax Rate Setup tool.
- Press Alt+G (Go To) > type or select Tax Rate Setup > and press Enter.
Alternatively, Gateway of Tally > Display More Reports > VAT Reports > Tax Rate Setup. - Press Alt+F5 (Detailed).
The VAT Rate Setup screen appears, as shown below:
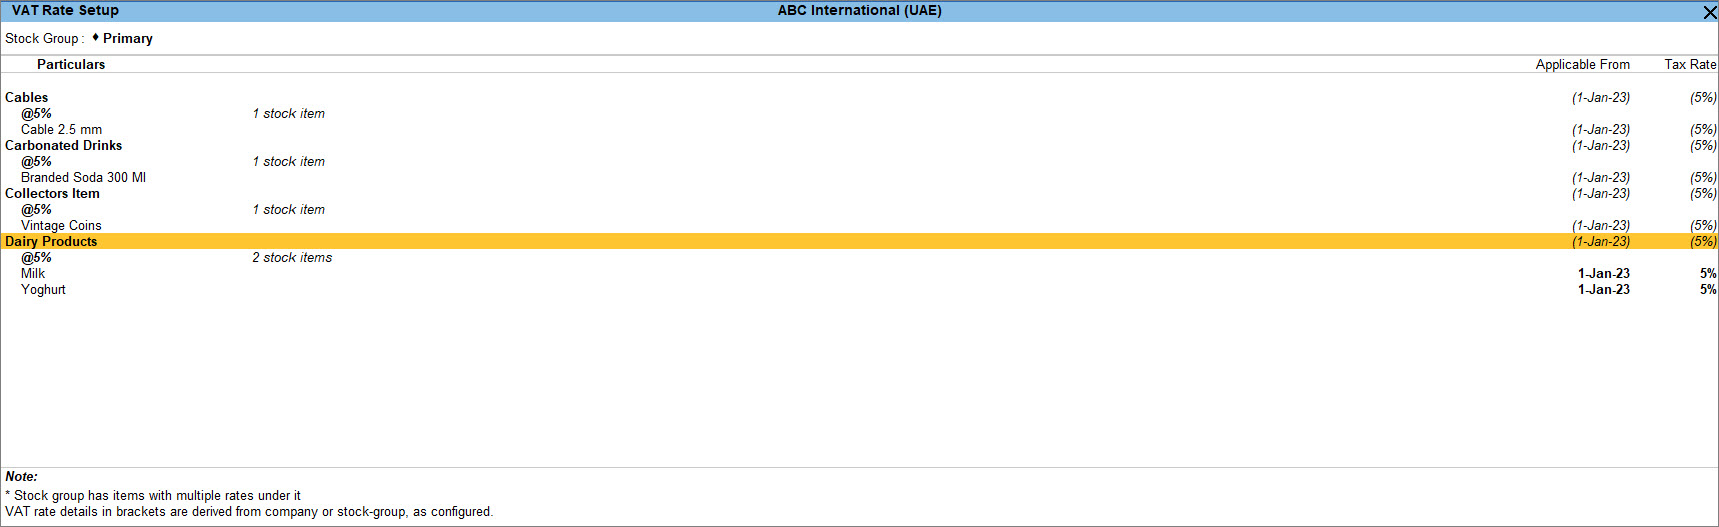
- Press the Spacebar to select stock groups or stock items.
- Press Alt+S (Set Rate) to view the VAT Details screen.
- Enter the VAT rate and Taxability. A common VAT rate is set for the selected groups or items.
- Accept the screen. As always, you can press Ctrl+A to save.
Similarly, you can set or alter tax details for other stock items or stock groups.
Change the stock group of a stock item
Grouping stock items with the same Taxability and VAT rates makes maintenance easier. To achieve this, you may want to alter the stock group of a particular stock item or multiple stock items, which can be done from the Tax Rate Setup screen. You can also create a sub-group under a stock group and move the stock items if required. Any rate changes can be applied to the whole sub-group without having to change them manually for each stock item.
- Press Alt+G (Go To) > type or select Tax Rate Setup > and press Enter.
Alternatively, Gateway of Tally > Display More Reports > VAT Reports > Tax Rate Setup. - Select a single stock item or multiple items and press Alt+R (Move to Group) in the VAT Rate Setup screen.
The Alter Stock Group for Selected Item(s) screen appears as shown below:
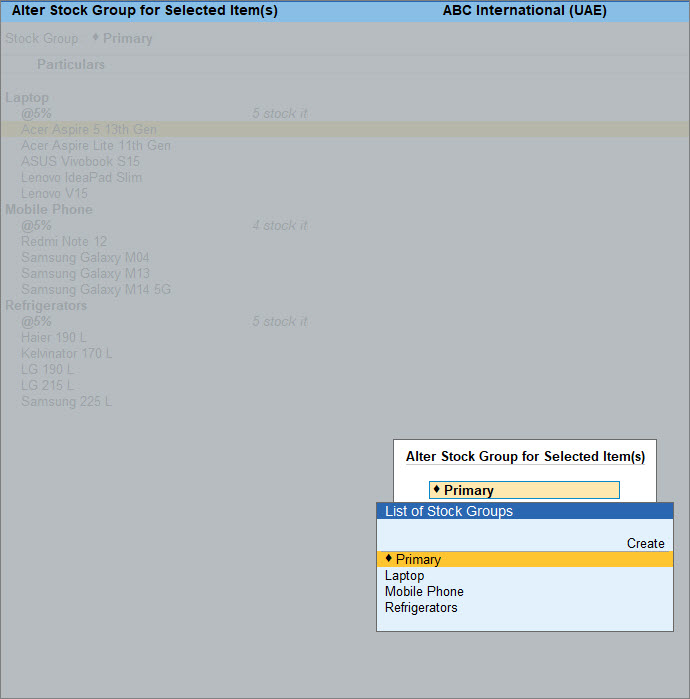
- Accept the screen. As always, you can press Ctrl+A to save.
Once the stock group of a particular stock item is changed the stock item will reflect under the new stock group or sub-group.
Remove VAT rate for exempted and zero-rated goods
In your business, you may deal with goods that were taxable earlier and later made exempted. In such a case, you need to remove the VAT rates defined for those stock items or for the stock group. You can select multiple items and remove the rates in one go.
- Press Alt+G (Go To) > type or select Tax Rate Setup > and press Enter.
Alternatively, Gateway of Tally > Display More Reports > VAT Reports > Tax Rate Setup. - Select the Stock Group and press Alt+W (Clear Rate). Multiple stock items can be selected using Space Bar to clear the tax details.
A message appears, as shown below:
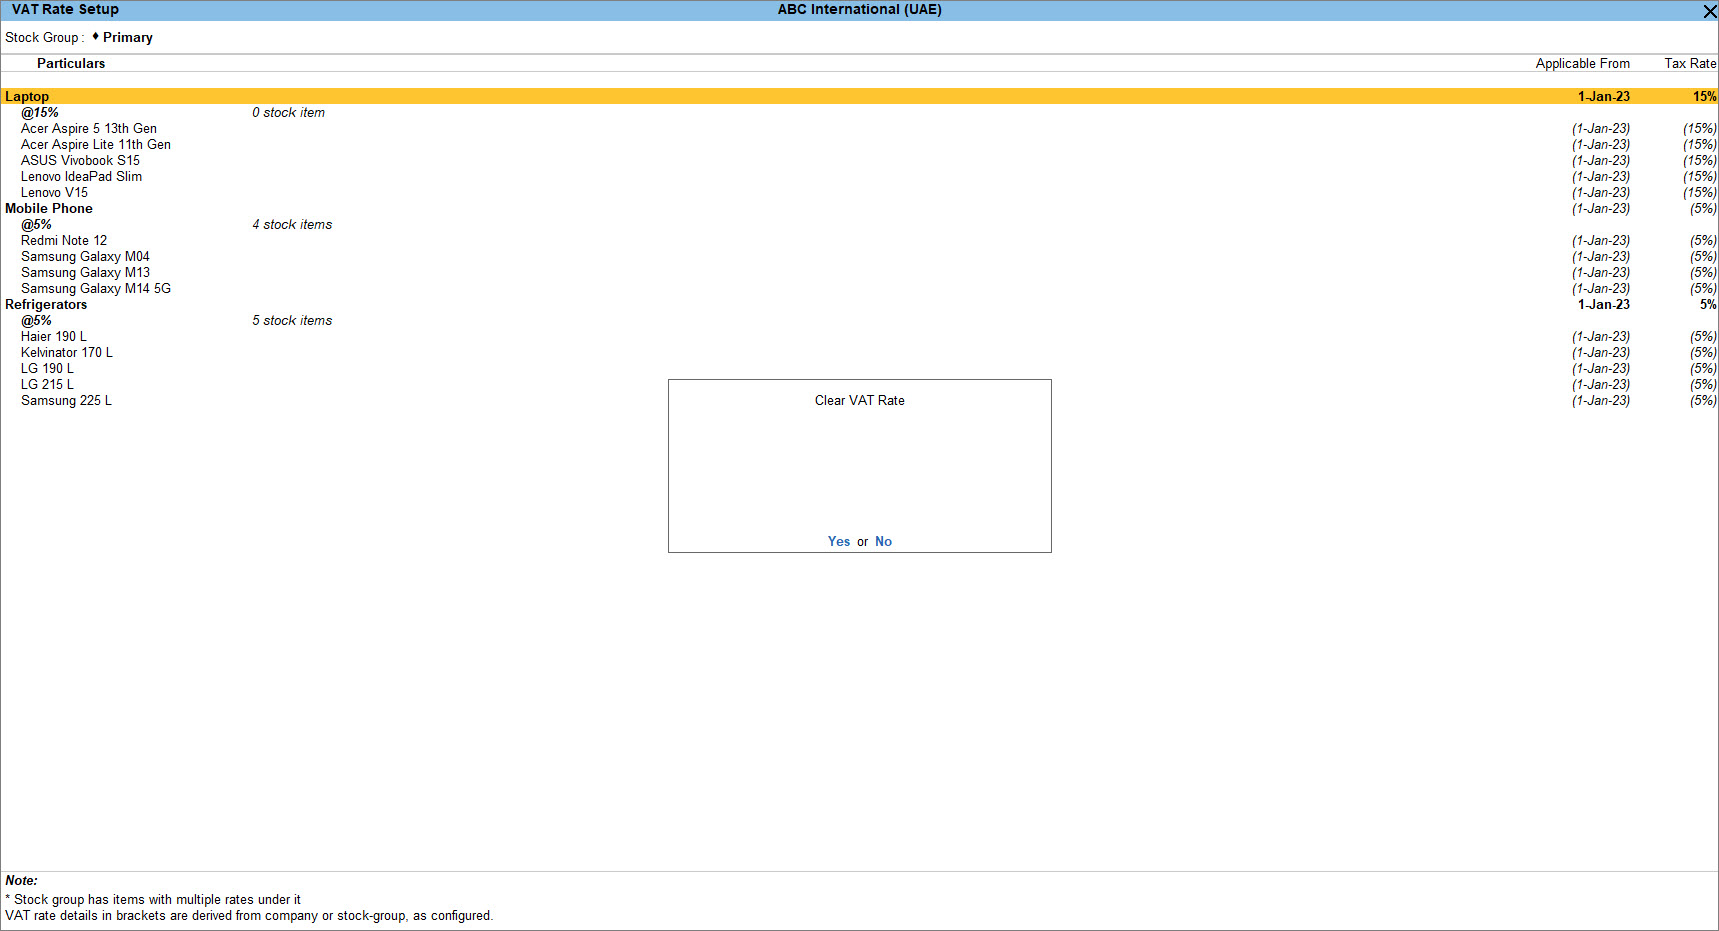
- Click Yes to clear the rate for the item.
Once the rate is removed, the stock group mirrors the rate maintained in the company master.
View and verify the list of stock groups/stock items without tax rate
Once the tax rate is removed, you can view the stock groups and items without the tax rate.
- In the VAT Rate Setup screen, press F12 (Configure).
- In Show items based on availability of tax details select the option Without configured/inferred rate.
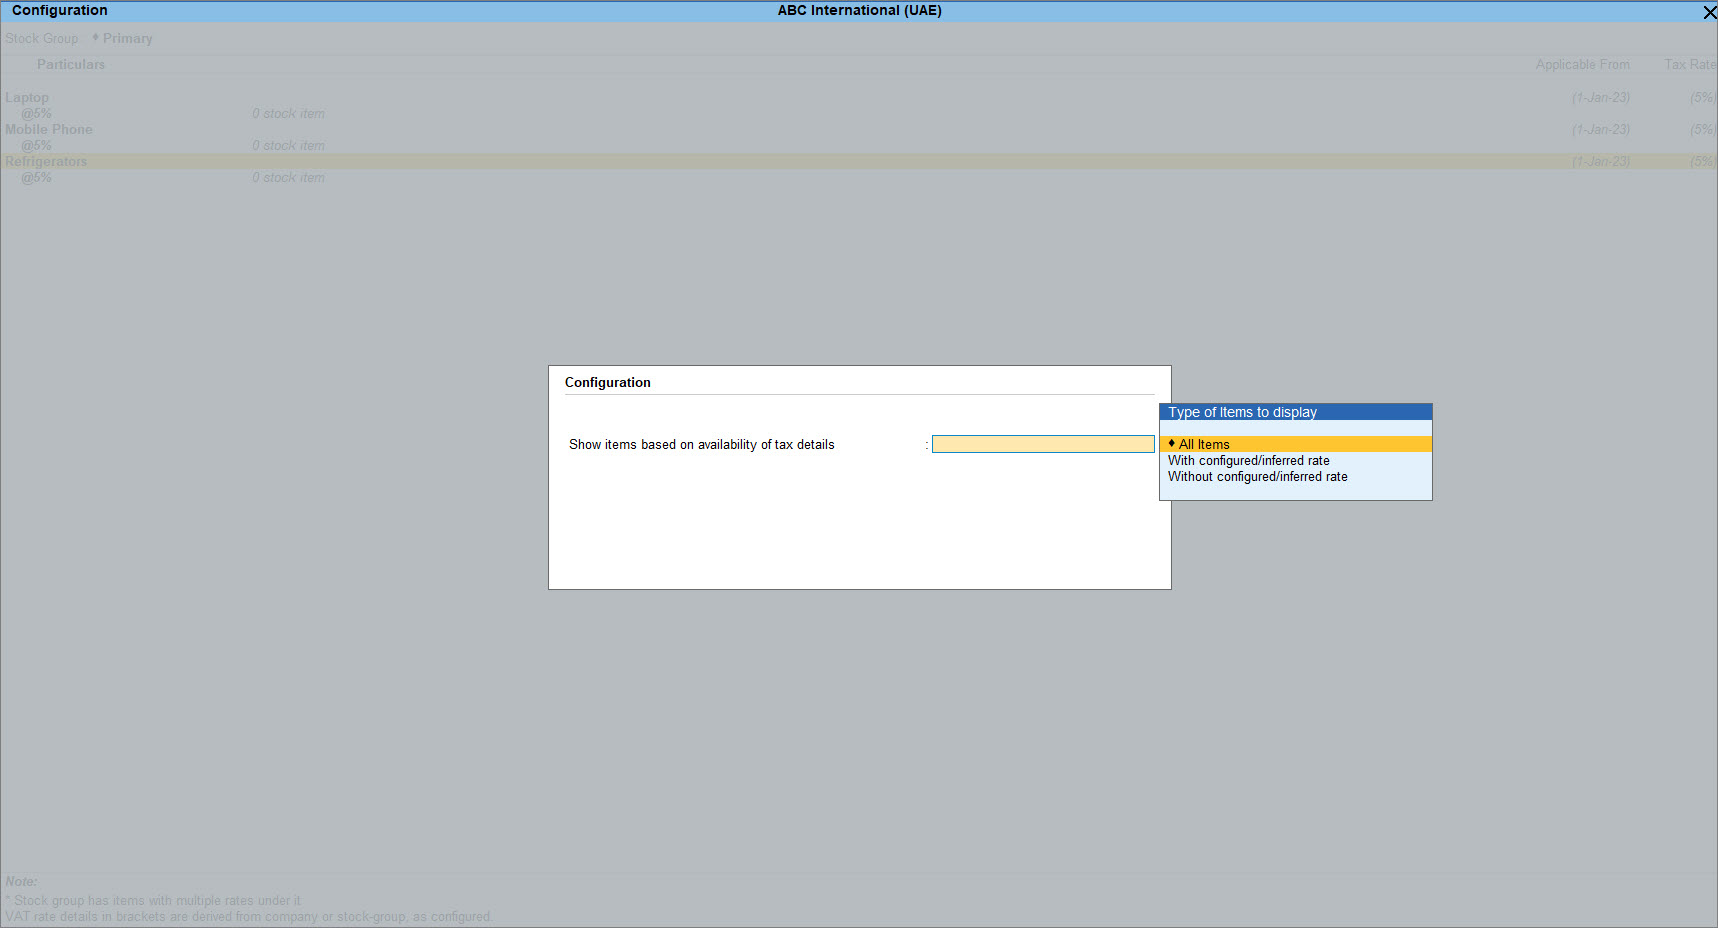
The facility to view and verify groups/items without tax rates helps you ensure the accuracy of setting up tax rates for items.
Set Up Accounting Masters for VAT
You need to create the relevant accounting masters for maintaining your books of accounts and taxation appropriately. If you are maintaining accounts along with inventory, then these accounting masters are in addition to the inventory masters. For accounting, you need to create ledgers for the services you are providing. You need to create sales and purchase ledgers, party ledgers and expense and income ledgers. In addition, you need to create VAT ledger for accumulation of tax amount you are collecting.
While recording the sales or purchase transaction, depending on the party ledger selected by you, TallyPrime automatically decide on the Nature of transaction. In order to do so, you need to select Not Applicable as Nature of transaction while creating the sales and purchase ledgers. The same is applicable while creating the service ledgers. However, you have the option to select manually the Nature of transaction and create multiple sales and purchase ledgers depending on the Nature of transaction selected. This will help you to track the sales or purchase as per the transaction nature. But if you are allowing your system to decide on the Nature of transaction then a common sales or purchase ledger is sufficient to record the transactions. You can override the Nature of transaction as one of case at the time of recording the transaction.
When you are selling or purchasing goods or services, there can be additional expenses incurred. Such expenses can be appropriated based on value or based on quantity of the goods or services sold. Based on the Method of appropriation chosen by you, the additional cost will be divided between the stock items accordingly. For instance, if you choose Appropriate by Qty, then the additional amount will be divided by the quantity of stock items in the voucher. On the contrary, if you choose Appropriate by Value, then the additional cost will get allocated to each stock item based on the ratio of values or rate of the items. When such an expense is recovered from customers, it becomes an income.
Apart from the accounting ledgers, for every registered party you need to update the VAT registration details in the party ledger. Depending on the country the VAT registration details vary. For example, if your party is from Oman then the party will have VATIN, if the party is from UAE then the party will have TRN details and so on.
In this section
- Nature of transaction
- Configure service ledgers
- Configure sales and purchase ledgers
- Configure party ledgers with VAT details
- Configure expense and income ledgers
- Configure tax ledgers
Nature of transaction
At the time of creating/altering the service, sales and purchase ledgers, you can select the Nature of transaction as Not Applicable for the system to decide the Nature of transaction depending on the location of your party. You can also select the Nature of transaction manually depending on the type of sales and purchase your business is involved with.
Below is the list of Nature of transaction available in TallyPrime:
| Type of transactions in your business | Nature of transaction in Sales/Purchase ledger |
|
Domestic sale or purchase of goods or services that are exempt from tax |
Domestic Exempt Supplies Domestic Exempt Purchases |
| Domestic sale or purchase of goods or services that are zero-rated | Domestic Zero Rated Supplies Domestic Zero Rated Purchases |
| Domestic sale or purchase of goods or services that are taxable | Domestic Taxable Supplies Domestic Taxable Purchases |
|
Domestic sale or purchase of goods or services on Profit Margin The tax is calculated on the profit instead of the full value |
Domestic Supplies – Profit Margin Domestic Purchases – Profit Margin |
|
Local transfer of ownership of goods The tax is calculated on the consideration paid instead of the actual value of the goods |
Domestic Supplies – Transfer of Right to Use |
| Purchase goods or services from parties located in the Designated Zone in the same country | Domestic Purchases – Designated Zone |
| Purchase goods or services from unregistered dealers in the same country | Domestic Purchases – Unregistered |
| Sale or purchase of goods or services from/to other GCC countries as part of subsequent sales or purchases | Intra GCC Subsequent Transfers or Intra GCC Subsequent Purchases |
| Sell goods or services to other GCC countries | Intra GCC Supplies |
| Purchase goods or services that are exempt from tax from other GCC countries | Intra GCC Exempt Purchases |
| Purchase goods or services that are zero-rated from other GCC countries | Intra GCC Zero Rated Purchases |
| purchasing goods or services that are taxable from other GCC countries | Intra GCC Taxable Purchases |
| Importing goods or services that are exempt from tax from countries outside the GCC | Imports – Exempted |
| Import goods or services that are zero-rated from countries outside the GCC | Imports – Zero Rated |
| Import goods or services that are taxable from countries outside the GCC | Imports – Taxable |
| Import goods or services from non-GCC countries for subsequent sales to the GCC countries | Import for Subsequent GCC Transfers |
| Sell goods or services to countries outside the GCC |
Exports |
Configure service ledgers
If you are in the service industry, the services provided by you are item-equivalent in a sales invoice. You must create the service ledgers under the Sales group, select the Type of supply as Services. If you have already created the service ledgers without configuring the VAT details, you can alter the ledger and update the same. You can select the Nature of transaction as Not Applicable and let the system decide depending on the party selected. If you have selected Nature of transaction as Not Applicable and the party is from other GCC countries then the system automatically selects Export as Nature of transaction. You can also select the Nature of transaction manually such as Domestic Taxable Supplies, Exports, Intra GCC Supplies and so on.
- Open the service ledger.
- Press Alt+G (Go To) > Alter Master > Ledger > and press Enter.
Alternatively, Gateway of Tally > Alter > type or select Ledger > and press Enter. - Select the service ledger from List of Ledgers.
- Press Alt+G (Go To) > Alter Master > Ledger > and press Enter.
- Update Statutory Details in the Service Ledger.
- Select the Nature of transaction as Not Applicable for system to decide or select the required Nature of transaction.
- Verify the Taxability and Tax rate of the Ledger.
By default, the Taxability and Tax rate mirrors the details given at the company level. - Select the Type of supply – Services.
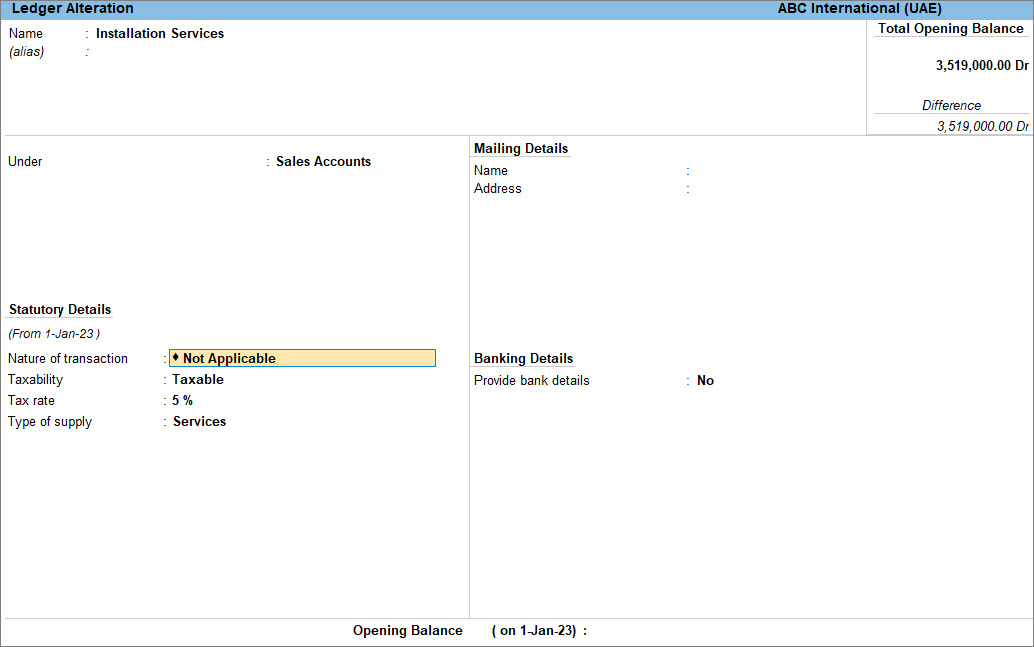
- Accept the screen. As always, you can press Ctrl+A to save.
You can use this ledger to bill the services rendered by your business, in the Accounting Invoice mode.
Configure sales and purchase ledgers
To record all types of sales or purchase transactions, you can create a single sales or purchase ledger to account for goods sold or purchased. You need to select the Nature of transaction as Not Applicable for the system to decide the Nature of transaction depending on the party selected while recording the transaction. If you already have the sales or purchase ledger created, you can alter the same and make the necessary changes. In TallyPrime, you also have the option to override the system inferred Nature of transaction at the time of recording the transaction.
For example, you have selected a party located in Oman and the sales ledger is updated with Not Applicable as Nature of transaction. In such case, the system based on the party location will select the Nature of transaction as Intra GCC Supplies. However, although your party is located in Oman, the goods need to be exported to India and hence you want to maintain the Nature of transaction as Export instead of Intra GCC Supplies. You can override the Nature of transaction at the time of recording the transaction and manually select Export as the Nature of transaction.
You can also choose to create multiple sales or purchase ledgers for each type of Nature of transaction if you wish to track them separately.
The other details such as Taxability and Tax rate are automatically updated as per the details maintained at the company level. You can alter an existing sales ledger, as shown below.
- Open the sales ledger.
- Press Alt+G (Go To) > Alter Master > Ledger > and press Enter.
Alternatively, Gateway of Tally > Alter > type or select Ledger > and press Enter. - Select Sales Ledger from List of Ledgers.
- Press Alt+G (Go To) > Alter Master > Ledger > and press Enter.
- Update the VAT details in the sales ledger.
- Press F12 (Configure) and enable Set Nature of Transaction for Ledgers.
- Select the Nature of transaction as Not Applicable for system to decide or select the required Nature of transaction.
- Verify the Taxability and Tax rate of the Ledger.
By default, the Taxability and Tax rate mirrors the details given at the company level. - Select the Type of supply. You can choose Goods or Services as Type of supply.
If you are supplying both goods and services, you can select the sales ledger for stock items with Type of supply as Goods and select the service ledger created under sales group with the Type of supply as Services.
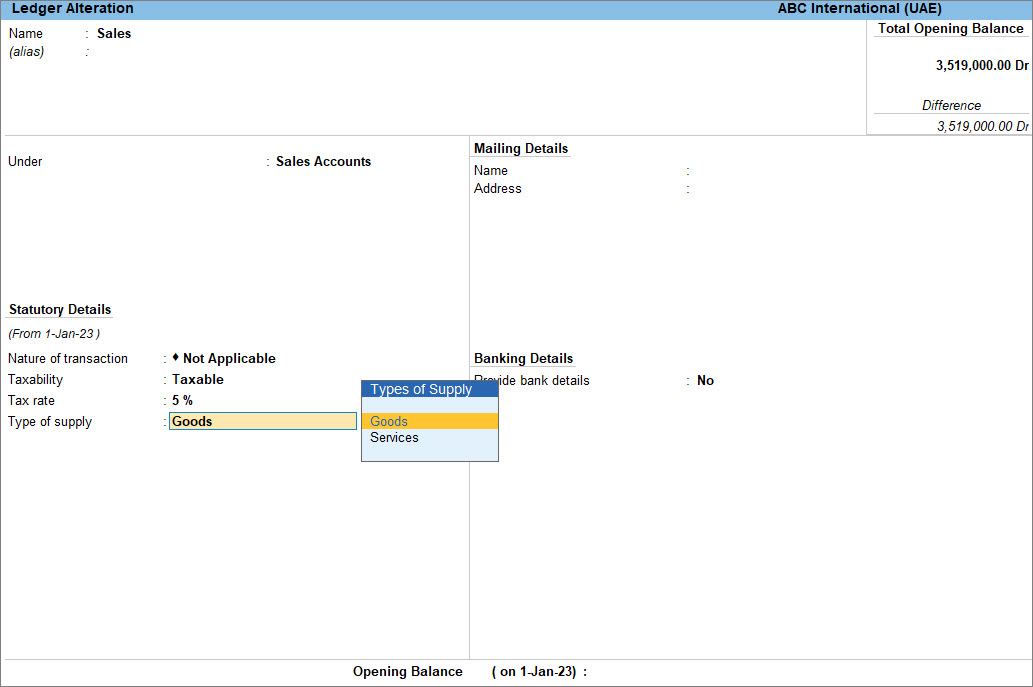
- Accept the screen. As always, you can press Ctrl+A to save.
Similarly, you can alter the Purchase ledger and make the necessary changes.
Configure party ledgers with VAT details
You need to update the VAT Registration details for all the registered parties within the GCC countries.
You can also import these details in case you have multiple parties to update. If the party is from UAE then you can enable the option Select Type of Party from F12 (Configure).
In this section
Configure VAT in party ledgers
At the time of creating the party ledgers, you can update the mailing details, VAT registration details for registered dealers and other required details. You can update those later as well by altering the party ledgers. If you are dealing with an unregistered dealer or consumers, then you need to select Unregistered as the Registration type while creating or altering the party ledger. Unregistered dealers will not have any VAT Registration details. For example, if one of your parties is registered in the UAE, then you can create or alter the party ledger and update the VAT details, as shown below.
- Open the party ledger.
- Press Alt+G (Go To) > Alter Master > Ledger > and press Enter.
Alternatively, Gateway of Tally > Alter > type or select Ledger > and press Enter. - Select the party created under Sundry Creditors or Sundry Debtors.
Select the supplier ledger in purchase transactions, and the customer ledger in sales transactions.
- Press Alt+G (Go To) > Alter Master > Ledger > and press Enter.
- Update the mailing details.
- Enter the Address, and select Country.
- Enter the Emirate, if the selected country is UAE.
- If you want to view the mailing details in Arabic in the invoice then set the option Mailing details in local language to Yes.
- Update the VAT Registration details.
- Select the relevant Registration Type from the list of Type of Dealer
- Specify the Date of VAT registration, if the party is a registered dealer.
- Enter the TRN, if the party is from UAE.
Similarly, enter TRN for Bahrain, VAT No. for KSA and VATIN for Oman.
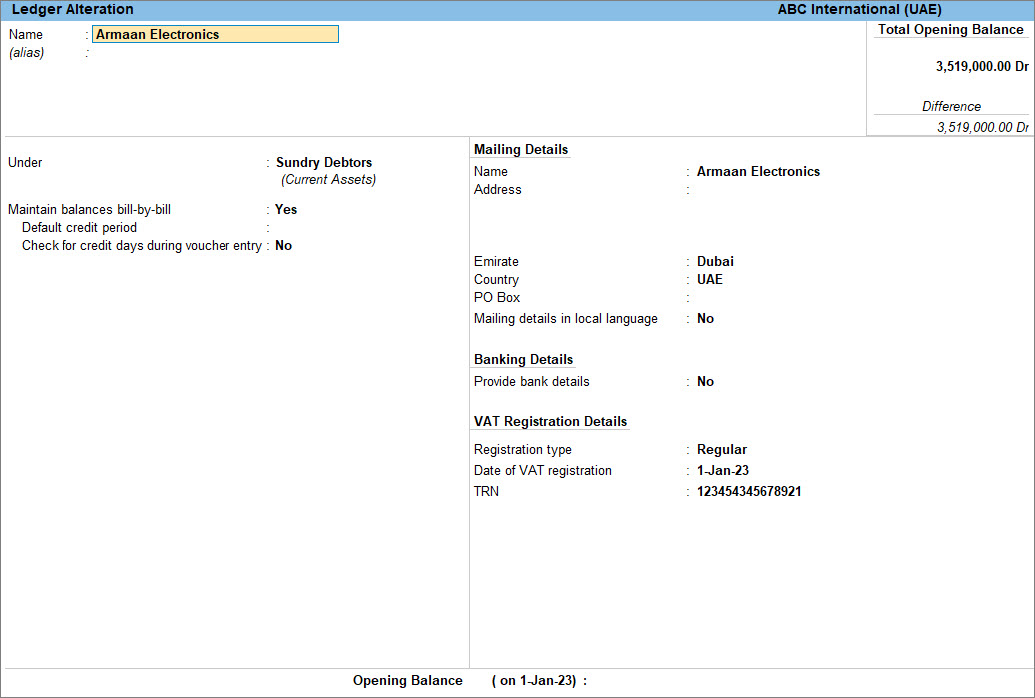
- Accept the screen. As always, you can press Ctrl+A to save.
Similarly, you can update the VAT details in the party ledger registered in other GCC countries by providing the required VAT Registration Details.
Update Party TRN in multiple party ledgers using import
You can quickly update the TRN details for your parties group-wise from the Update Party TRN report. You can also provide this at the individual party ledger level.
If there are missing TRN details or you want to update the TRN details of multiple parties then in TallyPrime you can do that easily with Import Party TRN tool. All you need to do is export the party details to Excel and then update the missing TRN details. Ensure that the party names and other details are not altered in the Excel sheet and must match the details provided in TallyPrime. Once the data is updated, you can import the same in TallyPrime and the missing TRN details will get updated as per the import file.
Update Party TRN for individual party ledger
- Press Alt+G (Go To) > type or select Update Party TRN> and press Enter.
Alternatively, Gateway of Tally > Display More Reports > VAT Reports > Update Party TRN. - Select the group and the ledger for which you want to update the TRN.
- In the Update Party TRN screen, enter the TRN for the party.
- Press F8 (All Ledgers) to view all the parties.
Update Party TRN for multiple party ledgers
- Export the party details to Excel.
- Press Alt+G (Go To) > type or select Update Party TRN > and press Enter.
Alternatively, Gateway of Tally > Display More Reports > VAT Reports > Update Party TRN. - Select Sundry Creditors or Sundry Debtors in the Name of Group. The Update Party TRN screen appears.
- Press F8 (All Ledgers) to view the list of all parties under Sundry Creditors or Sundry Debtors
- Press Alt+E (Export) and select Current to export the information in MS Excel format.
- Press Alt+G (Go To) > type or select Update Party TRN > and press Enter.
- Open the Excel file, specify the TRN details for the parties, and save the file.
- Import the TRN details for multiple parties
- Press Alt+G (Go To) > type or select Import Party TRN > and press Enter.
Alternatively, Gateway of Tally > Display More Reports > VAT Reports > Import Party TRN. - Specify the name of the MS Excel file and the path in the field Name of the file to be imported (Excel).
- Press Enter to import.
- Press Alt+G (Go To) > type or select Import Party TRN > and press Enter.
Once you have imported party TRNs for UAE or party VATINs for Oman, a message is displayed stating Data imported successfully and the MS Excel file opens.
Correct errors in the imported data
- Open the MS Excel file and check for a sheet called Errors. If this sheet is there, it means that some data was incorrect for some parties and has not been imported into TallyPrime.
- Check and make necessary corrections in the Excel Sheet.
- Import the file again. The corrected information gets imported this time.
Configure Expense and Income Ledgers
While accounting for expenses and incomes, the ledgers have to be grouped under Direct Expenses, Indirect Expenses, Direct Incomes, or Indirect Incomes depending on the nature of the expense and income. For example, expenses that are directly connected with the manufacturing or purchasing of goods are created under Direct Expenses such as Wages, Freight Inwards and so on. Expenses that are incurred during the operation of the business are created under Indirect Expenses such as packing charges, delivery charges, rent, salary and so on. On the other hand, income that you generate directly from your business is created under Direct Income and the income which is generated from non-business activities are created under Indirect Income.
- Open the Expense and Income Ledgers.
- Press Alt+G (Go To) > Alter Master > Ledger > and press Enter.
Alternatively, Gateway of Tally > Alter > type or select Ledger > and press Enter. - Select the expense or income ledger.
- Press Alt+G (Go To) > Alter Master > Ledger > and press Enter.
- Update the Statutory details.
- Set Taxability as Not Vatable.
These are additional charges which are getting apportioned with the item value. - Select VAT in the Include in assessable value calculation for field.
- In the option Appropriate to select,
- Goods: To include the expense or income value in the stock item cost.
- Services: To include the expense or income value in the service value.
- Goods and Services: To include the expense or income value in the stock item cost or service value.
- If the option Appropriate to is set to Services, appropriation is done based on the value. If the option is set to Goods, select the Method of Calculation as:
- Based on Quantity: To distribute the expense or income amount based on the quantity entered for each stock item in the invoice.
- Based on Value: To distribute the expense or income amount based on the value of each stock item or service selected in the invoice.
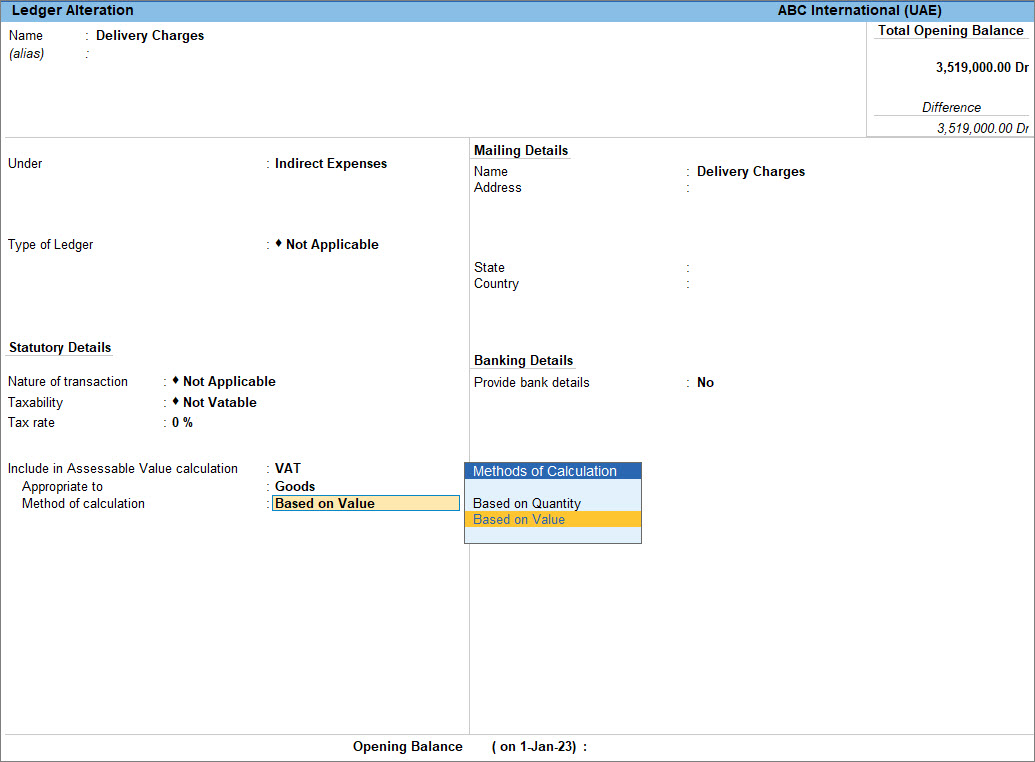
- Set Taxability as Not Vatable.
- Accept the screen. As always, you can press Ctrl+A to save.
Once an expense ledger is included in an invoice, the expenses are appropriated to the items in the invoice as specified in the ledger.
Configure Tax Ledgers
You can create tax ledgers and configure the ledger as per your requirements. You need to create the tax ledger under Duties and & Taxes. For example, if you need to create a ledger for accounting excise then you have to create the excise ledger under Duties & Taxes and select Excise as Type of Ledger.
- Open the Tax Ledger.
- Press Alt+G (Go To) > Alter Master > Ledger > and press Enter.
Alternatively, Gateway of Tally > Alter > type or select Ledger > and press Enter. - Select the tax ledger.
- Press Alt+G (Go To) > Alter Master > Ledger > and press Enter.
- Configure the ledger to account excise.
- Press F12 (Configure) and set Allow allocation of Ledgers for Excise to Yes.
- Press Ctrl+A to save the configuration.
- Select Others in Type of duty/tax and Excise in Type of Ledger field.
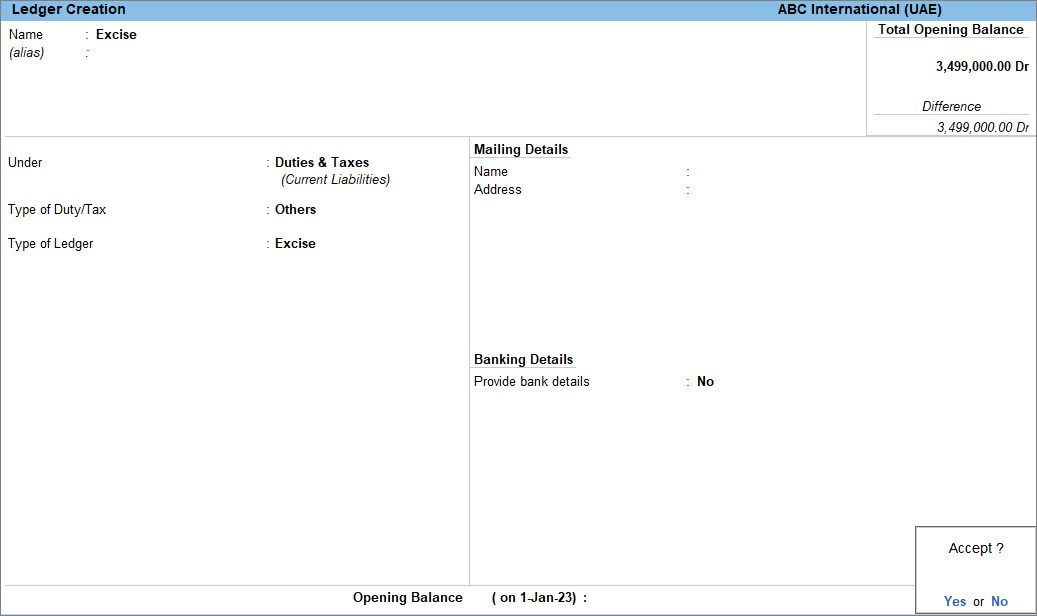
- Accept the screen. As always, you can press Ctrl+A to save.
After you have configured tax ledgers, you can use the tax ledger while recording the sales voucher as per your requirement.


