
Use the eTIMS Solution in TallyPrime Edit Log
If you run a business in Kenya, keeping up with your taxes is more crucial than ever. With the new rules for taxes and e-invoicing in Kenya, the Kenya Revenue Authority (KRA) requires all businesses to connect their invoicing systems to the Electronic Tax Invoice Management System (eTIMS) and upload all invoices electronically. We are happy to introduce the integration of eTIMS with TallyPrime Edit Log. This makes it easier to follow tax rules! If you use an automated billing system, eTIMS will be very helpful as it connects directly with the KRA using an Online Sales Control Unit (OSCU) or a Virtual Sales Control Unit (VSCU).
With TallyPrime Edit Log, you can create and send invoice details to the eTIMS portal in real-time, in just a few simple steps. To get started, you need to do a one-time setup in TallyPrime Edit Log and the eTIMS portal, and then you’re good to go!
Prerequisites for using eTIMS solution in TallyPrime Edit Log:
- Ensure that you are using TallyPrime Edit Log Release 5.0 and above.
- Migrate the data from TallyPrime to TallyPrime Edit Log, if required.
- Contact your Tally partner to get the eTIMS TDL file and load it in TallyPrime Edit Log.
TallyPrime Edit Log makes it easy to integrate and work with eTIMS. Here’s what you can expect:
- One-time setup: Complete a one-time setup in TallyPrime Edit Log and the eTIMS portal.
- Send master or transaction details to eTIMS: Easily send your master and transaction details from TallyPrime Edit Log to the eTIMS portal.
- Manage your eTIMS submissions: Use the eTIMS Overview Report to check the status of the masters and transactions you’ve sent or need to send to the eTIMS portal.
With the new eTIMS solution, manage your business data seamlessly between TallyPrime Edit Log and eTIMS. For more details on eTIMS and its functionalities, visit the eTIMS website.
One-time Setup for Using eTIMS
You need to contact your Tally partner to get the eTIMS TDL file and load the same in TallyPrime Edit Log. Then, complete a one-time setup for using the eTIMS solution in TallyPrime Edit Log. This section will walk you through the key steps to smoothly set up the eTIMS details in TallyPrime Edit Log and easily navigate through the eTIMS portal.
In this section
- Raise an eTIMS Utility Service Request
- Set up eTIMS details in TallyPrime Edit Log
- Sign up on eTIMS
- Fill and submit Service Request (eTims) form
- Send User Details to eTIMS
Raise an eTIMS Utility Service Request
You can purchase the eTIMS solution from the customer portal.
- Log in to the customer portal from tallysolutions.com.
- Select eTIMS Integration.
- Enter your Contact Details and select your Partner Name, as required.
- Tick the checkbox and click the link to accept the Terms and Conditions.
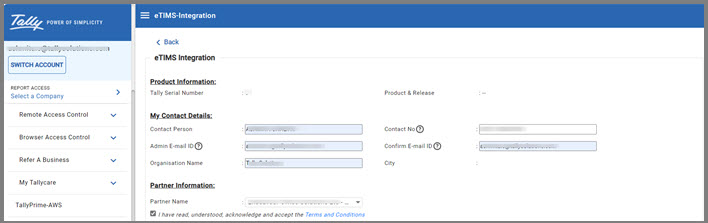
- Click SUBMIT.
Once you accept and submit the Terms and Conditions, an E-mail containing the accepted document will be automatically sent to you and your Tally partner. It is recommended that you save the document in your internal records for future reference.
An opportunity will be created for the selected partner in the Partner TT 2.0 portal. - The partner should place an order for the eTIMS solution from the opportunity created.
Once the order is placed, the Status will be In Progress.
Once the order for using the eTIMS solution is completed, the opportunity will be auto closed.
Set up eTIMS details in TallyPrime Edit Log
![]()
TallyPrime Edit Log allows you to configure the eTIMS details as per your business requirements. Follow the steps below to set up the eTIMS solution for your company:
- Press F11 (Company Features) > Taxation > Enable eTIMS > Yes.
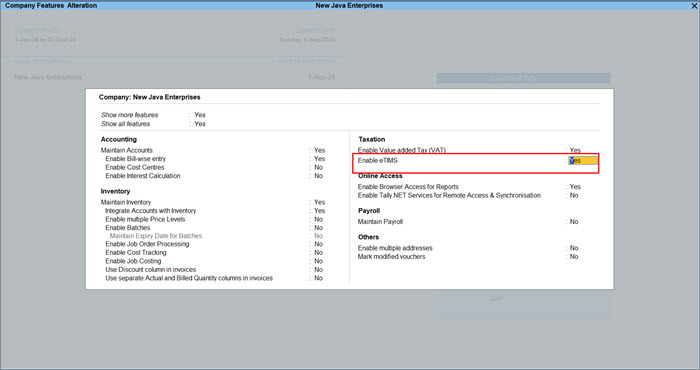
If Security is not enabled for the company, you will be prompted to enable it.
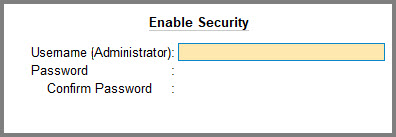
- Enter the Username (Administrator) and Password.
After enabling eTIMS, the eTIMS Registration Creation screen appears, as shown below:

Under eTIMS Registration Details, the fields Company Name and Branch ID are prefilled. - Enter the Applicable from date to use eTIMS from this date onwards and PIN.
- Fill Insurance Details as applicable.
- Set the option Insurance Applicable to Yes.
- Enter the Insurance Code of your company.
- Insurance Name: Enter the name of the insurance company.
- Premium: Enter the Rate of premium applicable to the insurance.
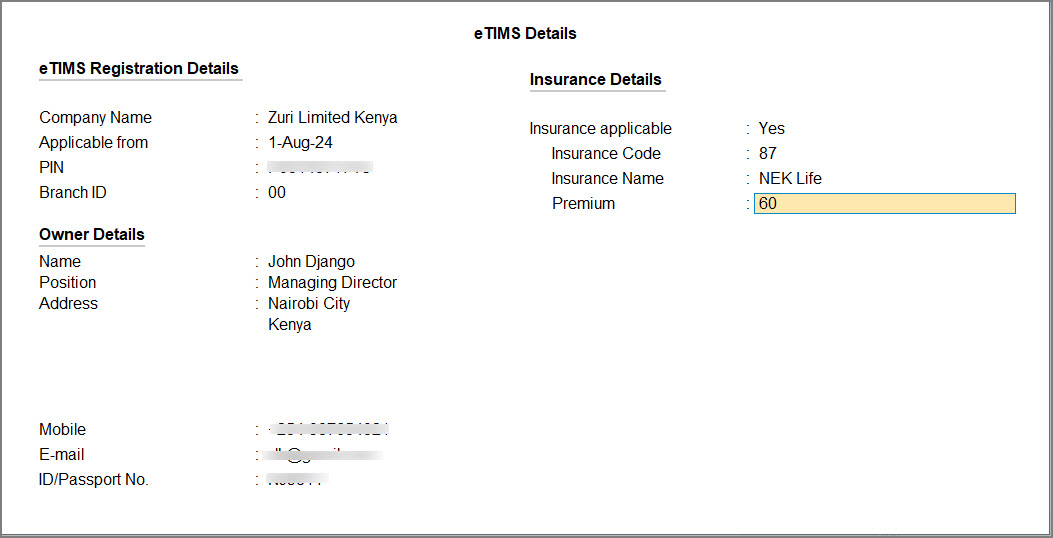
- Accept the screen. As always, you can press Ctrl+A to save.
A message appears on the screen to confirm if you want to generate the Device Serial Number for submitting on the eTIMS portal.
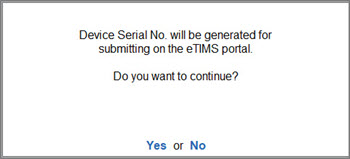
- Select Yes to generate the Device Serial Number.
A message appears to confirm that the Device Serial Number is generated successfully.

Once the eTIMS Details are updated in TallyPrime Edit Log, you can proceed with the other procedures to complete the one-time signup process for using the eTIMS solution.
Sign up on eTIMS
To be able to send e-invoice details to eTIMS, you need to first create an account in the eTIMS portal.
- Go to the eTIMS Taxpayer Portal.
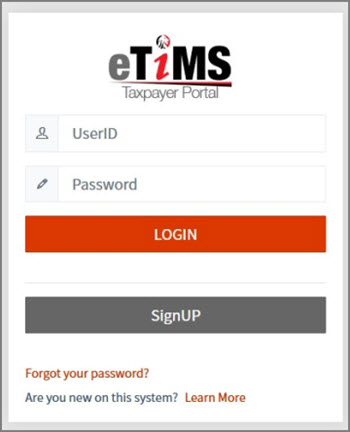
- Select SignUP > PIN.
- Enter the Input Taxpayer PIN > Verify.
The fields Tax payer name, Tax payer type, Mobile number, E-mail address and PIN are auto filled. - Fill other necessary details to complete the signup process.
- Create a Password to access the eTIMS portal and confirm it under Password Ok.
- Click Send OTP to receive an OTP in your registered mobile number.
- Enter the OTP and click the I have read, understood and agree to the provisions of the KRA data privacy statement and policy box.
- Click Sign up and complete the signup process.
You will receive a message from the KRA stating that the signup process has been completed successfully.
Fill and submit the Service Request (eTims) form
The Service Request (eTims) form is available in the eTIMS portal. You need to carefully fill the details and submit the form on the eTIMS portal.
- Go to the eTIMS Taxpayer Portal.
Alternatively, in TallyPrime, press F11 (Company Features) > Enable eTIMS > press Alt+V (Open eTIMS portal). - Enter UserID and Password and press LOGIN.
- Select Service Request > eTIMS.
The Service Request (eTims) form appears, as shown below:
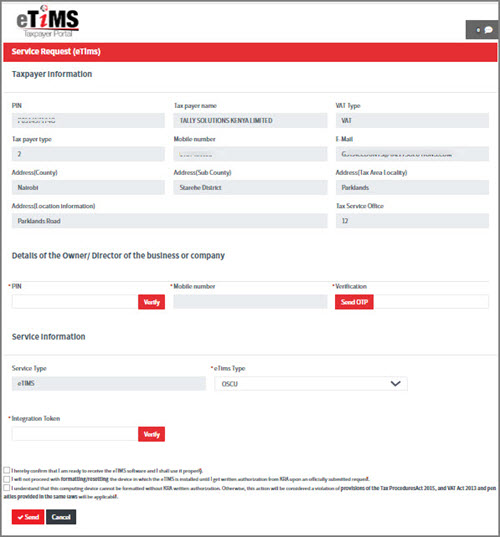
- Enter the Owner/Director’s PIN > click Verify.
The Mobile number will get auto filled. - Click Send OTP to receive an OTP in the Owner/Director’s mobile number.
- Under Service Information > eTIMS Type > select OSCU.
- Enter the Integration Token that you have received in the E-mail sent by KRA.
- Lastly, tick the three boxes and click Send.
You will receive a message from the KRA stating that the Service Request was approved. Once you receive the approval message you need to send the User Details from TallyPrime Edit Log to the eTIMS portal,
Send User Details to eTIMS
![]()
Once you are onboarded to the eTIMS portal, it is mandatory to send the User Details like eTIMS Login Credentials, User Account Details and Insurance Details to the eTIMS portal before you start sending master and transaction details. You can send these details from the eTIMS Overview Report in TallyPrime. You must have Administrator Rights to send the user account details.
If there is any alteration in the Administrator Username and Insurance Details, you can update the same from the eTIMS Overview Report.
- Press Alt+G (Go To) > type or select eTIMS Overview Report > press Enter.
Alternatively, Gateway of Tally > Display More Reports > eTIMS Reports > eTIMS Overview Report.
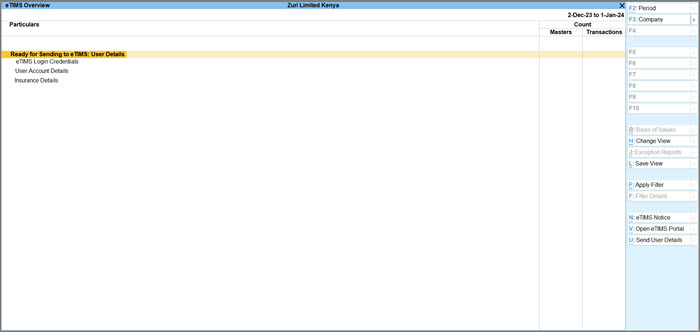
- Select the line Ready for sending to eTIMS (User Details) > press Ctrl+U (Send User Details).
- Enter the Username (Administrator) and Password.
A message appears on the screen, as shown below:
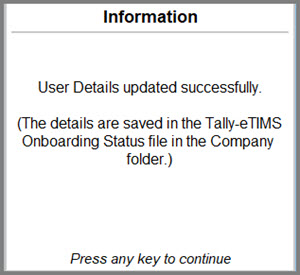
The User Details are sent to the eTIMS portal successfully. Now, you can start sending master and transaction details as well.
Send Master Details to eTIMS
While creating any master data, such as Stock Item or Ledger, you can send the details directly to the eTIMS portal from the master creation or alteration screen. In case you miss creating a master, you can create it on the fly while recording a transaction and send the details from the Accounting Voucher Creation screen. First, the master details will be sent to eTIMS, followed by the transaction details in the voucher.
In this section
- Send stock item details to eTIMS
- Send ledger details to eTIMS
- Import masters from Excel and submit the master details to the eTIMS portal
- Sync Head Office Masters with Branch Office
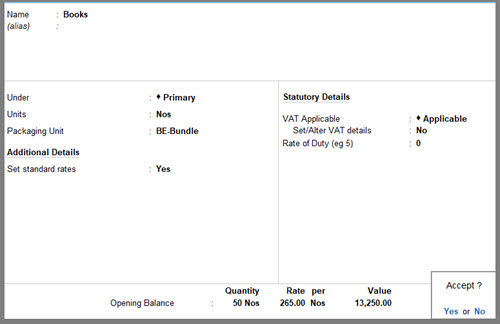
Send stock item details to eTIMS
![]()
Let’s say you are creating a stock item and want to send the stock item details to the eTIMS portal.
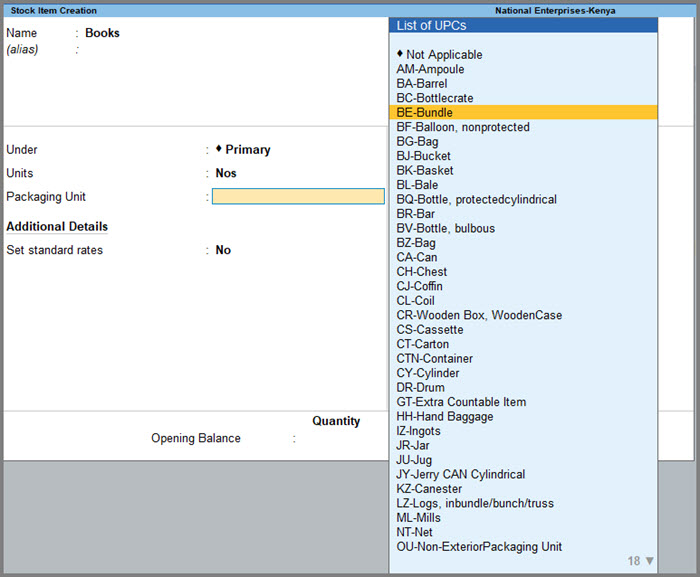
- In the Stock Item Creation screen, enter the Name of the stock item, select the required group in the Under field and the required unit of measurement in the Units field.
Ensure that you have provided the UQC while creating the Unit of Measurement. - From the List of Packaging Units, select the Packaging Unit that is applicable for the Units of stock items.
For instance, if you want 50 Nos of Books to be packed in one bundle, select BE-Bundle as the Packaging Unit.
If Packaging Unit is not applicable, select NT-Net.
- Set the standard rate of the stock item.
- Set the option Set Standard Rate (to send to the eTIMS portal) to Yes.
- Enter the Standard Cost and Standard Selling Price with the Applicable From dates and Rate per unit.
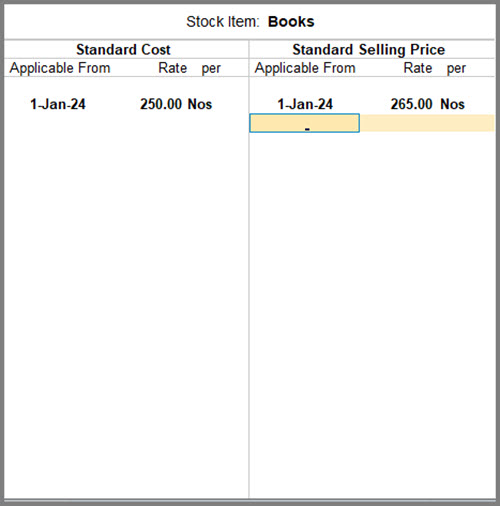
- Press Ctrl+A to save the Standard Rates screen.
- Set the option Set Standard Rate (to send to the eTIMS portal) to Yes.
- Fill other details such as required.
- Set/Alter VAT details: This option appears if VAT is applicable for the stock item. Set this to Yes to alter the Tax/Rate details of the stock item.
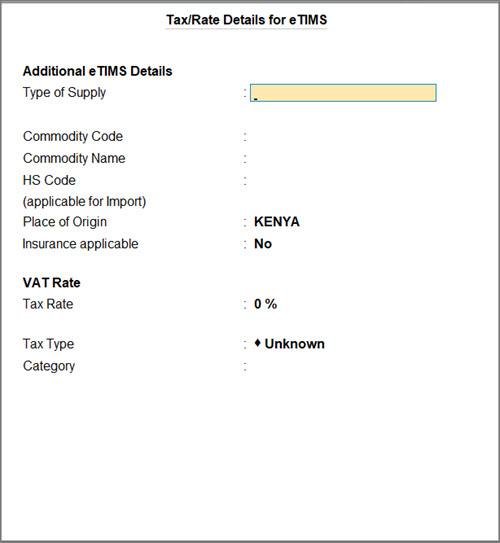
In the Tax/Rate details screen, fill the details as applicable.
- From the Type of Goods, select the Type of the stock item.
- From the Item helper option, select the Commodity Code and Commodity Name.
- Enter the HS Code if the stock item is applicable for import.
The fields Place of Origin and Insurance applicable are prefilled as per your selection. - Under VAT Rate, set the Tax Rate and select the Tax Type and Category of the stock item.
- Set/Alter VAT details: This option appears if VAT is applicable for the stock item. Set this to Yes to alter the Tax/Rate details of the stock item.
- Accept the screen. As always, you can press Ctrl+A to save.
A message appears on the screen to confirm whether you want to send the stock item details to the eTIMS portal.

- Select Yes to send the Stock Item details.
The stock item details are sent to the eTIMS portal successfully.
In case you select No here, you can send the stock item details to eTIMS from the eTIMS Overview Report as well.
- Press Alt+G (Go To) > type or select eTIMS Overview Report > press Enter.
- Select Ready for sending to eTIMS > select Masters and press Enter.
- In the eTIMS Overview Report, select the Group as required and drill down until you open the Master Alteration screen.
- Accept the screen. As always, you can press Ctrl+A to save the stock item and send the details to the eTIMS portal.
A confirmation box appears on the screen, whether you want to update the stock item details on eTIMS.
- Select Yes to send the details to the eTIMS portal.
The stock item details are updated in the eTIMS portal successfully.
Send ledger details to eTIMS
![]()
Let’s say you are creating a ledger and want to send the ledger details to the eTIMS portal.
- In the Ledger Creation screen, enter the Name of the ledger account and select the group Under which the ledger is created.
- Fill the Mailing Details.
- Enter the Address, select the County, Country and enter the Pincode.
- Enter the party’s Primary Mobile No.
In case you don’t see the option, press F12 (Configure) > Provide Contact Details > Yes. - Fill the other details as applicable.
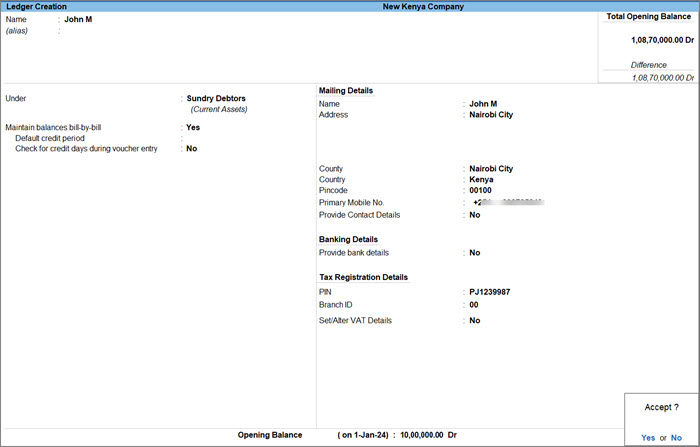
A message appears on the screen to confirm whether you want to send the ledger details to the eTIMS portal. - Select Yes to send the ledger details.
The ledger details are updated in the eTIMS portal successfully. Similarly, you can directly send other master details to the eTIMS portal while you create them.
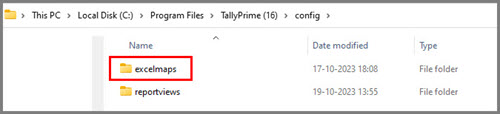
Import masters from Excel and submit the master details to eTIMS
If you have been maintaining your master details in Excel, you can import them into TallyPrime Edit Log and send the required details to eTIMS.
- Download this: mapping templates for importing masters.
- Unzip the file in the downloaded folder.
- Move the mapping template (.tsf file) to TallyPrime application folder> config folder> excelmaps folder.
This is needed to list the mapping templates under the List of Mapping Templates, while you select the template for importing data from Excel.
It is also recommended that you keep a backup of these templates in a separate folder.
Just fill in the worksheet with relevant data based on your day-to-day transactions or master details, and import using the mapped templates. You can use the Excel files as is or make any necessary modifications to record data and alter the corresponding mapping files as needed.
- If you are downloading the TSF files for Other Templates/Sample Excel Files for the first time, you must manually create the config > excelmaps folder under the TallyPrime installation folder.
To know more about importing data from sample excel files, refer to the sample excel file section.
Now that your masters are imported into TallyPrime, you can start send the master details to the eTIMS portal.
Send Transaction Details to eTIMS
In your business, you may record inward transactions such as Purchase, Material In, and outward transactions such as Sales, Material Out, on a day-to-day basis. Now, you can directly send these transaction details to the eTIMS portal while you’re recording the transactions.
In this section
- Send purchase invoice details to eTIMS
- Send sales invoice details to eTIMS
- View sales invoice details by scanning the QR Code
Send purchase invoice details to eTIMS
Say you are recording a purchase transaction of stock items in TallyPrime Edit Log and want to send the details to the eTIMS portal.
- Press Alt+G (Go To) > Create Voucher > press F9 (Purchase).
Alternatively, Gateway of Tally > Vouchers > press F9 (Purchase).
Ensure that the master details are updated in eTIMS before updating the transaction details.
- In the Accounting Voucher Creation screen, fill the required details such as Supplier Invoice No., Date, Party A/c Name and Purchase Ledger.
- Enter the number of Packages that you want to purchase.
If you’ve selected NT-Net as the Packaging Unit, the number of Packages should be one. - Select the required stock item including Quantity and Rate.
In case of Import Transactions, ensure that the stock items have a mandatory HS Code.
- Select the VAT ledger.
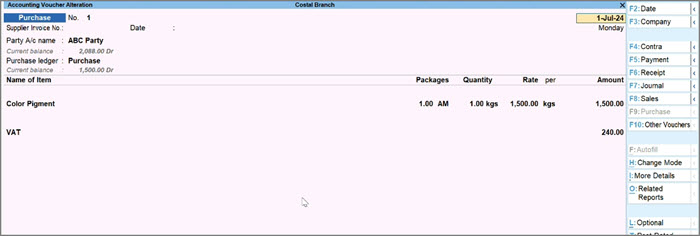
- Accept the screen. As always, you can press Ctrl+A to save.
A message appears on the screen to confirm whether you want to send the purchase voucher details to the eTIMS portal. - Select Yes to send the details.
The purchase voucher details are updated in the eTIMS portal successfully.
Send sales invoice details to eTIMS
![]()
Say you are recording your first sales Transaction in TallyPrime after registering on the eTIMS portal and want to send the details to eTIMS.
- Press Alt+G (Go To) > Create Voucher > press F8 (Sales).
Alternatively, Gateway of Tally > Vouchers > press F8 (Sales).
Ensure that the master details are updated in the eTIMS portal before updating the transaction details.
- In the Accounting Voucher Creation screen, fill the required details.
- Enter the Name of Item, number of Packages, Quantity and Rate of the Stock Item.
- Select the VAT ledger.
- Enter the narration if required.
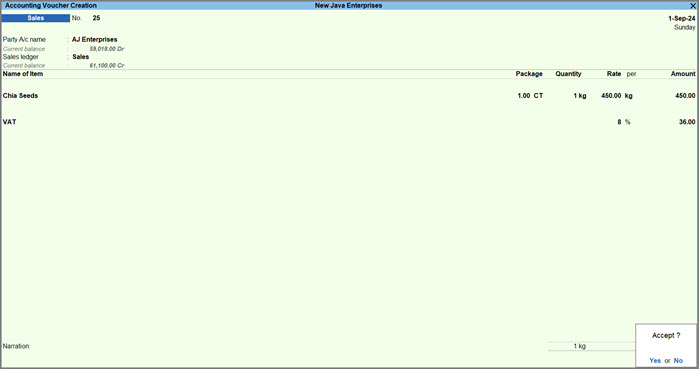
- Accept the screen. As always you can press Ctrl+A to save.
A message appears on the screen to confirm whether you want to send the details to eTIMS.
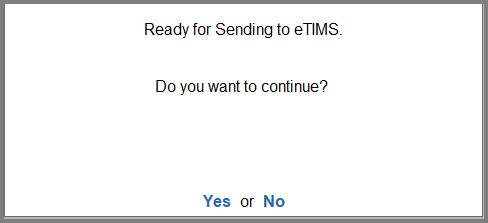
- Select Yes to send the details to the eTIMS portal.
The sales invoice details are updated in eTIMS successfully.
In case you select No here, you can send the transaction details to eTIMS from the eTIMS Overview Report as well.
- Press Alt+G (Go To) > type or select eTIMS Overview Report > press Enter.
- Select Ready for sending to eTIMS > select Transactions and press Enter.
- In the eTIMS Overview Report, select the Group as required and drill down until you open the Accounting Voucher Alteration screen.
- Save the voucher to send the details to the eTIMS portal.
A confirmation box appears on the screen whether you want to update the sales invoice details on eTIMS.
Select Yes to send the details to the eTIMS portal.
View sales invoice details by scanning the QR code
![]()
After sending the sales invoice details to the eTIMS portal, you can view or share the details by scanning the QR code available in the sales invoice.
- In the Voucher Printing screen, press Preview to view the preview of the sales invoice before printing it.
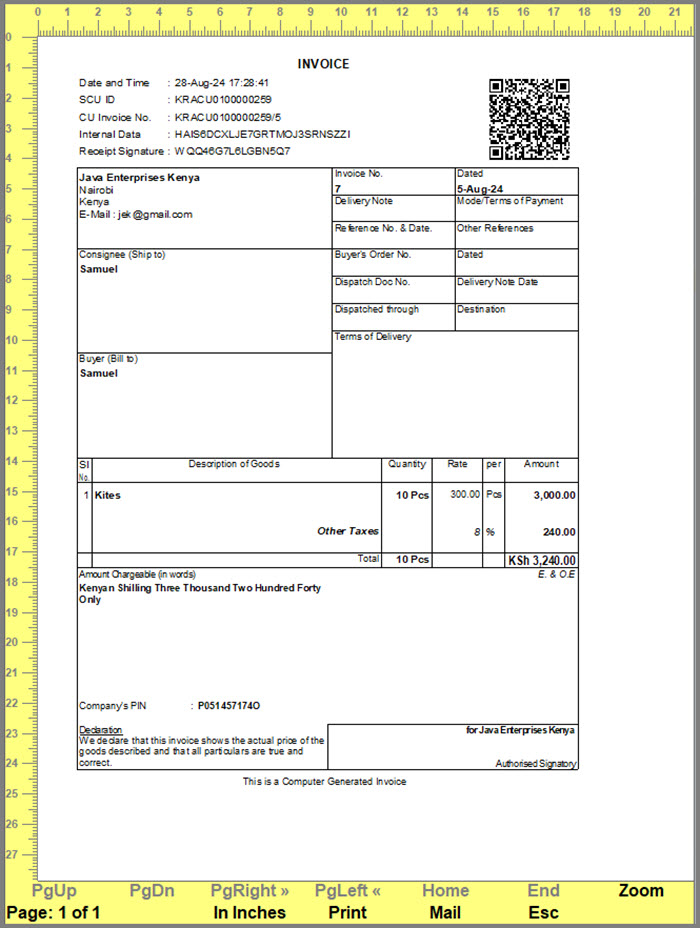
- Scan the QR code at the top right corner of the screen and view the sales invoice details sent to eTIMS from your mobile device as well.
By scanning the QR code, you can easily share the sales invoice details with your customers or stakeholders.
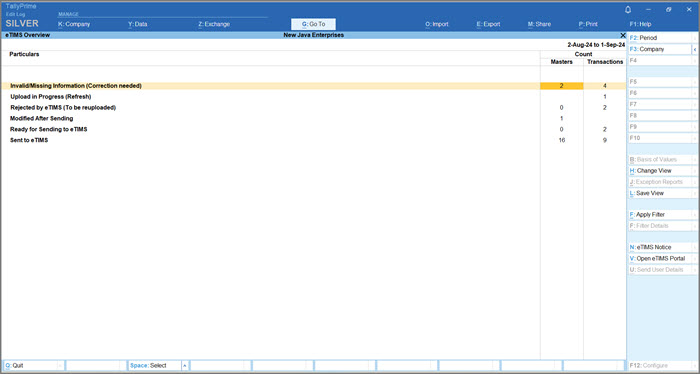
eTIMS Overview Report
![]()
The eTIMS Overview Report displays the status of the masters and transactions details sent, or will be sent to the eTIMS portal. Any pending action while sending the master or transaction details, can be completed and the same can be sent to the eTIMS portal from this report. Say some masters were rejected by the eTIMS portal due to invalid or missing information in those masters. You can resolve the errors from the eTIMS Overview Report and re-attempt sending the details to the eTIMS portal.
In this section
- Invalid/Missing Information (Correction needed)
- Upload in Progress (Refresh)
- Rejected to eTIMS (To be reuploaded)
- Modified after Sending to eTIMS
- Ready for Sending to eTIMS
- Sent to eTIMS
- eTIMS Notice
You can use the eTIMS Overview report to know more about the status of the masters and transactions details sent or are yet to be sent to the eTIMS portal.
- Press Alt+G (Go To) > type or select eTIMS Overview Report > press Enter.
Alternatively, you can view the report in Gateway of Tally > Display More Reports > eTIMS Reports > eTIMS Overview Report.
Invalid/Missing Information (Correction needed)
![]()
Say you missed entering a mandatory field or entered invalid information while creating a master, because of which the particular master got rejected by eTIMS and the master details weren’t sent to the eTIMS portal.
- Select the line Invalid/Missing Information (Correction needed), select Masters or Transactions and press Enter.
- Drill down to the Master Alteration screen, make the necessary changes to the master and then press Ctrl+ A to save it.
A confirmation box appears on the screen to confirm whether you want to update the master details on eTIMS. - Select Yes to send the updated master details to the eTIMS portal.
Similarly, you can update a voucher if you missed entering a mandatory field or entered invalid information while creating the voucher.
Upload in Progress (Refresh)
![]()
Let’s say you’ve recorded a transaction, but an internal KRA server error prevented you from receiving the confirmation message from the eTIMS portal regarding the successful upload of the transaction. You can view such transactions under Upload in Progress(Refresh) in the eTIMS Overview report.
- Select the line Upload in Progress (Refresh) > Transactions and press Enter.
- Drill down to the Voucher Display screen.
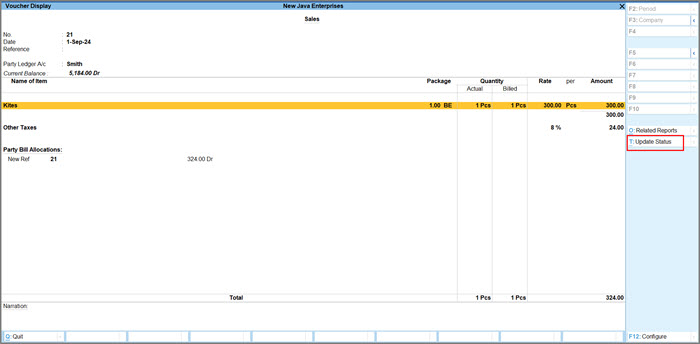
- Press Alt+T (Update Status) to refresh the upload status of the voucher details.
A confirmation box appears on the screen to confirm if you want to send the voucher details to the eTIMS portal. - Select Yes to send the updated voucher details.
This is applicable only for sending transaction details to the eTIMS portal and not for master details.
Rejected by eTIMS (To be reuploaded)
![]()
While sending masters or transactions details, they might get rejected by eTIMS and appear under Rejected by eTIMS (To be reuploaded) in the eTIMS Overview report. You can view the reason for the error and update the voucher accordingly before sending the details to eTIMS.
- Select the line Rejected by eTIMS (To be reuploaded) > Transactions and press Enter.
- Select the Group as required and drill down further.
The Reason for error appears under each transaction.
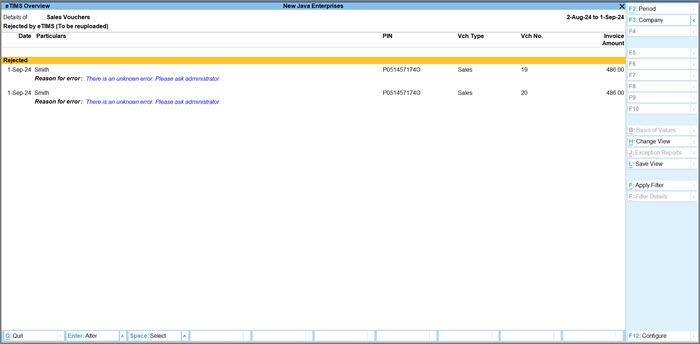
- Select the required transaction, drill down to the Accounting Voucher Alteration screen and make necessary changes to the voucher.
- As always, save the screen or press Ctrl+ A to save it.
A confirmation box appears on the screen to confirm whether you want to update the voucher details on eTIMS. - Select Yes to send the updated details to eTIMS.
Modified after Sending to eTIMS
![]()
Now say, after successfully sending the master details to the eTIMS portal, you alter some field in that particular master. In this case, the altered master will appear as Modified after Sending to eTIMS in the eTIMS Overview report.
- Select the line Modified after Sending to eTIMS > Masters and press Enter.
- Drill down twice and press Alt+S (send to the eTIMS portal) to send the master details to the eTIMS portal.
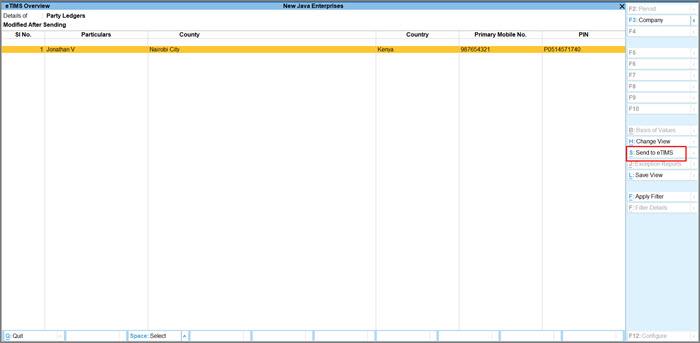
A confirmation box appears on the screen to confirm whether you want to update the master details on eTIMS. - Select Yes to send the details to eTIMS.
Unlike master details, you will not be able to modify the details in a voucher after sending the transaction details to eTIMS.
Ready for Sending to eTIMS
![]()
Now let’s say you have created some Masters but have not sent the master details to eTIMS yet. You can send the pending master details from this report.
- Select the line Ready for sending to eTIMS > Masters and press Enter.
- Select the Group as required and press Alt+U (Send to eTIMS) to send the master details in bulk, to the eTIMS portal.
A confirmation box appears on the screen to confirm whether you want to update the master details on eTIMS. - Select Yes to send the master details in bulk from this report.
Once you have sent the master details, you can start sending the pending transaction details to the eTIMS portal in a similar way.
Sent to eTIMS
You can view the masters and transactions successfully sent to the eTIMS Portal from this report.
- Select the line Sent to eTIMS and then select Masters or Transactions.
- Select the Group as required and drill down to the view the masters or transactions sent to eTIMS.
eTIMS Notice
There are notifications released by KRA to share the latest updates of the eTIMS Portal. You can view these notifications by clicking the eTIMS Notice button.
With eTIMS now working seamlessly with TallyPrime Edit Log, you can send your invoice details smoothly, save time and ensure everything’s in order.


Sync Head Office Masters with Branch Office
If your company operates multiple branches with a central Head Office, it’s now mandatory, according to KRA regulations, to send all master details to eTIMS from the Head Office rather than from individual branches. With TallyPrime Edit Log, you can effortlessly manage this requirement. You can now send all the Head Office master details to eTIMS, export them in XML format, and then import these masters into the branch offices. This ensures a seamless integration of master data across all your branches.
The exported XML file will be saved in the Folder Path selected while exporting the data.
Once imported, the masters will be seamlessly integrated into the Branch, allowing you to start recording transactions without any hassle.