Create Party Ledgers (Excise for Manufacturer)
Parties who supply excise goods or raw material for manufacturing excise goods, and customer purchase such goods can be created as ledgers.
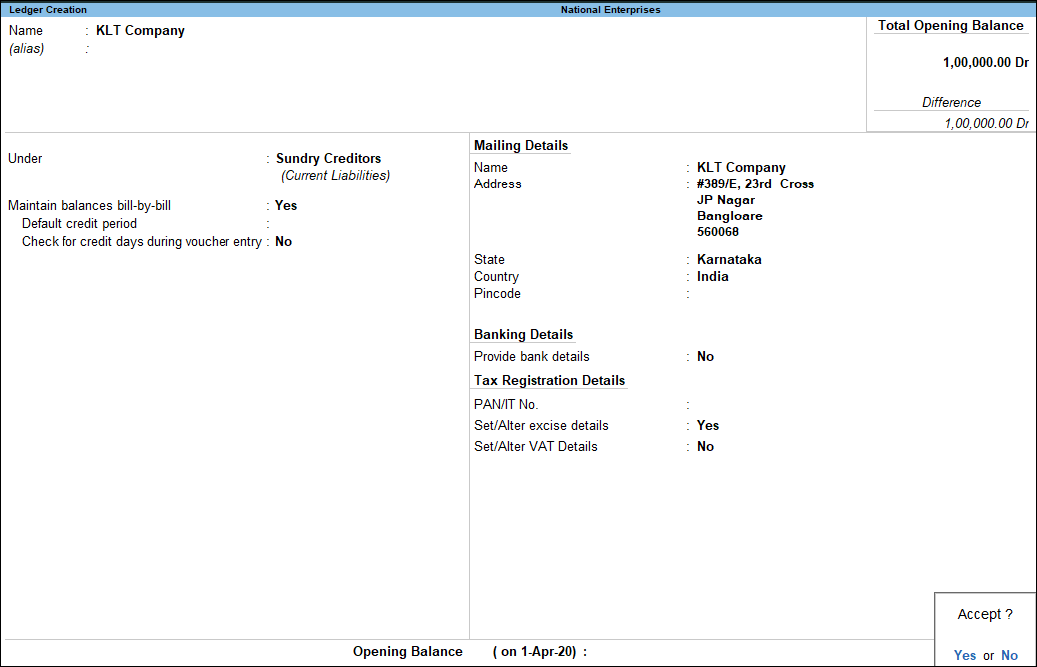
Supplier Ledger
- Gateway of Tally > Create > type or select Ledger.
Alternatively, press Alt+G (Go To) > Create Master > type or select Ledger. - Enter the Name of the supplier ledger.
- Select Sundry Creditors from the List of Groups in the field Under.
- Enable the option Maintain balances bill-by-bill.
- Enter the Default Credit Period, if any.
- Set Check for credit days during voucher entry to Yes, if required.
- Enter the Mailing Details.
- Select the Country to which the supplier belongs. The application will infer the nature of removal based on the country selected.
If the country selected is India, the nature of removal is Domestic by default. - Select the State, if applicable
On selecting a country other than India, the cursor skips the fields State. - Enter bank details, if required.
- Enter the PAN.
- Enable the option Set/Alter Excise Details to enter the excise details of the branch.
To enter the supplier’s excise details- Select the Default Nature of Purchase.
- Enter ECC No.
- Enter the IEC number.
- Enter the Range, Division, and Commissionerate. To define jurisdiction details specific to different periods, press Alt+W (Details).
- Enter the period from which the details of range entered, will be applicable from.
- Enter the Range, Division and Commissionerate.
- Press Enter.
- Enter the date Applicable From, Code, Name and Address for another period, if required.
- Press Enter.
- Enable the option Set/Alter VAT Details, if required.
- Enter the opening balance, if any.
The completed supplier ledger appears as shown below:

- Press Enter to save.
Customer Ledger
- Gateway of Tally > Create > type or select Ledger.
Alternatively, press Alt+G (Go To) > Create Master > type or select Ledger. - Enter the Name of the customer ledger
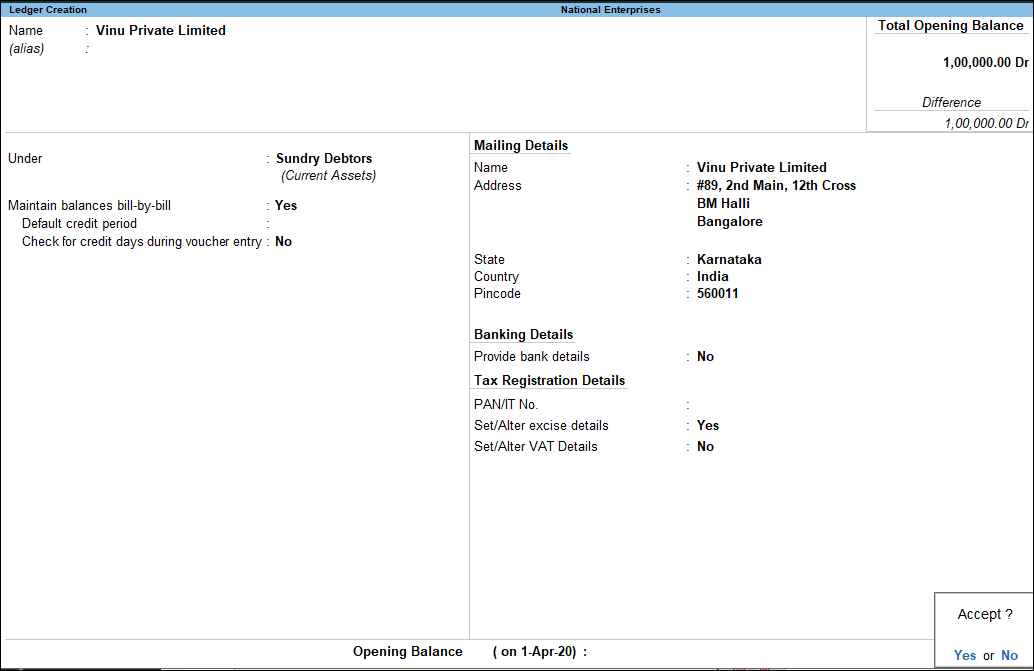
- Select Sundry Debtors from the List of Groups in the field Under.
- Enable the option Maintain balances bill-by-bill.
- Enter the Default Credit Period, if any
- Set Check for credit days during voucher entry to Yes if required.
- Enter the Mailing Details.
- Select the Country to which the customer belongs. The application will infer the nature of removal based on the country selected.
If the country selected is India, the nature of removal is Domestic by default. - Select the State, if applicable
On selecting a country other than India, the cursor skips the fields State. - Enter bank details, if required.
- Enter the PIN Code, if applicable.
On selecting a country other than India, the cursor skips the fields Pin Code. - Enter the PAN.
- Enable the option Set/Alter Excise Details to enter the excise details of the branch.
To enter the supplier’s excise details- Select the Default Nature of Purchase.
- Select the Nature of Removal, as required.
- Enter ECC No.
ECC number is PAN-based, and has 15 digits. The format of ECC no. is ABCDE1234HXM001.
- Enter the IEC code.
- Enter the Range, Division, and Commissionerate. To define jurisdiction details specific to different periods, click Alt+W (Details).
- Enter the period from which the details of range entered, will be applicable from.
- Enter the Range, Division and Commissionerate.
- Press Enter.
- Enter the date Applicable From, Code, Name and Address for another period, if required.
- Press Enter.
- Enable the option Set/ Alter VAT Details, if required.
- Enter the opening balance, if any. The completed customer ledger appears as shown below:

- Press Enter to save.
Branch/Division
- Gateway of Tally > Create > type or select Ledger.
Alternatively, press Alt+G (Go To) > Create Master > type or select Ledger. - Enter the Name of the branch/division.
- Select Branch/Division from the List of Groups in the field Under.
- Enable the option Inventory values are affected, if required.
- Enter the Mailing Details.
- Select the Country to which the branch/division belongs. The application will infer the nature of removal based on the country selected.
If the country selected is India, the nature of removal is Domestic by default. - Select the State
On selecting a country other than India, the cursor skips the fields State. - Enter the PIN Code
On selecting a country other than India, the cursor skips the fields Pin Code. - Enter the bank details, if required
- Enter the PAN.
- Enable the option Set/Alter VAT Details, if required.
- Enter the opening balance, if any.
The completed branch or division ledger appears as shown below:
- Press Enter to save.
Modifying Nature of Removal
The nature of removal in sales transactions can be defined in the party ledger master. To select the nature of removal:
- Enable Set/alter Excise Details in the party ledger master.
- Click F12 (Configure).
- Enable the option Allow selection of nature of removal.
- Press Ctrl+A.
- Select the Nature of Removal in the Excise Details screen.
Recording IEC in a Party Ledger
- Enable Set/alter Excise Details in the party ledger master.
- Click F12 (Configure).
- Set the option Enable Importers ECC no. to Yes.
- Press Ctrl+A.
- Enter the Importers ECC no. in the Excise Details screen.
Recording Notification Details
- Press F12 (Configure) in the Excise Details screen.
- Set the option Allow Notification Details to Yes in the Configuration screen.
- Press Ctrl+A.
- Enter Notification Details in the Excise Details screen.


