
Highest and Lowest Value Transactions
The Highest and Lowest Value Transactions in TallyPrime is a report that provides ledger-wise Highest and Lowest amount transactions along with the Difference Range and Difference Range Percentage.
View Highest and Lowest Value Transactions report
- Gateway of Tally > Display More Reports > Analysis & Verification > Data Analysis > Highest and Lowest Value Transactions.
Alternatively, press Alt+G (Go To) > type or select Highest and Lowest Value Transactions > and press Enter.
Note:
a. Difference Range: It is arrived by considering the Highest and Lowest Value Transaction of each ledger. Example: For ABC Bank Ledger,
* Highest Value Transaction is 1000
* Lowest value transaction is 200
Difference Range of ABC Bank (800) = Highest Value (1000) – Lowest Value (200)
b. Difference Range Percentage: It is arrived by dividing the Difference Range by Lowest value of a Ledger. Example: For ABC Bank Ledger,
* Lowest value transaction is 200
* Difference Range is 800
Difference Range Percentage of ABC Bank (400%) = Difference Range (800)/ Lowest Value (200)
The report displays the Highest Transaction Amount, Lowest Transaction Amount, Difference Range and Difference Range Percentage of all Ledgers. Users can drill down from the above report to view ledger-wise Highest and Lowest Value Transactions. - Select a Ledger and press Enter to view the Ledger-wise Highest and Lowest Value Transactions report.
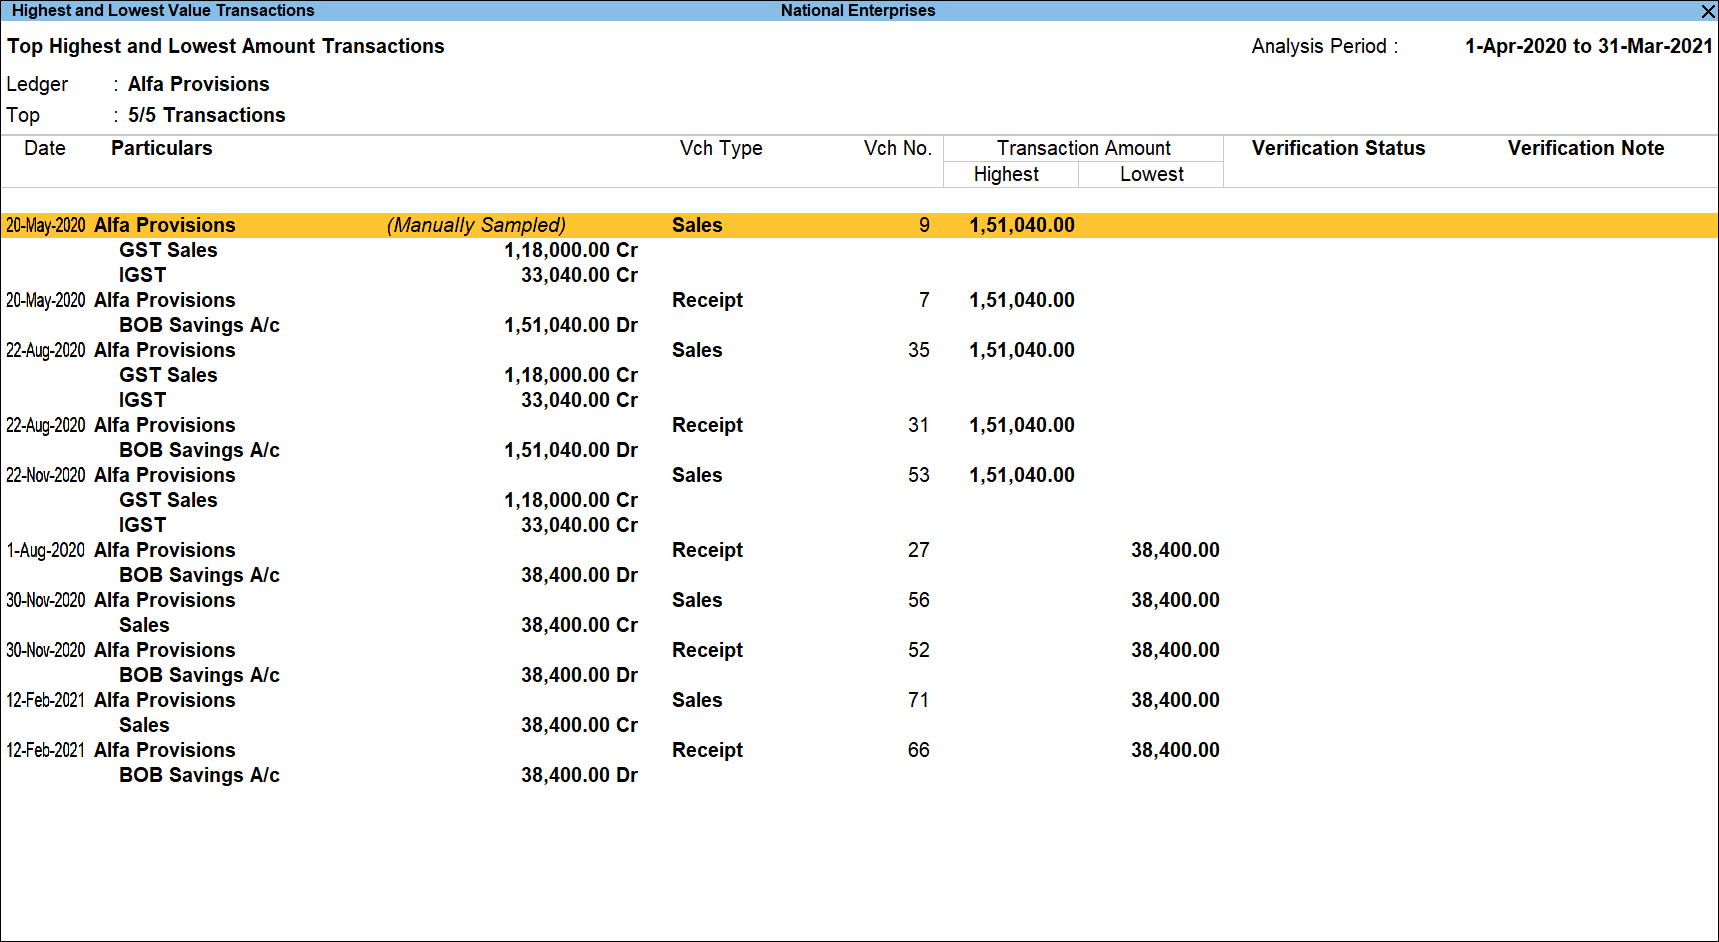
The basis for display of Highest and Lowest transactions for a ledger is also displayed on top of the screen.
To display the Highest and Lowest Value Transactions for a ledger, by default 5 Highest value and 5 Lowest value transactions has been set.
Users can configure the display of Highest and Lowest Transactions by pressing on F12 (Configure) and alter the numbers to show highest and lowest transactions.
Button options in Highest and Lowest Value Transactions Report
- Press F2 (Period) to change the selected period.
- Press F4 (Group)to select a different ledger and display the Highest and Lowest Amount Transactions report for the selected group.
- Press F8 (Show Ledger) to display the default ledger vouchers report for the selected party along with the details of the Opening Balance, Current Total and Closing Balance.
- Press F9 (Analysis & Ver Reports) > type or select Movement Analysis > press Enter.
You can follow this step to open any of the Accounting, Inventory, and Verification reports from the list. - Press Alt+J (Set Manual Sampling): to mark the selected Vouchers (using spacebar) as sampled. The manual sampling method will get applied to all such Vouchers and they will appear under the sampled column on the dashboard.
- Press Alt+L (Delete Manual Sampling): to delete the Manual sampling method already applied for the selected Vouchers (using the spacebar).
- Press Alt+R (Verify)to verify the selected vouchers. For more details on verification refer Verification Status
Note: The Alt+R (Verify) button will be highlighted when one or more Vouchers are selected for analysis using Spacebar. - Press Alt+S (Remove Verify) to change the Verify Status for the selected Vouchers as Not Verified.
- Press Alt+F12 (Range): to use the Range Filter option to search the specific vouchers from the list of Vouchers under each Voucher Type.
- Press Ctrl+F12 (Value): to use the Value Filter option to search the specific vouchers as per the specified user defined criteria.
Configuration Options
Press F12 (Configure) to change the default view for the above report.
![]()
- Show Narrations: Set this option to Yes to display the Narration entered by the Client during the Voucher entry.
- Show Highest: Define the Number of Highest Value Transactions to be considered for displaying in the report.
- Show Lowest: Define the Number of Lowest Value Transactions to be considered for displaying in the report.
- Show Verification Status: Set this option to Yes to display the Verification Status as selected by the user during the analysis. This option is set to Yes by default.
- Show Verification Note: Set this option to Yes to display the Verification Note as entered by the user during the analysis. This option is set to Yes by default.
- Show Client’s Clarification: Set this option to Yes to display the Clarification Note entered by the user for the Vouchers marked as Need Clarification by the user.
- Show Date and Time: Set this option to Yes to view the date on which, and time at which, clarification was provided for the listed Vouchers.
- Show Verified By: Set this option to Yes to view the person who has performed verification on the Vouchers.
- Show Clarification from: Set this option to Yes to view the user who has provided clarification, if any, for the Vouchers.
- Show Verification Status: Select a Verification Status and the Vouchers that have been marked with the chosen Verification Status will be filtered and displayed.
- Include Exceptional Vouchers: Set this option to Yes to include Vouchers marked as Optional in this report.


