
Export Data – FAQ
Some of the most frequently asked questions about exporting data in TallyPrime are answered here.
You can export or import a stock item to another new company.
- Load both the importing and exporting companies in TallyPrime.
- Select the Company from which the Stock Item has to be exported.
- Go to Gateway of Tally > Alter > Stock Item.
Alternatively, press Alt+G (Go To) > Alter Master > type or select Stock Item > and press Enter. - Select the required stock item.
- In the Stock Item Alteration screen, press F3 (Company).
- In the Change Company screen, select the company in which the stock item has to be imported.
- The Stock Item Alteration screen for the selected company appears, press Ctrl+A to save the stock item.
You can export the Sundry Debtor and Sundry Creditor ledgers to a newly created company.
- Gateway of Tally > Chart of Accounts > Ledgers.
- Press Alt+H (Multi-Masters) > Multi Alter > select Sundry Debtor/Sundry Creditor from the List of Groups.
- Press F3 (Company).
- Select the new company.
- In the Multi Ledger Alteration screen, press Ctrl+A to save the creditor/debtors ledgers in the new company.
Yes, it is possible to store the file on the desktop or any other location by specifying the required path or folder in the Folder Path field of Export screen.
Exporting the Masters and Vouchers separately, and then import them into another company individually is slow and time consuming. Hence, you can export both Masters and Vouchers together. This option is available while exporting the Day Book or all registers. To export the dependent masters and vouchers:
- Gateway of Tally > Day Book.
Alternatively, press Alt+G (Go To) > type of select Day Book > and press Enter. - Press Alt+E (Export) > Current.
- Press C (Configure) > type or select Include dependent masters and press Enter to set it to Yes.

- Press Esc to return to the Export screen.
- Press E (Send) to export.

Yes, there is an option to automatically open the exported file in TallyPrime.
- From any report, press Alt+E (Export) > Current. The Export screen appears.
- Press C (Configure) > select Show More and press Enter.
- Set the option Open folder after Export to Yes to automatically open the folder or file immediately after export.

Files exported to Excel, JPEG (single page), HTML and PDF formats open automatically. Whereas for ASCII, JPEG (multi-page), XML, SDF, and JSON formats, only the folders open.
You can know the GUID by exporting any voucher from Daybook in XML format.
Open the exported file in notepad, find the word GUID using Ctrl+F function. You will find a 36 character length alpha numeric string enclosed within (hexadecimal value).
For example, f64a4e48-950f-46f0-90f6-6c054a22fa68-00000002
In the above example, GUID of the company is “f64a4e48-950f-46f0-90f6-6c054a22fa68” and the last part “00000002” identifies the voucher.
No, the option Export closing balance as opening balance is supported only in XML format.
While exporting the data/report/invoice, specify the export location. TallyPrime creates the folder and exports data to the specified location.
You can export the data in SDF format.
- Press F1 (Help) > TDL & Add-On > press F4 (Manage Local TDLs).
- In the TDL Configuration screen, set Load selected TDL files on startup to Yes.
- Select the TDL File Name from the path or the folder where the TDL file is stored.
- Set Load TDL to Yes.
- Start TallyPrime.
In the export configuration screens and you will have the option SDF format along with other available formats.
While exporting the data/report/invoice, specify the export location. TallyPrime creates the folder and exports data to the specified location.
The major difference in Restricted (ASCII) and Default (All Languages) is enumerated in the below table.
| Default (All Languages) | Restricted (ASCII) | |||
| Only Indian language | Indian language with English alias or vice versa | Only Indian language | Indian language with English alias or vice versa | |
| ASCII | Export happens in the Indian language | The export happens in the selected language | Question mark appears | Export happens in English irrespective of the language selected |
| Excel | The export happens irrespective of the language | The export happens irrespective of the language | The export happens | The export happens |
| HTML | The export happens | The export happens | Question mark appears | The export does not have the selected language. |
| JPG | The export happens with the language | The export happens | The export happens with the selected language | The export happens |
| JSON | The export happens in the selected language | The export happens in the selected language | Question mark appears where Indian language is present |
The rupee symbol appears as question mark. When the language is changed during export the export happens in English |
| Question mark appears | Export happens. On changing the language the export to PDF option does not appear | Question mark appears | Export happens in English | |
| XML | The export happens in the selected language | The export happens in the selected language | Question mark appears where Indian language is present |
The rupee symbol appears as question mark. When the language is changed during export the export happens in English |
Why am I getting 'Insufficient data for an image' error when opening a PDF exported from TallyPrime?
Insufficient data for an image error appears when the Company logo used in reports or invoices is larger than the recommended size of 96×80 pixels. You can first resize the image using an image editing tool and then reconfigure the image path for Company logo in TallyPrime.
Resize Image using Image Editing Tool
Resize the image into 96×80 pixels using any image editing tool, such as MS Paint..
-
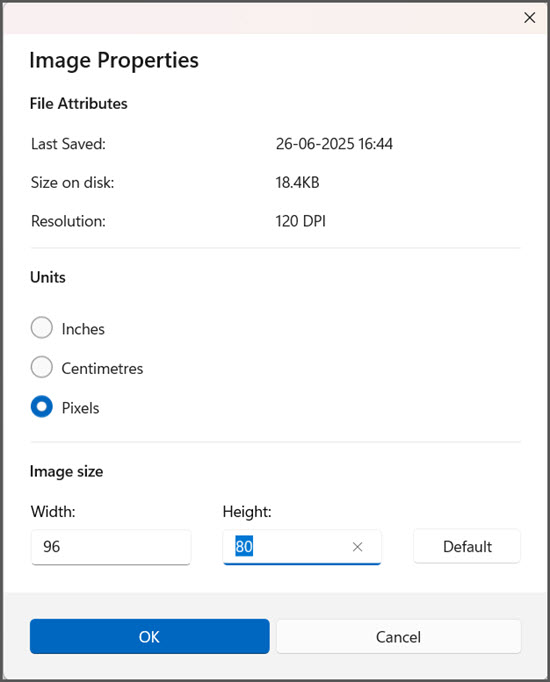
Open the image in MS paint > File > Image properties.
-
Under Image size, mention width as 96 and height as 80, and click OK.
- Save the image in BMP or JPEG format.
Reconfigure Image path for Company logo in TallyPrime
Define the path of the resized logo, while exporting the PDF.
- Press Alt+E (Export) > Configuration.
- Under List of Configurations, set Include company logo as Yes.
- Image File Name: Browse to the folder path and select the resized file.
The Image Path field will be updated by default after updating the Image File Name.
You can now export the invoices and reports with the logo (image which is resized) as PDF. You will get the complete data in PDF without any error message.


