
Actions, Events, Button Framework
In this topic, we will begin our discussion by understanding the meaning of an action and the various types of actions available. As we progress, we will have a detailed conceptual understanding on the usage of various widely used events available in TDL also will discuss the key definition and its various attributes in detail.
Actions
TDL is an event-driven language. Events can be triggered through a Keyboard shortcut or a Mouse click. In an event, some predefined actions get executed. For example:
- The Ctrl+A key pressed from a voucher, it accepts the entry screen.
- Clicking on the F1 Button from the Gateway of Tally menu results in the pop up of the Company Selection screen.
Actions are activators of a specific task with a definite result. An action always originates from a User Interface Object like Menu, Form, Line or Field.
Watch the below video to know about basic Actions in TDL.
Watch the below videos to know about Action Attributes and Event Framework.
Categories of Actions
Actions can be classified into two broad categories, viz
- Global Actions
- Object Specific Actions
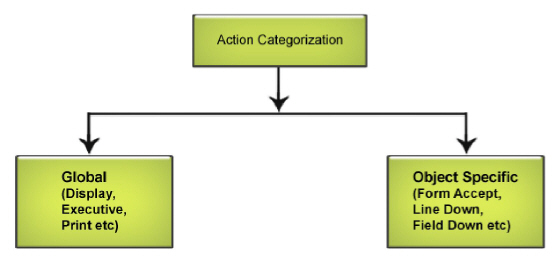
Global Actions are not specific to any User Interface Object. For example, Display, Create, Execute, Alter, etc., are Global Actions. They perform the action specified, irrespective of the UI Object. Global Actions are performed on a Report or a Menu.
Object Specific Actions are actions which can act only upon specific UI Objects. For example, Line Down is a part-specific action, since part owns multiple lines and an individual Line cannot move the current focus to the subsequent line. Only the part can move the focus to the subsequent line. Object specific actions are performed on relevant user interface objects.
| Global Actions | Object Specific Actions |
| Global Actions are not specific to any User Interface Object | These Actions are specific to a User Interface Object |
| Can be originated by a Menu, Button/Key or a Field | Can be originated by a Menu, Form, Line or a Field |
| Performed on a Report or a Menu | Performed on the relevant Interface Object |
| Example: Create, Display, Alter, Print, Print Report, Modify Object, Display Collection, etc. | Example: Line Up, Line Down, Explode (‘Line’ Object), Form Accept, Form Reject (‘Form’ Object), etc. |
Global Actions
As discussed, Global Actions are not specific to any UI Object. Global Action provides an indication to the TDL Interpreter as to which specific task should be executed to fulfill the user requirements. Global Actions are mainly performed on three principal definition types, namely Report, Collection, and Menu. Some frequently used Global Actions are discussed below:
Action – Menu
The action Menu acts only on the Menu definition, and vice versa. The value of the Menu action must be a Menu name. This Menu has to be further defined to list the items displaying another Menu or a Report. A Menu definition continues until all the items are used to display Reports, and there are no further Menu actions assigned to the final Menu items.
Example: 1
;; The following code demonstrates the usage of the Action Menu, along with further ;; Menu definitions
[#Menu : Gateway of Tally]
Add : Key Item : Sample Item : F : Menu : Sample Final Accounts
;; Menu definition for the Menu to be displayed when the above Item is activated
[Menu : Sample Final Accounts]
Add : Key Item : Trial Balance : T : Display : Trial Balance
Add : Key Item : Profit & Loss : P : Display : Profit and Loss
Add : Key Item : Balance Sheet : B : Display : Balance Sheet
In this example, the default menu Gateway of Tally is altered to add a new item Sample Item, with the Menu action displaying the Sample Final Accounts sub-menu. It displays all components of Final Accounts, i.e.,
- Trial Balance
- Profit & Loss
- Balance Sheet
All the items used the action Display . Hence, no further Menu definition is required.
As seen in the previous topic Objects, Methods and Collections, the action Display takes the Report name as its parameter, and is used to display the reports, as is specified.
Example: 2
;; The following code demonstrates the usage of Menu and Display Actions and also the relevance of their association in Menu ;; and Reports (through Form)
;; Button Definition to activate a Menu
[Button : Final Accounts]
Key : F5
Action : Menu : Sample Final Accounts
/* Since the above Button activates a Menu, it can be acted only upon a Menu It cannot be associated to a Report */
[#Menu : Gateway of Tally]
Buttons : Final Accounts
;; attaching a button to the menu
[#Form : Group Summary]
Buttons : Final Accounts
;; Above is an incorrect association as Buttons triggering Menu Action cannot be attached to a Form.
;; Button Definition to Display a Report
[Button : Balance Sheet]
Key : F6
Action : Display : Balance Sheet
/* Since the above Button activates a Report, it can be associated to both a Menu and a Report */
[#Form : Group Summary]
Button : Balance Sheet
;; attaching a button to the report
[#Menu : Display Menu]
Button : Balance Sheet
;; attaching a button to the menu
In this example:
- A new button Final Accounts is added to activate a menu Sample Final Accounts, which is attached to the default menu Gateway of Tally.
- The button Final Accounts cannot be attached to a report, since a menu cannot be acted upon in a report. In the example, the button Final Accounts is attached to form Group Summary, which is incorrect since the menu cannot be called from a Report.
- Another button Balance Sheet is added to display report Balance Sheet which is enabled in all reports, using form Group Summary, and also in the menu Display menu.
- The button Balance Sheet can be attached to a report as well as to a menu, since the report can be acted upon by a report as well as a menu.
Action – Modify Object
This action alters the methods of an object at any level in object hierarchy. It supports modifying multiple values of an object by specifying a comma-separated list of Method: Value pairs.
Syntax
Action : Modify Object : <PrimaryObjectSpec>.<SubObjectPathSpec>. MethodName : Value>[,Method Name : <Value> , …] [,<SubObjectPathSpec>. MethodName : <Value>, …..]
Where,
< Primary Object Spec > can be (<Primary Object Type Keyword>, <Primary Object Identifier Formula>)
< SubObjectPathSpec > is given as the Collection Name [<Index Formula>, [<Condition>]]
< MethodName > refers to the name of the Method in the specified path.
For more details, refer to the topic Objects and Collections .
A single Modify Object action cannot modify methods of multiple primary objects, but can modify multiple values of an object.
Modify Object is allowed to have primary object specification only once, i.e., for the first value. Further values permissible are optional in the sub-object and method specification only.
From the second value onwards, sub-object specification is optional. If sub-object specification is specified, the context is assumed to be the primary object specified for first value. In the absence of sub-object specification, the previous value specification’s leaf object is considered as the context.
Example: 1
[Key : Alter My Object]
Key : Ctrl + Z
Action : Modify Object : (Ledger,”MyLedger”).BillAllocations [First, + $Name=”MyBill”].OpeningBalance : 100,Address[Last].Address :”Bangalore”
The existing ledger My Ledger is being altered with new values for the opening balance for the existing bill and Address . The key alter my object can be attached to any menu or form.
Example: 2
[Key : Alter My Object]
Key : Ctrl + Z
Action : Modify Object :(Ledger,”MyLedger”).BillAllocations[1].OpeningBalance :1000,+
Name: ”My New Bill”,..Address[First].Address :”Hongasandra Bangalore”, Opening Balance:5000
The existing ledger My Ledger is being altered with new values for the opening balance applicable on the existing bill, opening balance of the ledger, and the first line of the address . The key Alter My Object can be attached to any menu or form.
A button bearing the action Modify Object, if associated at menu definition, requires a primary object specification as menu, which is not in the context of any data object.
Example:
[#Menu : Gateway of Tally]
Add : Button : Alter My Object
The following points should be considered while associating a key with the action Modify Object:
- Since the menu does not have any info objects in context, specifying primary object becomes mandatory.
- Since menu cannot work on scopes like selected, unselected, and so on, the scopes specified are ignored.
- Any formula specified in the value and evaluated, assumes menu object as requestor.
- Even method values pertaining to company objects can be modified.
- A button can be added in the menu to specify the action Modify Object at the Menu level.
Action – Browse URL
The action Browse URL is used to provide a link to any web browser, with a URL formula passed as a parameter.
Syntax
Action: Browse URL: <URL Formula>: [<Command Line Parameters>:<Logical Expression1>: <Logical Expression2>]
Where,
< URL Formula > is an expression which evaluates to a link to a website or a folder path.
< Command Line Parameters > is the list of command-line parameters separated by space. It is an optional parameter.
< Logical Expression 1 > can be any expression which evaluates to a logical value. When this parameter is set to yes, it executes the given action in hidden mode. It is an optional parameter.
< Logical Expression 2 > can be any expression which evaluates to a logical value. When this parameter is set to yes, it executes the action in admin mode. It is an optional parameter.
Actions – Create and Alter
The actions Create and Alter act only upon the report definition. These actions activate the report in create or alter mode. In other words, the report is started in the edit mode. In the case of create action, the user enters the report in order to add values, whereas in the case of alter, the user enters the report to modify the already created values.
These actions help the user to key in the relevant values. The values thus entered may or may not be stored. The treatment of values depends on need. The values thus entered in the report by the user, if required to be retained, can be stored as a part of Tally database or configuration file.
- As discussed in the topic on Variables, all the persistent variable values can be stored in a configuration file tallysav.TSF for subsequent sessions.
- The values entered in the report can also be stored as a part of the Tally database.
To store the values as a part of Tally database, the report must be associated with a data object. For example, group, ledger, voucher, etc., are some of the data objects available in Tally.
For instance, in order to design an interface to create a Ledger:
- The object Ledger must be associated to the report using report attribute Object
- Values entered by the user in the fields within the report must be stored in relevant methods using field attribute Storage
Example:
/* The following code demonstrates the usage of Action ‘Create’ and Attribute ‘Storage’ at Field Definition to store the values entered within the relevant Object associated at Report Level*/
[#Menu : Gateway of Tally]
Add : Key Item : Ledger Creation : L : Create : Create Ledger
[Report : Create Ledger]
Form : Create Ledger Object : Ledger
;; Object Association done at Report Level
[Form : Create Ledger]
Parts : Create Ledger
[Part : Create Ledger]
Lines : Store LedgerName, Store LedgerGroup
[Line : Store LedgerName]
Fields : Short Prompt, Name Field
Local : Field : Short Prompt : Info : “Name :”
Local : Field : Name Field : Storage : Name
/* Storing value entered by user in Internal Method Name available within Object associated at Report*/
[Line : Store LedgerGroup]
Fields : Short Prompt, Name Field
Local : Field : Short Prompt : Info : “Under :”
Local : Field : Name Field : Storage : Parent
Local : Field : Name Field : Table : Group
/* Similarly, Parent Method is stored with the user entered value which is considered as the Group of the Ledger created. Also Group is a default Table/Collection to display all the default as well as the user defined Groups. Field Attribute Table helps to restrict the user input to a predefined list*/.
In this example:
- The default menu Gateway of Tally has been altered to add a new item Ledger Creation, which allows the user to create a Ledger.
- Report create ledger associates the object ledger to it, which indicates that the report is meant for creating an instance of the object Ledger.
- Name and group of the ledger are stored in internal methods Name and Parent.
Example:
;; The following code demonstrates the usage of ‘Alter’ Action at Button
[Button : My Reco Button]
;; Button meant to do Bank Reconciliation
Key : Alt + F5
Action : Alter : Bank Recon
;; ‘Alter’ Action to trigger Bank Recon Report in ‘Alter’ Mode
Title : “Reconcile”
;; Associating the Button to the Report
[Form : My Bank Vouchers]
Button : My Reco Button
In this example:
- Button My Reco Button is defined with alter action to alter the report Bank Recon on pressing the Alt + F5 key. It is used for entering dates in the report Bank Reconciliation.
The button My Reco Button is associated with the form My Bank Voucher.
Example:
;;The following code demonstrates the usage of Alter Action at Field
[#Menu : Gateway of Tally]
Add : Key Item : Ledger Display : L : Display : My Ledger
[Report : My Ledger]
Form : My Ledger
[Form : My Ledger]
Parts : My Ledger
Height : 100% Page
Width : 100% Page
[Part : My Ledger]
Lines : My Ledger
Repeat : My Ledger: Ledger
;; Ledger is a default collection of Ledger Objects
Scroll : Vertical
[Line : My Ledger]
Fields : My Ledger
Key : Line Object Enter Alter, Line Click Object Enter Alter
;;The above default Keys act upon Line Definition and the action Alter Object is associated with the Keys, provided the ;;current Report is in Display Mode
[Field : My Ledger]
Variable : Ledger Name
;;Variable ‘Ledger Name’ retains the Ledger selected by the user for the subsequent report
Alter : Create Ledger
;; ‘Alter’ Action is used to activate the Report in ‘Alter’ Mode
;; ‘Create Ledger’ is a user defined Report defined while Ledger Creation
In the example,
- Two default keys are associated to a line definition, that allows a selection of any of the lines, from the set of repeated lines.
- Action associated with these keys is Alter object, which means that on hitting the key, the object associated with the current Line must be altered.
- Mode: Display specified in the keys signifies that current report must be in display mode.
- Alter action used at the Field definition prompts the report from being activated on the current field, which must be in alter mode.
Actions – Create Collection , Display Collection and Alter Collection
Action – Create Collection
A menu item can be used to create objects in a collection with the action Create Collection. This action is generally used for creation of masters such as groups, ledgers, stock items, voucher types, etc. Create Collection fetches a report through the defined collection. A report displayed through this action is displayed in create mode.
Example:
;; The following code demonstrates the usage of ‘Create Collection’ action
[#Menu : Gateway of Tally]
Add : Key Item : Ledger : L : Create Collection : Ledger
;; where a Ledger is a predefined Collection in DefTDL
One can also use the action Create in place of Create Collection, to create objects in a collection. The only difference is that Create explicitly calls a report and Create Collection requires a collection. Create Collection executes the same report through the defined Collection.
Action – Display Collection
A menu item or a button can be used to display a popup of object names in a collection, which in turn, can trigger a report. On choosing an object from the popup, a report in display mode is triggered by the action Display Collection. This action can be used for displaying the masters or reports pertaining to groups, ledgers, stock items, etc.
Example:
;; The following code demonstrates the usage of ‘Display Collection’ Action
[#Menu : Gateway of Tally]
Add : Key Item : Ledger : L : Display Collection : Ledger
;; where Ledger is a predefined Collection in DefTDL.
Though the action name is Display Collection, Display is meant for the subsequent report, which will be displayed on the selection of an object. Here, the report is in display mode.
Action – Alter Collection
The action Alter Collection is similar to Display Collection , but it triggers the report in alter mode. This action is generally used to alter the masters such as groups, ledgers, stock items, voucher types and so on.
Example:
;; The following code demonstrates the usage of ‘Alter Collection’ Action
[#Menu : Gateway of Tally]
Add : Key Item : Ledger : L : Alter Collection : Ledger
;; where Ledger is a predefined Collection in DefTDL
Though the action is Alter Collection, Alter is meant for the subsequent report, which will be displayed on the selection of an object. Display Collection, Create Collection and Alter Collection routes the final report through a collection. Let us understand some critical attributes required to achieve these actions.
Object Specific Actions
Some of the Object Specific actions are discussed in this section:
Menu Actions – Menu Up, Menu Down, Menu Reject
The actions Menu Up, Menu Down, Menu Reject, etc., act upon menu. They are associated to all menus (default as well as user defined TDL) through the declaration.
Example
[Key : Menu Up]
Key : Up
Action : Menu Up
[Key : Menu Down]
Key : Down
Action : Menu Down
[Key : Menu Reject]
Key : Esc
Action : Menu Reject
[System : Menu Keys]
Key : Menu Down, Menu Up, Menu Reject
[System: Menu Keys] declares a list of keys commonly required for a menu. Since all common menu operations like Scroll Up, Scroll Down, Drill down, etc., are declared here, a new menu added does not require these keys to be associated, as they are inherited from above declaration.
Form Actions – Form Accept, Form Reject, Form End
Actions Form Accept, Form Reject, Form End, etc., act upon form. They are associated to all forms (default as well as user defined TDL) through the declaration [ System: Form Keys ].
- Action Form Accept saves the current form.
- Action Form Reject rejects the current form, i.e., the current form is quit without saving.
Example
[Key : Form Accept]
Key : Ctrl + A
Action : Form Accept
Mode : Edit
[Key : Form Display Reject]
Key : Esc
Action : Form Reject
Mode : Display
[Key : Form End]
Key : Ctrl + End
Action : Form End
[System : Form Keys]
Key : Form Accept, Form Display Reject, Form End
[ System: Form Keys ] declares a list of keys commonly required for a report. Since all common form operations like Save Form, Reject Form, Form End, etc., are declared here, a new form added does not require these keys to be associated, as they are inherited from above declaration.
Part Actions – Part Home, Part End, Part Pg Up
The actions Part Home, Part End, Part Pg Up, etc., act upon a Part. These keys are associated with all the forms (default TDL codes as well as user defined TDL codes) through the declaration [ System: Form Keys ].
- Action Part Home positions the cursor to the beginning of the current part.
- Action Part End positions the cursor to the end of the current part.
- Action Part PgUp is used to quickly scroll the page to view the previous page.
Example
[Key : Part DisplayHome]
Key : Home
Action : Part Home
Mode : Display
[Key : Part Display End]
Key : End
Action : Part End
Mode : Display
[Key : Part Display PgUp]
Key : PgUp
Action : Part PgUp
Mode : Display
[System : Form Keys]
Key : Part Display Home, Part Display End, Part Display PgUp
[System: Form Keys] declares a list of keys commonly required for a part. Since all common like Part Home, Part End, Part PgUp, etc., are declared here, a new part added does not require part operations these keys to be associated, since they are inherited from the above declaration.
Line Actions – Explode, Display Object, Alter Object
Line Actions – Explode, Display Object, Alter Object, etc., act upon a Line.
- Action Explode explodes a line further to display all the explode details specified in the line attribute explode.
- Action Display Object is used to display the object in context of the current line.
- Action Alter Object is used to alter the object in context of the current line.
Example
[Key : Line Explode]
Key : Shift + Enter
Action : Explode
[Key : Line Object Display]
Key : Enter
Action : Display Object
Mode : Display
[Key : Line Object Alter]
Key : Ctrl + Enter
Action : Alter Object
Mode : Display
[System : Form Keys]
Key : Line Explode
Key : Line Object Display, Line Object Alter
[ System: Form Keys ] declares a list of keys commonly required for a Line. Since all common Line operations like Explode, Display Object, Alter Object, etc., are declared here, a new line added does not require these keys to be associated, as they are inherited from the above declaration.
Field Actions – Field Copy, Field Paste, Field Erase, Calculator
The actions Field Copy, Field Paste, Field Erase, Calculator, etc., act on fields.
- Action Field Copy copies the current field (field where the cursor is positioned) contents in the OS clipboard, which will be available later.
- Action Field Paste pastes the clipboard contents to the current field.
- Action Field Erase is used to erase the contents of the current field at a stretch, without hitting the Backspace or Delete key.
- Action Calculator is used for fields that require some computation, the result of which is to be returned to the field. Fields taking amounts/numbers as value require this action.
Example
[Key : Field Copy]
Key : Ctrl + Alt + C
Action : Field Copy
[Key : Field Paste]
Key : Ctrl + Alt + V
Action : Field Paste
[Key : Field Erase]
Key : Esc
Action : Field Erase
Mode : Edit
[Key : Calculator]
Key : Alt + C
Action : Calculator
Mode : Edit
[Field : NumDecimals Field]
Key : Calculator
[System : Form Keys]
Key : Field Erase
Key : Field Copy, Field Paste
[ System: Form Keys ] declares a list of keys that are commonly required for any field. Since all the common field operations like Field Copy, Field Paste, Field Erase, etc., are declared here, a new field added does not require these keys to be associated, since they are inherited from the above declaration. The Action Calculator is not required for all the fields; hence, it has not been declared in form Keys usage List. It has been associated to the fields where it is required. In the above example, NumDecimals field is a numeric field that may require calculations. Therefore, the Calculator key, associating the action Calculator, is attached to the field.
Action – Do If
The action Do If which was used only as procedural action has been enhanced to support conditional action execution in other definitions like button. Do If is a system action and it executes the given action when the condition evaluates to True.
Syntax
Do If: <Condition>: <Action Keyword>[:<Action Parameters>]
Where,
<Condition> is any value or expression that can be evaluated to true or false.
<Action Keyword> can be any global or object-specific action except the function-specific actions.
<Action Parameters> are the list of parameters as required by the action specified, separated by a colon. Depending on the specified action keyword this parameter can be optional.
Example 1: Do If in function definition
[Function: MastersCount]
……..
001 : Do If: (##MasterType = “Group”):Increment : GroupCount
002 : Do If: (##MasterType = “Ledger”):Increment: LedgerCount
Example 2: Do If in button definition
[Button: CreateMaster]
Title : $$LocaleString:”Create Master”
Key : Alt+F4
ActionEx : Group : Do If:(##MasterType = “Group”) : Create : Group
ActionEx : Ledger: Do If:(##MasterType = “Ledger”): Create : Ledger
In this example, if the value of the variable MasterType is group it opens the default group creation screen, otherwise it opens the ledger creation screen.
Prior to Do If, the conditional action execution was possible using Switch/Option in button definition. Using the action Do If, reduces the number of lines in the code.
Example: Conditional action using Option
[!Form: Contra Color]
Local: Button: Print Button: Option: Vch Print: $$InCreateMode
Local: Button: Print Button: Option: Vch Chq Print: $$InAlterMode
[!Button: Vch Print]
Action: Print Report
[!Button: Vch Chq Print]
Action : Call : Voucher Printing
Example: Conditional actions using ActionEx
[!Form: Contra Color]
Local: Button: Print Button: Add: ActionEx: CreateMode:Do If: $$InCreateMode:Print Report
Local: Button: Print Button: Add: ActionEx: AlterMode:Do If: $$InAlterMode:Call:Voucher Printing
Components of Actions
Any Action is always executed with respect to two contexts:
- Originator
- Executor
The Originator is one that originates the action, viz., menu, form, line, or field, e.g., a Down Arrow key pressed. The event is passed from the current report to the associated form, parts, lines, or fields. keys could be associated in menu, form, line or field. If the activated key is found in form, it searches further for line Association and then continues till field. The lowest level key association gets the highest precedence. If the key is associated at form as well as field, the key association at field level gets executed. In this case, the field is the Originator.
The Executer is one on which the action is executed. For example, form accept key, though attached at field Level, is a form action. Hence, form is the executer of the action. In case of execution, it searches from report to the field for the action to be executed. Line Down is a part level action. Though associated at the form, it will be executed by the part to move the current focus to the subsequent line. Hence, part is an executer of the Action Line Down.
|
Originator |
Executer |
|
The Originator initiates the action by associating the key or a button |
The Executer executes the action associated with the key or button, initiated by originator. |
|
Global Actions can be originated by Menu, Button/ Key or a Field, and Object Specific Actions by a Menu, Form, Line or a Field |
Global Actions are executed by the originator object. However, Object Specific Actions can be executed by objects other than originator |
|
The sequence followed to gather all Keys originating within a report is top to bottom, i.e., from report to field definition. The lowest in the hierarchy gets highest precedence, e.g., if the same key is associated at both form and field definitions, the key at field definition is considered for execution. |
The sequence followed to consume the keys originated is from bottom to top, i.e., from a field to a report definition. In other words, the lowest in the hierarchy gets the highest preference, e.g., if the same key is relevant for both part and line definitions, the key will be executed in context of the line definition. |
|
Example 1 [Key: Create Ledger] Key : Alt + C Action : Create : Ledger [Field: CST Supplier Ledger] Key : Create Ledger Associating the key with the field, field is the originator as well as executer here. |
Example 2 [Key: Part Display PgUp] Key : PgUp Action : Part PgUp [System: Form Keys] Keys : Part Display PgUp Key Part Display PgUp is originated by form, but its executer is the part. |
Action Association
Action Association at Menu Definition
Action association at Menu definition is done through the menu item. Every menu item except Quit is associated with an action. If an item is added without any action, then the default action associated is to exit from the current menu.
Syntax
[Menu : <Menu Name>]
Add : Key Item : [Position] : <Display Item> : <Unique Key> :<Action Keyword> : <Action Parameter>
Where,
<Action Keyword> can be any Global Action.
<Action Parameter> is decided by the Action Keyword. If the Action Keyword is Menu, then the Action Parameter necessarily has to be a Menu Name, else it has to be a Report Name.
Example:
[Menu: Commonly Used Reports]
Add : Key Item : Trial Balance : T : Display : Trial Balance
Add : Key Item : At Beginning : Outstandings : O : Menu : Outstandings
In this example, a Menu Commonly Used Reports is defined with 2 Items, viz.,
- An Item Trial Balance is added displaying the default report Trial Balance. Here, the action is display, so the Action Value has to be a Report Name.
- An Item Outstandings is added at the beginning to activate another Menu Outstandings. The action here is Menu, so the Action Value required is a Menu Name.
Action Association at Button/Key Definition
Action association at Button/Key definition is done using the attribute Action , followed by the Action Keyword, with the parameters, if required.
Syntax
[Button : <Button Name>]
Action : <Action Keyword> [: <Action Parameters>]
Where,
<Action Keyword> can be any Global or Object Specific Action.
<Action Parameters> is decided by the Action Keyword. If the Action Keyword is Menu, then the Action Parameter necessarily has to be a Menu Name, else it has to be a Report Name.
Example: Actions with Parameters
[Button : Outstandings]
Key : F5
Action : Menu: Outstandings
[Button : Trial Balance]
Key : F6
Action : Display : Trial Balance
Action Menu requires a Menu Name as Parameter and Actions Create, Display, Alter, etc., require a Report Name.
Example: Actions without Parameters
[Button : Printing Button]
Action : Print Report
[Button : Exporting Button]
Action : Export Report
Action Parameters for the Actions Print Report and Export Report are not mandatory. If the Action Parameter is specified, then it prints the specified Report, else it prints the current Report.
Action Association at Field Definition
Action association at Field is done using Action keyword with parameters and optional condition.
Syntax
[Field : <Field Name>]
<Action Keyword> : <Action Parameters>[: <Condition>]
Where,
<Action Keyword> can be both Global or Object Specific Actions.
<Action Parameters> can be the Value on which these Actions could be performed.
<Condition> is optional. It restricts the action to be performed only if the condition returns TRUE.
Example
[Field : My Trial Balance]
Display : Group : $$IsGroup
Display : Ledger : $$IsLedger
In this example, the Field Trial Balance has 2 statements, viz.,
- Displaying a Group, if the current object in context is a Group
- Displaying a Ledger, if the current object in context is a Ledger
Dynamic Actions
Please note that it is possible to specify the action keyword and action parameters as expressions. This allows the programmer to execute actions based on dynamic evaluation of parameters. The Action keyword can as well be evaluated dynamically. Normally, this would be useful for specifying condition-based action specification in the menu, key/button, etc. In case of functions, as the function inherently supports condition-based actions via IF-ELSE, etc., this would be useful when one required to write a generic function, which takes a parameter and later passes that to an action (as its parameter), which does not allow expressions and expects a constant. This has been achieved with the keyword Action.
‘Action’ Keyword
The Action keyword allows the programmer to execute actions based on dynamic evaluation of parameters. The syntax for specifying the same is as given below:
Syntax
Action : <Action Keyword Expression> : <Action Parameter Expression>
Where,
<Action> is the keyword action to be used for dynamic actions usage.
<Action Keyword Expression> is an expression evaluating to an action keyword.
<Action Parameter Expression> is an expression evaluating to action parameters.
We can specify and initiate an Action from the following:
- Menu Item
- Key Definition
- In a User Defined Function
At present, the capability is valid for:
- Global Actions like Display, Alter, etc.
- Global Actions inside User-Defined Functions
Example
Dynamic Actions in Key/Button Definition
[Button : Test Button]
Key : F6
Action : Action : Display : @@MyFor
;; The Button Test Button initiates a dynamic Action which takes the parameter as a formula.
[System : Formula]
MyFor : if ##SVCurrentCompany CONTAINS “ABC” Then “BalanceSheet” else “TrialBalance”
Observe the usage of Action keyword twice in this example. The first usage is the attribute “Action” for ‘Key’ definition. The second is the keyword “Action” used specifically for executing Dynamic Actions.
Dynamic Actions in User Defined Functions
[Button : Test Button]
Key : F6
Action : Call : TestFunc : “Balance Sheet”
[Function : Test Func]
Parameter : Test Func : String
01 : Action : Display : ##TestFunc
;;The function Test Func executes a dynamic action, which takes Action parameter as the parameter passed to the function.
Action – Log Object
The action Log Object a global action which allows logging the current object context details in a file. It accepts filename as a parameter. In the specified file the current context object, corresponding methods and sub collections are logged.
Syntax
Log Object [:<path/filename> [:<Overwrite Flag>]]
Where,
<path/filename> is optional. It accepts the name of the file, along with the path in which the log is created. If no filename is specified, the contents of the object are logged in TDLfunc.log when logging is disabled, otherwise, it logs into the Calculator pane.
<Overwrite Flag> is used to specify whether the contents should be appended or overwritten. The default value is NO, which appends the content in the file. If set to YES, the file is overwritten.
Example
[Function : FuncLedExp]
|
Object : Ledger
|
10 : Log Object : LedgerObj.txt
Action – Log Target
The action Log Target is function specific action which allows logging details of the target object in a file. It accepts filename as a parameter in which the log of object, its method and collection is created for the target object.
Syntax
Log Target [:<path/filename> [:<Overwrite Flag>]]
Where,
<path/filename> is optional. It accepts the name of the file along with the path in which the log is created. If no filename is specified, the contents of the object are logged in TDLfunc.log when logging is disabled, otherwise, it logs into the Calculator pane.
<Overwrite Flag> is used to specify whether the contents should be appended or overwritten. The default value is NO, which appends the content in the file. If set to YES, the file is overwritten.
Example
[Function : FuncLed Exp]
|
05 : Set Target
|
10 : Log Target : LedgerObj.txt
Action – Refresh Data
In Tally, whenever any report is being viewed, it contains the most recent updates till the last entry. If any report is left open and subsequently viewed later, possibly few more entries would have gone in the system entered by various other users on the Network. Hence, the report which is currently being viewed is older. To view the updated report, the user has to exit the report and once again, enter the Report. To solve this problem, a new action Refresh Data is used, which refreshes the data in memory automatically, as and when required.
Syntax
REFRESH DATA
Refresh Data can be used along with Timer Event and every few seconds, the report can be refreshed automatically to display the updated information.
Example
[System : Event]
Refresh Timer : TIMER : TRUE : Refresh Data
[#Form : Balance Sheet]
Add : Keys : Enable Refresh
[Key : Enable Refresh]
Key : Alt + R
Action : Start Timer : Refresh Timer : 300
In this example, Refresh Timer , a Timer event is declared under System Event to invoke the action Refresh Data at periodic intervals. A key Enable Refresh is added in the Balance Sheet Report, which will be used to start the timer Refresh Timer every 5 minutes.
The action Refresh Data is a Company Report – Specific Action. It will always require a Report in memory to Refresh the Data.
Action – SLEEP
Action SLEEP is used to specify time delays during the execution of the code. For few seconds, the system will be dormant or in suspended mode.
Syntax
SLEEP : <Duration in Seconds>
<SLEEP> is the action which halts the functioning of the Application for a few seconds as specified in <Duration in>.
Example
[#Menu : Gateway of Tally]
Add : Item : Trial Balance after 10 secs : CALL : TBafterSleep
[Function : TBafterSleep]
00 : SLEEP : 10
10 : DISPLAY : Trial Balance
;;In this example, the system will halt for 10 seconds and display the Trial Balance subsequently
Action – Copy File
A new action Copy File is used, which allows:
- Copying from one location to another within the same System
- Uploading of Files from a given Path to a FTP Site
- Downloading of File from FTP Site to the specified location/folder
Syntax
Copy File : <Destination File Path> : <Source File Path>
Where,
<Destination File Path> can be any expression evaluating to a valid local/FTP path.
<Source File Path> can be any expression evaluating to a valid local/FTP path.
Example
CopyFile : ##MyDstFilePath : ##MySourceFilePath
If any of the File path is an FTP path, the same can be constructed using functions like $$MakeFTPName. It accepts various parameters like servername, username, password, etc. The following code snippet sets the value of the variable MyDstFilePath using the function $$MakeFTPName.
SET : MyDstFilePath : $$MakeFTPName:##SVFTPServer:##SVFTPUser:##SVFTPPassword:@SCFilePathName
The function $$MakeFTPName uses the various parameters which are System Variables captured from the default configuration reports.
Action – Execute TDL
TDL action Execute TDL is used to programmatically load TDL, perform some actions and subsequently, unload the TDL or keep the TDL loaded for the current Tally session.
This can prove to be very useful in cases where the user needs to programmatically associate a TDL on the fly, for performing some operations.
Syntax
EXECUTE TDL : <TDL/TCP File Path>[: <Keep TDL Loaded Flag> : <Action>: <Action Parameters>]
Where,
<TDL/TCP File Path> specifies the path of the TDL/TCP File to be loaded dynamically.
<Keep TDL Loaded Flag> is the Logical Flag to determine if the TDL should be kept loaded after the action is executed. If the value is set to YES, then the TDL will continue to be loaded, else the Executed TDL will be unloaded after the execution of the specified action.
<Action> specifies the global Action to be performed, i.e., Display, Alter, Call, etc.
<Action Parameters> are the parameters on which the Action is performed. For example:
- If the action is Call, the Action Parameters contain the Function name along with the Function parameters, if any.
- If the action is Display, Alter, etc., then the Parameter should be the Report Name.
Example: 1
[Function : TDL Execution with Keep TDL Loaded enabled]
00 : Execute TDL : “C:TallyPrimeBSTitleChange.TDL” :Yes : Display : Balance Sheet
10 : Display : Balance Sheet
The file BSTitleChange.TDL contains the following lines of code:
[#Report: Balance Sheet]
Title : “TDL Executed Programmatically”
In this example, the TDL BSTitleChange.TDL , which is used to change the Title of the report Balance Sheet, is loaded dynamically by executing the action Execute TDL. The Keep TDL Loaded Flag is set to YES in the above code snippet. Based on the subsequent action Display: Balance Sheet, the Balance Sheet report will be shown with a new Title. The next statement also displays the Balance sheet. The title for this will again be the same, i.e., the changed title, as the dynamic TDL is still loaded, even after the action Execute TDL has completed its execution.
Example: 2
[Function : TDL Execution with Keep TDL Loaded enabled]
00 : Execute TDL : “C:TallyPrimeBSTitleChange.TDL” : No : Display : Balance Sheet
10 : Display : Balance Sheet
Here, the report Balance Sheet would be displayed twice and the title of the first report is “TDL Executed Programmatically”, i.e., the changed title as per BSTitleChange.TDL ; whereas, in the second report, the title is Balance sheet, since the attribute Keep TDL Loaded Flag is set to NO.
Action – BrowseURLEx
As we are aware, there is an action Browse URL/Execute Command used to open a web page or invoke an external application. There may be cases where subsequent actions are dependent on the completion of the previous action, i.e., the closure of external application. For example, the current action is used to execute an external file, which unzips/ extracts various other files. The subsequent actions use these extracted files to process further. In such cases, Browse URL, when used, will trigger the requested application and continue executing the subsequent actions.
Hence, in order to bring sync between the calling and the called application, the action Browse URL Ex/Execute Command Ex is used. The Action Browse URL Ex, when triggered, waits till the external application is closed, and then allows the application to resume with the subsequent action. Similar to ‘Browse URL’, the Action ‘BrowseURLEx’ can be used to:
- Open a web Page in the browser
- Open an external file with its associated application
- Run an executable application
- Open a folder in explorer
BrowseURL Ex is useful for URL, folder and executable without extension (for example, tally instead of tally.exe), and it has similar behaviour as Browse URL.
Syntax
BrowseURL Ex : <URL/File path/executable file path/folder path> [:<Command line Parameters>]
Where,
<URL/File path/executable file path> can be:
- A URL, which can be opened in a browser
- A file, which is to be opened with its associated application
- An executable file, which is to be run/executed
- A folder, which is to be opened in the explorer
<Command line Parameters> is an optional parameter. For example, Zip application may need parameter d to decompress, c to compress, etc.
Example:1
To open a URL in browser:
Action : Browse URL Ex : “http://google.com”
Example:2
To open a pdf file in pdf reader:
Action : BrowseURL Ex : “C:report.pdf”
In this example, report.pdf will be opened in default PDF reader of the system. This can be useful while reading a report, which is exported in PDF format.
Example:3
To open an executable file and wait for it to complete:
Action : BrowseURL Ex: “C:7zip.exe”: “D:software.7z”
In this example, 7zip is opened and the application waits until it finishes, i.e., the running application first waits for 7zip.exe to finish decompressing of software.7z, and then it proceeds further.
Example:4
To open a folder:
Action : BrowseURL Ex : “C:abc”
Action ZIP – UNZIP
ZIP is an archive file format that supports compression of data without any loss. A Zipped file may contain one or more files or folders in compressed form. The ZIP file format permits a number of compression algorithms. Originally created in 1989 by Phil Katz, the ZIP format is now supported by a number of software utilities.
The need for supporting this format in TallyPrime has been felt in various offline Integration projects. Data Exchange takes place between branches and their Head Offices, Distributors and the Principal Companies, etc., where the Head Offices/ Principal Companies having Tally or any other ERP would require the data from Branches/ Distributors for performance visibility. Usually, Principal Companies require the Item-wise Sales Information of the distributors, which helps them in planning their Stocks.
For integration purpose, Head Offices/ Principal Companies generally get TallyPrime installed at Branches/ Distributors’ locations. The day-to-day Transactions like Sales, Purchase Orders, etc., are then exported from TallyPrime and integrated by copying the appropriate XML files to FTP, which is consumed by the Head Offices/ Principal Companies.
At locations where the volume of transactions is large, the XML File becomes too bulky to upload to FTP, and subsequently, downloading from FTP takes a long time, thereby causing performance issues. Hence, zipping the file before uploading to FTP was necessary. This would save time both while uploading the File and while downloading it at the other end. Hence, the concept of Compression, i.e., Zip-Unzip is used.
Along with the actions for Zip/Unzip capability, wildcards * and ? are also supported, as a part of folder/file specification. Asterisk(*) represents zero or more characters in a string of characters. For example, t*.doc considers all files starting with ‘t’, bearing the extension .doc, e.g., Tally.doc, Tallyzip.doc, etc. Question Mark (?) represents any one character. For example, TDLDebug?.* considers all the files starting with TDLDebug, followed by any variable single character, and bearing any extension, e.g., TDLDebug1.xlsx, TDLDebug2.xlsx, TDLDebug1.log, etc.
ZIP Action
Zip action can be used to archive a set of folders/ files.
System Action – ZIP
System action Zip is useful when a single File or Folder Source needs to be zipped into a Target file.
Syntax
Zip : <Target File> : <Source Path> [:<Password> [:<Overwrite> [:<Include Sub-directory> [:<Show Progress Bar>]]]]
Where,
<Target File> is the name of the Zip File to be created, along with the Path.
<Source Path> is the path of the Folder/File(s), which is to be zipped. It can be a folder, or a file path (with or without wildcard characters).
<Password> is the password assigned to the Target zipped file.
<Overwrite> is the Logical Flag to specify the behaviour of the Action, if the Target File already exists. If YES is specified, the file will be overwritten. If ‘NO’ is specified, the file will not be overwritten and will remain as it is. The default value is ‘NO’.
<Include Sub-directory> is the logical flag to specify whether to include sub directories available in the specified source path or not. If the source path ends with a folder, the entire folder along with its sub-folders will be zipped, irrespective of this parameter. If the source path ends with a file name pattern, i.e., with wild cards, this parameter will be considered. If a ‘YES’ is specified, all the files/sub-folders matching the wild card pattern will be included for zipping. If ‘NO’ is specified, they will not be included. The default value is ‘NO’.
<Show Progress bar> is the logical flag to specify if the Progress Bar needs to be shown during the zipping process. If ‘YES’ is specified, the progress bar will be shown, and if ‘NO’ is specified, it will not be shown. If no value is specified, the default value will be assumed as ‘NO’.
Wild Cards * and ? are supported only for the last information in the path. For example, C:Wor?Cust*.txt is invalid whereas C:WorkCust*.txt is valid.
Example: 1
ZIP : “.Target.zip” : “tally.ini”: “Tally” : No
With the above action, the following will be achieved:
- The file tally.ini from the current Tally application/working folder will be zipped to the file Target.zip in the Tally application folder itself.
- The resultant zip file will contain the password Tally.
- If the file Target.zip exists in the current application folder, it will not be overridden.
Example: 2
To Zip all text files in work folder .
ZIP: “D:Target.zip”: “D:Work*.txt”: “Tally”: No: Yes: Yes
With the above Action, the following will be achieved:
- All the text files from the folder D:Work will be zipped to the file Target.zip in D:.
- The resultant zip file will contain the password Tally.
- If the file Target.zip exists in D:, it will not be overridden as the 4th parameter is set to No.
- All the text files within the sub-directories will be included under the folder D:Work, as the 5th Parameter is set to Yes.
The progress bar will be shown during zipping of the files, as the 6th parameter is set to Yes
Procedural Actions – Start Zip, Zip Add Path, Zip Exclude Path and End Zip
Procedural Actions Start Zip, Zip Add Path, Zip Exclude Path and End Zip are very useful in cases where multiple folders/files need to be zipped into / excluded from a target file.
Syntax
Start Zip : <Target File> [: <Overwrite>]
Zip Add Path : <Source Path> [: <Include sub-directory>]
|
|
Zip Exclude Path : <Exclude Path
Where,
<Target File> indicates the name of the resultant zip file , and also includes the folder path .
<Overwrite> is the logical flag to specify the behaviour of the action, if the target file already exists. If YES is specified, the file will be overwritten. If ‘NO’ is specified, the file will not be overwritten, and will remain as it is. The default value is ‘NO’ .
<Source Path> is the path of the files or folders, which are to be zipped. It can be a folder or a file path (with or without wildcard characters).
<Include Sub-directory> is the logical flag to specify whether to include sub directories available in the specified source path or not. If the source path ends with a folder, the entire folder along with its sub-folders will be zipped, irrespective of this parameter. If the source path ends with a file name pattern, i.e., with wild cards, this parameter will be considered. If a ‘YES’ is specified, all the files/sub-folders matching the wild card pattern will be included for zipping. If ‘NO’ is specified, they will not be included. The default value is ‘NO’.
<Exclude Path> is the path of the files/ folders which need to be excluded from the target zip .
<Password> is the password assigned to the target zipped file.
<Show Progress Bar> is the logical flag used to specify if the progress bar needs to be shown during the zipping process. If ‘YES’ is specified, then the progress bar will be shown, and if ‘NO’ is specified, it will not be shown. If no value is specified, the default value will be assumed as ‘NO’.
Example: 3
Start ZIP : “Target.zip” : Yes
/* Overwrite the File Target.zip, if it exists */
Zip Add Path : “tally.ini”
End Zip
The outcome of this example will be similar to the outcome of Example: 1. The only difference is that it is set to overwrite the target file Target.Zip , if it exists in the current application folder (as the <Overwrite> parameter of the action ‘Start Zip’ is set to Yes).
Example: 4
Start Zip : “Target.zip” : Yes
Zip Add Path : “.Tally.ini”
Zip Add Path : “D:Documents*.doc” : Yes
/* Include Sub-Folders also */
Zip Add Path : “C:Work”
/* The Folder Work and the Files within this folder will be included in the Zip File */
End Zip
In this example, there are 3 source paths, which are required to be zipped:
- First path indicates that the file Tally.ini from the current application folder is to be zipped.
- The second path indicates that the PDF files from within the D:Documents folder, including the sub-folders, need to be zipped.
- The third path indicates that the entire folder C:Work needs to be zipped.
The above source files would be zipped to the target file Target.zip, which is specified in the action Start Zip.
Example: 5
Start Zip : “Target.zip” : Yes
/* Overwrite the existing file in the target location */
Zip Add Path : “.Tally.ini”
Zip Add Path : “D:Documents*.doc” : Yes
/* Include Sub-Folders also */
Zip Add Path : “C:Work”
Zip Exclude Path : “*.txt”
End Zip
In this example, apart from using action Zip Add Path to specify the first 3 source paths, the subsequent action Zip Exclude Path is used to specify the exclusion of folders or files with the extension .txt. Thus, all the text files from the above specified source paths will be excluded.
UNZIP Action
The Unzip action can be used to extract the original files from the zipped files.
System Action – UNZIP
System Action Unzip is useful when all the folders/files in the source zip file need to be completely unzipped, as they are. (This action cannot be used in case of partial Unzip.)
Syntax
Unzip : <Target Folder>: <Source File> [: <Password> [: <Overwrite> [:<Show Progress Bar>]]]
Where,
<Target Folder> is the path of the Target folder where the unzipped files need to reside.
<Source File> is the name of the zip file to be unzipped.
<Password> is the zip file password. A zip file bearing a password cannot be extracted without the password.
<Overwrite> is the logical flag to specify the behaviour if the files being unzipped already exist in the target folder. The default value is ‘NO’.
<Show Progress Bar> is the logical flag to specify if progress bar needs to be shown during the extracting (unzipping) process. If YES is specified, the progress bar will be shown and if NO is specified, the progress bar will not be shown. The default value is ‘NO’ .
Example: 1
Unzip : “.” : “D:Target.zip” : “Tally”
In this example, the file D:Target.zip will be unzipped entirely in the current Tally application folder. Since the zip file bears a password Tally, same is being passed as the 3rd Parameter.
Example: 2
Unzip : “Documents” : “D:Target.zip” : “Tally”
In this example, all the folders/ files within the zip file D:Target.zip will be extracted to the folder documents in the current Tally application folder.
Procedural Actions – Start Unzip, Extract Path, Unzip Exclude Path and End Unzip
The Procedural actions Start Unzip , Extract Path , Unzip Exclude Path and End Unzip are very useful in case of partial unzip . Using the action Extract Path, one can specify the folder/ file path to be marked for extracting. The action Unzip Exclude Path can help to exclude the specified folders/ files from the zip file and extract the rest. These actions can be used in both the cases, i.e., for partial unzip as well as for total unzip.
Syntax:
Start Unzip : <Source File> [: <Password>]
Extract Path : <Folder/ File Path>
|
|
Unzip Exclude Path : <Folder/ File Path>
|
|
End Unzip : <Target folder> [:<Overwrite> [:<Show Progress Bar>]]
Where,
<Source File> is the path of the zip file which needs to be zipped.
<Password> is the password to access the target zipped file.
<Extract Path> is the file/ folder which need to be extracted from the zip file.
<Unzip Exclude Path> is the path of files/ folders, which need to be excluded from the unzipping operation.
<Target Folder> is the path of the target folder, where the unzipped files need to reside.
<Overwrite> is the logical flag to specify the behaviour if the files being unzipped already exist in the target folder. The default value is ‘NO’.
<Show Progress Bar> is the logical flag to specify if progress bar needs to be shown during the extracting (unzipping) process. If YES is specified, the progress bar will be shown and if NO is specified, the progress bar will not be shown. The default value is ‘NO’.
Example: 3
Start Unzip: “D:Target.zip”
End Unzip : “D:Unzipped” : Yes
/* Overwrite the existing files, if any, in the Target Folder */
These actions will unzip all the folders/ files within D:Target.zip to the folder D:Unzipped and if any file already exists, the same will be overwritten (as the second parameter of the action End Unzip is set to Yes.)
Example: 4
To extract only .txt and .doc files from the zip file.
Start Unzip : “D:Target.zip”
Extract Path : “*.txt”
Extract Path : “*.doc”
End Unzip : “.”
In this example, only the *.txt and *.doc files from D:Target.zip will be unzipped to the current Tally application folder.
Example: 5
Start Unzip : “D:Target.zip”
Extract Path : “SamplesSupporting Files”
Unzip Exclude Path : “*.xls”
End Unzip : “.”
In this example, from D:Target.zip , all the files and subfolders within the folder ‘Supporting Files’ under ‘Samples’ will be unzipped to the current Tally application folder, as the target folder is specified as a dot (.). Also, all the files with extension .xls will not be zipped.
A file which has been zipped from TallyPrime can be extracted by using any standard third party archiving tools like Winzip, Winrar, etc., and vice-versa.
Limitations of Zip/Unzip in TallyPrime:
In the following cases, Zip/Unzip action will fail:
- If the number of files being zipped is greater than 65535
- If the size of the zip File is greater than or equal to 4 GB
- If the size of any file within the zip file is greater than or equal to 4 GB
Function Actions
The introduction of user defined functions in TDL has empowered the TDL programmers with one of the most important needs, i.e., automation of data entry. Irrespective of the data source, one can make use of user defined functions to update the database without much user intervention. However, in comparison to import of data through XML/SDF Files, updation of data through user defined functions takes a much longer time. A performance lag has been observed while updating data with user defined functions, as compared to updating data of a similar size by the import method. In order to give a uniform user experience and better performance, the approach followed in data import has now been extended to data updation through user defined functions.
Importing of data implicitly follows a Batch Posting approach, wherein the data to be incorporated in the database is updated in batches, thereby improving the performance. This approach has now been extended to data updation through user defined functions, with the introduction of two new Actions, namely START BATCH POST and END BATCH POST . Batch Posting Mode accumulates sets of objects into batches, and pushes a whole batch of data into the database at a time, which optimizes the performance. Batch Posting Mode also requires the size of the batch, which can be set as a parameter to the Action START BATCH POST .
Actions – START BATCH POST and END BATCH POST
The actions START BATCH POST and END BATCH POST are procedural actions which can only be used within user defined functions. These actions indicate that all the data updation actions falling between the actions START BATCH POST and END BATCH POST must be updated to the database in batches. Instead of the data being directly updated to the database, the data is updated to a temporary file, and once the Batch Size limit is reached, the entire data is flushed from the temporary file into the database.
A batch is a set of objects, wherein the batch size can be specified by the TDL programmer as an optional parameter to the action START BATCH POST. In the absence of this parameter, the default size of the batch is considered as 100 Objects. On encountering the batch size limit, the temporary file posts/flushes the data into the Tally database. On completion of the posting of the previous batch of data, the subsequent batch posting iteration takes place, and this cycle continues till the entire data is updated to the database. The bigger the batch size, the lesser the total number of batches, and the better the performance. The operation will be accomplished faster if the batch size specified is optimal. A very high batch size, beyond a particular point, may also deteriorate the performance. Hence, striking the right balance and specifying the optimal batch size is important to achieve the best performance.
Syntax
START BATCH POST [:<Batch Size>]
NEW OBJECT: <Object Type>: <Object Name> : <Forced Update Flag>
Action 1
Action 2
:
:
Action n
SAVE TARGET
END BATCH POST
Where,
<Batch Size> is the size of each batch.
In the absence of Action END BATCH POST , the End of the user defined function is assumed as the end of batch posting. However, it is recommended to specify END BATCH POST , especially in presence of nested loops/ large volume of data.
Example
[Function : Create Ledgers]
Parameter : pNumberofLedgers : Number : 1000
000 : START BATCH POST : 500
010 : For Range : i : Number: 1: ##pNumberofLedgers
020 : New Object : Ledger
030 : Set Value : Name : “Customer ” + $$String:##i
040 : Set Value : Parent : “Sundry Debtors”
050 : Create Target
060 : End For
070 : END BATCH POST
In this example, when the function “Create Ledgers” is invoked, 1000 Ledgers, ranging from “Customer 1” to “Customer 1000”, are created under the group ‘Sundry Debtors’. If the batch posting feature was not used, the database files would get locked and released for updating every object, and this would continue till all the objects were updated. Thus, 1000 cycles would take place, affecting the performance adversely. However, with batch posting approach, these objects are updated in 2 batches of 500 objects each, i.e., the database is locked and released only twice, thus improving the performance vastly. The impact of this enhancement can be observed during updation of data of large volume. For instance, the following table shows the statistics of time taken for creating 1000 ledgers using the given code, but with different batch Size:
|
Without Actions START BATCH POST and END BATCH POST |
NA |
3 Minutes 29 Seconds |
|
With Actions START BATCH POST and END BATCH POST |
100 |
4 Seconds |
|
500 |
2 Seconds |
|
|
1000 |
1 Second |
Table 1. Batch Posting Statistics
As seen in the table, with the usage of the actions START BATCH POST and END BATCH POST, the time taken reduces significantly. Also, it is noticed that with increase in the batch size, the performance keeps improving. The operation will be accomplished faster if the specified batch size is equal to the total number of objects being updated, i.e., in this case, specifying the batch size as 1000 will give optimal performance as 1000 objects will be posted to the database at a time.
Limitation
Greater the batch size, better the performance of data update. However, the database files are locked from the beginning till the end of the write operation of each batch. This results in unavailability of the database for data updation from other sources executing parallelly, like data entry in a Multi-User environment, Data Synchronization, etc. Thus, a higher value of batch Size will improve the performance, but will slow down the simultaneous updation of data. Hence, determining the optimal batch size is necessary to strike the right balance for getting the best performance. A very high batch size, beyond a particular point, may deteriorate the performance.
Points to remember
- Actions START BATCH POST and END BATCH POST are not be used in a nested manner. If used so, only the first instance is considered, while the remaining ones are ignored.
- A batch can only be ended or closed in a function where it is initiated. If the user misses the closing part, the System will END the batch implicitly.
- One must backup the data prior to using the Batch Posting Feature, as incorrect usage of the same may lead to corruption/loss of data.
- For import of data also, we have a parameter similar to batch size, i.e., Import Batch Size, which can be used to improve the performance while Importing Data. This parameter can be specified in Tally.INI, in the absence of which, it is set to 100 by default. Setting this parameter to a higher value will decrease the time taken for import, but will increase the wait time for other simultaneous data updation operations. Setting it to -1 will disable the batch posting feature for import of data, which means that the data import would consume a longer time, as every object would need to be updated to the database individually.
Asynchronous Message Box Actions – START MSG BOX and END MSG BOX
These are asynchronous message boxes, i.e., the message box continues to appear till the action End Msg Box is encountered or the function is terminated, whichever is earlier. Unlike action ‘Msg Box’, this action is executed asynchronously, i.e., it does not expect a key press from user. When executed, it displays the message box, and continues to execute the subsequent Actions.
Syntax
Start MSG BOX : <Title Expression> : <Message Expression>
<Action 1>
:
<Action n>
End MSG BOX
Where,
< Title Expression > is the value that is displayed on the title bar of the message window.
< Message Expression > is the actual message displayed in the box. It can be an expression as well, i.e., the variable values can be concatenated and displayed in the display area of the box.
Example
[Function : MsgBox Actions]
Variable : Counter : Number
Variable : TotalCount : Number : 100
Returns : Number
Local Formula : StrTotalCount : ($$String:##TotalCount)
Local Formula : StCounter : ($$String:##Counter)
00 :StartMsg Box : Stat u s : “T h is Function creates” + @StrTotalCount + “ Ledgers”
10 :Start Progress : # # TotalCount : ## SVCurrentCompany : “Creating Ledgers” : “Please wait”
20 : While : # #Count e r < ##TotalCou n t
30 : New Object : Ledger : “Ledger” + @StrCounter : Y es
40 : Set Value : Name : ” Ledger” + @St r Counter
50 : Set Value : Parent : ” Sundry Debtors”
60 : Save Target
70 : Increment : Count e r
80 : Show Progress : ##Counter
90 : End While
100 : End Progress
110 : End Msg Box
Here, the action ‘Start Msg Box’ invokes the message box and retains it till action ‘End Msg Box’ is encountered. Thus, the message box will continue to appear from label 00 to 110. In absence of ‘End Msg Box’, the msg box is automatically terminated when the function MsgBox Actions ends.
If nested Start Msg Box is executed, then the previous Message box is overwritten. At any time, only one Message Box can be displayed.
Programmable Configuration for Actions – Print, Export, Mail, Upload
The actions Print, Export, Mail, and Upload depend on various configuration parameters such as Printer Name, File Name, Email Address, SMTP Settings, etc. Before executing these actions, Tally normally displays a configuration report to capture the required inputs. These settings are persisted in system variables and can be reused as default values in subsequent operations.
In scenarios such as bulk printing, mass exports, or sending multiple emails in sequence, repeatedly displaying the configuration report interrupts the workflow and requires continuous user intervention. To address this, these actions support an additional logical parameter that allows the configuration report to be suppressed. When suppressed, all required configuration variables must be set programmatically before invoking the action.
The Mail action additionally supports OAuth-based authentication, enhanced error reporting through $$LastError, and customizable progress messages using system variables.
Syntax
<Action Name>: <Report Name>: <Logical Value>
Where
- <Action Name> can be Print, Export, Mail, or Upload.
- <Report Name> is the name of the report on which the action is to be performed.
- <Logical Value> can be Yes, No, True, or False.
- Yes / True → Suppresses the configuration report.
- No / False → Displays the configuration report before executing the action.
Behavior
- Suppresses the configuration report for automated processing.
- Requires the necessary configuration variables to be set before invoking the action.
- Supports automation scenarios such as bulk printing, exporting, uploading, and emailing reports.
- The Mail action supports both password-based and OAuth-based authentication.
- For the Mail action, $$LastError returns the mail response code, while detailed error information is available in the Event Log.
- Progress messages for mail operations can be displayed using SVMailProgressNote and SVMailProgressIndication.
With this syntax, it is possible to configure the values of the report only once and then mail it to the specified e-mail addresses, without repeated display of the configuration report.
Example
[Function: TSPL AutoMailBalanceSheet]
60 : Call : SetOAuthProviderFromEmailId : ##SVMailFromAddress
70 : Set : SVPrintFileName : $$MakeMailName:ToAddress:MailServer:FromAddress:CCAddress:MailSubject:UserAddress:””:True:No:BCCAddress
80 : Mail : Balance Sheet : True
In the above example, the OAuth provider is determined automatically from the sender email address, the mail configuration is generated using $$MakeMailName, and the Mail action sends the Balance Sheet report without displaying the mail configuration screen. If a valid OAuth session exists, the email is sent directly; otherwise, the platform initiates the authentication flow.
Following are the action-specific variables and their acceptable values:
The Configuration Variables – Action Specific
The actions use a set of system variables to configure their behaviour. These variables can be grouped based on their purpose.
Common Variables
- SVOutputType – Specifies the output action to be performed. The platform uses this value to determine the appropriate configuration and processing flow. Typical values include Print Button, Export Button, Mail Button, and Upload Button. These values are also used by functions such as $$InPrintAction, $$InExportAction, $$InMailAction, and $$InUploadAction to identify the current action in the form of SVPrintConfiguration. For example, if the value of SVOutputType is Print Button, then the optional form SV PrintConfig in the report SVPrintConfiguration is executed.
- SVPrintFileName – Specifies the destination file name or output location for the action. The value is interpreted differently depending on the action being performed. For example, during Export, it represents the file path of the exported document, while during Mail, it is typically generated using $$MakeMailName to create the mail attachment.
- SVExportFormat – Specifies the format in which the report is generated for Export, Mail, and Upload actions. Supported formats include SDF, ASCII, HTML, Excel, XML, AnsiSDF, AnsiASCII, AnsiHTML, AnsiExcel, and AnsiXML. Use the corresponding $$SysName value while assigning the format.
System Actions
Action – Load TDL
In TDL, the action Execute TDL is used to execute some action, and then unload the TDL or keep it, depending on the logical value. With this action, the TDL would get loaded. However, the execution of action was mandatory. The action Load TDL loads the TDL/TCP dynamically for only the current session of Tally. However, if the TDL file is already loaded due to being specified in Tally.INI, or through previous execution of the action ‘Load TDL’/‘Execute TDL’, it will not be loaded again. On closing the current session of TallyPrime, the dynamically loaded file(s) will not be available for the subsequent Tally session.
Syntax
LOAD TDL : <TDL/TCP File Path Expression>
Where,
<TDL/TCP File Path Expression> evaluates to the path of the TDL/TCP File to be loaded dynamically.
Example
[Button : Load Dynamic TDL]
Key : Alt + L
Action : Load TDL : @@TDLFilePath
[System : Formula]
TDLFilePath : “C:TallyPrimeTDLSamples.tcp”
In this example, on triggering the button ‘Load Dynamic TDL’, the action ‘Load TDL’ loads the TDL from “C:TallyPrimeTDLSamples.tcp”. If this TDL is already loaded due to being specified in Tally.INI, or previous execution of the Action ‘Load TDL’, then the same will not be loaded again.
Local TDLs will be loaded at the Remote End if ‘Allow Local TDLs’ is enabled to the user logged in.
Action – Unload TDL
To unload the TDL dynamically from the current Tally session, the action Unload TDL is used. With this action, the local TDL File(s), including the ones added through Tally.ini and those added dynamically using actions ‘Load TDL’ or ‘Execute TDL’, can be unloaded. However, they would be unloaded only for the current Tally session, and in the subsequent session, all the TDL/TCP files specified in Tally.INI will be loaded once again. Using this action, the files can be unloaded by specifying either the TDL /TCP file name or the GUID of the TCP file.
Syntax
UNLOAD TDL : <TDL/TCP File Path Expression or GUID Expression>
Where,
< TDL/TCP File Path Expression or GUID Expression > evaluates to the path of the TDL/TCP File or GUID of the TCP file to be unloaded dynamically.
Example
[Button : Unload Dynamic TDL]
Key : Alt + U
Action : Unload TDL : @@TCPFileGU I D
[System : Formula]
TCPFileGUID : “c29 0 1088-3 4 9b-434b – 946c-9 a da601fd 6 b7”
In this example, on triggering the button ‘Unload Dynamic TDL’, the action ‘Unload TDL’ unloads the compiled TDL with the GUID “c2901088-349b-434b-946c-9ada601fd6b7”. If the particular TDL is not found to be loaded, then the same is ignored. If the TCP file was dynamically loaded, then the same is removed from the list of TDL files. However, if the TCP File was available in Tally.INI, then the same is removed temporarily and reloaded in the subsequent session of Tally.
Account/Remote TDL file(s) cannot be unloaded using Action Unload TDL. Once a TDL is unloaded explicitly, if one attempts to load such TDL file(s) by changing the TDL configuration, the file(s) will not be loaded in that session.
Action – Exec Excel Macro
The action Exec Excel Macro invokes the available macros defined in the Excel.
Syntax
Exec Excel Macro : <Macro Name> [:<Parameter list>]
Where,
< Macro Name > is the name of the macro.
< Parameter list > can be n number of parameters that correspond to the parameters required by the Excel macro.
Example
On : After Export : Yes : Exec Excel Macro : MacrotoComputeGraphs : Pie Chart
In the above example, when the macro MacrotoComputeGraphs is executed, it displays the values in Excel as a pie chart.
Action – Format Excel Sheet
Action Format Excel Sheet is used to set the cell properties of Excel sheet. It accepts two parameters.
Syntax
Format Excel Sheet : <PropertyName> : <PropertyParms>
where,
< PropertyName > is a system keyword for an Excel cell property, viz, ColumnWidth or CellTextWrap.
< PropertyParms > is a list of required parameters for the specified PropertyName and the number of parameters vary based on the PropertyName.
Example
[Function: FileIOExcel]
Variable : InputFile : String : “D:SampExcel.xls”
010 : Open File: ##InputFile : Excel : Write
020 : Format Excel Sheet: CellTextWrap : 5 : 6 : Yes
030 : Format Excel Sheet: ColumnWidth: 1 : 30
040 : Close Target File
In the above example, CellTextWrap is the PropertyName and “5: 6: Yes” is the parameter required for the CellTextWrap property
Event Framework
When the user does something, an event takes place. Events are actions which are detected by a program and can change the state of system or execution flow. Events can occur based on user actions or can be system-generated. In TDL, the key framework is mainly used to handle user actions like keyboard and mouse events. This can be considered as a part of the Event Framework.
We know that TDL is a definition language which does not have any explicit control on the flow of execution. The programmer has no control over what will happen when a particular event occurs. There are certain attributes like SET/PRINTSET, used to initiate some action on the occurrence of event/change of state (like report construction, and so on.). In this scenario, there is a need of a generic event framework, which allows the programmer to trap the events and initiate an action/set of actions in the state when the event has occurred.
The event framework allows the specification of an Event Handler, where it is possible to specify an event Keyword, a condition to control event handling and the action to be performed. The process of detecting an event and executing the specified action is called as Event Handling.
Types of Events
When the user operates the application, different types of events are generated. The events are classified as System Events or Object-Specific Events, based on their origin.
System events are for which no object context is available when they occur.
Example
Tally application launch.
Object Specific events are performed only if the specific object context is available.
Example
Form Accept is a Form-specific event.
System Events
In TDL, Events are used in the System definition. All the system events are defined under this definition. As of now, TDL event framework supports the following four system events, viz. System Start, System End, Load Company and Close Company.
Syntax
[System : Events]
Label : <EventKeyword> : <ConditionExpr> : <ActionKeyword> : <Action Parameters>
Where,
<Label> is a name assigned to the event handler. It has to be unique for each event handler.
<EventKeyword> can be one of System Start, System End, Load Company or Close Company.
<ConditionExpr> should return a logical value.
<ActionKeyword> can be any one of the actions.
<Action Parameters> are parameters of the action specified.
The events System Start and System End are executed when the user launches or quits Tally application, respectively. The events Load Company and Close Company are executed when the user loads or closes a company, respectively
Example
[System : Events]
AppStart1 : System Start : TRUE : CALL : MyAppStart
The function MyAppstart is called as soon as the Tally application is launched.
Event ‘NatLangQuery’
As we are already aware, Tally has a natural language processing capability which accepts queries either from the Calculator Pane or from SMS Request. Tally has the intelligence of parsing received/ given commands, in order to process the same. This parsed information is used by the system to process the query and deliver the result. However, in certain cases, queries received might not be understood by the system. There have also been requirements in the market to support data updation queries like Ledger, Voucher Creation, etc.
A system event NatLangQuery used to cater to the above requirements. This event gives complete control in the hands of the TDL Developer, thereby enabling him to process the query received and do the needful. If the query is ignored by TDL, then the System continues to process it and provide the response as usual.
Syntax
[System : Event]
<Event Name> : NatLangQuery : <Condition> : <Action> : <Action Parameters>
Where,
<Event Name> can be any unique name, indicating the purpose of the event.
<Condition> if evaluated to TRUE on receiving a query, an action will be executed.
<Action> is the Action Call which can be used for processing the Query received/given.
<Action Parameters> can be a Function Name and its required Parameters.
Example
[System: Event]
Ledger Creation: NatLangQuery: @@IsLedgerinQuery: Call: Create Ledger
Whenever a Query is received, Tally checks the logical condition @@IsLedgerinQuery. If it evaluates to TRUE, then the function ‘Create Ledger’ is invoked.
In the given syntax, <Action> can be any global Action like Display, Alter, Print, etc. However, NatLangQuery being a query from a remote location, it is not advisable to populate any report in the User Interface of Tally at the Server end.
In order to support the event NatLangQuery, the following System Variables, along with a Built-in TDL Function $$NatLangInfo , is used.
Example to Demonstrate NatLangQuery event
Create Ledger RadheShyam SundryDebtors
Requirement
The requirement here is to create a Ledger with the name RadheShyam, under the Group Sundry Debtors.
Implementation
- Firstly, we need to write a system event to trap the query received and perform the necessary action.
[System : Event]
Create Ledger : NatLangQuery : @@IsCreateLedger : Call : Create Ledger
- If the Request contains ‘Create Ledger’, then only the above action is to be performed, so the following system formula needs to be declared to check the value of the variable SVNatLangFullRequest.
[System : Formula]
IsCreateLedger : ##SVNatLangFullRequest CONTAINS “Create Ledger”
- When the action is being executed, firstly we need to tokenize the words from the string:
[Function : TokenizeQuery]
000 : List Delete Ex : SMSStrings
010 : For Token : TokenVar : ##SVQueryRequest : ” “
020 : List Add Ex : SMSStrings : ##TokenVar
030 : End For
[System : Variable]
List Var : SMSStrings : String
- Finally, create the ledger with the Action New Object
[Function : CreateLedger]
000 : Call : TokenizeQuery
010 : New Object : Ledger : ##SMSStrings[3] : Yes
020 : Set Value : Name : ##SMSStrings[3]
030 : Set Value : Parent : ##SMSStrings[4]
040 : Save Target
5. Send the Response to the source of the query.
050 : Set : SVNatLangResponse : “Ledger Created”
060 : Set : SVNatLangRequestProcessed : Yes
Similarly, the NatLangQuery Event can also be used to customize the interpretation of the queries being sent, and act accordingly.
We have used Space as a delimiter for Tokenizing Query Strings in the given example. One can specify any delimiter like Inverted quotes, comma, etc., to separate different strings.
If customized with the help of Tokens, the Query Signature must be retained exactly in the same order and with the delimiters specified. In the given example, if the Query ‘Create Ledger Keshav under SundryDebtors’ is specified, the code will fail, as the function expects the 4th Word to be a Group Name. Hence, the Programmers must communicate the Query Signature clearly with the end users.
System Events for Object Deletion and Cancellation
With these events, whenever an Object is subject to Deletion or Cancellation, these events get triggered, which allows the TDL Programmer to take some appropriate action. Only on confirmation of Deletion or Cancellation, these events are triggered. In other words, only when the user confirms the deletion or cancellation of the object by responding with a YES, the relevant events get triggered.
Irrespective of the Source of Deletion or Cancellation, i.e., from an external XML Request, Tally User Interface, Remote Tally User Interface, etc., the appropriate events get triggered. Any Object deletion or cancellation event gets triggered only at the Server end. Let us understand these System Events in detail.
Delete Object Events – ‘Before Delete Object’ and ‘After Delete Object’
These events get triggered whenever any of the primary Objects defined in Tally Schema is deleted. For example, Object Company, Voucher, Ledger, etc.
As the names suggest, the Events Before Delete Object and After Delete Object are triggered before and after the deletion of the Object, respectively. The Current Object context would be available in both these Events. Triggering of the Event After Delete Object confirms the successful Deletion of the Object.
Syntax
[System : Events]
<Label> : Before Delete Object : <Logical Condition Expr>: <Action Keyword > : <Action Parameters>
<Label> : After Delete Object : <Logical Condition Expr> : <Action Keyword > : <Action Parameters>
Where,
< Label > is a Unique and Meaningful Name assigned to the System Event handler.
< Logical Condition Expr > is a Logical Expression, which when evaluates to TRUE, executes the given Action.
< Action Keyword > is the Action to be taken once the System Event is triggered.
< Action Parameters > are the parameters required for the particular Action.
Both these event s are mutually exclusive. In other words, the System Event Before Delete Object need not be necessarily triggered in order to trigger the System Event After Delete Object , and vice versa.
Example
[System : Event]
BeforeStockItemDeletion : Before Delete Object : $$IsStockItem:Call:BeforeDeleteObjectFunc
AfterStockItemDeletion : After Delete Object : $$IsStockItem:Call:AfterDeleteObjectFunc
[Function : BeforeDeleteObjectFunc]
00 : Log : “Before Delete Object Event starts here”
10 : Log : $Name + “under the Stock Group” + $Parent + “is being deleted by ” + $$CmpUserName
20 : Log : $MasterID
30 : Log : “Before Delete Object Event ends here”
[Function : AfterDeleteObjectFunc]
00 : Log : “Stock Item ” + $Name + “ Deleted”
In this example, the events are invoked only when the Stock Item Object is actually being deleted. Since the object context is available both before and after the object deletion, the object details such as Name, MasterID and Parent can be logged in either of the events. The Event After Delete Object confirms the Object Deletion.
Cancel Object Events– Before Cancel Object and After Cancel Object
Similar to Delete Object Events, two more new System Events are Before Cancel Object and After Cancel Object. Cancellation is applicable only to the Object Voucher. As the names suggest, the Events Before Cancel Object and After Cancel Object are triggered before and after cancellation the of the Voucher object, respectively. The Current Object context would be available in both these Events. Triggering of the Event After Cancel Object confirms the successful Cancellation of the ‘Voucher’ Object.
Syntax
[System : Events]
<Label> : Before Cancel Object : <Logical Condition Expr> : <Action Keyword> : <Action Parameters>
<Label> : After Cancel Object : <Logical Condition Expr> : <Action Keyword> : <Action Parameters>
Where,
< Label > is a Unique and Meaningful Name assigned to the System Event handler.
< Logical Condition Expr > is a Logical Expression, which when evaluates to TRUE , executes the given Action.
< Action Keyword > is the Action to be taken once the System Event is triggered.
< Action Parameters > are the parameters required for the particular Action.
Both these System Events are mutually exclusive, i.e., the Event Before Cancel Object need not be necessarily trigged in order to trigger the Event After Cancel Object, and vice versa.
Example
[System : Event]
BeforeVchCancellation: Before Cancel Object : Yes : Call : BeforeCancelObjectFunc
AfterVchCancellation: After Cancel Object : Yes : Call : AfterCancelObjectFunc
[Function : BeforeCancelObjectFunc]
Local Formula : StrMasterID: $$String:$MasterID
00 : Log : “Before Cancel Object Event ” + @StrMasterID + “starts here”
10 : Log : $VoucherNumber
20 : Log : $VoucherTypeName
30 : Log : “Before Cancel Object Event ” + @StrMasterID + “ends here”
[Function : AfterCancelObjectFunc]
Local Formula : StrMasterID : $$String:$MasterID
01 : Log : “Voucher with MasterID ” + @StrMasterID + “ cancelled”
In this example, the System Events Before Cancel Object and After Cancel Object are triggered the moment any voucher is cancelled. Since the object context is available both before and after the cancellation of the object, the details such as Voucher Number, Voucher Type Name, Master ID and Date of the cancelled voucher can be logged through both the user defined functions. The Event After Cancel Object confirms the Voucher Object Cancellation.
Points to remember
- The System Events for Object Deletion or Cancellation will be triggered when an Object gets deleted or cancelled from any Source, viz.,from an External Third Party Request, from the Tally User Interface or from Remote Tally.
- In case multiple vouchers are selected, and subsequently cancelled or deleted:
- The Event is triggered as many times as the number of vouchers selected. For instance, if five Vouchers are selected for Deletion in Daybook, the System Events for Deletion would be triggered five Times, once for each Voucher.
- Only the methods fetched in the Collection used in the Report displaying the list of Vouchers would be available in the Deletion or Cancellation Context. For instance, if multiple Vouchers are selected in Daybook, only the methods fetched in the Collection used in Daybook would be available in the current context. However, the entire Voucher Object context (including all the methods) can be associated by using the Object Association Syntax within the User Defined Function, i.e., Object : Voucher : ”ID :” + ($$String:$MasterID), and all the methods will be available in the context.
- In case of Remote Login, when the remote user deletes or cancels an object, these events are triggered at the server.
Object Specific Events
Objects specific events can be specified for the associated object only.
Example
Before Print event is specific to ‘Report’ object. The attribute ON is used to specify the object specific events as follows:
Syntax
ON : EventKeyword : <ConditionExpr> : <ActionKeyword> : <Action Parameters>
Where,
<EventKeyword> can be any one of ‘Focus’, ‘Form Accept’, ‘Before Print’ and ‘After Print’.
<ConditionExpr> should return a logical value.
<ActionKeyword> can be any one of the actions.
<Action Parameters> are parameters of the action specified.
ON is a list type attribute, so a list of actions can be executed when the specific event occurs.
Event – FORM ACCEPT
The event Form Accept is specific to ‘Form’ object; hence, can be specified only within Form definition. A list of actions can be executed when the form is accepted, which can also be based on some condition. After executing the action Form Accept, the current object context is retained. So all the actions that are executed further, will have the same object context.
The event Form Accept, when specified by the user, overrides the default action Form Accept. So, when ‘Form Accept’ event is triggered, the form will not be accepted until the user explicitly calls the action ‘Form Accept’.
Example
[Form : TestForm]
On : FormAccept : Yes : HTTPPost : @@SCURL : ASCII : SCPostNewIssue : SC NewIssueResp
Action HTTP Post is executed when the event Form Accept is encountered. But, the form will not be accepted until the user explicitly calls the action Form Accept on event Form Accept as follows:
On : FormAccept : Yes : Form Accept
Now, after executing the action HTTP Post , Tally will execute the action Form Accept as well.
Event – FOCUS
The event Focus can be specified within the definitions Part, Line and Field. When Part, Line or Field receives focus, a list of actions get executed, which can also be conditionally controlled.
Example
[Part : TestPart2]
On : FOCUS : Yes : CALL : SCSetVariables : $$Line
Event – BEFORE PRINT
The event Before Print is specific to ‘Report’ object; so it can be specified only within ‘Report’ definition. The event ‘Before Print’ is triggered when the user executes the ‘Print’ action. The action associated with the event is executed first, and then the report is printed.
A list of actions can be executed before printing the report, based on some condition.
Example
[Report : Test Report]
On : BEFORE PRINT : Yes : CALL : BeforeRepPrint
The function BeforeRepPrint is executed first and then the report Test Report is printed.
Event – AFTER PRINT
The event After Print can be specified for Report, Form, Part and Line definitions. It first prints the current interface object and then executes the specified actions for this event. A list of actions can be executed after printing the report based on some condition. Print is an alias for After Print.
Example
[Line : LV AccTitle]
On : After Print : Yes : CALL : SetIndexLV : #LedgerName
The function SetIndexLV is called after printing the line LV AccTitle. So, if there are 10 lines to be printed, the function will be called ten times.
Timer Event
The Timer Event is used to perform the Timer based automated events. System Event Timer is used to perform the required set of operations automatically at periodic intervals.
Syntax
[System : Event]
<Timer Name> : TIMER : <Condition> : <Action> : <Action Parameters>
Where,
<Timer Name> is the user defined name for the timer event.
<TIMER> keyword indicates that it is a Time-based event.
<ConditionExpr> should return a logical value.
<ActionKeyword> is any one of the actions.
<Action Parameters> is nothing but the parameters of the action specified.
We can have multiple Event Handlers with unique names which can invoke specific actions at different intervals. In order to specify the interval for the various Timers and to begin and end the Timers, the associated Actions are ‘Start Timer’ and ‘Stop Timer’.
Action – START TIMER
It starts the specified timer and accepts the Timer Name and Duration in seconds as the action parameters.
Syntax
START TIMER : <Timer Name> : Duration in seconds
Where,
<Timer Name> is the user defined name for the timer event.
Action – STOP TIMER
This action stops the specified timer, and it accepts the Timer Name as its parameter.
Syntax
STOP TIMER : <Timer Name>
Where,
<Timer Name> is the user defined name for the timer event.
Following is an example of scheduling automatic backups every hour:
Example
[System : Event]
;; Setting up timer event to call a function
Auto Backup : TIMER : TRUE : CALL : Take Backup Function
;; Starting the Timer when Tally Application Starts
Schedule Backup : System Start : TRUE : START TIMER : Auto Backup : 3600
;; Adding Keys to ‘Company Info’ Menu
[#Menu : Company Info.]
Add : Keys : Stop Backup Timer
;; Declaring a Key to Stop the Timer
[Key : Stop Backup Timer]
Key : Alt + S
Action : Stop Timer : Auto Backup
Title : “Stop Backup”
In this example, following is done:
- Auto Backup, a Timer event is declared under System Event to invoke the function
- Take Backup function at periodic intervals, as specified within the action Start Timer .
- Schedule Backup, a System Start event is declared under System Event to Start the above Timer ‘Auto Backup’ and execute the specified action every 3600 Seconds, i.e., every hour.
- A corresponding Key to stop the Timer is associated to Menu Company Info, which is defined to stop the Timer. User can stop the timer if he chooses not to continue taking automatic backups any further.
Timer events can be very useful in many cases like displaying Exception Reports , Negative Balances intimation, Inventory Status below Minimum or Reorder Level, Outstanding Reminders , Auto Sync at regular intervals, and many more.
Event ‘Load’ – at Report Definition
The Event Load is used at the Report Definition. This event is triggered before the Report is displayed to the user. In other words, when this event is triggered, the Report is constructed and updated with variables, object context and the data. The Event ‘Load’ provides control to the TDL Layer, before Tally gets into wait loop, where the user will start operating on the Report. It may allow storing of the current state, etc.
Syntax
ON: Load : <Condition Expr> : <Action Keyword> : <Action Parameters>
Where,
< Logical Condition Expr > is a Logical Expression, which when evaluates to TRUE, executes the specified Action.
< Action Keyword > is the Action to be executed, once the System Event is triggered.
< Action Parameters > are the parameters required for the given Action.
Example
[#Report: ProfitandLoss]
On : Load : @@IsLossIncurred : CALL : ShowMsgifLossEncountered
In this example, once the user loads or displays the report ProfitandLoss, the ‘Load’ event invokes the Function ShowMsgifLossEncountered, if the System Formula IsLossIncurred evaluates to TRUE.
Event ‘Reject’ – at Form Definition
The Event Reject is used at the Form Definition. This event gets executed in the Edit Mode, when the user quits the current Form without accepting or saving it. It allows the Programmer to perform the desired action on rejection of the Form. Once the Event ‘Reject’ is used at the Form Definition, the default Action ‘Form Reject’ is overridden, as a result of which, the action Form Reject has to be explicitly specified.
Syntax
ON : Reject : <Condition Expr> : <Action Keyword> : <Action Parameters>
ON : Reject : <Condition Expr> : Form Reject
Where,
< Logical Condition Expr > is a Logical Expression, which when evaluates to TRUE, executes the given Action.
< Action Keyword > is the Action to be taken, once the System Event is triggered.
< Action Parameters > are the parameters required for the given Action.
Example
[#Form : Accounting Voucher]
On : Reject : Yes : Call : TDLRejectFunc
On : Reject : Yes : Form Reject
[Function : TDLRejectFunc]
00 : Msg Box : Status : “The form is rejected”
In this example, when the form is rejected, the Function TDLRejectFunc is invoked, which displays the message “The form is rejected”. Once the execution of the function is over, the form gets rejected due to the explicit Action Form Reject.
Event ‘Accept’ – at Field Definition
The Event Accept is used at the Field Definition. This event gets executed the moment an editable Field is accepted. Once the Event ‘Accept’ is used at the Field Definition, the default Action ‘Field Accept’ is overridden, as a result of which, the action ‘Field Accept’ to accept the Field contents, has to be explicitly specified.
When a Field is accepted, the event sequence runs in the following order:
- The Field value is validated through the ‘Validate’ attribute
- The ‘Modifies’ Variable is modified/updated.
- The Event ‘Accept’ is executed
- The Sub-Form is invoked
Note: If the validation fails, then this event will not be executed, as it will result in an error to the user.
Syntax
ON : Accept : <Condition Expr> : <Action Keyword> : <Action Parameters>
ON : Accept : <Condition Expr> : Field Accept
Where,
< Logical Condition Expr > is a Logical Expression, which when evaluates to TRUE, executes the given Action.
< Action Keyword > is the Action to be taken, once the System Event is triggered.
< Action Parameters > are the parameters required for the given Action.
Example
[#Field : Qty Primary Field]
On : Accept : @@IsNegativeClosQty : Call : MsgBoxforNegative
On : Accept : @@IsNegativeClosQty : Field Accept
Here, the event Accept is triggered on accepting the Field Qty Primary Field, which in turn, invokes the function MsgBoxforNegative . Once the function terminates, the field is accepted.
Event ‘After Import Object’ – at Import File Definition
This allows the TDL Programmer to take any desired action every time an Object is imported. This Event will help the user to create appropriate logs after Importing of each Object, terminate the Import Process based on some condition, track/record changes that can be used for preparing the response (for SOAP requests), etc.
Syntax
[Import File : <Import File Definition Name>]
On: After Import Object: <Logical Condition Expr> :<Action Keyword> :<Action Parameters>
Where,
<Logical Condition Expr> is a Logical Expression, which when evaluates to TRUE, executes the given Action.
<Action Keyword> is the Action to be taken once the System Event is triggered.
<Action Parameters> are the parameters required for the particular Action.
Buttons and Keys
The actions in TDL can be delivered in three ways – by activating a Menu Item, by pressing a Key or by activating a Button. The definition of both Buttons and Keys are the same, but at the time of deployment, Keys differ from Buttons.
All the Buttons used within the attribute Buttons are visible on the button bar, so that the user can either click it or press the unique key combination. All the Buttons used within the attribute Keys are invisible entities and the key combination associated in the Key must be pressed to activate a key; whereas to activate a button, either it can be clicked or the key combination assigned for the button can be pressed.
Attributes of Buttons/Keys
Title
The Title attribute can be used to give a meaningful Title to the Button being displayed on the Button Bar. This attribute is optional.
Syntax
[Key/Button : <Key/Button Name>]
Title : <Button Title>
Example
[Button : NonColumnar]
Title : “No Columns”
Key/Keys
This attribute is used to give a unique key combination, which can be activated by pressing the same from any Report or Menu. This attribute is mandatory if action is specified in this definition.
Syntax
[Key/Button : <Key/Button Name>]
Key : <Combination of Keys>
Example
[Button: NonColumnar]
Key : Alt + F5
Action
The Action attribute is used to associate an Action with the button. Every button or key is defined for the purpose of executing certain predefined actions.
Syntax
[Key/Button : <Key/Button Name>]
Action : <Required Action>
Example
[Button : NonColumnar]
Action : Set : ColumnarDayBook : NOT ##ColumnarDayBook
Inactive
The Inactive attribute is used to activate the button, based on some condition. If the condition is FALSE, the button will be displayed, but it cannot be activated.
Syntax
[Key/Button : <Key/Button Name>]
Inactive : <Logical Condition>
Example
[Button: Close Company]
Inactive : $$SelectedCmps < 1
ActionEx
The attribute ActionEx is used to enhance the multi-action support at button or key level. It allows you to specify multiple actions for executions when you invoke a key or button. ActionEx is a triple list attribute.
Syntax
[Button:<Button Name>]
ActionEx: <Label>:<Action Keyword>[:<Action Parameters>]
OR
[Button :<Button Name>]
<Label>:<Action Keyword>[:<Action Parameters>]
Where,
<Button Name> is the name of the button definition.
<Label> is any string to identify the ActionEx statement. Label supports for deletion, addition, modification, and replacement of the ActionEx statements. It is a mandatory sub-attribute.
- If the labels are unique, every ActionEx statements are executed in the order of their specifications.
- If the labels are same, the last action within the same label is executed.
<Action Keyword> is any platform or object-specific action except the function specific actions.
<Action Parameters> List of parameters as required by the action specified, separated by colon. Depending on the specified action keyword this parameter can be optional.
Example: 1
[Button: Show Final Accounts]
Key : Ctrl + F
ActionEx : TB : Display : Trial Balance
ActionEx : PL : Display : Profit and Loss
ActionEx : BS : Display : Balance Sheet
OR
[Button: Show Final Accounts]
Key : Ctrl + F
TB : Display : Trial Balance
PL : Display : Profit and Loss
BS : Display : Balance Sheet
Example: 2
Modify the code in example 1 to display the modified final accounts as given below:
- Delete the action to display TrialBalance using the attribute Delete: TB.
- Add the action to set the attribute ExplodeFlag as yes, after the label PL.
- Modify BS label to display the report ‘MyBalanceSheet’.
[Button: Modified Final Accounts]
Use : Show Final Accounts
Delete : TB
Add : ActionEx: After:PL: ExplodeFlagNo: Set: ExplodeFlag: No
Replace : ActionEx: BS :BS: Display : My Balance Sheet
[Report: My Balance Sheet]
……
Example: 3
Use the button Show Final Accounts mentioned in Example 1, in the report MyReport and modify it locally to delete the display of Trial Balance using ActionEx.
[Report: My Report]
……
Form : My Report
[Form: My Report]
….
Button: Show Final Accounts
Local : Button: Show Final Accounts: Delete: ActionEx: TB
You can use the attribute ActionEx to achieve multi-action support which reduces the code size, instead of the attribute Action List with additional key definitions.
To display the final accounts using a button you need to write the following code using the attribute Action List.
Example:
[Button: Show Final Accounts]
Key : Ctrl + F
Action List : Show Trial Balance, Show Profit and Loss, Show Balance Sheet
;; Key Names which are to be triggered in sequence
[Button: Show Trial Balance]
Key : Ctrl + F
Action : Display : Trial Balance
[Button: Show Profit and Loss]
Key : Ctrl + F
Action : Display : Profit and Loss
[Button: Show Balance sheet]
Key : Ctrl + F
Action : Display : Balance Sheet
Whereas when you use the attribute ActionEx, it reduces the code size.
Example:
[Button: Show Final Accounts]
Key : Ctrl + F
ActionEx: TrialBalance : Display : Trial Balance
ActionEx: ProfitandLoss : Display : Profit and Loss
ActionEx: BalanceSheet : Display : Balance Sheet
Points to Remember
- When ActionEx is specified with unique labels, the order of execution is same as the order of specification.
Example
[Button: Show Final Accounts]
Key : Ctrl + F
Title : Final Accounts
ActionEx: TB : Display : Trial Balance
ActionEx: PL : Display : Profit and Loss
ActionEx: BS : Display : Balance Sheet
In the above example, the button Final Accounts displays the reports in the given order Trial Balance, Profit and Loss, and Balance Sheet.
- When multiple instances of ActionEx are specified with the same label name, then only the action specified in the last label occurrence will get executed.
Example
[Button: Show Final Accounts]
Key : Ctrl + F
Title : Final Accounts
ActionEx: TB: Display : Trial Balance
ActionEx: PL: Display : Profit and Loss
ActionEx: TB: Display : Balance Sheet
In the above example, the button Final Accounts displays the report Balance Sheet first and then the report Profit and Loss. It ignores the report Trial Balance.
- When you use these attributes Action List, Action, and ActionEx together in your button definition, in any combination, the order of priority for actions is as given below:
- Action List
- ActionEx
- Action
It executes only the highest priority action statement and other action statements are ignored. Refer the following table to understand more about the order of execution.
|
Attributes Specified |
Executed |
Ignored |
|
Action, Action List, and ActionEx |
Action List |
Action and ActionEx |
|
Action List and ActionEx |
Action List |
ActionEx |
|
Action List and Action |
Action List |
Action |
|
ActionEx and Action |
ActionEx |
Action |


