
Manage Backup Schedules | Schedule Backup Report
The Schedule Backup report in TallyPrime is your central dashboard to view and manage the backup schedules. The report displays existing schedule details such as the backup frequency, time, and the occurrence of backup. It also displays the date and time of the last backup, its status, and details of the next backup as per the schedule.
You can create new schedules, alter, delete, and move existing ones, view backup history, and take immediate backup directly from the Schedule Backup report in TallyPrime. Also, in case an action is required to take a backup, the report displays such schedules under a separate section for you to identify and take action.
![]()
To open the Schedule Backup report,
-
Press Alt+Y (Data) > Backup & Restore > Schedule Backup.
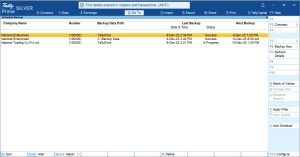
The report displays the Company Name, Number, Backup Data Path, Last Backup details such as the Date & Time and Status, and the date and time of the Next Backup.
To view the Schedule Details on the report,
-
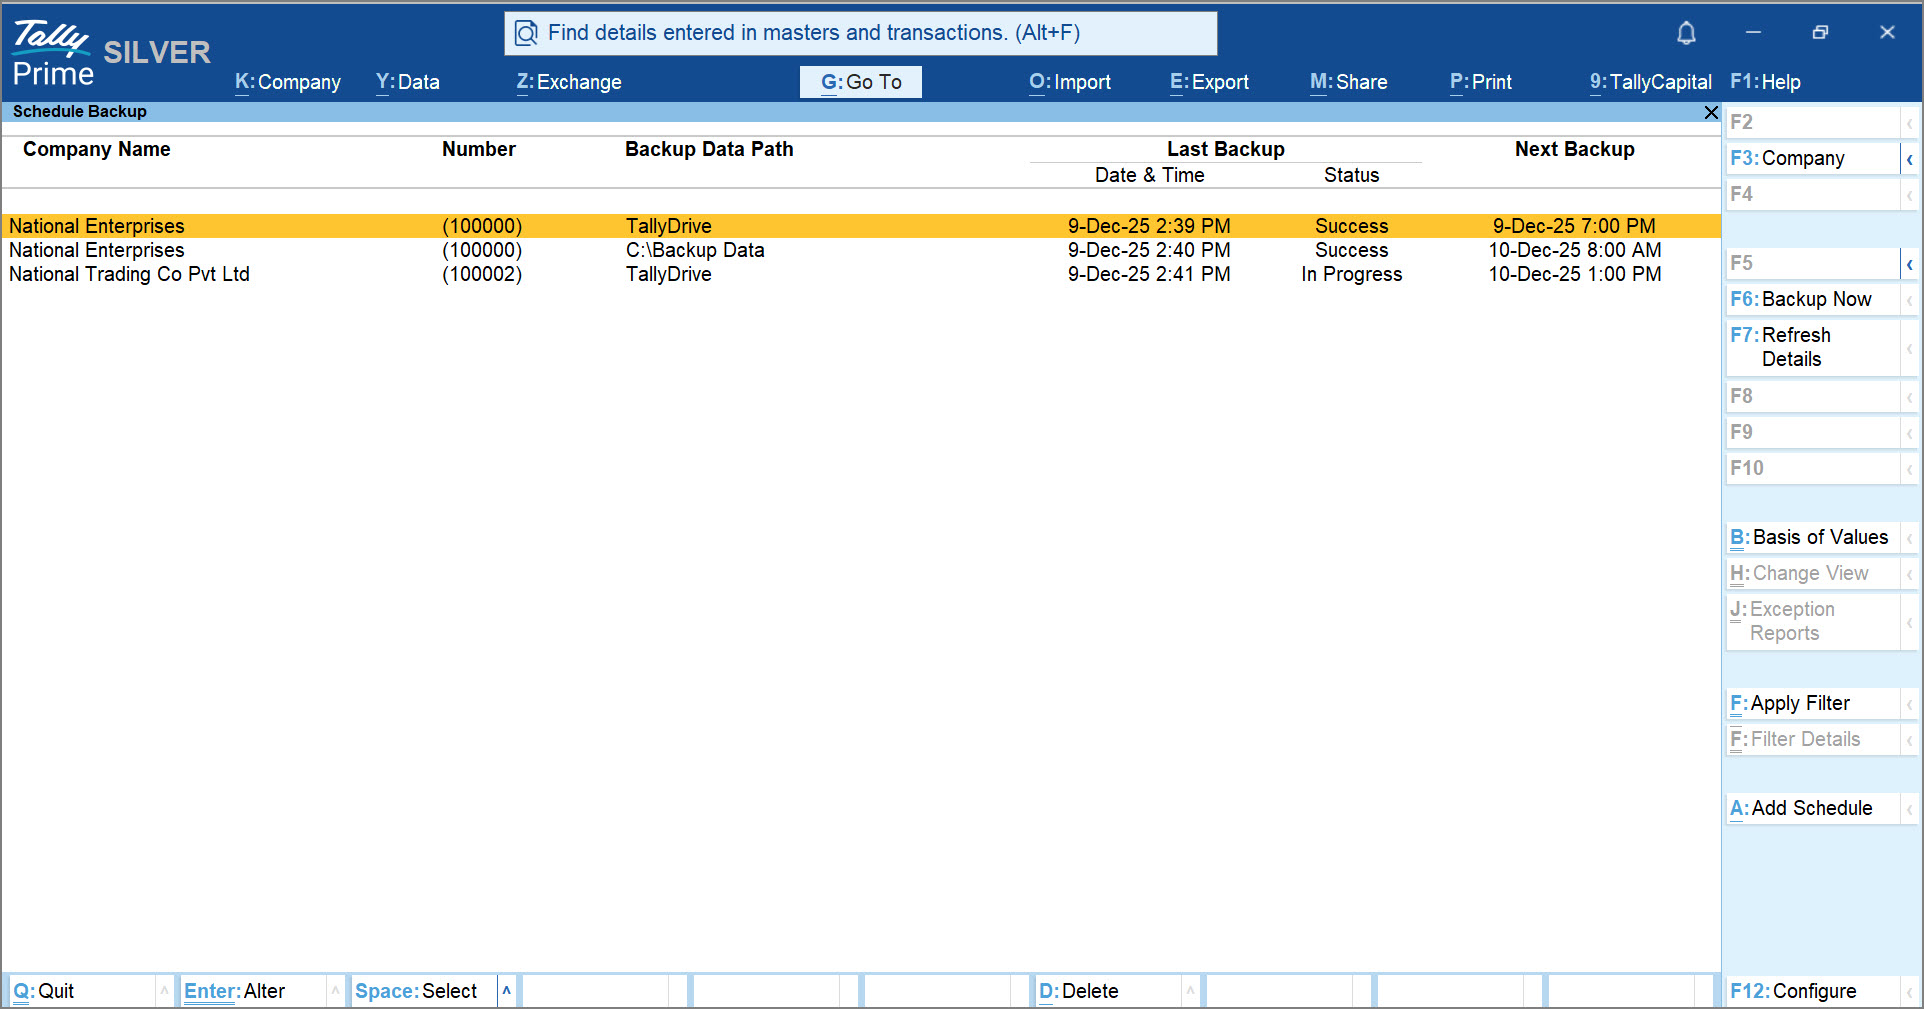
Press F12 (Configure) and enable the option Show Schedule Details.
Once enabled, you can see the Schedule Details such as the backup frequency, its occurrence, and time.

Press Alt+F5 (Detailed) to have a detailed view of the report.
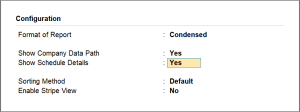
What’s more! You also have the option to configure the report as per the type of schedules, last backup status, and backup frequency from the Basis of Values.
Press Ctrl+B (Basis of Valuses) and configure as required.
Show report for: Configure this option to view the type schedule such as active, paused, completed, or all.
Last Backup Status: Configure this option to view schedules based on the last backup status such as in progress, success, failed, on hold, or yet to start.
Backup Frequency: Configure this option to view schedules based on the backup frequency once, daily. monthly, weekly, or all.
Note that to configure the report as per the Backup Frequency, you must first enable the option Show Schedule Details from F12 (Configure).
You can also refresh the report details by press F7 (Refresh Details). This is useful when you want to see the latest schedule details.
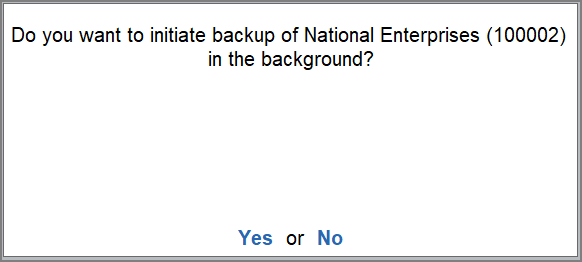
Backup Now
You can also take an immediate backup from the Schedule Backup report when the scheduled backup is set for a later time.
![]()
-
Press Spacebar to select the required company and press F6 (Backup Now).
-
Press Y to click Yes to confirm.
This will initiate a backup of the selected company in the background.
Add Backup Schedule
Apart from viewing the backup schedule details, you can also create a new schedule directly from the Schedule Backup report in TallyPrime.
![]()
To create a new schedule from the Backup Schedule report,
-
Press Alt+A (Add Schedule).
To learn more about scheduling a backup in TallyPrime, refer to Create a Backup Schedule (TallyDrive).
Backup Log
Backup Log in the Schedule Backup report lists all backups taken as part of this backup schedule.
![]()
To view the Backup Log,
-
Place the cursor on the required schedule and press Enter.
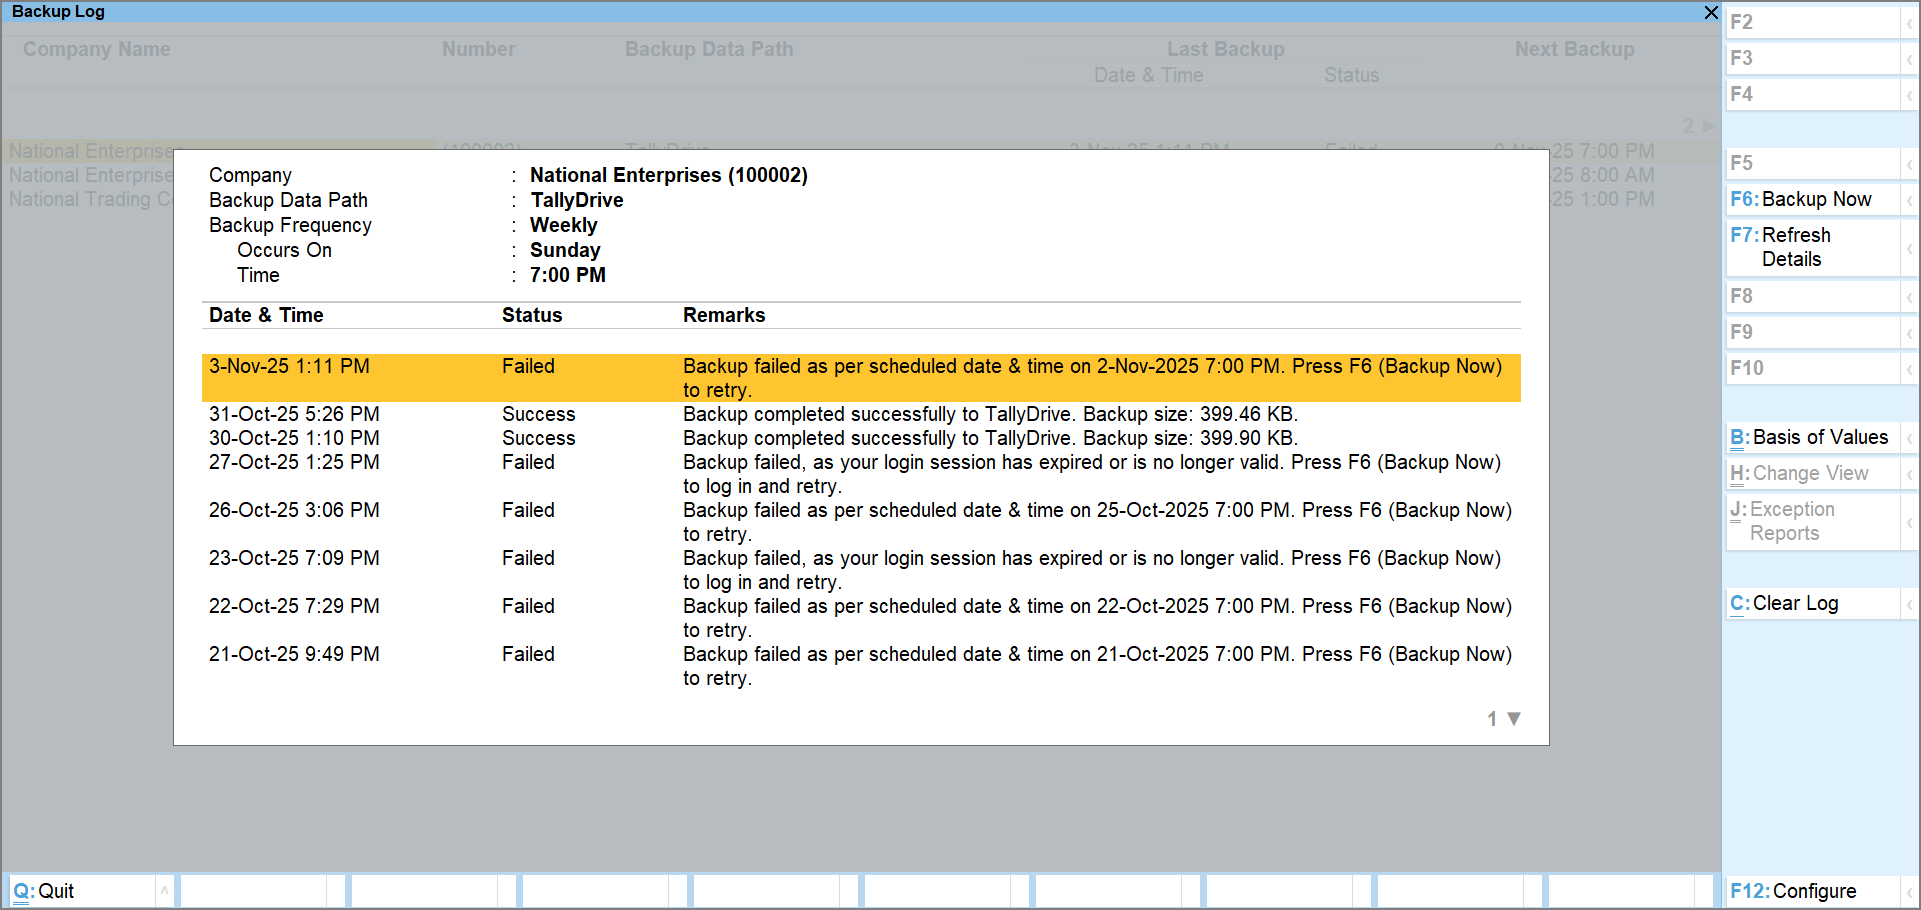
The report shows the Company details, Backup Data Path, Backup Frequency, Occurs On, and Time as per the schedule. It also displays the Date & Time of the last backup, its Status, and Remarks to help you understand the status.
If you want to take an immediate backup of the company, press F6 (Backup Now) and press Y or Enter to confirm. This will initiate a backup of the selected company.
You can configure the Backup Log of a company as per the Backup Status, if required.
Press Ctrl+B (Basis of Values) and select the Backup Status.
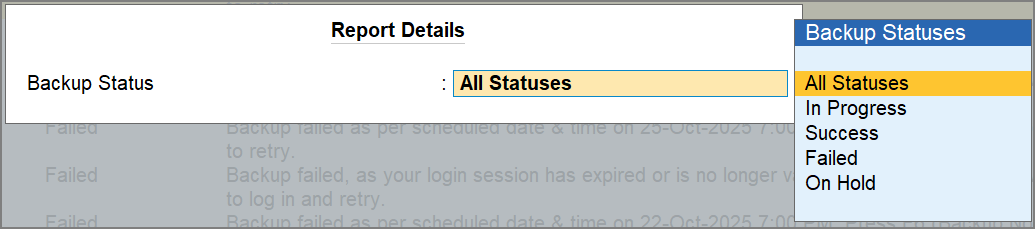
Once configured, the Backup Log will display only the backups as per the selected backup status.
Clear Log
-
Press Alt+C to clear log, if needed.
-
Enter the TallyPrime Server credentials.
-
Press Y to confirm clearing the log.
It will remove all the backup logs from the report, except the latest log.
Delete Backup Schedule
You can easily delete schedules you no longer need for backing up your company data. Note that deleting the schedule will only delete the task and its backup log, and not the associated backups taken on TallyDrive or local drive.
![]()
To delete a schedule or multiple schedules,
-
Select the schedules you want to delete and press Alt+D (Delete).
-
Press Y or Enter to confirm.
Alter Backup Schedule
The Schedule Backup report in TallyPrime provides you the flexibility to alter the schedules as and when required. Whether the backup was scheduled to TallyDrive or to a local drive, you can alter it from the Schedule Backup report.
Alter backup schedule of a local drive
![]()
To alter a schedule on a local drive,
-
Select the schedule you want to alter and press Ctrl+Enter (Alter Schedule).
The Schedule Backup Alteration screen will appear.
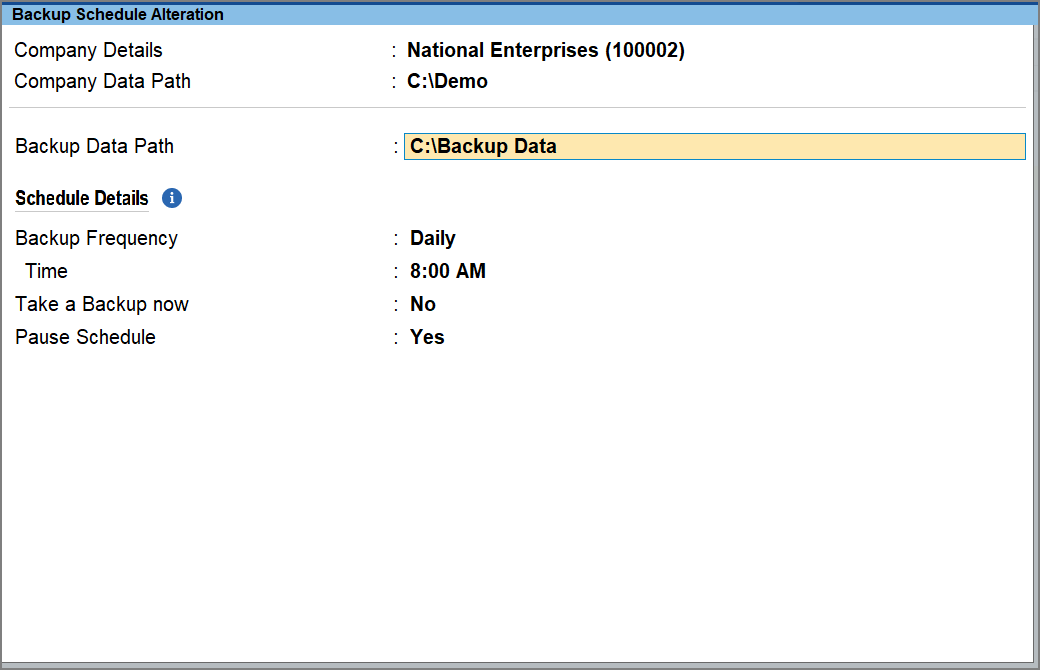
- Alter the schedule details as required.
If you change the Backup Data Path of a schedule from local drive to TallyDrive, you will get the option to enter the Security Details, and prompted to log in to TallyDrive.
-
Enable the option Take a Backup Now, if needed.
It ensures a backup is created immediately after you save the schedule, even if your actual scheduled backup is set for a later date and time. -
Enable the option Pause Schedule, if needed.
It will pause the schedule, and it will not run at the scheduled date and time until you resume it. -
Press Ctrl+A to save the schedule.
Alter backup schedule of TallyDrive
![]()
To alter a schedule on TallyDrive,
- Select the schedule you want to alter and press Ctrl+Enter (Alter Schedule).
The Schedule Backup Alteration screen will appear.
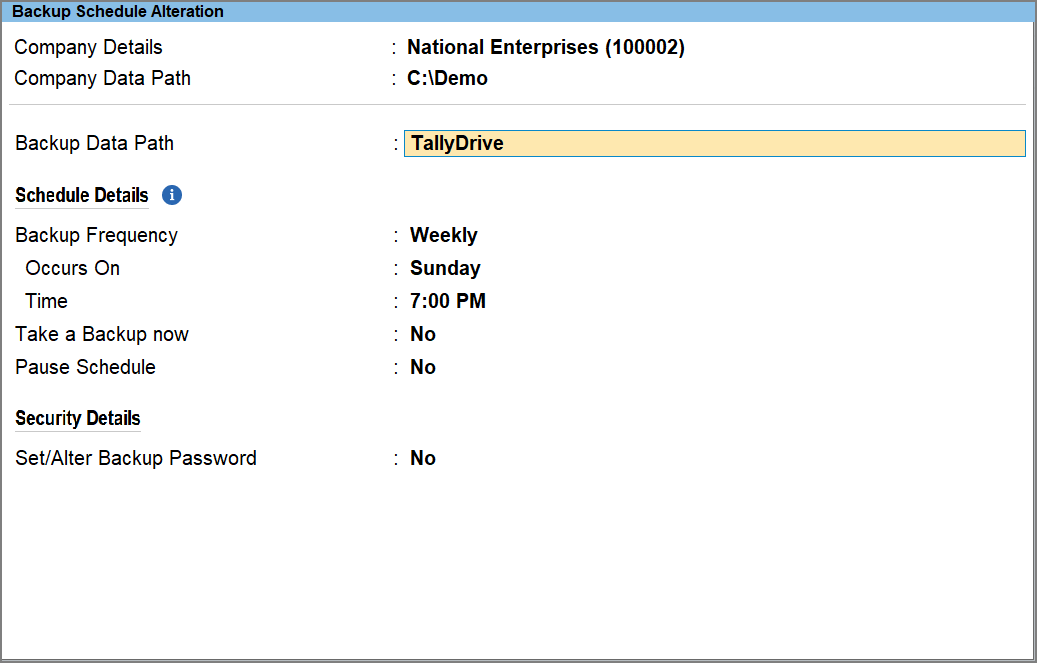
- Alter the schedule details as required.
- Enable the option Take a Backup Now, if needed.
It ensures that a backup is taken immediately after you save the schedule, even if your actual scheduled backup is set for a later date and time. - Enable the option Pause Schedule, if you want to pause the schedule.
It will pause the schedule, and it will not run at the scheduled date and time until you resume it. - Alter the Security Details, if needed.
If a Backup Password exists, you can alter, reset, or remove the password, as required.
You can also add a password if the schedule was created without one.-
Under Security Details, enable the option Set/Alter Backup Password.
-
Alter Password: To alter an existing backup password, enter the Old Password and then enter the New Password and Confirm New Password.
During restore, the new password will be applicable to both previously taken backups and all future backups taken under this schedule.
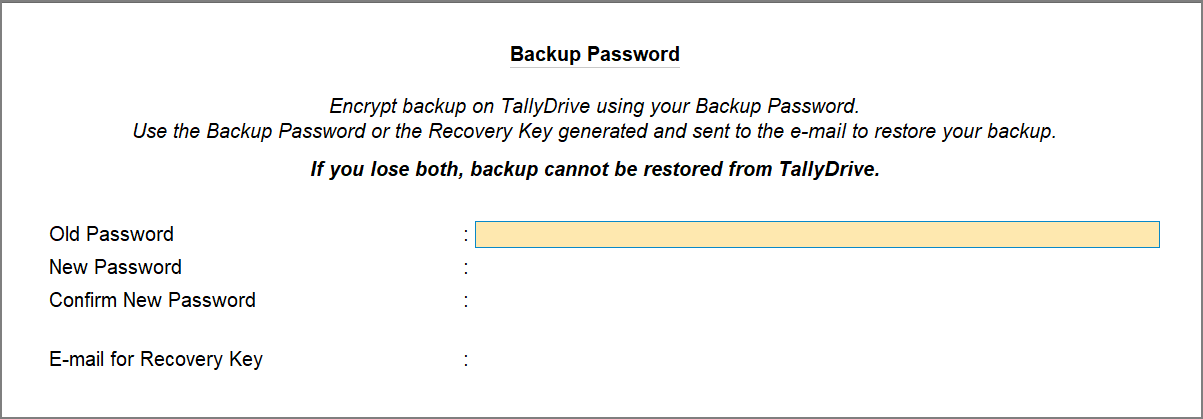
- Add Password: If the backup password does not exist, you can add the backup password while altering the schedule. To add a Backup Password, enter the New Password and Confirm New Password.
During restore, the password will be applicable to both previously taken backups and all future backups taken under this schedule. - Remove Password: You can also remove the backup password while altering the schedule. To remove the password, enter the Old Password and then keep the New Password and Confirm New Password blank.
This will remove password protection all the backups taken under this schedule till now, and future backups. Hence during restore, no password will be required. - Reset Password: In case you have forgotten the backup password, you can reset the password as well. On the Backup Password screen, press Alt+R (Reset Backup Password) and enter the New Password and New Confirm Password.
The new password will be applicable only to the upcoming backups taken under this schedule. The existing backups will not be impacted. Hence, the existing backups can be restored only with the old password, and new backups can be restored only with the new password.
-
- In all the above cases, under the E-mail for Recovery Key, enter the email address or multiple addresses where you want to receive the key. The existing recovery key, if any, will no longer be valid. You can use this key to restore your backup if you forget your password. By default, the key is sent to the Tally.NET ID used for your TallyDrive login.
-
- Enable the option Take a Backup Now, if needed.
- Press Ctrl+A to save the schedule.
View Schedules On Other Scheduler | Multi-User View
The schedule backup feature in TallyPrime supports multi-user environment. Hence, multiple users can schedule the backup of the same shared company on their systems. To get a consolidated view of all the backups scheduled for company, you can use the Schedule Backup report at company level. It allows you to view the schedules created by other users for a specific company.
![]()
-
Press Alt+Y (Data) > Backup & Restore > Schedule Backup.
-
Press F3 (Company) to select a company from the loaded companies or press Alt+F3 (Select Company) to select from the List of Companies.
-
Select the required company and press Enter.
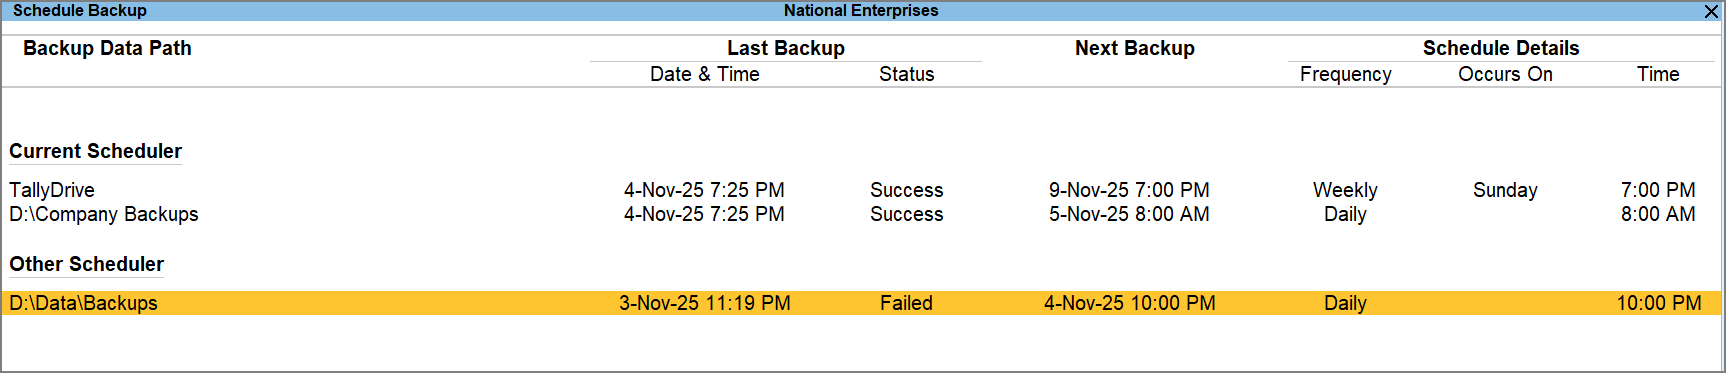
You can see the the backup schedules for the company on the Current Scheduler – the scheduler running on your computer, and Other Scheduler – the scheduler running on other computer or a different installation of TallyPrime done on the same system.
To view the Schedule Details like Last Backup and Next Backup, press F12 (Configure) and enable the option Show Schedule Details.
Move backup schedule
TallyPrime gives you the flexibility to move the backup schedule from other scheduler to your current scheduler.
This is useful when the backup schedule is failing on the other scheduler, or when the other user’s system is inaccessible. By moving the schedule, you can continue running the existing backup without interruption.
Once you move the schedule to the current scheduler, it is deleted from the other scheduler.
To move a schedule,
-
Select the required schedule under Other Scheduler and press Alt+V (Move).
-
Press Y or click Yes to confirm.
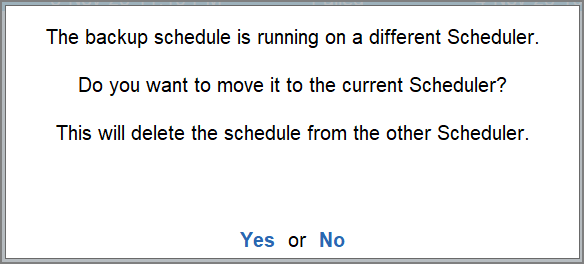
Once moved, the backup will run as per the schedule on your current scheduler.
Once you move a schedule to your Current Scheduler, you can alter it and also take a Backup Now as well, if needed.
Backup Schedules of TallyVault Companies
Backup Schedules of vaulted companies are also displayed in the Schedule Backup report. The way these schedules appear and the actions you can perform depend on whether the company is loaded and whether the TallyScheduler has the TallyVault password.
When the vaulted company is loaded
Tasks for this company appear in the report with the company name and all backup details (Last Backup, Next Backup, and so on).
You can perform all actions:
-
Enter – View the Backup Log
-
Alter – Open the Schedule Backup Alteration screen.
-
Delete – Delete the schedule.
-
Backup Now – Take an immediate backup of the company.
When the vaulted company is not loaded
The company name appears as ******* in the report, but backup details are shown.
You can:
-
Enter: View the Backup Log with company name shown as *******.
-
Alter/Delete: Unable to proceed, as TallyVault password is required. Press Alt+F3 (Select Company), load the company, and enter the TallyVault password to continue.
-
Backup Now: Take an immediate backup of the company.
Handle Exceptions in Backup Schedules | Action Required
The Action Required section in the Schedule Backup report in TallyPrime lists schedules that cannot run due to exceptions. In case of scenarios such as vaulted companies, migrate or repair requirements, and inaccessible data, backup schedules are listed under this section. For your assistance, each issue is flagged with a reason so you can identify the problem and take corrective steps.
On the Schedule Backup report, press Alt+F5 (Detailed) to view the reason for exceptions.
TallyVault password required
For vaulted companies, the TallyVault password must be provided before scheduled backups can run.
Scenarios:
-
Press Enter on Schedul/Alter Schedule/Backup Now/Delete Schedule
Error Message: Unable to proceed, as TallyVault password is required.
Resolution: Press Alt+F3 (Select Company), enter the TallyVault password, then retry.
Company not accessible from source path
If the company folder is missing, renamed, corrupted, or on a disconnected drive, the backup task cannot run.
Scenarios:
-
Press Enter on Schedule / Alter Schedule / Backup Now
Error Message: Error Code X Company data is not accessible at <company data path> . -
Delete Schedule: The schedule is deleted from the report (not from the missing company).
Resolution: Verify the source path, and reconnect the storage.
Company Requires Migration/Repair
If a company needs migration, repair, or reset, or if such processes are in progress, backup tasks are flagged.
Scenarios:
-
Press Enter on Schedule / Alter Schedule / Backup Now / Delete Schedule
Error Message: Unable to proceed, as Repair/Migration/Reset of company data is required or is currently in progress.
Resolution: Open the company and complete migration, repair, or reset before retrying.
By reviewing the Action Required section regularly, you can quickly identify and resolve scheduling issues, ensuring that your company data backups remain consistent and complete.
Q&A
- If I delete a backup schedule, will it delete the backups already taken to my destination?
- What happens to my existing backups if I alter the Backup Data Path?
- How long are backup logs retained in TallyPrime?
- Why does the backup log show “Your backup is up to date. There was no change in the company data, hence no new backup was taken.”?
- What happens to my backup schedules and logs if I split my company?


