Once you purchase Tally.ERP 9 License, you need to activate the license to enjoy all the features of the product. On activating the license, an Account will be created with Tally. You can use this account for future communications with Tally. The license is valid for lifetime. You need to renew TSS once in a year to get the latest product updates.
An Account is created once you activate your license. An account contains your license details, user details, and so on. An account is identified by a unique Account ID . It can be of two types Single site account and Multi-site account.
During your journey with Tally, you may have to perform few of the licensing operations.
|
Related Topics |
On this page
● Configure license using Tally Gateway Server
You need to activate your Tally.ERP 9 license to use all the features of the product.
1. Start Tally.ERP 9.
2. Click A : Activate Your License in the Startup screen, as shown below:

You need to have the required rights to activate the license.
o If you are a Microsoft Windows standard user, and do not have the required rights, a message appears as shown below:

Click Yes , and enter your computer administrator username and password to restart Tally.ERP 9 with administrator rights.
o If you have Microsoft Windows administrator rights, a message appears as shown below:

Click Yes , for Tally.ERP 9 to restart with administrator rights.
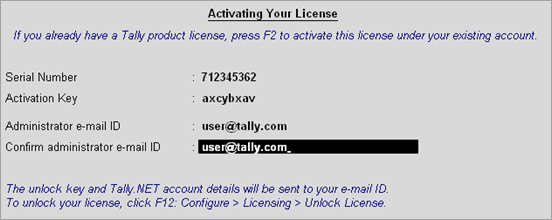
3. Enter your Tally.ERP 9 Serial Number , Activation Key , and Administrator e-mail ID , as shown below:

Note : The e-mail ID provided in the License Activation screen is linked to your Tally.ERP 9 serial number, and can be used for all further licensing operations, and interactions with Tally Solutions.
4. Press Enter to activate your license. A confirmation message appears, as shown below:

5. Press Enter to view the Unlock License screen.
6. Enter the Unlock Key sent to your e-mail ID in the Unlock License screen , as shown below:

Note : If you have not received the unlock key, click F2: Get Unlock Key in the Unlock License screen. Enter your Tally.ERP 9 serial number in the Unlock Key Service screen to view the unlock key.
7. Press Enter to unlock your license. A confirmation message appears once you unlock your license. Your License has been successfully activated.
In a multi-user environment, you need to configure all your client computers to the Tally Gateway Server to access the license.
You can configure Tally.ERP 9 License by
● Configuring to an available Tally Gateway Servers
● Configuring manually to a Tally Gateway Server
1. Start Tally.ERP 9 .
2. In the Startup screen, press Alt+C : Configure Existing License . Alternatively, press F12: Configure > Licensing > Configure Existing License . You will be prompted to connect to an available Tally Gateway Server.
Note : Tally Gateway Server (TGS) is a Microsoft Windows service that is installed and started after activating your license. You can access the license via LAN by configuring your computer to point to the TGS where the license is active.
3. Click Yes to connect to the license. Click No to configure the license manually .
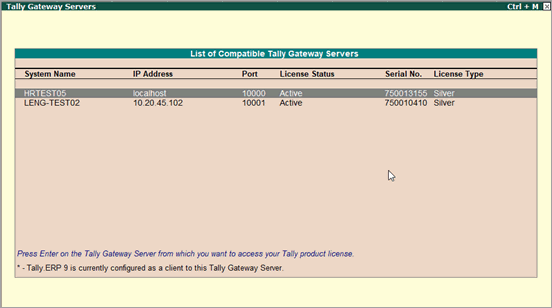
4. If you have more than one Tally Gateway Servers, then the following screen appears and you can connect to the desired TGS.

Note : If a license is in Educational Mode, the Serial No. and License Type will appear blank in the above screen. On pressing F4: Show All , list of all the Tally Gateway Servers (including Educational Mode) will be displayed.
5. Once the license is configured to the Tally Gateway Server, a message Restart Tally.ERP 9 to apply the changes? is displayed. Press Enter . Your Tally.ERP 9 application is now licensed.
Note : You can also press Ctrl+F2 to configure manually. to configure your license by entering the Server name/IP and Port .
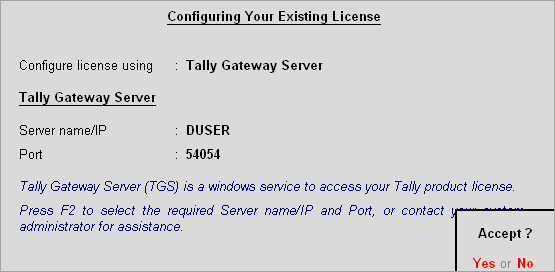
You can configure manually to a Tally Gateway Server by entering the Server name/IP and Port as shown below:

Note : The option of configuring your Tally.ERP 9 license through a license file has been removed from Release 6.6.1.
You have to reactivate your license, if you have surrendered it due to various reasons. Reactivation could be for subsequent activation on the same computer or another computer.
1. Start Tally.ERP 9.
2. Click V : Reactivate Your License in the Startup screen, as shown below:

Note : You can alternatively, click F12: Configure > Licensing > Reactivate License .
You need to have the required rights to reactivate the license.
● If you are a Microsoft Windows standard user, and do not have the required rights, a message appears as shown below:

● Click Yes , and enter your computer administrator username and password to restart Tally.ERP 9 with administrator rights.
● If you have Microsoft Windows administrator rights, a message appears as shown below:

● Click Yes , for Tally.ERP 9 to restart with administrator rights.
3. Enter the Administrator e-mail ID and Tally.NET password in the License Reactivation screen, as shown below:

If you are the administrator of more than one site, the License Reactivation screen displays a List of Sites that can be reactivated, as shown below:

4. Select the license that you want to reactivate.
5. Press Enter to reactivate. A confirmation message appears on reactivating your license.
You need to update your Tally.ERP 9 license due to either of the following reasons:
● The latest version of Tally.ERP 9 does not appear in the information panel.
● TDL or other configurations linked to your account have to be used.
● Add-ons purchased from TallyShop have to be used.
● Tally Software Services (TSS) subscription is renewed.
● Your Tally.ERP 9 has switched to Education Mode as it is unable to access the license in your computer.
1. Start Tally.ERP 9.
2. Click F12: Configure > Licensing > Update License .
3. Enter the Administrator e-mail ID and Tally.NET password in the Update License screen, as shown below:

4. Press Enter to update your license. A confirmation message appears once your license is updated.
Note : If you are updating your site license, you can enter site administrator e-mail ID and password.
If you want use your Tally.ERP 9 license on another computer, you need to surrender the license. You can surrender through the product or through the Tally website.
● Surrender license from the product
● Surrender license from the website
1. Start Tally.ERP 9.
2. Click F12: Configure > Licensing > Surrender License .
● Microsoft Windows Standard User : If you are a Microsoft Windows standard user, and do not have the required rights, a message appears as shown below:

● Click Yes , and enter your computer administrator username and password to restart Tally.ERP 9 with administrator rights.
● Microsoft Admin User : If you have Microsoft Windows administrator rights, a message appears as shown below:

● Click Yes , to restart with administrator rights.
3. Enter the Administrator e-mail ID and Tally.NET password in the Surrendering Your License screen, as shown below:

4. Press Enter to surrender your license. A confirmation message appears once your license is surrendered.
Note: If you are surrendering your site license, you can enter the site administrator e-mail ID and password.
You can also surrender your Tally.ERP 9 license from the Tally website.
1. Log in to the Tally website.
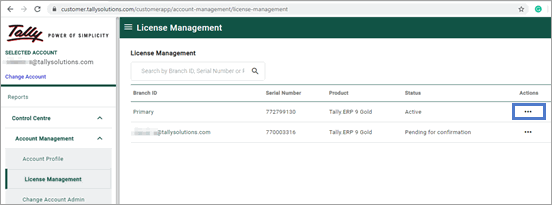
2. Go to Control Centre > Account Management > License Management . The License Management screen appears as shown below:

3. Click the ellipsis icon under the Actions column. Select Edit Site Profile .
4. In the Site Information screen, click the ellipsis > Surrender License .

5. Click SURRENDER in the confirmation window.
Your Tally.ERP 9 license has now been surrendered.