|
Related Topics |
You can record sales and print a valid GST tax invoice with party’s GST registration and location, item details (HSN or SAC), and tax rates.
On this page
● Local sales with multiple GST rates
● Override assessable value in invoice
● Update party details in invoice
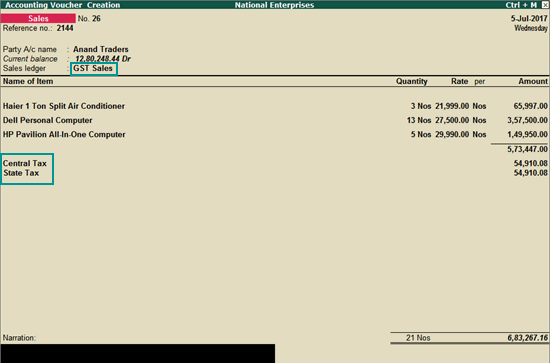
1. Go to Gateway of Tally > Accounting Vouchers > F8: Sales .

2. In Party A/c name , select the customer ledger or the cash ledger.
3. Select the common sales ledger in which GST rate is not defined.
4. Select the stock items defined with different GST rates, and specify the quantities and rates for each of them.
5. Select the central and state tax ledgers. GST will be calculated based on the GST rates defined in the stock items.
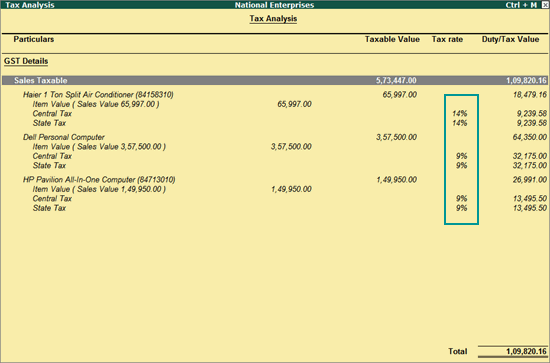
You can view the tax details by clicking A : Tax Analysis . Click F1 : Detailed to view the tax break-up.
6. In the sales invoice, press Alt+P to print the invoice in the required format.
For multiple copies :
Press Alt+P and then Alt+C to select the number of copies.

Note: When you are printing multiple copies of the invoice, only the page number of the current invoice will be displayed, and not the number of the copy. For example, if you want to print 3 copies for an invoice (original, duplicate, and triplicate), then in the print preview, the page number would be displayed as 1 of 1, and not 1 of 3.
For services, original copy for buyer and duplicate copy for supplier will be printed in the invoice.
For goods, original for buyer, duplicate for transporter and, triplicate for supplier will be printed in the invoice. If you do not want to print the transporter's copy, then disable the option Print transporter's copy in the sales Invoice Printing Configuration screen.
As per GST guidelines, details such as the applicable taxes and tax rates, and the GSTIN/UIN of the company and the customer will be captured. After selecting the state in the ledger master, the state name and the state code will be captured in the printed invoice. Depending on your requirements, you can include additional details in your invoice by clicking F12: Configure .
To ensure that company GSTIN is printed on the sales invoice:
● Specify GSTIN under Set/alter GST details in company F11 > F3 features.
● In the Voucher Printing screen of the sales invoice, press F12 and set:
o Print Company GSTIN Number to Yes .
o Print Item-wise GST details to Yes , to print the GST invoice in landscape orientation with tax breakup for each stock item.
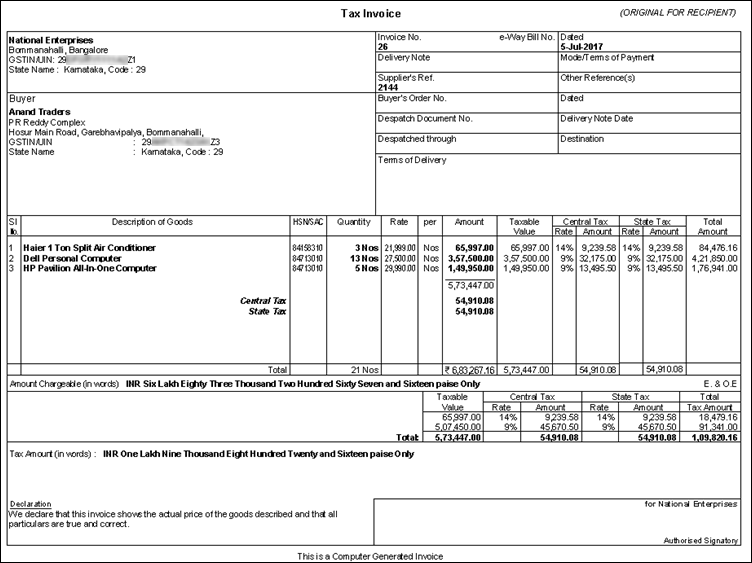
Note: The total value of Total Amount column does not appear, as the invoice value is captured with GST in the Amount column.
1. Go to Gateway of Tally > F12: Configure > Printing > Advanced Configuration .
2. Set Reduce space between address and item name/particulars to No .
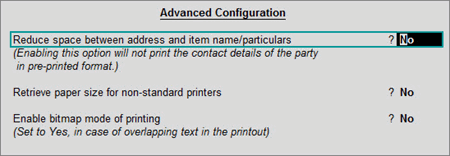
3. Press Ctrl+A to accept.
Follow the steps used for recording a local sales transaction. The only difference is that you have to select the integrated tax ledger instead of central tax and state tax.
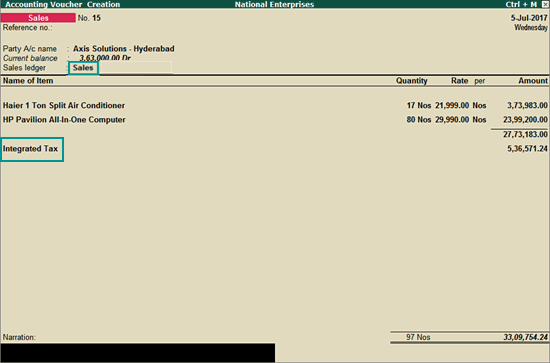
When you maintain only accounting transactions (but not inventory of your goods), or when your company deals with services, you can use the accounting invoice mode for recording your local and interstate sales.
1. Go to Gateway of Tally > Accounting Vouchers > F8: Sales .
2. Click I: Accounting Invoice .
3. In Party A/c name , select the customer ledger or the cash ledger.
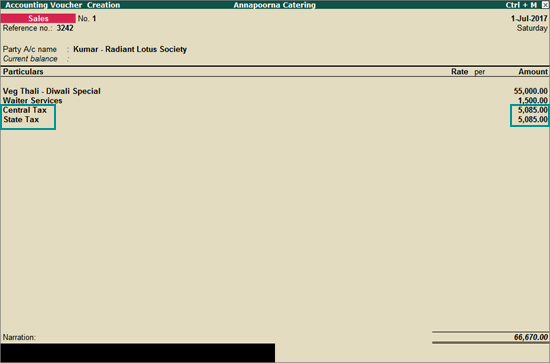
4. Select the required service ledgers, and specify the amount. Alternatively, press Alt+C to create the ledgers.
5. Select the central and state tax ledgers for local sales and the integrated tax ledger for interstate sales.
1. In the sales invoice, press F12 and set the options as given below:
● Use common ledger account for item allocation - No .
● Allow modification of tax details for GST - Yes .
2. Select the party ledger and stock item.
3. Select the sales ledger. In the GST Details screen, press F12 and set the option Allow override assessable value to Yes .
4. Add the amount which should form part of the Taxable Value . GST will be calculated on this updated amount .

5. Similarly, select the required stock items, and update the Taxable Value .
6. Select the GST ledgers.
7. Press Alt+A to view the Tax Analysis screen. The GST assessable value appears as overridden by user.
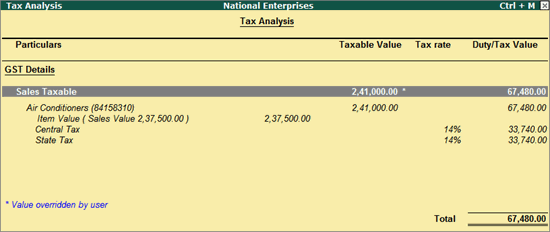
8. Press Esc to return to the sales invoice. The sales invoice appears as shown:
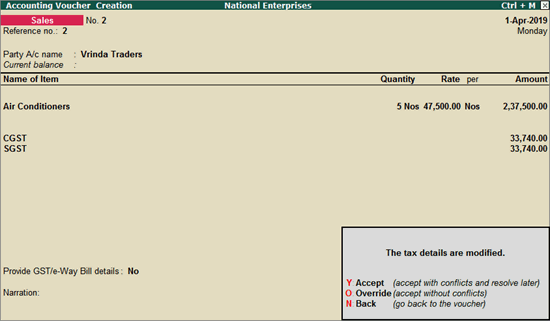
9. Press O to override the values.
Note : When you override tax rate details in a company with Ladakh as the State , the field State Tax is displayed if the voucher date is earlier than 01-Jan-2020 and UT Tax , if the date is 01-Jan-2020 or later.
If you press Y ( Enter ) instead of O , the transaction will appear as an exception in the GST report as shown below:

You can press Enter to view the transaction, select it, and press Alt+A to accept it as is.

The transaction will get included in the relevant section of the GST report.
If you had defined HSN code in the stock item, but want to change it in the invoice, you can select the HSN classification.
Follow the steps given below:
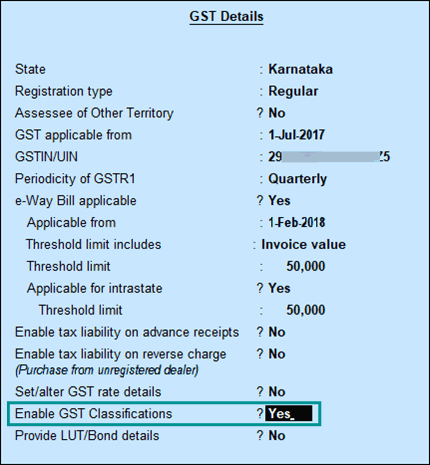
1. In Company GST Details , set the option Enable GST Classifications to Yes .
2. Create a new HSN Classification with the required HSN code.
● Go to Gateway of Tally > Inventory Info. > Statutory Info. > GST Classifications > Create .
● Enter the HSN code, and applicable GST details.
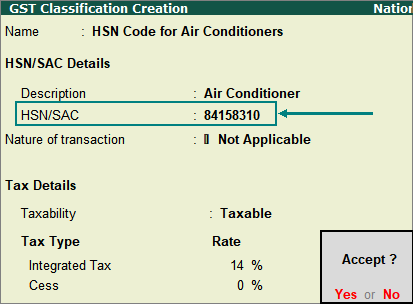
● Press Enter to save.
3. Record the sales invoice by overriding the HSN code.
● In the sales invoice, press F12 and set the options as given below:
o Use common ledger account for item allocation - No .
o Allow modification of tax details for GST - Yes .
● Select the party ledger and stock item.
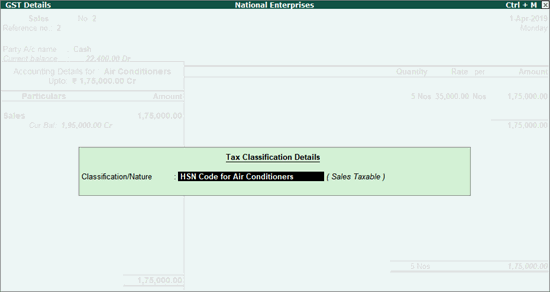
● Select the sales ledger. In the GST Details screen, press F12 and set the option Allow override Classification/Nature to Yes .
● Select the HSN classification.
Note: Similar to sales invoice, you can record purchase invoice by selecting the required HSN classification.
● Similarly, select the required stock items, and select the HSN classification.
● Select the GST ledgers.
● Press Alt+A to view the Tax Analysis screen. The details appear as overridden by user.
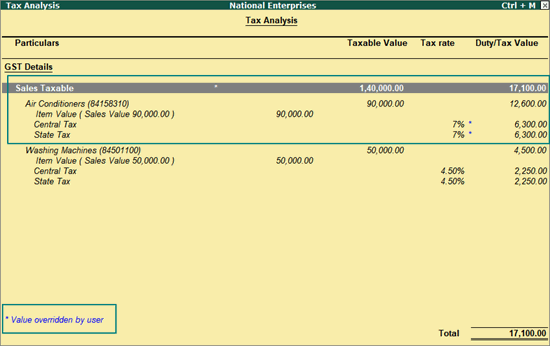
● Press Esc to return to the sales invoice. The sales invoice appears as shown:
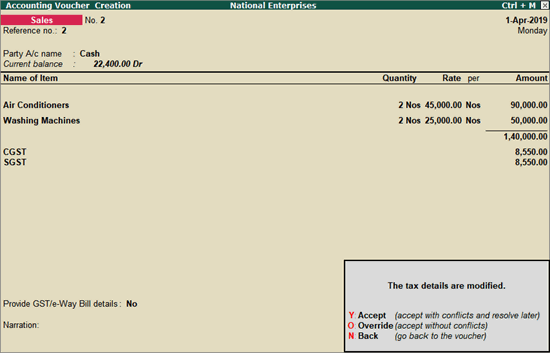
● Press O to override the values.
If you press Y ( Enter ) instead of O , the transaction will appear as an exception in the GST report as shown below:

You can press Enter to view the transaction, select it, and press Alt+A to accept it as is.

The transaction will get included in the relevant section of the GST report.
● Open the invoice in alteration mode
● Select the party ledger, and press Enter to view the Party Details screen.
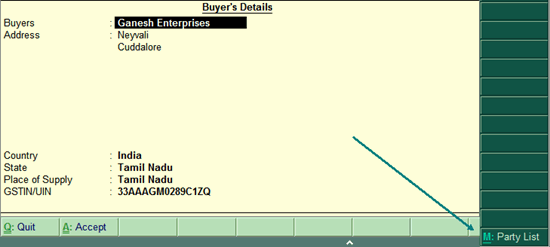
● Press Alt+M and select the required party ledger.