To enable manufacturers to easily process an upward revision in the price per unit and/or rate of Excise duty of finished goods which have been already sold, Tally.ERP 9 Release 4.7 now has an easy solution - the Excise Supplementary Invoice.
During the normal course of business a company or manufacturer may negotiate with the buyer for an upward revision in the Rate per Unit for invoices already issued. To recover this additional amount and the corresponding duty on the revised amount it is required to issue an additional invoice called Excise Supplementary Invoice.
Supplementary Invoice is necessary in these scenarios:
When there is an upward revision only in Rate per Unit
Finalisation of provisional assessment of Rate of Duty
When there is an upward revision only in Rate of Duty
When there is an upward revision in Rate per Unit and Rate of Duty
Supplementary Invoice will be recorded only when it is required to recover additional duty.
To get started:
Create a new Voucher type - Excise Supplementary Invoice
Recording an Excise Supplementary Invoice for a revision in Rate per Unit
Recording an Excise Supplementary Invoice for a revision in Rate of Duty
Recording an Excise Supplementary Invoice for a revision in Rate per Unit and Rate of Duty
Creating a new Voucher type
Go to Gateway of Tally > Accounts Info > Voucher Type > Create
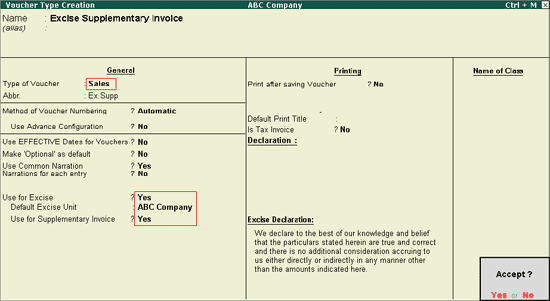
Enter a suitable name for the Voucher type, for e.g., Excise Supplementary Invoice
Select Sales in the Type of Voucher field
Set the option Use for Excise to Yes
Choose the appropriate Default Excise Unit
Set the option Use for Supplementary Invoice to Yes

Accept the Voucher type
Note: This Voucher Type is different from the Excise Sales Voucher type created to record Excise Sales transactions.
Recording a Revision in Rate per Unit
To record a change in Rate per Unit, follow the process below:
Go to Gateway of Tally > Accounting Vouchers > F8 to select the Sales Voucher
Select Excise Supplementary Invoice
Enter required details in the Party Details screen
Select Domestic in the Nature of Removal field
Enter the date range within which the sale transaction was recorded
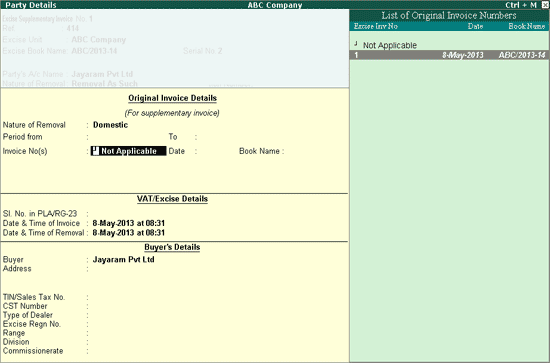
Select the original invoice from the list displayed. This will capture the details of goods and Excise duty charged in the original Excise sales invoice. The Original and Revised rates of goods and duty will also be displayed
Note: Select Not Applicable in the Invoice No(s) field to manually enter the Invoice Number, date, quantity, rate etc. in the Item Allocations screen, after the Stock Item has been selected (mentioned in Step 9).
Select the Sales Ledger
Select the Stock Item
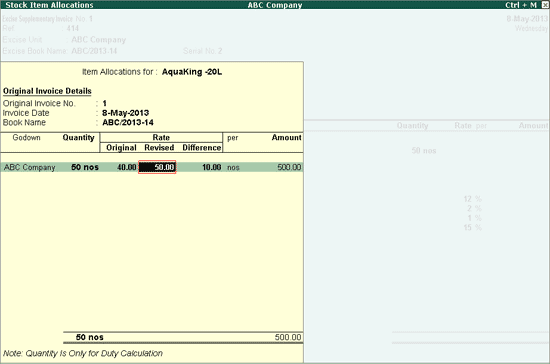
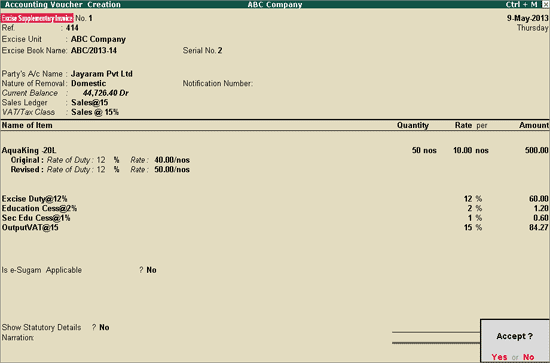
In the Item Allocations screen, enter the new rate (agreed revision in Rate per Unit) in the Revised Rate field. The difference in Rate per Unit will be automatically calculated and posted in the Difference field. Alternatively only the difference in unit rates can be entered in the Difference field.
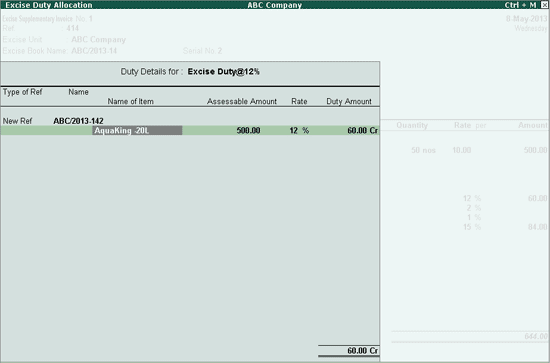
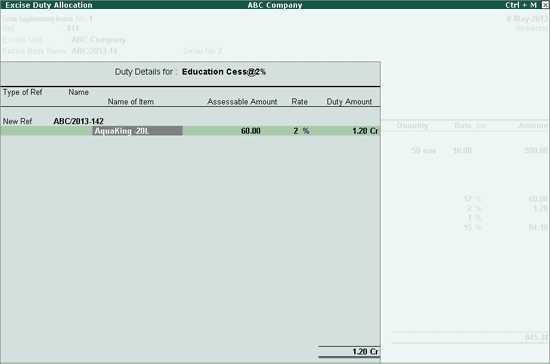
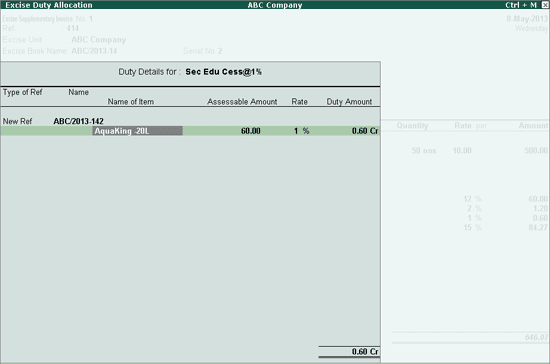
Navigate to the Duty details of each Ledger – Excise Duty, Education and Sec Edu Cess and Output VAT and accept the Voucher. Duties will be calculated only on the differential amount.
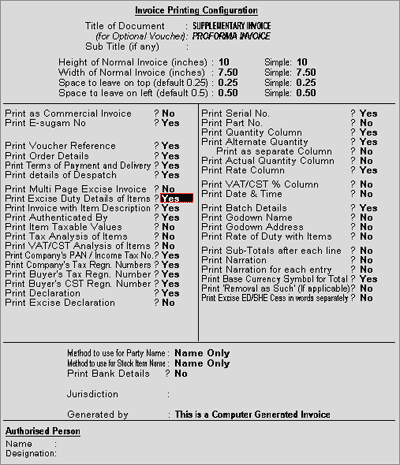
While printing the Rule 11 Invoice, press F12 to view the Print Configuration screen. Here, set the option Print Excise Duty Details to Yes for the Rule 11 Invoice to display the details of the original and revised duty and rate.
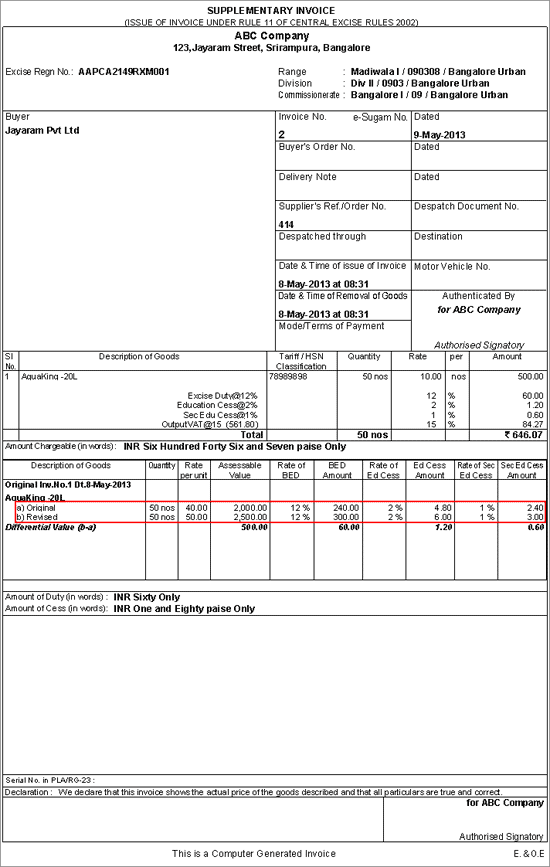
Recording a Revision in Rate of Duty
To record a change in Rate of Duty charged, follow the process below:
In the Excise Supplementary Invoice enter all the requisite details like Reference, Serial numbers, Party’s A/c name
Select Domestic in the Nature of Removal field
Enter the date range within which the sale was made
Enter the date range within which the sale transaction was recorded
Select the original invoice from the list displayed. This will capture the details of goods and Excise duty charged in the original Excise sales invoice. The Original and Revised rates of goods and duty will also be displayed
Note: Select Not Applicable in the Invoice No(s) field to manually enter the Invoice Number, date, quantity, rate etc. in the Item Allocations screen, after the Stock Item has been selected (mentioned in Step 7).
Select the Sales Ledger
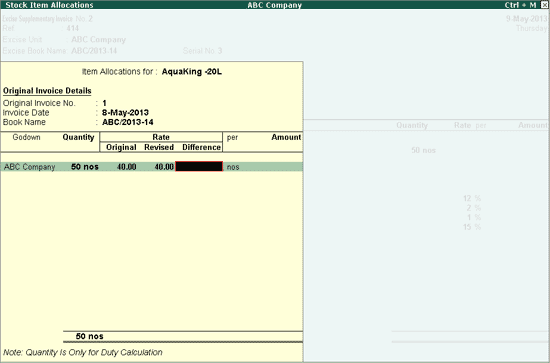
Navigate to the details of Stock Items, to the Item Allocations screen
In this scenario, leave the Difference field blank
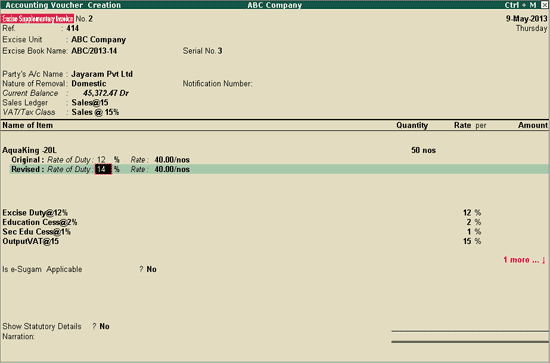
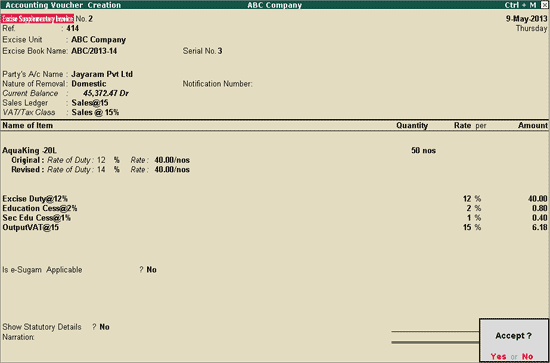
In Voucher creation screen; in the Rate of Duty field, in the Revised line, enter the new rate of duty.
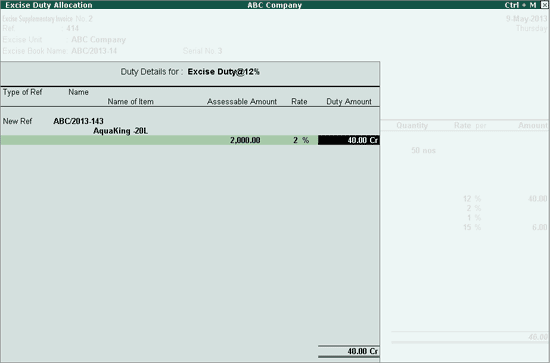
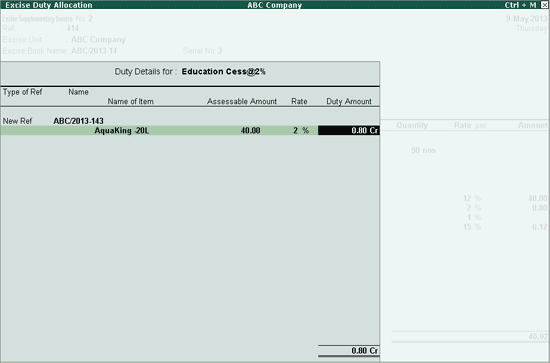
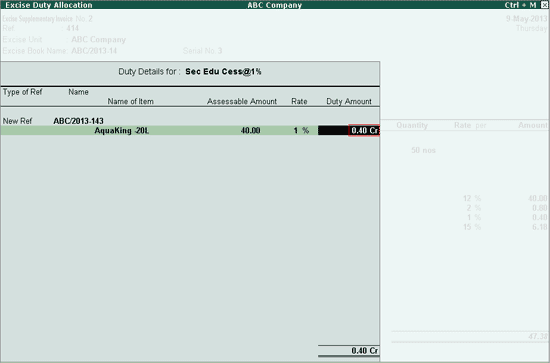
Navigate to the Duty details of each Ledger – Excise Duty, Education and Sec Edu Cess and Output VAT and accept the Voucher.
While printing the Rule 11 Invoice, press F12 to view the Print Configuration screen. Here, set the option Print Excise Duty Details to Yes for the Rule 11 Invoice to display the details of the original and revised duty and rate.
Recording a Revision in Rate per Unit and Rate of Duty
To record the change in Rate per Unit and Rate of Duty charged follow the process below:
In the Excise Supplementary Invoice enter all the requisite details like Reference, Serial numbers, Party’s A/c name
Select Domestic in the Nature of Removal field
Enter the date range within which the sale was made
Enter the date range within which the sale transaction was recorded
Select the original invoice from the list displayed. This will capture the details of goods and Excise duty charged in the original Excise sales invoice. The Original and Revised rates of goods and duty will also be displayed.
Note: Select Not Applicable in the Invoice No(s) field to manually enter the Invoice Number, date, quantity, rate etc. in the Item Allocations screen, after the Stock Item has been selected (mentioned in Step 7).
Select the Sales Ledger
Navigate to the details of Stock Items, to the Item Allocations screen
In the Item Allocations screen, enter the new rate (agreed revision in Rate per Unit) in the Revised Rate field. The difference in Rate per Unit will be automatically calculated and posted in the Difference field. Alternatively only the difference in unit rates can be entered in the Difference field.
In Voucher creation screen; in the Rate of Duty field, in the Revised line, enter the new rate of duty
Navigate to the Duty details of each Ledger – Excise Duty, Education and Sec Edu Cess and Output VAT and accept the Voucher.
While printing the Rule 11 Invoice, press F12 to view the Print Configuration screen. Here, set the option Print Excise Duty Details to Yes for the Rule 11 Invoice to display the details of the original and revised duty and rate.