To create the synchronisation rule on the Client follow the steps given below:
It is essential to select the required company before creating the client rule
From Gateway of Tally > Import of Data > Synchronisation > Client Rules > Create
In the Client Rule Creation screen that appears, make the following configurations:
Enter the required Name of Rule
Set Use Tally.NET Server to Yes
Note: To synchronise data using Direct IP, set the option Use Tally.NET Server to No, provide the required IP Address or URL of the server
Enter the Server's Account ID
Note: The Account ID is displayed in the License block of the Information panel on the Server Tally.ERP 9 configured earlier.
To synchronise data using Direct IP Synchronisation set the option Use Tally.NET Server to No and provide the required URL or IP Address of the Server
Enter the Server Company's Connect name in the Company Name on Server field
Set Enable Sync from Server to Yes in order to initiate data synchronisation from the server
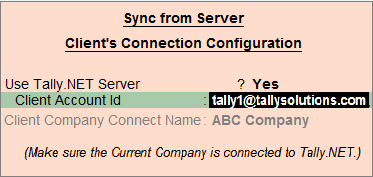
The Sync from Server screen appears
Set Use Tally.NET Server to Yes
Enter the respective Client Account ID
In the Client URL, select the required option
Unknown - when the synchronisation client's URL is unknown
User defined - enter the synchronisation client's URL in User Defined URL
The company name on synchronisation client is displayed in Client Company Connect Name
Note: When Use Tally.MET Server is set to No, Tally.ERP 9 by default will display the IP Address and port number of the synchronisation client.
Set Notify when Server Initiates Synchronisation to Yes in order to display a message when the server starts synchronising the data. However, the user can disable this option in order to synchronise data without notification on the client
Note: Ensure that the respective company on the synchronisation client is connected
Set Synchronise Altered Transactions to Yes in order to Synchronise altered/modified voucher
Set Sync over slow connection to Yes to send smaller packets of data over a slow internet connection
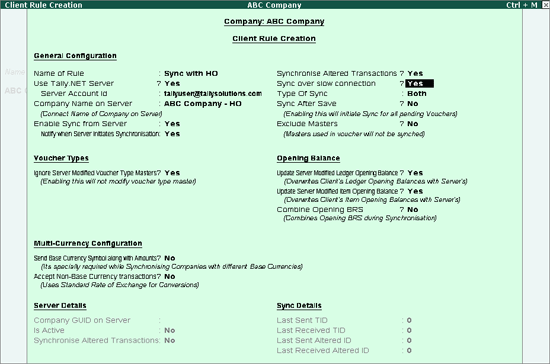
By default Type of Sync is set to Both, select the type of synchronisation from the Type of Sync displayed
Both: By default you can send and receive all voucher types or specify the voucher types you want to send and receive
Recv Data: By default you can receive all voucher types or specify the voucher types you want to receive
Send Data:By default you can send all voucher types or specify the voucher types you want to send
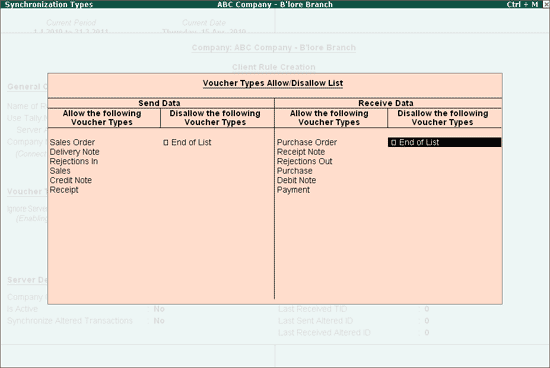
In the Send Data section of Synchronisation Types screen
By default, Allow the following Voucher Types is set to All Voucher Types, select the required voucher types from the Types of Vouchers displayed
Select End of List to complete the selection
To disallow a specific voucher type from being synchronised select the required Type of Vouchers in Disallow the following Voucher Types
Select End of List to complete the selection
In the Receive Data section
By default, Allow the following Voucher Types is set to All Voucher Types, select the required voucher types from the Types of Vouchers displayed
Select End of List to complete the selection
To disallow a specific voucher type from being received select the required Type of Vouchers in Disallow the following Voucher Types
Select End of List to complete the selection
Press Enter to save the configuration
Recv Data: Allows you to receive all the voucher types or selected voucher types only
Send Data: Allows you to send all the voucher types or selected voucher types only
Note: Selecting the option Send Data or Receive Data will bring up the Send Data or Receive Data screens respectively, to allow or disallow synchronisation for the required voucher type select the type of vouchers.
In the Client Rule Creation screen
Set Sync after Save to Yes
In the Voucher Type Sync After Save Config screen
Select the voucher type to synchronise on saving from the Type of Vouchers displayed
Select End of List to complete the voucher type selection
Set Exclude Masters to Yes to synchronise the vouchers only, and not masters
Set Ignore Server Modified Voucher Type Masters to No will synchronise the altered Voucher Type masters from the server. Any new voucher types created on the server will be updated on the client where as the existing voucher types will be overwritten during synchronisation
Set Update Server Modified Ledger Opening Balance to Yes in order to overwrite the client's ledger opening balance with server's ledger opening balance
Set Update Server Modified Item Opening Balance to Yes in order to overwrite the client's item opening balance with server's item opening balance
Set Combine Opening BRS to Yes to combine the Opening BRS amount of the client with that of the server
Set Send Base Currency Symbol along with Amounts to Yes so that the client transmits the currency symbol while synchronising the data
Set Accept Non Base Currency Transactions to Yes to synchronise transactions with foreign currency

Press Enter to save the Client Rule
Note: The Company Name on Server should be the Connect Name for the Server Company.
Synchronise the Client Rule with Server
The Client Rule created has to be synchronised with Server.
To Synchronise with Server, from the Client machine,
Go to Gateway of Tally > Import of Data > Synchronisation > Synchronise