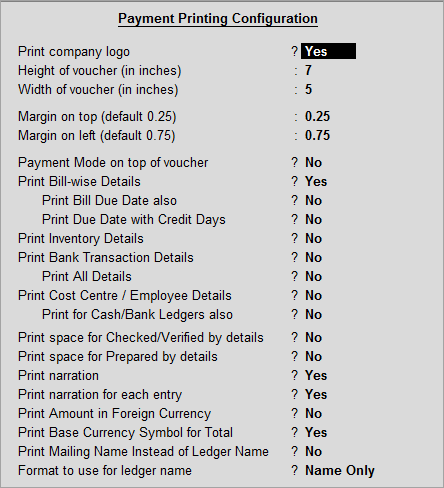
The printing parameters of the payment voucher can be configured from this screen. You can set the size, margin of the voucher and decide the amount of information to print.
To configure printing payment voucher
● Go to Gateway of Tally > F12: Configure > Printing > Payment Voucher.
The Payment Print Configuration screen can also be configured from the payment voucher.
To configure printing payment voucher from payment voucher
1. Go to Gateway of Tally > Accounting Vouchers > F5: Payment.
2. Click P: Print to view the Voucher Printing screen.
3. Click F12: Configure to view the Payment Print Configuration screen.
The Payment Print Configuration screen appears as shown below:

Print Company Logo
Set this option to Yes to print the company's logo in the payment voucher. To set an image as company logo, refer Enable Company Logo.
Margin setup
Voucher print page setup contains height, width, top margin and left margin. By default, height is set as 7 inch, width is set as 5 inch, top margin is set as 0.25 inch, and left margin is set as 0.75 inch.
Payment Mode on top of voucher
Set this option to Yes to print the cash/bank ledger name at the top of the voucher.
Print Bill-wise Details
Enable this option to print the bill-wise details. The bill-wise details is printed during payment voucher printing.
Print Bill Due Date also
This is a sub-option of Print Bill-wise Details. Set this option to Yes to print the bill due date along with bill-wise details in the payment voucher.
Print Due Date with Credit Days
Set this option to Yes to print the credit days allowed with the due date. This option can be enabled only if the option Print Bill Due Date also is set to Yes.
Print Inventory Details
Set this option to Yes to print the inventory item details in the payment voucher.
Print Bank Transaction Details
Set this option to Yes to print the bank details such as transaction type, instrument number and date in payment voucher.
Print Cost Centre Details/ Employee Details
Set this option to Yes to print the cost centre and employee details in the payment voucher.
Print Space for Checked/Verified initials
Set this option to Yes to provide space and print Checked and Verified By at the bottom of the payment voucher.
Print space for Prepared By
Set this option to Yes to provide space and print Prepared By at the bottom of the payment voucher.
Print narration
Enable this option to print the narration in the payment voucher.
Print narration for each entry
Set this option to Yes to print the narration for each entry in the payment voucher.
Print Amount in Foreign Currency
Set this option to Yes to print the amount in the payment voucher is the foreign currency, as configured.
Print Base Currency Symbol for Total
Set this option to Yes to prefix the base currency symbol to the total amount during printing of payment voucher.
Print Cheque after Saving Voucher
Set this option to Yes to print cheque for every cheque transaction in payment voucher.
Note: To print cheque, while entering the payment voucher, select Cheque as the Transaction Type, and configure cheque book. When the transaction is saved, the Cheque Printing screen appears. Press Enter, to print the cheque.
Print Mailing Name instead of Ledger Name
Set this option to Yes, to print the mailing name specified in the ledger. This is useful in cash and bank transactions, when the ledger selected is cash/ bank.
Method to use for Ledger Name
Select the style to display the ledger name.