Form ER 1 is a monthly return for production, removal of Goods, other relevant particulars and CENVAT Credit.
All the Excise Manufacturing (Regular/Large Tax payer) Units should file returns in Form ER 1.
You can generate Form ER 1 in Tally.ERP 9 to view Form ER 1
Go to Gateway of Tally > Display > Statutory Reports > Excise Reports > Manufacturer > Form ER 1
From the List of Excise Units select the Excise Unit – ABC Company (for which you want to print ER 1)
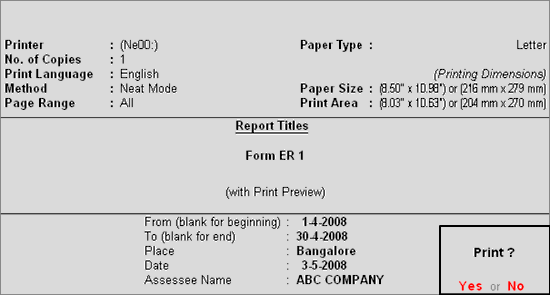
The Excise ER1 Print Configuration screen appears as shown

Press Backspace to set the From Date and To Date to take the print of Form ER 1 for appropriate period
Ensure Alt +I: Print Preview is selected.
The Print Preview of Form ER 1 appears as shown
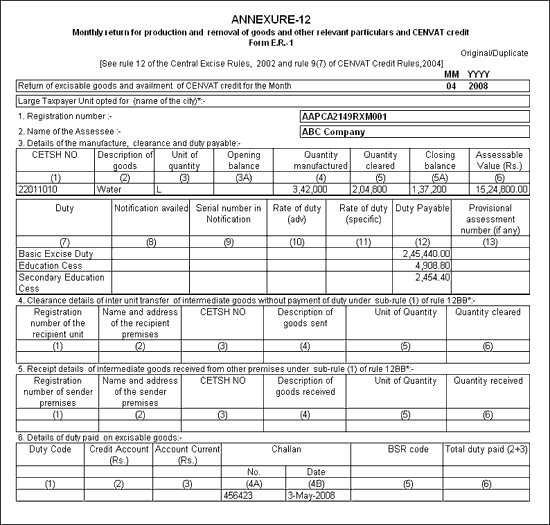
Return of excisable goods and availment of CENVAT credit for the month: Displays the Month and Year of the return.
Large Taxpayer Unit opted for (name of the city): This field displays the name of the city which is opted by the manufacturing unit as Large Tax payer unit.
Registration Number: This field displays the Registration Number of the Manufacturing Unit
Name of the Assessee: In this field Name of the Excise Unit will be captured.
Details of the manufacture, clearance and Duty payable: This section displays details of manufacture, clearance of stock and duty payable on clearance of goods.
CETSH No. – Display the Central Excise Tariff Sub Heading Number of the Stock item.
Description of the Goods: Displays the Tariff Classification of the stock Item as selected in the stock Item.
Unit of Quantity: Displays the Unit of Measure (Reporting UOM) of the Stock Item.
Opening Balance: Displays the opening stock balance for the period selected.
Quantity Manufactured: Displays the Quantity of Stock Item manufactured during the period.
Quantity Cleared: Displays the Quantity of Stock Item cleared during the period.
Closing Balance: Displays the closing balance of the stock item for the period.
Assessable Value: Displays the Assessable Value of the stock Item on which the duty is calculated.
Duty: Displays the Duty Type applicable for the Tariff Classification.
Notification Availed: Displays the Notification Number, if the assessee has any notification received towards tariff classification regarding duty exemption, special rates etc.
Serial Number in Notification: Displays the line number of the tariff classification in the notification.
Duty Payable: Displays the total Duty payable for the period
Clearance details of inter unit transfer of intermediate goods without payment of Duty under sub-rule (1) of rule 12BB: This section captures the details of inter unit transfer of intermediate goods without payment of goods.
Receipt details of intermediate goods received from other premises under sub-rule (1) of rule 12BB: This section captures receipt details of intermediate goods received from other premises.
Details of duty paid on excisable goods: Displays the details of duty paid during the period.
Duty Code: Displays the Duty code towards which the duty is paid.
Credit Account: Displays the CENVAT credit amount adjusted for the period
Account Current: Displays the duty amount paid for the period using G.A.R. 7 Challan.
Challan No and Date: Displays the Challan Number and Date of Payment of duty.
BSR Code: Displays the BSR code of the bank through which the duty is paid.
Total Duty paid: Displays the total of CENVAT Credit availed and the net Duty paid for the period.
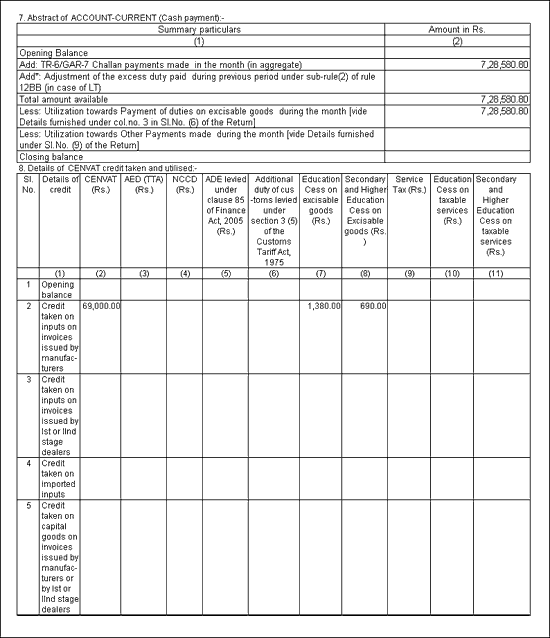
Abstract of ACCOUNT-CURRENT (Cash Payment): This section Captures the details of all the payments made during the period using G.A.R.7 Challan
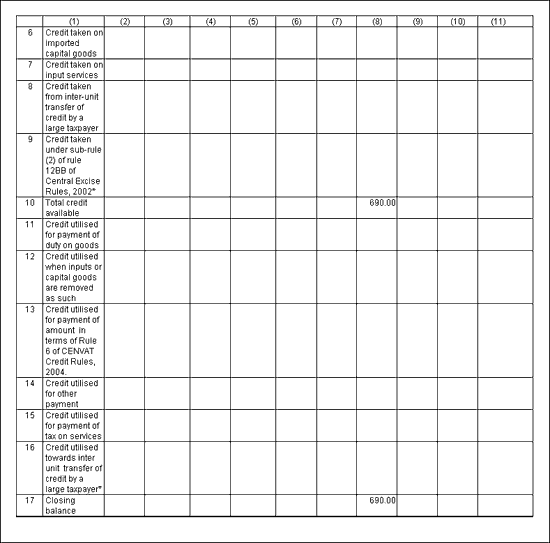
Details of CENVAT credit taken and utilised: This section captures the details of CENVAT credit taken and utilised during the period.
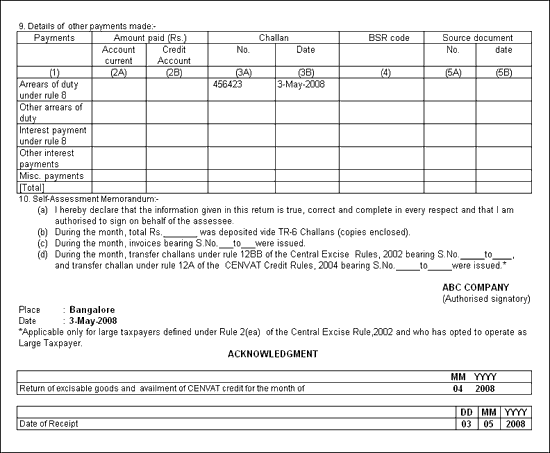
Details of other payment made: This section captures the details of other payments such as arrears, penalty, interest and miscellaneous payments paid during the period.
Self-Assessment memorandum: In this section assessee will declare the required details, Name of Assessee or Authorised signatory, place and Date.
ACKNOWLEDGMENT: This will be returned to the assessee, which will be sealed and signed by the by the Range officer.