The employee recruitment process is a complete solutions for recruiting employees in an organisation or recruiting employees for another organisation. The recruitment process contains various folder relevant to the employment process, the employer needs to move the candidate from one folder to another as the candidate clears various levels of the recruitment process.
By default the recruitment process has the following folder which allows the user to track the candidate during various phases of recruitment.
Applied contains the profile of all the candidates who have applied for a published job.
Considered contains candidate’s profile who match the job profile and considered for the selected job.
Test Scheduled contains the list of candidate who are scheduled to take a test.
Test Completed contains the list of candidate who have completed the test.
Rejected contains the list of candidate who were marked Reject for the selected job.
Based on the requirement, the user can create additional folders and move the candidates to the respective folders as they clear the phases of recruitment.
To recruit candidates who have applied for a job published follow the steps shown:
In the Control Centre screen
Select R: Recruitment or press Alt + R.
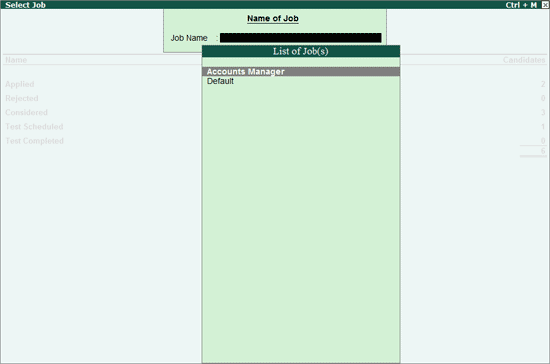
The Select Job screen appears as shown:
Select the required job from the List of Job(s) displayed and press Enter.
Note: Initially, the List of Job(s) will contain only Default job.
Job requirements have to be created and published from Job Management.
List of Job(s) displays all job requirements published from Job Management.
The Job Folders screen appears as shown:
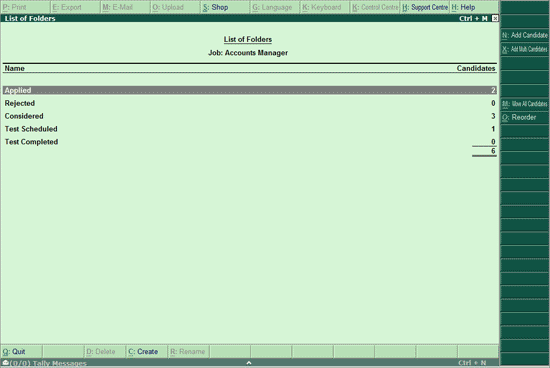
Note: The candidates who have applied for a published job appear in Applied folder.
The candidates considered for recruitment appear in Considered folder.
The following functions can be performed from the Job Folders screen:
This button allows you to create new candidates from other media or walk in candidates. The candidate added from List of Folders is moved to Applied folder.
This button allows you to create multiple candidates from other media or walk in candidates. Only basic information like Name, Age, Gender, Email ID and Mobile Number can be entered. The candidates added from List of Folders is moved to Applied folder.
Click here for the detailed procedure.
This button allows you to create new folders in addition to the default folders available under List of Folders of a selected Job.
To create a new folder
From the List of Folders screen
Click C: Create or press Alt + C
Create New Folder screen appears as shown:
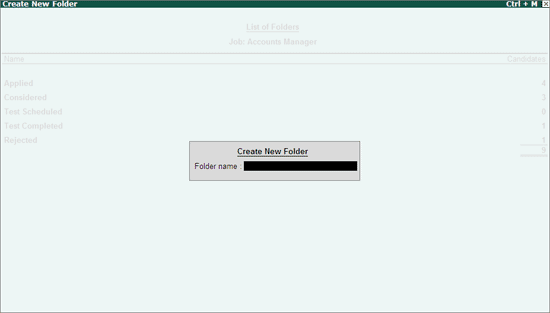
Enter the required folder name under Folder Name field and press Enter
Press Y to Accept
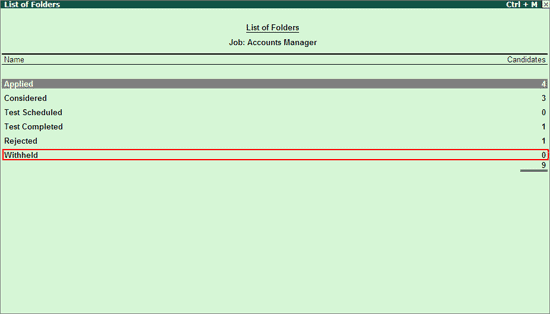
The List of Folders screen displays the newly created folder as shown:
This button allows you to rename the created folder.
To rename the folder
From the List of Folders screen:
Select the created folder.
Click R: Rename or press Alt + R.
Rename Folder screen appears.
Enter the required new name in the field provided and press Enter.
Note: Default folders cannot be Renamed
This button allows you to delete the created folder.
To delete the folder
From the List of Folders screen:
Select the created folder.
Click D: Delete or press Alt + D.
Delete Folder screen appears.
A message Are You Sure! Yes or No will prompt you for confirmation.
Press Y to confirm.
Note: Default folders cannot be Deleted.
This button allows you to move all the candidates in a particular folder to another folder. Its is similar to the Move To option inside the folders.
To move all candidates to a different folder
Select the required folder.
Click M: Move All Candidates or press Alt + M.
Move Candidate screen appears

Note: The folder options listed in the Parent Folder will vary depending on the folder from where the Move to is executed.
In Move to folder field select the required folder from the Parent Folder list.
Enter the comments, if any, in the Comments field.
The completed Move Response screen appears as shown:
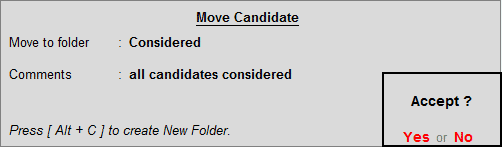
Press Enter to Accept.
The all candidates get moved to the appropriate folder.
This button allows you to reorder the folders in the List of Folders screen.
To reorder folders,
Click O: Reorder Folder or press Ctrl + O
Reorder Folder screen will appear as shown:
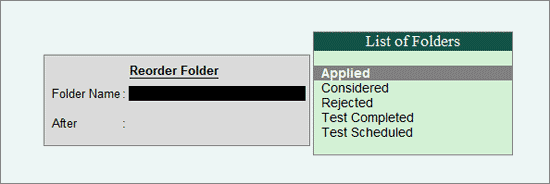
Select the folder that you want to move from the List of Folders
In the After field, select another folder after which you want the first folder to appear in the List of Folders screen, as shown:
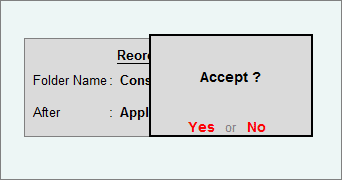
Press Enter to Accept.
The first folder will appear after the second folder.
This folder contains the profile of all the candidates who have applied to a published job. You can short list the required employees and considered for further processes.
To open the Applied folder
Select Applied folder and press Enter
The List of Candidates screen of Applied folder appears as shown:
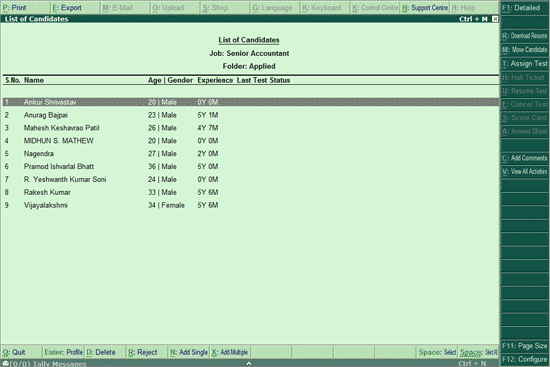
The following functions can be performed from this folder:
F1: Detailed: Allows you to view the details of the candidates, such as, their Key Skills, Highest Qualification, Current & Expected Salary, Contact details, etc.
N: Add Single: Allows you to create New Candidates from other media. The new candidates added from this screen gets updated in the Applied folder.
Ctrl+X: Add Multiple : Allows you to create Multiple New Candidates from other media. The new candidates added from this screen gets updated in the Applied folder.
D: Download Resume: Allows you to download the resume of the selected candidate.
M: Move Candidate: Allows to move the selected candidate to Considered or Rejected folder. It also has the capability to create a user specified folder and move the selected candidate.
Ctrl+R: Reject: Allows to move the selected candidate to Rejected folder.
T: Assign New Test: Allows to assign a test to the selected candidate.
C: Add Comment: Allows to add comment to the selected candidate.
V: View All Activities: Allows to view all the activities of a selected candidate along with the comments passed at each of the process level.
Press Page Down or + key to navigate to the next candidate's profile.
Press Page Up or - key to navigate to the previous candidate's profile.
Press Esc to come back to List of Candidates screen.
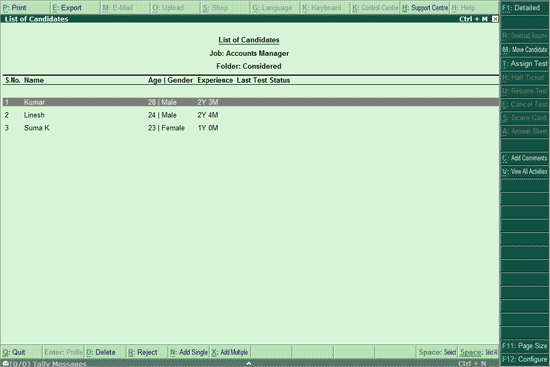
This folder contains the list of candidates who have been considered by the employer from the Applied folder or from Candidate Search or by adding New Candidates. The employer can proceed with further recruit operations from this folder.
To open Considered folder, from the Job Folders screen:
Select Considered folder and press Enter.
The Candidate List screen opens displaying the list of candidates considered by the employer.
Note: The New Candidates added from Test Scheduled and Test Completed folders will be added to Considered folder.
The following functions can be performed from this folder:
F1: Detailed: Allows you to view the details of the candidates, such as, their Key Skills, Highest Qualification, Current & Expected Salary, Contact details, etc.
N: Add Single: Allows you to create New Candidates from other media. The new candidates added from this screen gets updated in the Considered folder.
Ctrl+X: Add Multiple: Allows you to create Multiple New Candidates from other media. The new candidates added from this screen gets updated in the Considered folder.
D: Download Resume: Allows you to download the resume of the selected candidate.
M: Move Candidate: Allows to move the selected candidate to Considered or Rejected folder.
Ctrl+R: Reject: Allows to move the selected candidate to Rejected folder.
T: Assign New Test: Allows to assign a test to the selected candidate.
C: Add Comment: Allows to add comment to the selected candidate.
V: View All Activities:Allows to view all the activities of a selected candidate along with the comments passed at each of the process level.
Press Page Down or + key to navigate to the next candidate's profile.
Press Page Up or - key to navigate to the previous candidate's profile.
Press Esc to come back to List of Candidates screen.
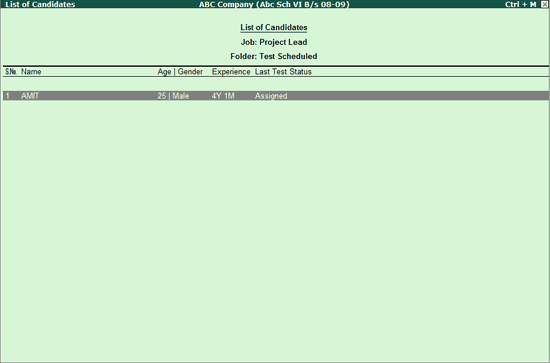
This folder displays the list of candidates who have been assigned new test by the employer from any of the other folders.
To open Test Scheduled folder, from the Job Folders screen:
Select Test Scheduled folder and press Enter
The Candidate List screen appears displaying the list of candidates to whom tests have been scheduled as shown:
The following functions can be performed from this folder:
F1: Detailed: Allows you to view the details of the candidates, such as, their Key Skills, Highest Qualification, Current & Expected Salary, Contact details, etc.
N: Add Single: Allows you to create New Candidates from other media. The new candidates added from this screen gets updated in the Considered folder.
Ctrl+X: Add Multiple: Allows you to create Multiple New Candidates from other media. The new candidates added from this screen gets updated in the Considered folder.
D: Download Resume: Allows you to download the resume of the selected candidate.
M: Move Candidate: Allows to move the selected candidate to Applied, Considered or Rejected folder.
Ctrl+R: Reject: Allows to move the selected candidate to Rejected folder.
R: Resume Test: Allows the employer to resume the assigned test that was interrupted while performing online test due to various reasons. In such cases, the Last Test Status column in Test Schedule folder will display as Aborted. The employer has to click R:Resume Test so that the candidate continues the online test.
D: Delete Response: Allows the employer to select and delete employees
T: Assign New Test: Allows the employer to assign a new test to the candidate.
H: Hall Ticket: Allows the employer to view/print/email the hall ticket for the online/assessment test
E: Cancel Test: Allows to cancel a test assigned to a candidate. This button will be active only to the candidates in Assigned status.
Ctrl+S: Score Card: Allows the employer to view/print/email the score card for the online/assessment test
A: Answer Sheet: Allows the employer to view the answer sheet of a selected candidate.
C: Add Comment: Allows to add comment to the selected candidate.
V: View All Activities:Allows to view all the activities of a selected candidate along with the comments passed at each of the process level.
Press Page Down or + key to navigate to the next candidate's profile.
Press Page Up or - key to navigate to the previous candidate's profile.
Press Esc to come back to List of Candidates screen.
To conduct a Scheduled Test the respective candidate should follow the steps shown:
Start Internet Explorer.
In the address bar type www.tallysolutions.com/test
The Start Online Test page appears as shown:

Enter the Test ID which you had noted, in Please enter your test id here.
The Start Online Test screen appears displaying the Profile Information and Online Test Instruction.
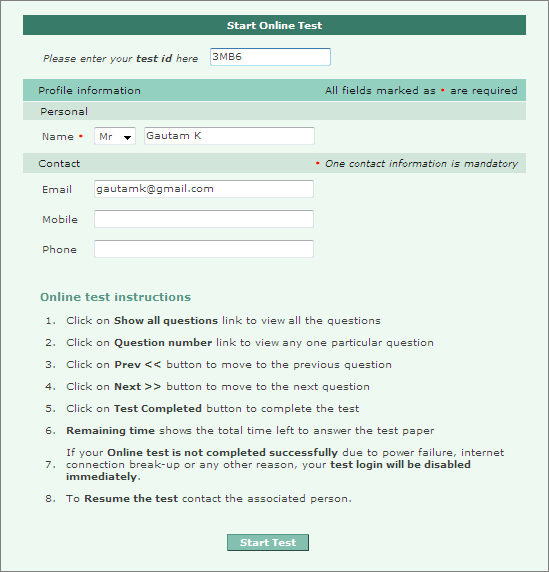
Click Start Test
The Online Test Paper page appears as shown:
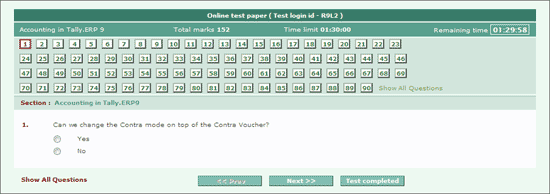
In the Online Test Paper page the following buttons perform the respective tasks: :
<< Prev go to the previous question.
Next >> go to the next question.
Test Completed indicates you have completed the test.
Show All Question displays all questions of the respective question paper.
Proceed to answer the questions from the question paper assigned.
Click Test Completed to indicate that you have completed the test successfully.
On completing the test click Test Completed. A screen displaying statistics for the test taken appear as shown:
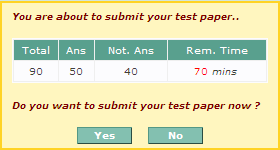
Click Yes to submit the test taken
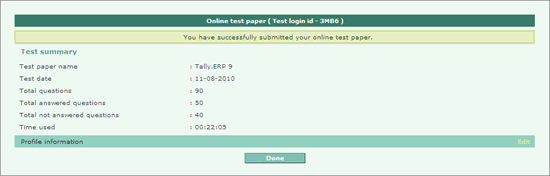
Click Done to confirm submission
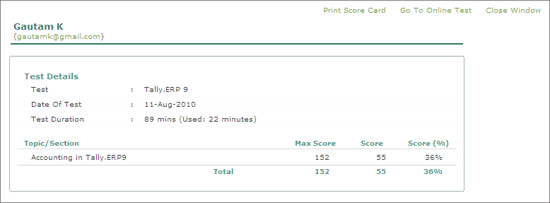
The candidate’s scorecard for the assigned test paper appears as shown:
The employer or the organiser of the online test can view the marks sheet by following the steps shown:
Login to the Control Centre
Select Jobs & Recruitments > Recruitments
Select Test Completed folder
Select the required candidate
Click A: AnswerSheet or press Alt + A
In case the online test comes to an abrupt halt due to any one of the following reasons:
Power Failure.
Employer or Candidate has accidentally closed the window.
The system has crashed.
In such cases, the employer needs to login to the Control Centre:
Select Jobs & Recruitments > Recruitments.
Select the respective job for which the test was conducted.
Select Test Scheduled folder
The List of Candidates screen displays the Last Test Status column as Aborted to candidates whose online test failed during the process.
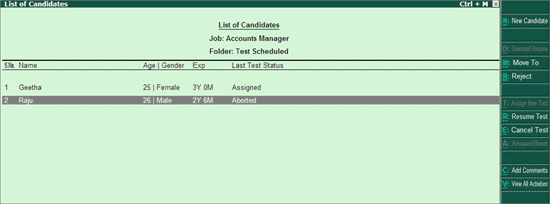
Select the required Aborted candidate
Click R: Resume Test.
A message Are you sure to resume the test? Yes or No appears.
Press Y to allow to continue the test for the same candidate.
The Status under Last Test Status changes to In Progress as shown:

To restart the same test follow the steps shown:
Start Internet Explorer
In the address toolbar type www.tallysolutions.com/test
The Start Online Test page appears. The Candidate should provide the same test id which was provided to him earlier.
The Online Test screen appears, click on Continue.
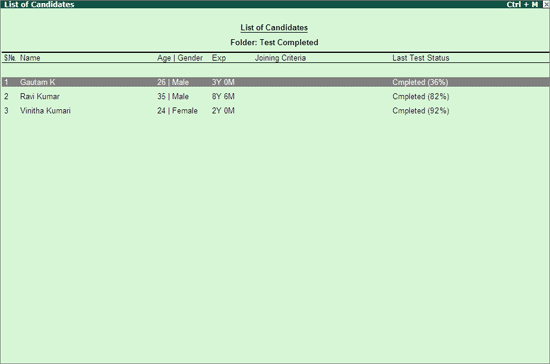
This folder displays the list of candidates who have completed their online tests.
To open Test Completed folder, from the Job Folders screen:
Select Test Completed folder and press Enter.
The List of Candidates screen appears displaying the list of candidates who have completed their online tests as shown:
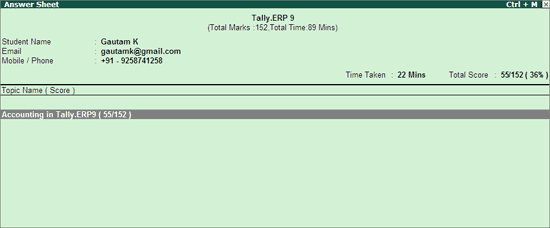
Select the required Candidate.
Click A: Answer Sheet or press Alt + A
The Answer Sheet screen of the selected candidate appears as shown:
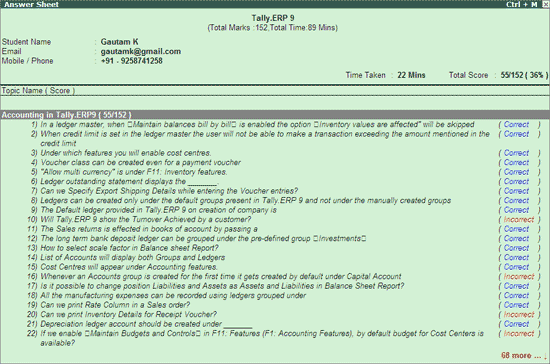
Click F1: Detailed or press Alt + F1
The detailed Answer Sheet appears as shown:
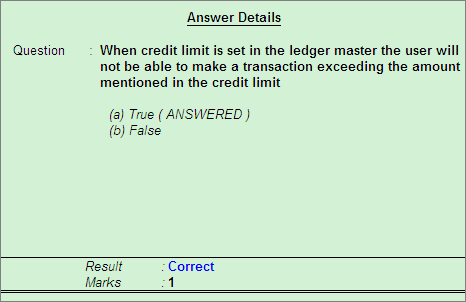
Select the required question
Click D: View Details or press Alt + D
The Marks and Result for the selected screen are displayed in Answer Details as shown:
The following functions can be performed from this folder:
F1: Detailed: Allows you to view the details of the candidates, such as, their Key Skills, Highest Qualification, Current & Expected Salary, Contact details, etc.
N: Add Candidate: Allows you to create New Candidates from other media. The new candidates added from this screen gets updated in the Considered folder.
Ctrl+X: Add Multi Candidates: Allows you to create Multiple New Candidates from other media. The new candidates added from this screen gets updated in the Considered folder.
D: Download Resume: Allows you to download the resume of the selected candidate.
M: Move Candidate: Allows the employer to move the selected candidate to Applied, Considered or Rejected folder.
Ctrl+R: Reject: Allows to move the selected candidate to Rejected folder.
C: Add Comment: Allows to add comment to the selected candidate.
V: View All Activities:Allows to view all the activities of a selected candidate along with the comments passed at each of the process level.
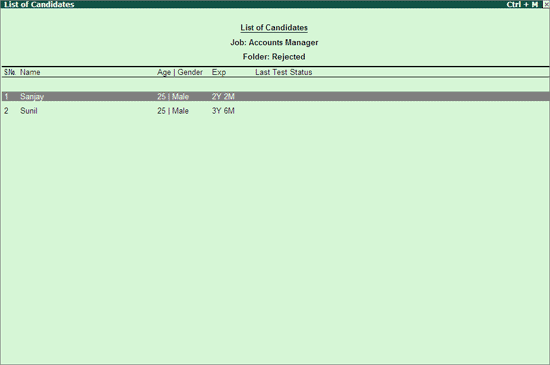
This folder displays the list of candidates who have been rejected during any of the recruiting process levels. This folder allows the employer to reconsider the rejected candidates to move to relevant folders. The employer can also perform other functions like assigning new test, add comments and view all activities, etc., from this folder.
To open a Rejected folder, from the List of Folders of a selected Job screen:
Select Rejected folder and press Enter.
The List of Candidates screen appears displaying the list of candidates who have been rejected for various reasons as shown:
The following functions can be performed from this folder:
F1: Detailed: Allows you to view the details of the candidates, such as, their Key Skills, Highest Qualification, Current & Expected Salary, Contact details, etc.
N: Add Candidate: Allows you to create New Candidates from other media. The new candidates added from this screen gets updated in the Rejected folder.
D: Download Resume: Allows you to download the resume of the selected candidate.
M: Move Candidate: Allows the employer to move the selected candidate to Applied, Considered or Rejected folder. It also has the capability to create a user specified folder and move the selected candidate.
Ctrl+R: Reject: Allows to move the selected candidate to Rejected folder.
C: Add Comment: Allows to add comment to the selected candidate.
V: View All Activities:Allows to view all the activities of a selected candidate along with the comments passed at each of the process level.