
Print Invoices and Reports in TallyPrime
When you generate your invoices – like sales voucher, purchase voucher, delivery or receipt note and so on – you will need to hand over the customer copy of such invoices to your party as needed. Similarly, you may have to submit a hardcopy of your Balance Sheet or other financial reports to your peers, auditors and CA. Printing documents related to your day-to-day transactions can be managed using the Printing capabilities in TallyPrime.
Print simple and commercial invoice formats: You can print your invoices in simple or commercial formats depending on your business practices. Based on your selection, TallyPrime displays the applicable information for you to further include or exclude from the invoice and automatically takes care of the changes required in the invoice layout before printing.
Optimised printing: Printing several invoices each day can be costly. In TallyPrime, you can configure printing of your invoices – such as sales and purchases – to use optimised printing and save paper.
Print Reminder letters/Confirmation of Accounts: Whether you have to collect the dues or need to share a confirmation of accounts with your parties, TallyPrime enables you to print them with all the necessary information.
Print Company details: When you print any business document, you will need to have the company information on the printed document for reference. Whether it is your invoices or financial reports, having details such as Company Address, contact details, company logo and so on, printed on the document is important. TallyPrime facilitates all such needs to assist you.
Ease of printing with Printer Settings: Whether it is your invoices, reports, or reminder letters, printing in TallyPrime has always been simple. You can choose the default printer or change/configure the printer setup, select the print format, paper type, specify the number of copies, page range to print – the way you would generally want in your business. You can also set preview as the default to not only ensure that you have included all the necessary information for printing, but also to avoid printing documents by mistake.
Invoice Formats for Printing | Simple & Commercial
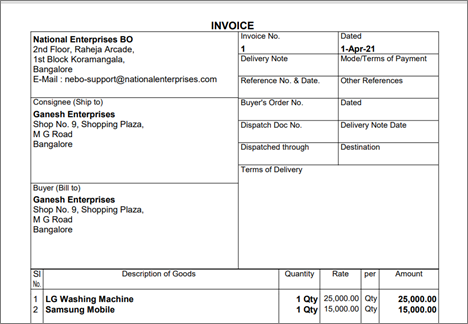
When you make a sale or a purchase, you may need to have a printed copy of the invoice, based on the business type or the party’s requirement, TallyPrime supports printing invoices in pre-printed formats by default. You can configure the options to print such invoices in commercial format, and customise it as needed.
To print a sales invoice in commercial format:
- Press Ctrl+P (Print) > C (Configure) > set Use Commercial Invoice format to Yes.
Optimised Printing of Invoices | Save Paper While Printing
By default, TallyPrime prints invoices on A4 size papers. In certain cases, your transaction may involve only a few items and can be printed in less paper space. In such cases, you can reduce the print size for your invoice and use papers of only the required size for printing. To know how to optimising printing of invoices, refer to:
Printer Settings | Easy Access to Print-Related Options
Printing invoices and reports for different business needs is quite common. TallyPrime supports different print requirements, such as printing multiple invoice copies, printing on a specific paper type, or using a specific print format. You have the flexibility to set up certain print configurations at the application-level for all the documents or set up print configurations for selected invoices and reports when needed.
If you prefer to preview your documents before printing them, you can do a one-time configuration to always open the preview screen by default. This not only helps you verify if your invoice or report has all the required information to be printed, but also avoids the risk of printing unwanted pages, especially if you hit Enter unknowingly from the print screen.
In this section
- Set print configurations across application
- Set preview as default| preview before printing
- Access frequently used print options
Set print configurations across applications
Press Alt+P (Print) > Configuration > set all the required configuration as needed.
Example:
- To preview every time you print an invoice or report, Set Preview as default: Yes.
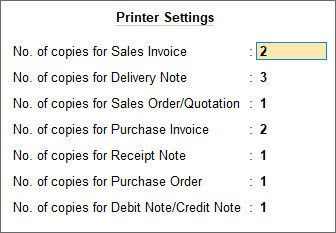
- Similarly, to specify the no. of invoice copies for different invoice types
- Select Set no. of copies for printing vouchers and press Enter.
- Enter the numbers for each invoice type as needed.
You can set other common configurations as in the sample image:
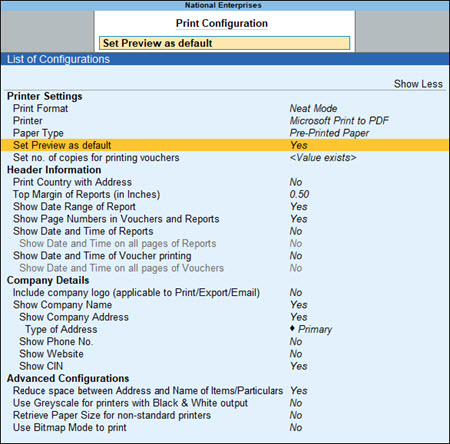
Note that you can still override the configuration set here by setting up the print configuration for any invoice or report, as per the needs.
Set preview as default | Preview before printing
When you need to print an invoice, you might want to verify if all the required information is available for printing. At times, you may unknowingly print pages from a report or invoice that need not be printed. To support such requirements, TallyPrime provides an option to set previewing of invoices and reports by default.
- Set the option Set Preview as default to Yes.
Next time you open the print screen, the Preview button is selected by default, You can still print by pressing P (Print). - Press Enter to open the print preview of the screen.
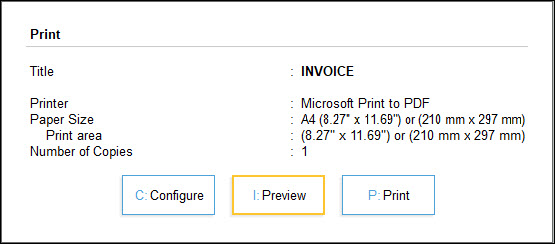
- Once you have previewed, press Esc > P (Print) to print the document.
However, if you have Set Preview as default to No, the Print button is selected by default. You can still preview by pressing I (Preview).
Access frequently used print options
Printing invoices and reports is simple in TallyPrime as the frequently used options are accessible immediately from the right button bar.
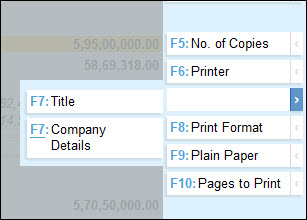
When you are on the print screen, you can:
- Press F5 (No. of Copies) to set the no. of copies to be printed.
- Press F6 (Printer) to change/configure the printer setup.
- Press F7 (Title) to update the title and sub-title of the document.
- Press Alt+F7 (Company Details) to configure the Company Details to be printed.
- Press F8 (Print Format) to select the print formats – Dot matrix, Neat mode, or Quick/Draft format
- Press F9 (Plain Paper) to toggle between Pre-Printed Paper and Plain Paper.
- Press F10 (Pages to Print) to specify the page numbers and page range for printing.
All of these options are also available under F12 (Configure) > Printer Settings.
Select Page/Paper Size and Set/Change Print Size While Printing Invoices and Reports
You may want to select or change the page/paper size of invoices and reports before printing them in TallyPrime. For all your printing needs, you can set a standard page/paper size. However, if you need to change it for a specific invoice or report, then you can select the required paper/page size for that instance.
In this section
Configure Paper Size and Print Size
- Navigate to the Company’s Default or Invoice/Reports Printer settings, as required.
- For the Company’s Default Printer settings:
Press Alt+P (Print) > Configuration > Printer.
- For Printer settings of Invoice or Report:
Press Alt+P (Print) > Current > press C (Configure) > Printer.
- For the Company’s Default Printer settings:
- Select Printer Name from the List of Printers.
- Select the required Paper Size as shown below.
- Click OK.
Print required number of Invoice copies
As per your invoice printing requirements, you can print one or more copies of the invoice or GST invoices. Also, you can mark them as original, duplicate, triplicate, quadruplicate, and extra copies, based on the type of copy you want to print. For example, you can print only the original or duplicate invoice copies or GST invoice copies.
- On the print screen, press F5 (No. of Copies).
- Set the no. of copies to be printed.
- Select the Type of Copy.
If you want to print only one type of copy – Original/Duplicate/Triplicate/Quadruplicate/Extra Copy, set the Number of copies to 1, and select the required Type of Copy.
|
Scenario |
Number of Copies |
Type of Copy |
Invoice Copies |
|
GST is enabled
|
2 |
All |
The printed invoices will be marked as ORIGINAL FOR RECIPIENT and DUPLICATE FOR SUPPLIER. |
|
3 |
All |
The printed invoices will be marked as ORIGINAL FOR RECIPIENT, DUPLICATE FOR SUPPLIER and EXTRA COPY. |
|
|
GST is not enabled
|
2 |
All |
The printed invoices will be marked as Original and Duplicate. |
|
3 |
All |
The printed invoices will be marked as Original, Duplicate and Triplicate. |
|
|
4 |
All |
The printed invoices will be marked as Original, Duplicate, Triplicate, and Quadruplicate. |
|
|
5 or more |
All |
The printed invoices will be marked as Original, Duplicate, Triplicate, Quadruplicate, and Extra Copy. |
Company Details | Print Company Logo and Company Address
If you generally add your company logo and other company details in the printed copy of invoices and reports, in TallyPrime, you can do so by setting up the application-level configuration for print.
- Print company logo.
Press Alt+P (Print) > Configuration > and under Company Details , set Include company logo to Yes.
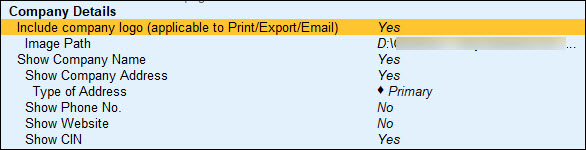
Next time you print an invoice or report in TallyPrime, it will get printed with the company logo.
- Print Company Name, Company Address and other details.
- Press Alt+P (Print) > Configuration > and set the Company Name and Company Address options to Yes.
Next time you print an invoice or report in TallyPrime, the Company details will get printed. - If you want to set up printing company details like Name and Address for selected invoices or reports, you do not have to set the application-level configuration. In a Sales Voucher or Balance Sheet, do one of the following:
- Press Ctrl+P (Print) > Alt+F7 (Company Details) > set Show Company Name and Show Company Address to Yes.
This button is available in the right button bar of the Print screen.
- Press Ctrl+P (Print) > C (Configure) > under Company Details, set Show Company Name and Show Company Address to Yes.
- Press Ctrl+P (Print) > Alt+F7 (Company Details) > set Show Company Name and Show Company Address to Yes.
- Press Alt+P (Print) > Configuration > and set the Company Name and Company Address options to Yes.
Print Invoice and Report Titles/Subtitles
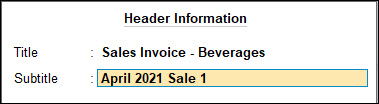
Printing titles on the invoices and reports is a general practice. You can update the title and subtitle of an invoice based on your party, business type, or type of invoice, such as GST or other taxation related, Similarly, your reports can be printed with a title and subtitle based on the period or purpose of the report.
To update the default title of invoice or report:
- Open the Header Information sub-screen. Do one of the following:
- Press Ctrl+P (Print) > F7 (Title).
- Press Ctrl+P (Print) > C (Configure) > and under Header Information, select Title or Subtitle.
- Provide the required title for the document and save.
Print Multiple Addresses in Reports and Invoices
After creating multiple addresses for company and creating multiple addresses for party, you have the flexibility to choose the address which you want to print on reports and invoices.
In this section
Print Reports with Company Address
To print the company address on the report, follow the steps below:
- Open any report (for example, Trial Balance) of your company, press Ctrl+P and click Configure.
- Click Show More from the List of Configurations, as shown below:
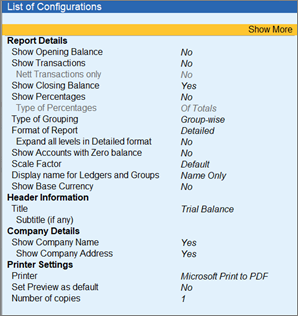
- Under Company Details, press Enter on Type of Address.
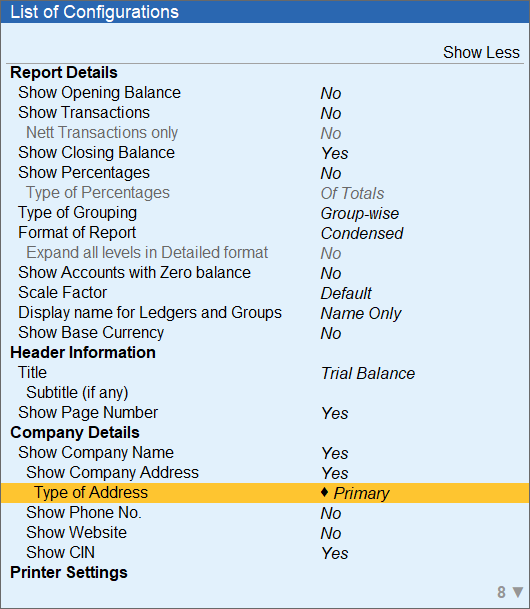
- Select the Type of Address from the List of Address Types, as shown below:

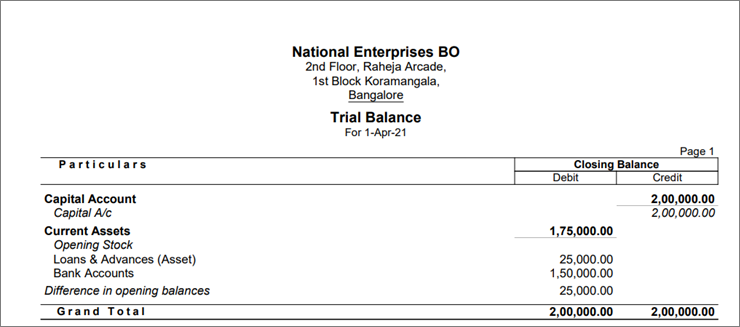
- Press Ctrl+A to save the configuration and click Print. The company address is printed on the report, as shown below:
Print Invoices with Party Address
To print the party address on the invoice, follow the steps below:
- From any Voucher (for example, Sales), select the Party Ledger (for example, Ganesh Enterprise), and select the Address Type from the List of Address Types.
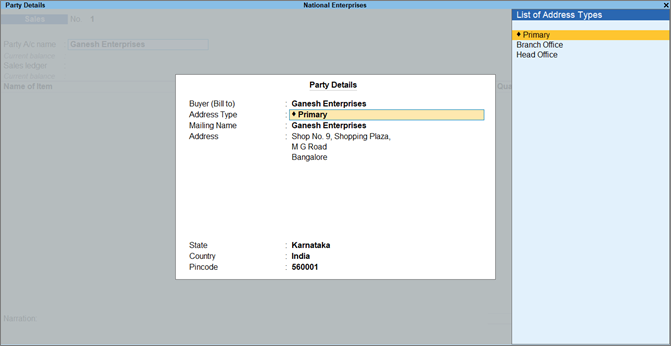
If you want to print the same address (which is mentioned on the Party Master) on both Consignee (Ship to) and Buyer (Bill to) sections, then select Primary as Address Type. Or, if you want to print the different address on the Buyer (Bill to) section, select other address (for example, Branch Office or Head Office) as Address Type.
- Press Ctrl+P > Configure.
- Click Show More from the List of Configurations, as shown below:
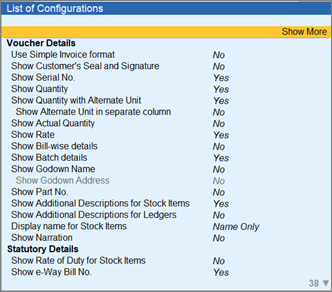
- Under Party Details.
-
- If you want to print the same address (which is mentioned on the Party Master) on both Consignee (Ship to) and Buyer (Bill to) sections, then set Show Name and Address from Party Master as Yes.

Press Ctrl+A to save the configuration and click Print. The Party Master address is printed under the Consignee (Ship to) and Buyer (Bill to) sections on the invoice.
- If you want to print the different address on the Buyer (Bill to) section, then set Show Name and Address from Party Master as No.

- If you want to print the same address (which is mentioned on the Party Master) on both Consignee (Ship to) and Buyer (Bill to) sections, then set Show Name and Address from Party Master as Yes.
Print Reminder Letters/Confirmation of Accounts
When you have outstanding amounts to be received from your parties, the Bills Receivable report in TallyPrime displays all such dues. To receive the due amounts on time, you can print reminder letters to send to your parties. Similarly, TallyPrime enables you to print Confirmation of Accounts when needed. To know how to print reminder letters and confirmation of accounts, refer to:
Printing Multi-Account Reports
You can print the primary Books of Accounts, like the Cash and Bank Books, Account Ledgers, Sales and Purchase Registers and so on, without having to select the accounts one at a time and printing them. Refer to the Printing Multi-Account Reports topic to know more.
Print All Tiles or Specific Tiles in Dashboard
Just like any other report in TallyPrime, you can print Dashboard or even specific tiles, as needed. All you need to do is choose to print all the tiles or a specific tile and then configure the print, as per your preference. Thereafter, you are ready to print the Dashboard or specific tiles.
To know more, refer to the Print a Single Tile or All Tiles section in the Use Dashboard in TallyPrime to Analyse Business Information and Data Trends topic.
Print Party Ledger Balances in Invoices | Reconcile Ledger Balances
TallyPrime now provides you with the flexibility to print the ledger balances of a party directly in the invoice. You have the option to print the Current Balance as per the current date and also the Previous Balance carried forward from earlier transactions.
This feature will be a quick and handy reference for your party, as they can compare the balances printed in the invoice with the balances recorded in their own books. It will help in easy reconciliation of the ledger balances in both the books and ensure that the values are accurate in the respective accounts. In this way, you and your party can prevent any discrepancies and build mutual trust and alliance in the long run.
Based on your business practices and understanding with your parties, you can reconcile the ledger balances on a monthly, quarterly, half-yearly, or annual basis.
In this section
Print Previous & Current Balances of a Party
- In TallyPrime, open the invoice that you want to print.
- Press Ctrl+P to open the Print screen.
- Press C (Configure) and, under Party Details, enable the Show Previous and Current Balances of Ledger option.
- In the Print screen, press P (Print) to continue.
The invoice printout will be saved in the specified folder.
In the invoice printout, you can see the Previous Balance, which is carried forward from earlier transactions with the same party, and the Current Balance as per the Current Date, which considers both the Previous Balance and the Amount of the current transaction.
Note: If different currencies are used in your company and in the invoice, then the ledger balances will not be printed in the invoice, owing to fluctuation in forex rates.
View Previous Balance and Current Balance in Real Time
The Previous Balance and the Current Balance will reflect the values as per the Current Date, which will ensure that you and your party always view the latest values in real time. Even when you record multiple transactions with the same party on the same day, the latest balances will be printed as per that moment in time.
For example, let us consider that you have recorded the following invoices with the party, Supreme Traders, on 18th December 2023:
- Voucher number 101, with an invoice Amount of Rs 10,000, Previous Balance of Rs 3000, and Current Balance of Rs 13,000
- Voucher number 102, with an invoice Amount of Rs 20,000, Previous Balance of Rs 13,000, and Current Balance of Rs 33,000
Now, if you print voucher number 101 while recording the transaction, the Previous Balance will appear as Rs 3000 and the Current Balance as Rs 13,000. However, if you print voucher number 101 again later, after recording voucher number 102, then the Previous Balance will appear as Rs 13,000 and the Current Balance as Rs 33,000. This will ensure that the combined values are reflected from both the invoices.
Similarly, if any voucher is modified, inserted, or deleted, then the balances will be updated accordingly while printing the invoices.

