This topic contains Error Codes, Error Messages, and frequently asked questions related to Data in TallyPrime.
Data Security – FAQ
You can retrieve your data if you forget your Security Control username and password. If you have forgotten both Admin and User level password, you can restore earlier backup in which you have not mentioned the password. If you do not have an earlier backup, contact your service partner. Partner will try to rectify your data.
- Only User level password forgotten.
- Open the company in Admin level.
- Alt+K (Company) > Users and Passwords > and press Enter.
Alternatively, Gateway of Tally > Alt+K (Company) > Users and Passwords > and press Enter. - Enter new Password for the required User Roles.
- Press Y to accept the screen.
- Share the password with the user.
- Alt+K (Company) > Users and Passwords > and press Enter.
- Open the company in Admin level.
- Only Admin level password forgotten.
- Open the company in user level.
- Create a new company with the same financial year.
- Export and import the data.
Click here for the detained instructions on how to export and import the data to a new company.
You can restrict users from accessing Back Dated vouchers.
Days allowed for Back Dated vouchers – By default this field is set to 0. Enter the required number of days. Alteration or Insertion of back dated vouchers can be done within the number of days mentioned from the Date of Last Entry of vouchers
Cut-off date for Back Dated vouchers – You can specify the required date. TallyPrime does not allow you to record a transaction prior to the date mentioned. This can be used in addition to Days Allowed for Back Dated vouchers. This input will be useful in situations where you have completed the audit and do not require any changes in the data.
Case 1: When the Cut-off date is set to 0 (zero).
Scenario: ABC company Ltd: The last date of transaction is 30 Apr 2021. The user should not alter or pass the transaction from 1 Apr 2021-14 Apr 2021. Users should only pass the transaction on 15 Apr 2021 and onward.
Note: Currently TallyPrime will not consider last date of transaction. Hence TallyPrime will allow you to alter or pass the transaction backward by 15 days from the last date of the transaction starting from 29 Apr 2021, so from 29 Apr 2021-15 Apr 2021.
Configure the following settings to restrict users’ access to Back Dated vouchers.
- Days allowed for Back Dated vouchers to 15.
Cut-off date for Back Dated vouchers to 0 (zero).
Click here for more detailed instructions on how to restrict access to Back Dated vouchers.
Note: With every change in the date of the last entry, the voucher restriction changes as well.
Case 2: When the Cut-off date is set to any date.
Scenario: ABC company Ltd: The last date of transaction is 30 Apr 2021. The user should not alter or pass the transaction from 1 Apr 2021- 14 Apr 2021. User should only pass the transaction from 20 Apr 2021 onward.
Configure the following settings to restrict users’ access to Back Dated vouchers.
- Days allowed for Back Dated vouchers to 15.
- Cut-off date for Back Dated vouchers to 20 Apr 2021.
Click here for more detailed instructions on how to restrict access to Back Dated vouchers.
Note: As of the last day of the transaction, if the cut-off date happens to fall before the days allowed for back dated vouchers, TallyPrime will restrict access to the voucher whichever date is earlier. For example, the last date of the transaction is 30 Apr 2021. The days allowed for the Back Dated vouchers are 15 days, and the cut-off date is set to 20 Apr 2021. TallyPrime will allow users to alter or pass the transaction starting from 29 Apr to 21 Apr. The user will not be allowed to alter or pass the transaction on 20 Apr 2021 backward until 15 Apr 2021.
Security levels can be configured to allow or disallow access to a feature. Various type of access can be provided to a feature such as full access, create, alter, display, print, and preview.
Click here for detailed instructions on how to restrict user access to any particular items in Security Levels based on your requirement.
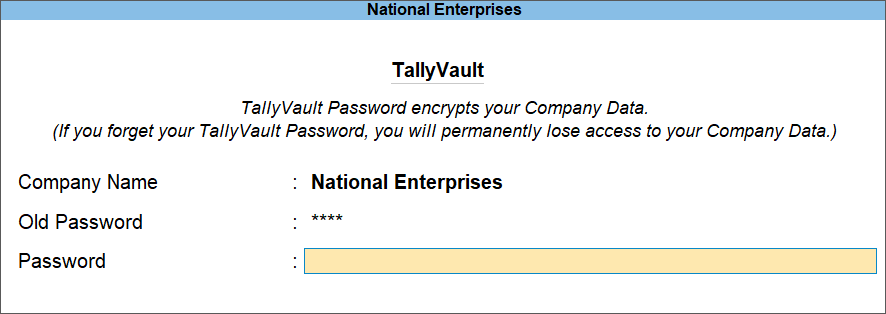
To remove TallyVault password specified earlier, open the required company, and enter the Tally Vault password.
- Alt+K (Company) > TallyVault.
Alternatively, Gateway of Tally > Alt+K (Company) > TallyVault. - Enter the details in TallyVault screen of your company.
- Press Y to accept the screen. As always, you can press Ctrl+A to save.
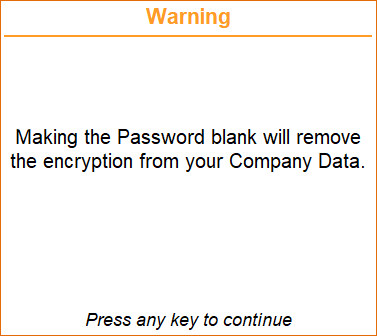
A message will appear informing you that removing your TallyVault password will close all the reports, vouchers, and masters without saving any changes.
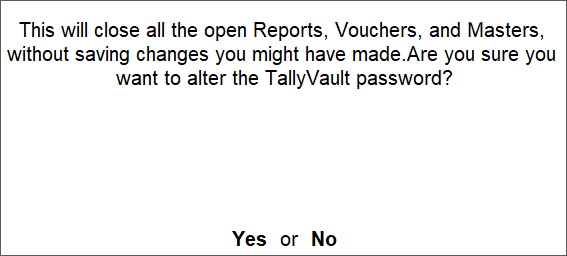
- Press Y to accept the screen.
A message will appear asking to create a copy of your company. - Choose the required option as needed.
On choosing Yes, TallyPrime will create a new company by assigning a new company number and retaining the existing company name.
For more information on TallyVault for your company, click here.
Take a backup of your data before changing the Admin username and password.
Click here for the detailed instructions on how to change Admin level username and password.
TallyVault is an enhanced security system to maintain the privacy of the company that you have created in TallyPrime. It uses a non-stored password with an advanced algorithm to validate a new user without prior knowledge of the password. The decrypted form of data is not stored on the system. Hence, the TallyVault password cannot be retrieved, resulting in permanently losing access to your company information.
You can remove the Security Levels provided to users when they are no longer required.
Click here for the detailed instructions on how to remove Security Levels defined for users.
In TallyPrime, the Tally.NET Auditor has the Owner’s rights by default. This right allows the Auditor to view all reports. In case the Auditors are different for VAT, Service Tax, TDS, and TCS, then the Client can configure the Tally.NET Auditor with corresponding rights so that only the concerned auditor can view statutory reports.
Click here for the detailed instructions on how to assign Security Levels for Statutory Reports.
As the Tally.NET Authentication was enabled in the Security Levels screen, you were unable to enter the password.

To disable the option in Security Levels:
- Alt+K (Company) > User Roles > Select the required Security Levels.
Alternatively, Gateway of Tally > Alt+K (Company) > User Roles > Select the required Security Levels.
The Security Levels screen appears.
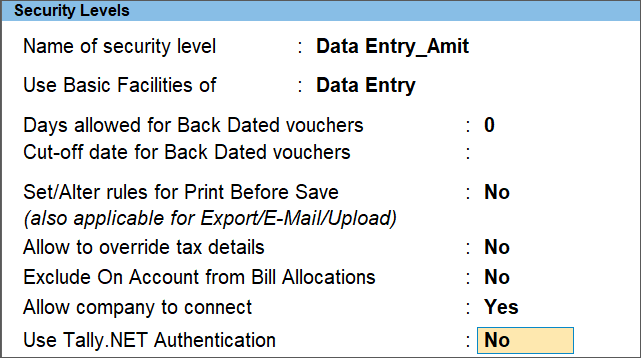
- Set the option for Use Tally.NET Authentication to No.
You can now proceed to authorize the user and enter the password as required.
It is necessary to prepare a price list for the required stock item at different price levels before restricting users from altering the stock item rates.
Click here for the detailed instructions on how to create a Price list for stock items. Therefore, when an invoice is recorded, the rate field will be skipped, and the rates from the price list will be used.
Click here for the detailed instructions on how to restrict users from altering stock item rates.
There is no way to break the password if you are accessing the company data with a single user login. However, if you have a multiuser login to access the company data, you can open the company using a user level password and then export all the masters and vouchers to it.
- How to do authentication for HTTP request?
Scenario: After successfully synchronizing data with the branch office, we noticed that the Balance Sheet was displaying incorrect figures. On reviewing the accounts, we found that the Ledger opening balances and Item opening balances were incorrect. The Ledger opening balance and Item opening balances at HO were replaced with the Ledger and Item opening balances of the branch. Is it possible to restrict this from happening in the future?
Yes, it is possible to restrict the Ledger and Item opening balance at HO from being replaced with the Ledger and Item opening balance of the branch.
This can be done in the Client Rule Creation/Alteration screen by setting:
- Overwrite opening balances for ledger to No.
- Overwrite opening balances for stock item to No.
You can disable either one of the options or both, based on your requirements.
Click here for detailed instructions about how to disable overwriting of opening balances and more information about Data Synchronization.
Cause:
This error may appear while opening TallyPrime, in the following situations:
- TallyPrime data files, such as, .tsf or .900 files, are locked by any other process such as third-party backup software, or by any other application that accesses TallyPrime data files. At the same time, TallyPrime tries to write to the TallyPrime database at the same time, but it fails.
- Since the Ransomware protection feature is enabled, the antivirus software blocks access to TallyPrime data.
- Microsoft Windows Offline Sync has been enabled.
Solution:
- Change the permissions of the shared folder to full control.
- Exclude .tsf and .900 files from scheduled backups in any third-party party backup software running on LAN-based systems.
- Run a backup scheduler when no user is accessing TallyPrime data.
- Avoid accessing the TallyPrime database, for example, copying or trying to open the .tsf files by double-clicking them.
- Add Readretrycount=10 to the Tally.ini file and save it with the changes. The command will try writing again in case of failures to write or delays in writing. (This parameter will impact the performance. This is because the system will keep trying to write the data).
- Disable Windows Offline Sync, as this may also cause problems when accessing the data.
- Add TallyData files to the Exception list of the Antivirus Software’s Ransomware Protection feature.
Cause:
This error occurs due to corrupted data files, while accessing data over a network in a multi-user environment. The data may be corrupted due to network fluctuation or when different types of network such as LAN and WIFI are used in the multi-user environment.
Solution:
This issue can be resolved by doing a zero re-write of data. However, ensure that you take a data backup before doing zero re-write. Additionally, take the following measures to ensure this error does not occur again.
- Correct the fluctuations in the ping speed.
- In case there are any WIFI systems installed in the network, isolate that system to stop this problem from occurring repeatedly.
- Use same category of cable, preferably CAT 6 in all the client systems.
- Include TallyPrime data files in the exceptions list of your antivirus software.
Cause:
Error 1392 is usually displayed whenever a file or directory is corrupted and unreadable.
The location specified in the error message states that some temporary files are corrupt. Since the files are only temporary, you could delete the mentioned file in the error message and check if the issue persists.
Below are some of the most common causes of Error 1392.
- Corrupt system files
- Antivirus interference
- Presence of malware
- Bad sectors on the hard disk
Solution:
To rectify Error Code 1392,
Step 1: Perform a simple repair process in TallyPrime.
Step 2: Scan the computer for malware using Windows Defender.
Step 3: Perform SFC scan.
Step 4: Re-write company data.
Step 5: Re-write company data.
Step 1: Perform a simple repair process in TallyPrime.
- Open TallyPrime.
- Press F1 (Help) > Troubleshooting.
- Select Repair > Select the company for which the error is appearing.
- Set Repair to Yes and Backup to No.
- Check the data after repair.
In case, Error 1392 persists, follow Step 2.
Step 2: Scan the computer for malware using Windows Defender.
Windows comes with an in-built antivirus software called Windows Defender. Windows Defender scans your device for viruses, spyware, ransomware, rootkits, and other types of malware. Using Windows Defender scan and its scanning options, you can scan your system to find malware.
Step 3: Perform SFC scan.
SFC (System File Checker) is a utility in Windows that allows users to scan and restore corrupted Windows system files. The SFC command scans the integrity of all protected system files and replaces incorrect (corrupted or modified) files.
How to run SFC?
- In administrator mode, open the Run command.
- Open the Command prompt using cmd.
- In the command prompt, type sfc /scannow.
- And verify for any Hard disk issues.
Note:
-
- Do not close until the verification is 100% complete. The scan results will be shown after this process is finished.
- Ensure these steps are followed in consent with the system administrator.
Step 4: Repair company data
To repair company data, follow the below steps.
- Open TallyPrime.
- Click Data (Alt+Y) menu.
- Select Repair.
The Repair Company screen will open. - Select the required company and Repair Company data.
Step 5: Re-write company data.
- Open TallyPrime.
- In the Gateway of Tally screen,
- Press Ctrl+Alt+R to rewrite company data.
- Select the company from the list.
- Press Enter to rewrite the data.
Note: Before rewriting company data, ensure that you have taken proper backup of the company data.
You can avoid this error by upgrading to the latest release of TallyPrime.
Cause:
This error occurs when the TMESSAGE.TSF file is damaged.
Solution:
To fix this issue
- Right click on the TallyPrime icon and select Open File location.
- Open the Data folder from the file location.
- Open the folder in which the company’s data are stored.
- Delete the TMESSAGE.TSF file if its size is between 0 and 1 KB. If the file size is more than 1 KB, move the file to another location.
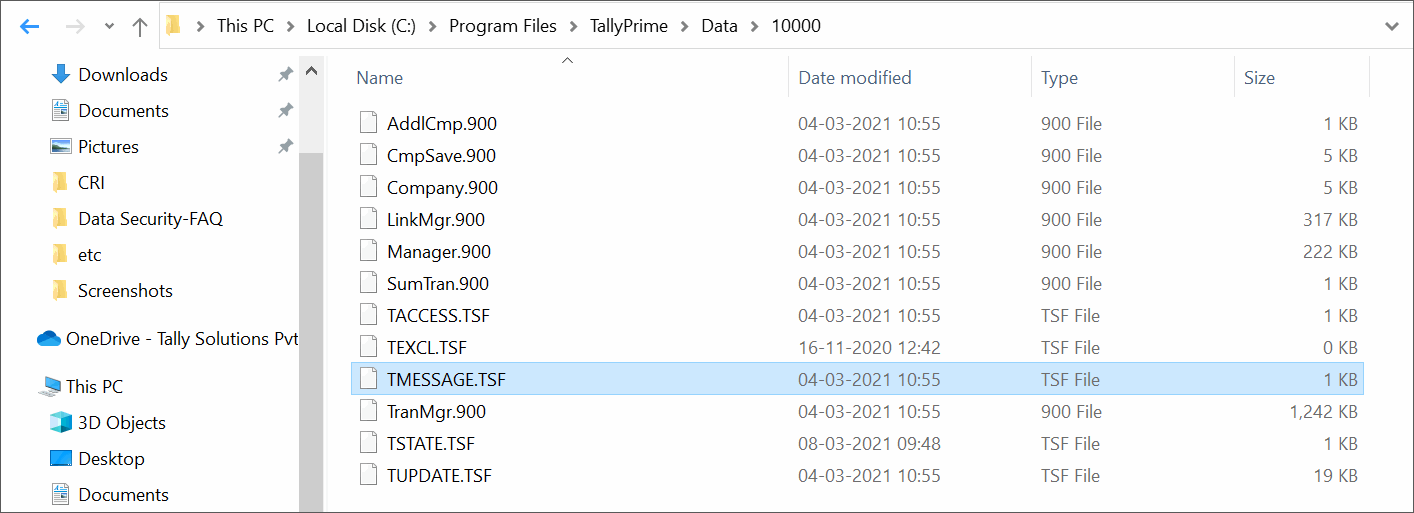
- Reload the company in TallyPrime.
This error can be resolved by following the steps below:
- Create a Data Backup.
- Check file size of Transmgr.900. If the file size is 1 KB, restore the earlier backup, if any.
- If the Transmgr.900 file size is large, follow the steps of Repair below:
- Take the existing backup of the corrupted data and perform Zero Command Repair.
- Check the bad sectors on the Hard Disk as well. Click here to view the procedure.
This error can be resolved by following the steps below:
- Create a Data Backup.
- Check file size of Manager.900/Linkmgr.900. If the file size is 1 KB, restore the earlier backup, if any.
- If the Manager.900/Linkmgr.900 file size is large, follow the steps of Repair below:
- Take the existing backup of the corrupted data and perform Zero Command Repair.
- Check the bad sectors on the Hard Disk as well. Click here to view the procedure.
To resolve this error, follow the steps below:
- Upgrade to the latest version of TallyPrime.
- Backup your existing company data, and Repair.
You will be able to learn how to resolve errors tmessage.tsf, tstate.tsf, and tstate.tsf error code 32 here.
- Error – tmessage.tsf
This error appears on the client machine. - Error – tstate.tsf
To resolve this error, follow the steps below:- Ensure that all the files/sub-folders in the data folder have full access permissions enabled for the relevant users.
- Provide full access permission to all the users (working on TallyPrime).
- Verify the network connectivity.
- Error – tstate.tsf error code 32
Cause: This error occurs while splitting company data when third-party software is used for data backup, and the .tsf files are saved by this third-party application for backup.Solution: Add the .tsf files to the exclusion list of the data backup software.Note: Contact your system administrator to add files to the exclusion list.
Cause: This error occurs due to the duplication of masters (ledgers) in your company.
Solution:
Recommended: Upgrade to the latest release of TallyPrime to prevent this error.
Interim Fix
To fix this issue in your current release, you need to Repair your company data. After Repairing the data, the duplicated masters (ledgers) will be removed from your company data.
- Take a backup of the company data.
- Go to Gateway of Tally > F12 (Configure) > Data Configuration.
- Set Load Companies on startup? to No.
However, if the option Load Companies on startup? was set to Yes by default, then you have to modify the tally.ini file (Tally configuration settings).
To modify the tally.ini file:- Go to the TallyPrime application folder on your computer.
- Open the tally.ini file.
- Set Default Companies= No.
- Press Ctrl+S to save the settings.
- Close TallyPrime.
- Use Command Prompt to enter the path where Tally.exe is located, followed by the data path and the ID number in the error message.
For example, C:\Program Files\TallyPrime\tally.exe data 1284.
If your data is stored in a different folder or drive (for example, D:\TallyPrime\tally.exe “D:\client data” 1234), enter the relevant path.TallyPrime now starts in the Command Prompt. - Press Ctrl+Alt+R to repair the company data.
Cause: This error message appears when splitting data if bill-wise details in a transaction are not saved completely.
Solution: The transaction with incomplete bill-wise details must be re-accepted.
- Open the spl file available in the TallyPrime folder and check the bill numbers mentioned.
- Go to Gateway of Tally > Day Book.
Alternatively, press Alt+G (Go To) > type or select Day Book. - Select the transactions mentioned in the spl file.
- Verify the Bill-wise details in the transaction and re-accept.
- Re-start the splitting process.
Cause: The error appears when the default group has been altered in TallyPrime while splitting the company data.
Solution:
- Open spl file available in the TallyPrime installation folder.
- Search for the error message in the file.
- Rectify the errors, as per the instructions.
- Proceed with splitting the company data.
Cause: The error occurs when the default journal voucher type is changed while splitting company data.
Solution: Upgrade to the latest release of TallyPrime.

