
This topic lists the different frequently asked questions (FAQ) on data synchronisation.
You can check the status of each synchronisation activity from the Event Log:
Press F1 (Help) > Troubleshooting > Event Log.
You can see the synchronisation messages in the Event Log:
Press F1 (Help) > Troubleshooting > Event Log.
It is recommended that you check the Event Log after each Synchronisation to check the status of the activity.
Synchronisation between Tally.ERP 9 and TallyPrime is not recommended, as it may corrupt your data.
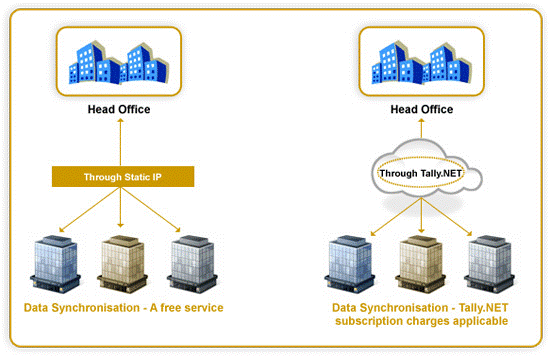
Replicating data accurately without any threat or interference between the Head Office and its branches is the need of an organisation. This is achieved by using the Synchronisation feature in TallyPrime. Data synchronisation is performed either by using Tally.NET, a framework that works in the background, or using Direct/IP Sync to create a virtual private network. While it is essential to configure the client and the server, data synchronisation happens at the click of a button.
User Information
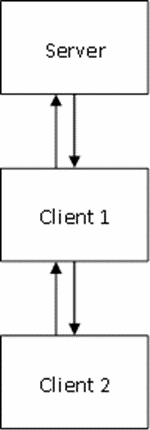
Synchronization is a process of replicating data between two or more computers using TallyPrime in a Client-Server environment. During synchronisation, data is transferred from the client to the server and from the server to the client. TallyPrime offers control over the frequency of Synchronization, that is, data can be replicated after each transaction or updated at specific intervals.
Data can be sent over the Internet or a private network system:
- Synchronization using Tally.NET (On-demand/Online)
- Synchronization using Private Network/Direct and Server (IP) Sync
Once synchronization is set up at the Server and its Clients, replicating the data is a single-click activity.
Types of Synchronisation
- Receive Data: Receive data from the other end.
- Send Data: Send data to the other end.
- Both: Send and receive data from the other end.
Synchronisation using Tally.NET
With a major technological enhancement in TallyPrime, data synchronization is available through Tally.NET. In the current framework it is essential to connect to Tally.NET at the synchronisation server in order to synchronize the data between the Server and the Client.
Synchronization using Private Network/Direct and Server (IP) Sync
From TallyPrime, Direct Synchronisation/Synchronisation (IP Sync) using a private network is available by default. This feature is also known as IP Sync.
In Direct/IP Sync, data synchronization takes place between two or more computers in a Virtual Private Network. It is essential to provide the synchronisation server’s IP Address in the Client Rule and the synchronisation server need not be connected to Tally.NET.
While the entire process of synchronization using Tally.NET and Direct IP remains the same, the only differentiating factor between synchronising data using Tally.NET and Direct/IP Sync is the Account ID or the Server’s IP Address and Port Number provided in the Client Rule. Based on the parameter provided, TallyPrime begins synchronisation using Tally.NET or a Virtual Private Network.

Operating Information
Before commencing data synchronisation either through Tally.NET or Direct IP Sync, it is essential to configure the synchronisation server and clients using the following steps:
Synchronisation using Tally.NET
- Configure Synchronisation Server
- Configure Tally.NET Features on Server
- Connect Server Company to Tally.NET
- Configure Client for Synchronization
- Create Sync Rule on Client mentioning Server’s Account ID
- Activate Rule from Client
- Activate/Enable Sync Rule on Server
Synchronisation using Direct/IP Sync
- Configure Server for Synchronization
- Configure Client for Synchronization
- Create Sync Rule on Client providing Server’s Static IP Address
- Activate Rule from Client
- Activate/Enable Sync Rule on Server
Precautions
- Ensure that the same set of F11: Features are activated on the Client and Server companies.
- Do not alter Accounting or Inventory masters. When the accounting or inventory master is altered, a new master is created at the other end on synchronizing the data.
For example, the accounting master Conveyance having a transaction for Rs. 3600/- is altered in the Client to Local Conveyance. A new entry is recorded for Rs. 2700/-. On synchronising data from the Client, the Local Conveyance ledger has a balance of Rs. 6300/-, while the Conveyance ledger balance on the Server is Rs. 3600/- and Local Conveyance Rs. 2700/-. - When masters are altered, manual correction needs to done on the Server and Client computers.
- Do not alter the default Voucher Type names available in TallyPrime.
- Using automatic voucher numbering makes it difficult to trace vouchers on synchronisation, as each voucher is allotted a new voucher number. Create specific voucher types at the client and server when using the same voucher types.
- Do not delete vouchers using Alt+D. Cancel vouchers using Alt+X. This ensures that vouchers remain on the system. Identify and delete respective voucher from both the Server and Client computers.
- Do not restore the back-up of a company created earlier at other location for synchronization. Data Synchronisation between two companies having the same GUID will not take place.
Technical Information
System Requirements
Data can be synchronised from any computer without additional hardware. For quick and smooth synchronisation of data it is recommended to have computers with the following configuration:
- A minimum of pentium IV processor with Microsoft Windows 98/ME/NT/2000/2003/XP/Vista/Windows 7.
- A minimum RAM size of 2 GB on both Synchronization Server and Client.
- Broadband Internet connection with a minimum internet speed of 256kbps.
- Public IP on Server in case of Direct IP Synchronization. The IP must be static.
- During synchronisation, data is transferred in packets and each packet contains 200 vouchers, whereas the synchronisation performance solely depends on data size and Internet speed.
Communication between Tally Server/Tally Client
- Data replication between the synchronisation server and client happens in a secure environment using Encrypted Format and Algorithm (Modified DES), which is proprietary in nature.
- Data Synchronization in TallyPrime is not a web-based communication. The data is exchanged using HTTP Protocol between synchronisation Client and Server through Encrypted XML over HTTP.
- While synchronising data through Tally.NET, the data is not stored anywhere on the Tally.NET server. Tally.NET acts a channel between the synchronisation client and server without storing the data on Tally.NET.
- The synchronization Client is authenticated on the synchronization Server by the rules created on the Client. However, data transfer will not take place unless the rule is activated on the respective synchronization Server.
- The communication between the synchronization server and the client happens using a dedicated TCP port. By default, TallyPrime communicates using port 9000. However, it is recommended to use a TCP port between 9000 and 65000.
- If the computer is accessing internet through the Proxy Server, TallyPrime needs to be configured accordingly.
- Synchronisation supports Basic and NTLM scheme of Proxy authentication.
Online Help and Troubleshooting
What are the features of synchronisation?
One-way voucher synchronization – Allows to send/receive vouchers from the server.
Filter voucher types – Specify the voucher types to synchronise.
For example: Receive Stock Transfer Journals and send Sales and Receipt vouchers. It also allows you to configure the type of synchronisation from either one-way (send/receive) or two-way (both send and receive).
Sync after save – Any voucher saved will be synchronised to the corresponding server as specified in the rule. This provides Real-time Data Transfer from one location to another location.
Snapshot Sync (Exchange Snapshot Online) – This is the process of bulk data exchange between the synchronisation server and client, without the need to manually import or export data. It is often used as a first-time setup methodology of synchronisation and speeds up the process of implementation.
Voucher ordering – It helps in maintaining the sequence of altered vouchers post synchronisation. The order of altered vouchers is maintained in the same sequence as it was before synchronising the data.
Opening balance control – Configure the behaviour to update the Opening balances of Masters. You can opt to update the ledger balances from the server or the client. A similar option is also made available for item masters.
Multiple Level Synchronisation – Synchronise data between Multiple Levels by maintaining the same voucher at all locations.
Import & Synchronisation – When the vouchers are imported from Company A to Company B and then synchronised, the synchronisation process commences from the point of importing the vouchers, but in TallyPrime, synchronisation will not be impacted by manual imports.
Multi-Currency Transaction Control – Configure the behaviour to update the Base Currency Symbol of Amounts. You can also configure to update the Non-Base Currency Transactions.
Synchronisation Reports – This displays the list of vouchers sent and received during Synchronisation. When multiple synchronization rules are available, the user has the option to switch between them to view the respective report.
Auto Reconnect – On detecting network failure or disconnection from Tally.NET Server, TallyPrime automatically reconnects to Tally.NET.
Deactivation of Rule – Notifies the server for any unauthorized changes to the Client rule. After authorizing the changes to the synchronization rule at the Server, the system proceeds to synchronise the data. Not authorizing the synchronization rule at the server rule leads to deactivation, and the system will not synchronise the data. Activate this option by enabling Deactivate When Client Rule Changes in the server rule.
Tally ensures that all the Masters required to save a transaction are moved along with the transaction. This includes Ledgers, Groups, Stock Items, Units of Measures, Currencies, and so on. This essentially makes synchronization a single-click and error-free operation.
After the first instance of synchronization, the alterations made in source transactions are reflected in subsequent synchronizations.
The Server Company maintains the Creation ID (CID) and Alteration ID (AID) values of the Client Company in its Server Rule. Similarly, the Client Company maintains the CID and AID values of the Server Company in its Client Rule.
In cases where the synchronization process starts, the Client sends its previous CID and AID values of the Server as per its Rule to the Server and the Server checks whether the CID and AID are the latest as per the data. The Server will respond back with all vouchers having the CID/AID greater than the incoming Rule values. These vouchers will be imported into the Client. Thus, the synchronization will be complete and all the data on the Client gets updated on the Server and vice-versa.
CID or Creation ID of a voucher gets generated when a new voucher is entered and does not change when the voucher is altered. The CID is used by Tally to find out if any new transactions have been created at the remote end since the last synchronization.
AID or Alteration ID of a voucher gets generated each time the voucher is altered or re-accepted. The AID value is dynamic and is used by Tally to find out if any transactions have been altered at the remote end since the last synchronization.
For a company having various branches in different locations, the data from the branches can be synchronized to the head office. Further, transactions can be entered and consolidated reports can also be viewed from the various branches.
For a company having many branches, the mirror concept of synchronisation is recommended. In this method, the data from branches (clients) is synchronised to a newly created individual company for each location at the head office (server). The mirror companies at the head office (server) will in turn synchronise with a company that contains the consolidated data locally. Thereby, the data of branches is updated at the head office in the mirror company as well as in the consolidated company.
This method is beneficial when concurrent users are accessing the same data at the Head office to create or alter the vouchers, as the load is shared during data synchronisation.
The same method can be adopted to synchronise data between multiple locations one way, that is, only to send or receive the data.
- Go to Control Panel > Sync Center.
- Click Manage offline files.

- Click Disable offline files in the Offline Files.

- Click OK to save the settings.
No, data synchronisation requires a multi-user licence at the Server-end even if there is only a single user. The licence at the Client end can be either a single-user or a multi-user.

When you create a company and enable sync in Tally, a GUID gets created. It is a global unique identification given to each company for easier identification of companies while synchronizing.
GUID (Globally Unique Identifier) is a 16-byte value that uniquely identifies a company created in Tally. Technically, a GUID is a very large, statistically unique identifier generated from the address of the Ethernet card in the current computer. No two Ethernet cards anywhere should have the same address. Another number is allotted for computers without a network card that will almost certainly be unique to the computer. It is highly unlikely that duplicate GUIDs will ever be created. GUIDs are useful because they ensure that there will be no naming clashes within the companies created in Tally. Tally assigns an individual GUID to every company while creating it.
It is necessary to reconfigure synchronization after splitting the data at the synchronization server and client.
Let us take an example to understand this better:
ABC Company has a Head Office and a branch office where the synchronization server and synchronization client are located, respectively. The data available on the server and client is for the period 01/04/2008 to 31/05/2010 and data synchronisation is performed till date.
Let us assume that you have split the data for the period 01/04/2008 to 31/3/2009 and 01/04/2009 to 31/05/2010. There are two companies each on the synchronization server and client. The newly created companies on the server and the client will have the same GUID, but the existing rules on both the server and client are removed while splitting the data. Hence, a new client rule needs to be created to start synchronisation, which results in the duplication of vouchers.
- Eliminate the current financial year company at the server or client.
- Create a new company where the current financial year data was eliminated.
- Follow the normal synchronization setup procedure.
- Exchange data using snapshot procedure, so that data is updated on both the ends.
- Start recording transactions for the current financial year.
- Synchronise data at regular intervals.
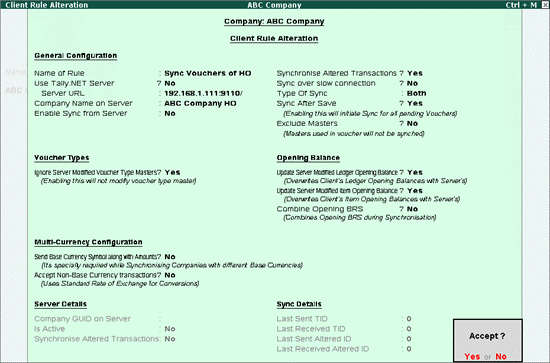
- Press Alt+Z (Exchange) > Data Synchronisation > Server Rules > Alter.
- Select the required rule from the List of Rules
- Set Synchronise Altered Transactions to Yes.
- Press Enter to save the Server Rule.
Now the system will transfer the altered transactions during synchronisation.
TallyPrime provides the facility to synchronise the data by providing the Server IP address in the Client rule. You should therefore have a static IP address on the Server side.
Initialise synchronisation using IP address
To begin the process of synchronisation, ensure that:
- Synchronisation Setup is completed on the Client computer.
- The Client computer is connected to the Internet.
- Synchronisation Setup is completed on the Server computer.
- The Server computer is connected to the Internet.
From the Client computer:
- Start TallyPrime and select the company from where vouchers are to be synchronised to the server computer.
- Press Alt+Z (Exchange)> Data Synchronisation > Synchronise.
- Activate the Server rule on the Server computer.
From the Server computer:
- Press Alt+Z (Exchange)> Data Synchronisation > Server Rules > Activate.
- Set the options Is Activated and Synchronise Altered Transactions to Yes.
From the Client computer:
- Press Alt+Z (Exchange)> Data Synchronisation > Synchronise.
On the Client computer, the message Sync Start at time and Sync End at time will appear in the Event Log.
On the Server computer, check for the synchronised vouchers after you receive the message Synch End at the Client End.
This will complete the sync process. You will notice that all the vouchers from the client have been replicated to the server. Next time when you opt for sync, the synchronised vouchers will not get posted again. However, the new vouchers and the altered vouchers from both the Client and Server computers will get updated on the Server and Client computers.
Ensure that the vouchers are not deleted after synchronisation. However, you may cancel the vouchers, and they will get updated at both the ends.
In case the vouchers have been deleted, ensure that they have been deleted from both the ends (that is, from the server and client).
Note: The financial years and base currencies for the companies should be the same.
Data synchronisation could be slow due to the following reasons:
- The amount of data transferred at a time is too high.
- The internet connection is slow, that is, the bandwidth is too low to transfer the data.
The hardware is below the recommended minimum (RAM is below 512 MB or processor is below P4).
Sync Over Slow Connection transmits smaller packets of transmission over a slow internet/intranet connection.
Enable Sync Over Slow Connection to synchronise data over a slow transmission network. This will ensure the delivery of smaller packets of data to the other side. It transmits 200 vouchers per packet over a slow network, as compared to 2000 vouchers per packet over a normal network when Sync Over Slow Connection is disabled.
You can configure the client rule and server rule.
Client Rule
- If Synchronise Altered Transactionsis set to No – The vouchers altered at the Client will not synchronise with the Server.
- If Synchronise Altered Transactionsis set to Yes – Altered transactions that were synchronised with the Server will be resent during the subsequent synchronisation. These altered transactions will overwrite the vouchers at the server end and remove any changes made to the vouchers in the server computer.
Server Rule
- If Synchronise Altered Transactionsis set to No – The vouchers altered at the Server will not synchronise with the Client.
If Synchronise Altered Transactions is set to Yes – Altered transactions that were synchronised with the client will be resent during the subsequent synchronisation. These altered transactions will overwrite the vouchers at the server end and remove any changes made to the vouchers in the server computer.
No, you cannot get back the deleted entries if they are not synchronised. In case you had synchronised the data before deleting the respective entries, then they will remain at the other end and will not be deleted.
This happens when the client/server rules have been deleted and recreated.
The Account ID and Connect Name must be taken from the location where Server Company is available. The Account ID is displayed in the About page under License Information, and the Company Display Name is displayed in the Contact Details screen:
Press Alt+K (Company) > Configure > Online Access > Contact Details.
Yes, data can be synchronized from multiple locations to a single Server Company. However, synchronization is a two-way function, and, by default, the data will be exchanged from one company to another. For example, say Company A in Bangalore and Company B in Chennai want to synchronize their data with the HO in Mumbai, to arrive at a consolidated position. Owing to the two-way synchronisation, the data of Company A will be transferred to Company B through the HO, by default. To prevent this, TallyPrime would need to be customised to add the One Way Sync feature.
In this case, it is recommended that you create new voucher types with unique names at all branches under default sales and receipt, so that the head office will have the exact record of bills as per branches.
Disable the Offline sync and check the ping speed.
Let us assume that Universal Traders has branches in multiple locations and wants to synchronise the data.
Scenario
- All the locations maintain their own books of accounts with the same masters across the locations.
- Opening Balances would differ for the masters at all locations.
Solution
- If the masters have to be created in Data Synchronisation:
- Every location can maintain their own books of accounts with the same masters using the Exchange Snapshot Online
- During Snapshot Exchange, all the data are synchronised to the branches.
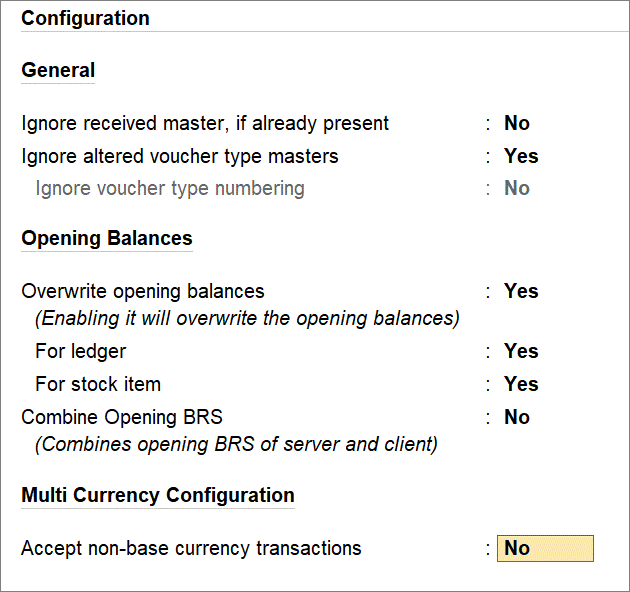
- As the requirement is to maintain different Opening Balances that are already defined in the masters, you have to disable the option Overwrite Opening Balances.
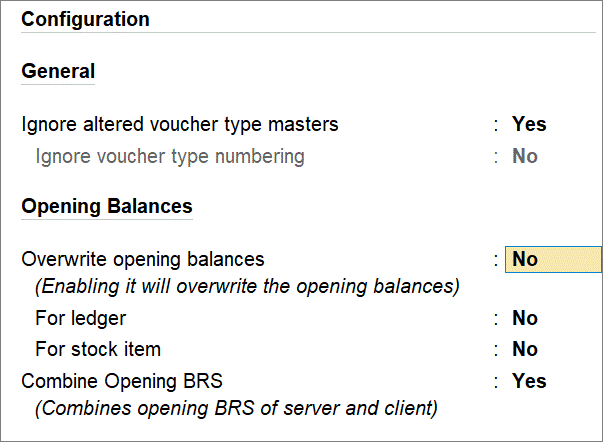
- Set the options For Ledger and For Stock Item to No, such that the opening balances will not be disturbed.
The client and the server companies are connected online through the Tally.NET server or a private network. The sync rule and data are immediately transferred to the connected company for synchronisation. It is mandatory for the client and server companies to be online during synchronisation.
When vouchers are recorded at branches, the same should be updated at the head office. At the branch office, you can select the voucher types for synchronisation with the head office.
- Press Alt+Z (Exchange) > Synchronisation > Client Rules > Alter.
- Select Head Office.
- Select Both as the Direction of Sync, in the Client Rule Alteration screen.
- Select the voucher types that you want to synchronise in the Synchronisation Types screen, as shown below.
- Press Ctrl+A to accept. You can activate Client Rule at the head office to perform real-time synchronisation.
Note: The voucher types selected under the column Allow the following Voucher Types, under Send Data, will be synchronised. Similarly, the voucher types selected under the column Allow the following Voucher Types, under Receive Data, will be synchronised.
The Transaction Sync Summary report is available at a click and displays the details of data synchronised from the client or server. It displays information about the vouchers sent, received, and pending for synchronisation.
- Press Alt+Z (Exchange) > Data Synchronisation > Sync Reports > Sync Summary.
- Press the required key or click the required button to view the respective report.
-
- F7 (Pending): This displays the list of vouchers pending for synchronisation.
- Alt+F7 (Sent): This displays the list of vouchers sent from the client/server during synchronisation.
- Ctrl+F7 (Received): This displays the list of vouchers received at the client/server during synchronisation.
When the synchronization server/client has multiple synchronisation rules, select the required rule by pressing F4 (Change Rule).
TSS (Tally Software Services) is required both in the Server and the Client if data is Synchronised using Tally.Net Server.
TallyPrime assists in creating more than one price list, when you have different price structures/levels for different purposes, such as different groups of customers requiring different discounts or dealing in different products.
Companies operating in multiple locations have to synchronise the price lists if the Head office creates a price lists for all the branches, to avoid repetition of work. Further, synchronisation of price lists will also be required if the branches are allowed to create the required price lists.
Currently, price list synchronisation does not happen. The price lists have to be manually exported from the location where they are created and imported at the location where they are required.
Yes, it is possible to synchronise data using a combination of both Static IP Address and Tally.NET servers. Ensure that you provide the correct details in Client Rules before synchronising.
When
- If opening BRS details are entered on the server and client ends, with the Combine Opening BRS option set to No on both the ends, it will consider the opening BRS of the Server end only.
- If no opening BRS details are mentioned in the server and there are no voucher entries on Server, but the client has opening BRS as well as voucher entries, then the opening BRS of the client would get updated on the Server as there are vouchers on the client for the particular bank ledger
When

If the opening BRS details are entered on the server and client and the Combine opening BRS during synchronization option is set to Yes, then the opening BRS details are combined.
Yes, data synchronization can be done via VPN.
In the books of accounts, vouchers are recorded using stock item. Later a new stock item is created and the items selected in the existing vouchers are replaced with newly created stock item. During data synchronisation, the new stock item is not getting created and the changes in the vouchers are not updated on the Server.
In the Sync Rule, the option Synchronise Altered Transactions is set to No. If an entry that is already synchronised is altered with a new master, then the changes will not be effected on other side if the option Synchronise Altered Transactions is set to No.
You can decide whether you want to synchronise the altered transactions or not, and then enable/disable the Synchronise Altered Transactions option accordingly. However, if you want only the new masters to get updated at the other end, you can import the masters manually or you can exchange snapshots.
Yes, there is no limit on the creation of Rules from a Client.
Scenario
We had synchronized data with HO till the end of the 2nd quarter of the current financial year. In the beginning of the 3rd quarter we began the process of migrating to another internet service provider. While the process of migration was in progress, the branches were unable to perform synchronisation with HO. As a result, the entire data for the 3rd quarter is pending to be synchronized. Can we electronically transfer the data for the 3rd quarter from the branch to HO rather than manually exporting and importing the data?
Solution
It is possible to electronically transfer data from branch to HO. This can be done using the Exchange Snapshot Online feature, which initiates the data exchange from the client. During the process it determines and begins data exchange from the point where data was synchronised in the previous exchange.
Update the opening balances at the client:
- Press Alt+Z (Exchange)> Data Synchronisation > Client Rules.
- Select Create.
- In the Client Rule Creation screen, go to the Opening Balance section:
- Set Overwrite Opening Balance to Yes,to update the server’s ledger opening balances at the client.
- Set For Ledger to Yes.
- Set For Stock Item to Yes.
Update the opening balances at the server:
- Press Alt+Z (Exchange)> Data Synchronisation > Server Rules.
- Select Activate.
- In the Server Rule Activation/Alteration screen, go to the Opening Balance section:
- Set Overwrite Opening Balanceto Yes, to update the server’s ledger opening balances at the client.
- Set For Ledger to Yes.
- Set For Stock Item to Yes.
Yes, it is possible to transfer the opening balances of Ledgers and Stock Items from one location to another using the Exchange Snapshot or Export Snapshot feature. These features will synchronise masters that have opening balances but have no transactions associated to them.
On starting synchronisation, the Sync Start message appeared in the Event Log. But the Sync End message did not appear. On the server end, the company is connected to Tally.NET.
Solution
When some of the transactions are deleted, TallyPrime takes longer time to read deleted entries. Do not delete any entries while using the synchronization feature. Instead, you can cancel the transaction by pressing Alt+X.
Deleted entries tend to corrupt the Client Rule, hence it is recommended that you take a backup of the existing data, create a new company, export and import the data, create a new client rule, and then synchronise the data.
This problem may occur due to one of the following reasons:
- In the Client Rule, Directions of Syncis set to Receive Data.
- There is a mismatch between the Alter ID sent from the Client and the Alter ID received at the Server. This problem occurs when the earlier version Company.900 file is restored or copied.
There are two reports that show the data status after synchronisation:
- Synchronisation Status: Press Alt+Z (Exchange)> Data Synchronisation > Sync Report > Sync Status.
This report shows the synchronisation status of master and transactions. You can see details of Rule info, Type of Data, Last Synced info, Status and Mode of Transfer.

- Exceptions: Press Alt+Z (Exchange)> Data Synchronisation > Sync Report > Exceptions.
This report shows the possible errors during the import of data. For example, if Zero Valued Entries are enabled at the Server and the same is not enabled at the client, then an error will appear during sync, which can be viewed in the Event Log:

You will have to make the following changes in advanced configuration:
- Press Alt+Z (Exchange)> Configure > Data Synchronisation > Client/Server Setup.
- Set Enable ODBC server to No.
- Press Ctrl+A to accept the configuration screen.
- Restart TallyPrime when prompted.
During synchronisation TallyPrime does not exchange all the available ledgers. It exchanges ledgers that are referred in vouchers. Based on your requirement, ensure that the Opening Balance options for the Ledger/Item or both are enabled in the Client/Server Rule in order to accept the Opening Balance changes.
To get the complete Opening Balance, follow one of the following methods:
- To update the Opening Balances of all Ledgers/Stock Items on the other side, you can perform either of the following actions:
- Exchange Snapshot or Export and Import snapshot.
- Manually export all Ledgers/Stock Items and import it to the other side.
- To update the Opening Balance of a particular Ledger/Stock Item, pass a Zero Value/Optional Entry for the required Ledgers/Stock Items and initiate Synchronisation. This will ensure that the Opening Balance of the particular Ledger/Stock Item is reflected on the other side.
To halt the synchronisation process, follow either of the following steps:
- Press Ctrl+Qor Esc, and press Enter to confirm.
- Disconnect the companies that are connected to Tally.Net Server at the Server end, or close the company loaded on the Server (in case of Direct IP Sync).
No, it is not mandatory to enable ODBC server to synchronise data through Tally.NET Server/Direct IP.
Enabling ODBC server is mandatory to fetch data through ODBC in TallyPrime.
The speed of data synchronisation using Tally.Net depends on the available internet bandwidth and the volume of data. A broadband connection with a good speed is recommended in order to transfer data on higher bandwidth.
A new option called Deactivation of the server rule is introduced, which notifies the server of any unauthorized changes to the synchronisation rule at the client. On authorizing the changed synchronization rule at the Server, the system proceeds with synchronizing the data, or else the server rule will be deactivated and the system will not synchronise the data.
To activate this option on the synchronization server, enable the option Deactivate When Client Rule Changes in the server rule. You can proceed with synchronization when the option Deactivate when client rule changes is disabled at the Server end.
You need not reconfigure synchronization after splitting the data in TallyPrime. It will work as is after the data is split.
Scenario
We are an organization with regional offices and branches located across the country, involved in procuring and selling different products. We record the inflow of stocks at the HO and the actual stock is delivered directly to the respective branches and sold through our retail counters located at each branch. As of now we have been synchronizing data at the end of each day to update the stock position at HO and view the revenue generated. We want to update the stock position at HO the moment goods are sold, which would give us a real-time picture on the availability of stock. Is it possible to update the stock online using TallyPrime?
Solution
Yes, it is possible to update the stock online using the option Synchronise after Save, which is available in the client rule. This option can be enabled while creating or altering the client rule. It is essential to connect the company at the Head Office (Server) to Tally.NET and connect the retail units (clients) to the Internet, in order to exchange data.
Note: After detecting voucher types for Synchronise After Save, the system triggers synchronisation and synchronises all the pending vouchers.
You can synchronise vouchers after saving them in TallyPrime. You have to enable the Synchronisation after save option.
The company at the Head Office (Server) and the retail units must be connected to Tally.NET and Internet to exchange the data. The system detects the voucher types to be synchronised after saving, and synchronises the vouchers.
- Press Alt+Z (Exchange)> Data Synchronisation > Client Rule > Create/Alter.
- Select the required Rule created for Transaction.
- Set the option Set/alter advanced configurations to Yes.
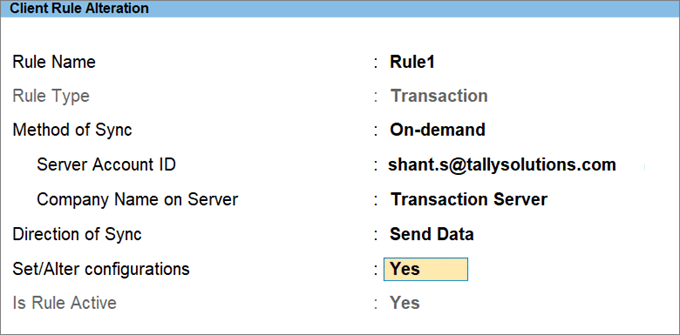
- Set Synchronise after save? to Yes.

- Select the voucher types.

- Save the Client Rule .
- Synchronise the data once again.
Enable the option to synchronise vouchers after saving them in Release 4.x
- Go to Gateway of Tally > Import of Data > Synchronisation > Client Rule > Alter.
- Select the required Rule.
- Set Sync After Save to Yes.
- Save the Client Rule.
- Synchronise the data once again.
This error message occurs when the same voucher number is assigned to two different vouchers. It is recommended that you change the voucher number and then synchronise the data. Ideally, use separate voucher types at either ends. This will make the operation easier as vouchers can be identified distinctly.
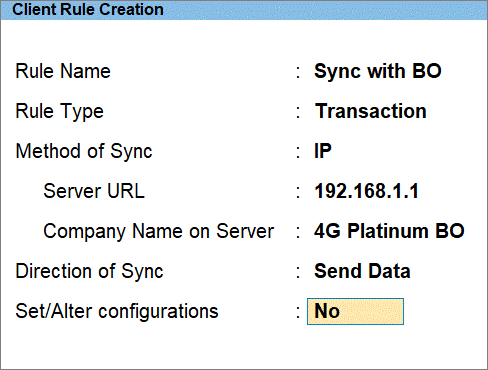
- Press Alt+Z (Exchange)> Data Synchronisation > Client Rule > Create. The Client Rule Creation screen appears.
- By default, the Type of Sync is set to Both. Based on your requirement, you can select Send Data or Receive Data.
- Save the Client Rule.
On synchronizing, the data will flow only in one direction as configured.
Check connectivity at the client and server end.
Connectivity at the client end
- Open the web browser.
- Enter http://serveripaddress:tallyport. For example, http://198.162.1.64:9090. If you receive an HTML/XML response, the Tally server is connected.
Connectivity at the server end
If the internet is connected, the Event Log will display the message Successfully connected to Link Server with ID XXXX (Server ID).
Yes, data synchronisation is effective within a LAN environment, provided you have a Tally Server module and a Tally Client module activated on your computer.
The error messages are displayed in the Event Log: Press F1 (Help) > Troubleshooting > Event Log.
You must check the Event Log after synchronisation is completed.
Data synchronization is possible between any two companies using Tally. However, no data can be synchronized unless the Server Rule is activated for the company on the Server.
Let us assume that National Traders has branches in many countries. It wants to synchronise data from different branches and view reports in the Head Office.
Scenario
- All locations record transactions (vouchers) in their respective currencies.
- The reports have to be displayed in the respective Base Currency in the Head Office and Branch Offices.
Solution
All locations can record voucher entries in their own currencies. In the Client Rule of Branches, you have to to enable the option Send Base Currency along with Amounts, so that the voucher is synchronised to the Head office with the Currency of that particular location.
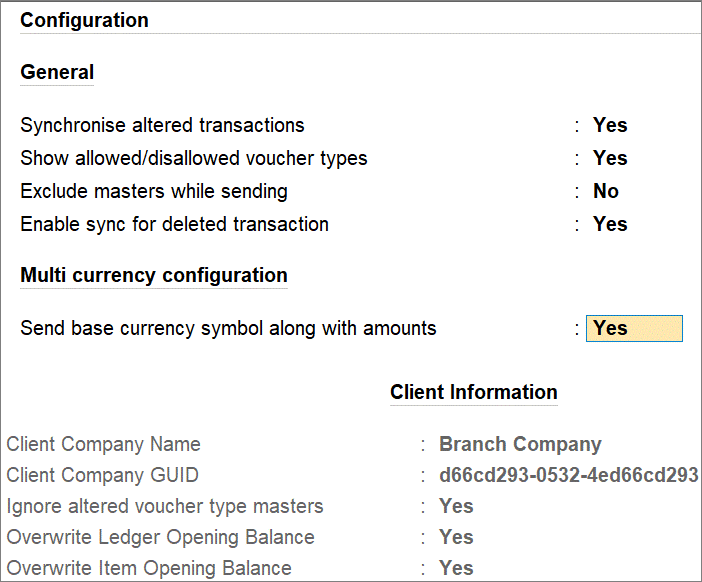
In the Server Rule of Head Office, you have to enable the option Accept Non-Base Currency transactions, so that the Base Currency is converted to the foreign currency.
Note: You have to specify Standard Rate of Exchange in the Currency masters, as the conversion happens based on the standard rate of exchange.
Data can be synchronized across various media, such as V-SAT, VPN Tunnel, broadband connection, ISDN Dial Up, Normal Dial Up, and so on. The speed of synchronization depends on the bandwidth of the Internet connection you are using. On a good connection, it takes approximately 3 to 4 minutes to transfer 1 packet, that is, 25 vouchers.
It is not recommended that you delete an existing Client Rule. In case you have deleted the client rule and created a new one, then, after synchronisation, the new rule will exchange all the vouchers once again and overwrite the existing vouchers.
Yes, it is possible to prevent the opening balances from being overwritten at the server and/or at the client. Based on your requirement you can activate these options on the Client/Server.
Scenario 1
The Ledger/Item opening balances are entered or already available at the client and needs to be updated on the Server.
At the Synchronisation Client:
- Press Alt+Z (Exchange) > DataSynchronisation > Client Rules.
- Select Create or Alter, and go to the Opening Balance
- Set Overwrite Opening Balance to No:
- For Ledger to No, to prevent the overwriting of Ledger Opening Balance.
- For Items to No, to prevent the overwriting of Item Opening Balance.
At the Synchronisation Server:
- Press Alt+Z (Exchange) > DataSynchronisation > Server Rules.
- Select Activate or Alter, and go to the Opening Balance
- Set Overwrite Opening Balance to Yes:
- For Ledger to Yes, for overwriting the Ledger Opening Balance of the Server with the Client.
- For Items to Yes, for overwriting the Item Opening Balance of the Server with the Client.
Scenario 2
The Ledger/Item opening balances are entered or already available at the Server and needs to be updated on the Client.
At the Synchronisation Client:
- Press Alt+Z (Exchange) > DataSynchronisation > Client Rules.
- Select Create or Alter, and go to the Opening Balance
- Set Overwrite Opening Balance to Yes:
- For Ledger to Yes, for overwriting the Ledger Opening Balance of the Client with the Server.
- For Items to Yes, for overwriting the Item Opening Balance of the Client with the Server.
At the Synchronisation Server:
- Press Alt+Z (Exchange) > DataSynchronisation > Server Rules.
- Select Activate or Alter, and go to the Opening Balance
- Set Overwrite Opening Balance to No:
- For Ledger to No, to prevent the overwriting of Ledger Opening Balance.
- For Items to No, to prevent the overwriting of Item Opening Balance.
Scenario 3
The Ledger/Item opening balances are maintained independently at the Client and the Server.
At the Synchronisation Client:
- Press Alt+Z (Exchange) > DataSynchronisation > Client Rules.
- Select Create or Alter, and go to the Opening Balance
- Set Overwrite Opening Balance to No:
-
- For Ledger to No, to prevent the overwriting of Ledger Opening Balance of the Client with the Server.
- For Items to No, to prevent the overwriting of Item Opening Balance of the Client with the Server.
At the Synchronisation Server:
- Press Alt+Z (Exchange) > DataSynchronisation > Server Rules.
- Select Activate or Alter, and go to the Opening Balance
- Set Overwrite Opening Balance to No:
-
- For Ledger to No, to prevent the overwriting of Ledger Opening Balance of the Server with the Client.
- For Items to No, to prevent the overwriting of Item Opening Balance of the Server with the Client
Scenario
ABC Company is using the Data Synchronisation feature for many years. There is an accountant who manages everything. The accountant had recently left the company and, before leaving, he had taken the data backup of ABC Company to synchronise the Data from his own license.
Now the proprietor of ABC Company is worried, and he wants to stop Data Synchronisation to his data from the data backed up by the Accountant.
Solution
To stop data synchronisation, change the Company Display Name on the Server. As a result, the accountant would not know the new Company Display Name, and when he tries to synchronise the data, the message Company Currently not Connected will appear, and the data of ABC Company will be safe.
- Ensure that the same set of F11: Features are activated on the Client and Server companies. If the features enabled on the client and server company are not the same, data may be lost. For example:
- If tracking numbers are enabled at one end and disabled at the other end, then the purchase/sales bills pending reports will not appear properly.
- If Zero valued entries are enabled at one end and disabled at the other end, then data synchronisation will not be allowed.
- Restoration/Copy of data to implement data synchronisation for multiple locations:
- Data will not be synchronised between two companies having the same GUID.
- While implementing data synchronisation for multiple locations, it is easier to copy and paste the data from one location to multiple locations. By doing this, data will not be synchronises, as the GUID is the same at all locations.
- Alteration of Accounting or Inventory masters:
When the accounting or inventory masters are altered, a new master gets created at the other end on synchronizing data.
For example, the accounting master Conveyance having a transaction for Rs. 3,600 is altered in the Client to Local Conveyance. A new entry is recorded for Rs. 2,700. In Client, the Local Conveyance ledger has a current balance of Rs. 6,300. On synchronising data from the Client, a new ledger Local Conveyance gets created on the Server. In the Server, Conveyance ledger balance is Rs. 3,600 and Local Conveyance Rs. 2,700.
When masters are altered, manual correction is needed on the Server and Client computers. If you want the alterations to be effected at the other end, then you can perform an exchange snapshot or import the masters manually from the altered location.
- Alteration of default Voucher Type names available in TallyPrime:
If default voucher types are altered, then, during data synchronisation, the same will be altered at other locations, if the server/client rules are configured to ignore modified voucher type masters.
If the option Ignore modified voucher type masters is enabled in rules, then it will not allow to synchronise the data. Hence, you need to create new voucher types under the default voucher types. You can create location-wise voucher types and specify the method of voucher numbering with prefix or suffix, so that data synchronisation will happen smoothly.
The use of automatic voucher numbering makes it difficult to trace vouchers after synchronisation, as each voucher is allotted a new incremental voucher number when it is synchronised with the other location. Hence, it is recommended that you create the required voucher types at the client and server, as explained.
- Delete vouchers using Alt+D and cancel vouchers using Alt+X
Cancellation ensures that vouchers remain intact on the system, and if you want to delete a voucher, identify and delete specific voucher from both the Server and Client computers.
On deleting a voucher in server or client, the Remote ID of a voucher gets deleted, thereby the identity of the voucher is removed from the system.
If vouchers are already synchronised from the Client to the Server and later a voucher is deleted by mistake from the Client, then to get the voucher again to the Client computer, re-accept the voucher (which is deleted on the client, but available in the server) by pressing Ctrl+A, and synchronise the data.
- Master Balances
Before implementing Data Synchronisation, the requirements pertaining to master-level information like Name of the Masters and Opening Balances need to be understood properly. Understanding the requirements before setting up Data Synchronisation and knowing the Do’s & Don’ts/Precautions would make implementation easier.
In case of Data Synchronisation for Consolidation of Data, the masters created at multiple locations may be different but it would be serving the same purpose. For example: Conveyance, Conveyance Expenses, and so on. So, you can maintain one group for conveyance and create different ledgers at different locations to account for conveyance expenses by placing them under conveyance group.
Synchronization is the process of replicating data between two or more computers using TallyPrime in a Client – Server environment. During synchronisation, TallyPrime will first transfer the masters and then the transactions related to the synchronised masters.
If the name of the masters used in the synchronised transactions are altered, then TallyPrime will verify the existing masters in the server and when the masters with the altered name are found, it creates a new master with the altered name.
Hence, if the masters are altered only at the Client or at the Server, then alter the masters manually at the other end.
Yes, all vouchers (Optional/Memorandum/Reversing Journal/Cancelled) can be synchronized.
Tally provides users with complete control over the frequency of replication. You can replicate the data after every transaction or at specific intervals.
You can configure TallyPrime to send or receive specific voucher types in the client rule.
- Press Alt+Z (Exchange) > DataSynchronisation > Client Rule > Create. Enter the required details in the Client Rule Creation
- Select Both as the Direction of Sync. The Voucher Types Allow/Disallow List screen appears.
Under the Send Data section:
- Allow the following Voucher Types: Select the voucher types that need to be sent to HO.
- Disallow the following Voucher Types: Select End of List.
Under the Send Data section
- Allow the following Voucher Types: Select the required voucher types that have to be received from HO.
- Disallow the following Voucher Types: Select End of List.
Synchronise to send or receive the specified vouchers types only.
You can configure TallyPrime to send or receive specific voucher types in the client rule by following the steps shown below:
- Press Alt+Z (Exchange) > DataSynchronisation > Client Rule > Create.
- Enter the details in the Client Rule Creation screen that appears.
- Select Both as the Direction of Sync. The Voucher Types Allow/Disallow List screen appears.
- Under the Send Data section:
- Allow the following Voucher Types: Select the voucher types that need to be sent to HO.
- Disallow the following Voucher Types: Select End of List.
- Under the Receive Data section:
- Allow the following Voucher Types: Select the required voucher types that have to be received from HO.
- Disallow the following Voucher Types: Select End of List.
- Save the Client Rule.
Cause
Companies having businesses in different locations may want to consolidate the branch data with the HO data to find out the turnover/outcome and other information. The company’s branches and HO may be dealing in dissimilar stock/inventory. If all the branches and HO are dealing in the same stock, then there is a possibility that you can find a few stock items that have data with stock balances.
When data with common stock items are synchronised, instead of displaying the combined opening stock balance for similar stock items, it displays the stock balance available in the last company synchronised.
For example, let us assume that ABC Company has branches in Mumbai, Calcutta, and Ahmedabad. It synchronises data from the branches with its Bangalore HO data. In all the data, one stock item is common, and it has an opening balance in all the locations: Bangalore – 56, Mumbai – 150, Calcutta – 70, and Ahmedabad – 30. On synchronisation of data, instead of displaying the combined balance as 306, it displays 70 as the Opening Balance (Calcutta branch stock balance, which was synchronised at the end).
The problem of opening balance aggregation in multi-location synchronisation also exists for Ledger Balances.
Solution
- Export the masters manually from different locations.
- Import the masters with Treatment of Entries as Combined Opening Balances, at the location where you want to consolidate the data.
Note: While manually Exporting/Importing masters, ensure that the option Update/Modify Opening Balances in Client & Server Rule is set to No at all locations.
Yes, a valid TSS subscription is required at both the Server and the Client to perform synchronization using TSS Servers.
Yes, a Bank Reconciliation Statement can be synchronised between Server and Client computers.
The synchronization of data has to be initiated at the branch/client level after the updation of books of accounts. Moreover, a Client always initiates synchronization, since the Server Rule gets created implicitly when a Client Rule tries to synchronize with the Server.
It is possible to prevent the opening balances from being overwritten at the server and/or at the client. Based on your requirement, you can activate these options on the Client/Server.
Scenario 1
The Ledger/Item opening balances are entered or already available at the client and need to be updated on the Server.
At the Synchronisation Client:
- Press Alt+Z (Exchange) > DataSynchronisation > Client Rules.
- Select Create or Alter, and go to the Opening Balance section.
- Set Overwrite Opening Balance to No:
- For Ledgers to No, to prevent the client’s ledger opening balances from being updated with the server’s ledger opening balances.
- For Items to No,to prevent the client’s item opening balances from being updated with the server’s item opening balances.
At the Synchronisation Server:
- Press Alt+Z (Exchange) > DataSynchronisation > Server Rules.
- Select Activate or Alter, and go to the Opening Balance section.
- Set Overwrite Opening Balance to Yes:
- For Ledgers to Yes,to update the ledger opening balances at the server with the respective ledger opening balances of the client.
- For Items to Yes,to update the item opening balances at the server with the respective item opening balances of the client.
Scenario 2
The Ledger/Item opening balances are entered or already available at the Server and needs to be updated on the Client.
At the Synchronisation Client:
- Press Alt+Z (Exchange) > DataSynchronisation > Client Rules.
- Select Create or Alter, and go to the Opening Balance section.
- Set Overwrite Opening Balance to Yes:
- For Ledgers to Yes,to update the ledger opening balances at the server with the respective ledger opening balances of the server.
- For Items to Yes,to update the item opening balances at the server with the respective item opening balances of the server.
At the Synchronisation Server:
- Press Alt+Z (Exchange) > DataSynchronisation > Server Rules.
- Select Activate or Alter, and go to the Opening Balance section.
- Set Overwrite Opening Balance to No:
- For Ledgers to No,to retain the existing ledger balances at the server.
- For Items to No,to retain the existing item balances at the server.
Scenario 3
The Ledger/Item opening balances are maintained independently at Client and Server.
At the Synchronisation Client:
- Press Alt+Z (Exchange) > DataSynchronisation > Client Rules.
- Select Create or Alter, and go to the Opening Balance section.
- Set Overwrite Opening Balance to No:
- For Ledgers to No,to retain the existing ledger balances at the Client.
- For Items to No,to retain the existing item balances at the Client.
At the Synchronisation Server:
- Press Alt+Z (Exchange) > DataSynchronisation > Server Rules.
- Select Activate or Alter, and go to the Opening Balance section.
- Set Overwrite Opening Balance to No:
- For Ledgers to No,to retain the existing ledger balances at the server.
- For Items to No, to retain the existing item balances at the server
There will be no impact on the data synchronised, unless the data is corrupted.
Scenario
On successfully synchronising data with the branch office we noticed that the balance sheet was displaying incorrect figures. On reviewing the accounts, we found that the ledger opening balances and item opening balances were incorrect. The Ledger opening balance and Item opening balances at HO were replaced with the Ledger and Item opening balances of the branch.
Solution
Yes, it is possible to restrict the Ledger and Item opening balance at HO from being replaced with Ledger/Item opening balance of the branch. This can be done in the Server Rule Activation/Alteration screen by setting the option Overwrite Opening Balance for both items and ledgers to No. Based on your requirement, you can disable one or both the options
Tally maintains CID and AID of the Client company along with the Server/Client Rules. Synchronizing back-dated vouchers would mean updating these IDs in the Server company:
- Client sends data to the Server
- Client retrieves data from the Server
- Process for updating the Server
The problem of updating these IDs is complex unless you have set up synchronization between companies having large amount of data.
- The initial synchronization can take a long time over the Internet.
- The Client computer is likely to display an Out of memory
Besides, if synchronization takes place in the middle of the year, the Masters without any transactions will not get synchronized. In such cases, the recommended way to proceed with synchronization is to export data of the source company (in XML format) to a disk file and import the same into the target company.
Perform the following steps to ensure proper updation of Remote IDs in the corresponding Rules.
Client sends data to the Server
- Create a Client Rule.
- Select Synchronize on Client, which creates the corresponding Server Rule.
- Activate the Server Rule.
- Do not synchronize again. Instead export all the Masters (in XML format) from the Client to the disk file.
- Export all the vouchers (in XML format) from the Client to the disk file.
- Import the Masters into the Server from the disk file.
- Import the transactions into the Server from the disk file.
- The CID and AID of the last imported voucher are updated in the Server Rule.
- Subsequent CIDs and AIDs would be incremental.
- To synchronize over LAN/Internet, you can send one packet of 25 transactions at a time by selecting Sync over slow connection in the Client Rule. This will prevent the Out of memory
Client retrieves data from the Server
- Create a Client Rule.
- Select Synchronize on Client, which creates a corresponding Server Rule on the Server.
- Activate the Server Rule.
- Do not synchronize again. Instead export all the Masters (in XML format) from the Server to disk file.
- Export all the transactions (in XML format) from the Server to the disk file.
- Import the Masters into the Client.
- Import the transactions into the Client from the disk file: Press Alt+Z (Exchange) > DataSynchronisation > Snapshots > Import Snapshot.
You have the option to update the Server and Client when there is a substantial amount of data. This is done by creating a snapshot file at the source and importing it to the destination computer.
Updating the Server
- Create the Client Rule, and select Synchronize > Export/Import Snapshot.
- Export the snapshot at the Client: Press Alt+Z (Exchange) > DataSynchronisation > Snapshots > Export Snapshot.
- Copy the snapshot file to a Drive.
- Activate the Server Rule.
- Import the snapshot file from the CD at the Server: Press Alt+Z (Exchange) > DataSynchronisation > Snapshots > Import Snapshot.
The process must be reversed for updating a Client.
No, a static IP address is required only at the location assigned as Synchronisation Server.
To synchronise data using static IP Address, you need to obtain the Static IP Address from your Internet Service Provider and provide it in the Client Rule along with the Server’s Port number that is used by TallyPrime.
Ensure that the same set of features are activated in F11: Features on both the Client and the Server for the company.
- Do not alter the Accounting or Inventory Masters. If altered, it will get updated as a new Master during synchronization. For example, the accounting master ‘Rent’ having one transaction for Rs. 2500/- is altered in the Client to ‘Building Rent’. A new entry is made for Rs. 2000/-. After synchronising the data, in the Client, the ledger will be ‘Building Rent’ for Rs. 4500/-, while in the Server it will get updated as ‘Rent’ for Rs. 2500/- and ‘Building Rent’ for Rs. 2000/-. Thus, in cases where the Masters have been altered, the correction needs to be made manually in the Server and Client computers.
- Do not delete any vouchers using Alt+D. Instead, cancel the vouchers using Alt+X, which ensures that the voucher remains in the system. The other option is to identify and delete the voucher from both the Server and Client computers.
- Do not use a back-up of the company created and restore it at the other location for synchronization. The data will not get synchronized, since the GUID (Global Unique Identifier) of both the companies will be the same.
| Manual Import | Import Snapshot |
| The synchronisation rules are not updated. | The synchronisation rules are updated with the Alter IDs sent/received. |
| This imports the complete data. | This updates the information that is not available. |
- Connect Company at the Server instance:
Load the required company at the Server instance and connect the company. On successfully connecting to Tally.NET, the connection status appears as shown below:

- Create Client Rule on Client:
-
- Load the required company at the Client instance.
- Press Alt+Z (Exchange) > Data Synchronisation > Client Rules > Create.
- Activate the Rule on Client: Press Alt+Z (Exchange) > Data Synchronisation > Synchronise.
- Activate/Enable Synch Rule on Server: After activating the rule on the client, it is essential to activate the rule on the server before synchronising the data:
-
- Press Alt+Z (Exchange) > Data Synchronisation > Server Rules > Activate.
- Select the required rule from the List of Rules. The Server Rule Alteration screen appears.
- Set Activate Rule to Yes.
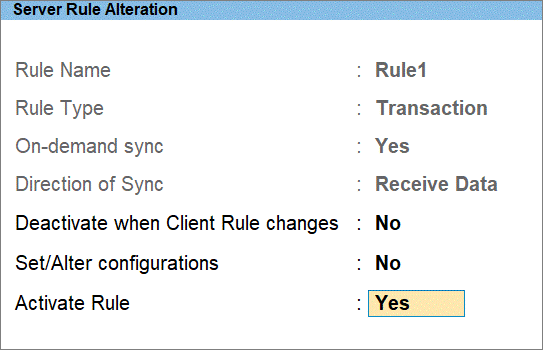
- Set the other options, as required, and save the settings.
- Perform Exchange Snapshot Online at the Client instance:
-
- Press Alt+Z (Exchange) > Data Synchronisation > Snapshots > Exchange Snapshot Online.
- Select the required rule from the List of Rules and press Enter. The Exchange Snapshot starts. You can see the following message in the Event Log after the completion of Exchange Snapshot:

Note: The exchange snapshot is initiated at the client instance. During the snapshot exchange process, TallyPrime will determine the point of the last exchange and exchange the data between the client and server.
Scenario
I have been using Data Synchronisation for some time and I have deleted the entries that were synchronised earlier at the Client location. Will this deletion affect the data on Server?
Answer
During Synchronisation, every voucher is identified with the help of IDs like Remote ID, GUID, Alter ID and Master ID. When a voucher is deleted, the respective IDs in the voucher object are removed only on the Client, whereas the transaction on the server data remains intact.
The system will not alter the corresponding ID on the server on subsequent Data synchronisation from the Client computer, as the deleted voucher IDs do not exist at the client
Cause: This error may occur while resetting the password due to the following reasons.
- The IP Address mentioned in the Client Rule is not available or incorrect.
- The option Connect to Tally.NET Server running on non-HTTP Port is enabled, when connection is on HTTP port 80.
Solution: Check whether the IP address and the port number mentioned in the Client Rule is correct. If the option Connect to Tally.NET Server running on non-HTTP Port is enabled, set the port to 9050.
Cause: This error occurs due to a problem with the .cap file in TallyPrime.
Solution:
- Note the capsule number displayed in the error message. For example, 41194-00004.cap.
- Close TallyPrime. For multi-user scenarios, close both the server and client instances.
- Go to the TallyPrime installation folder on the server and client computers and open the Capsules folder.
- Delete the capsule (.cap) file displayed in the error message from the client and server application folders.
- Open TallyPrime by connecting to the Internet. The deleted capsule will be redownloaded.
TallyPrime Release 3.0 onwards, the default Voucher Numbering method was updated to Automatic Retain for all voucher types. This change ensures that once a voucher number is assigned, it remains unchanged even if vouchers are deleted or inserted in between. This stability is beneficial amidst recent compliance changes in the e-Invoice and e-Way Bill systems, preventing accidental modifications to the existing voucher numbers.
However, during sync activities in TallyPrime 3.0 where the Voucher Numbering is set to Automatic Retain, mismatches may occur if there are deleted vouchers at the source. When a voucher is deleted, its associated number moves to an unused category and does not synchronize with the destination.
You can prevent mismatch and maintain consistency in Voucher Numbering by following these methods:
-
Instead of deleting vouchers, you can cancel them. Cancelled vouchers retain their associated numbers and sync accurately to the destination. As a result, this eliminates shuffling of Voucher Numbers at the receiving end after sync.
-
If cancelling is not feasible, create a new Voucher Type or Numbering Series, update the Sync Rules, and continue recording the transactions as you used to do in Release 2.1.
-
Create a new Numbering Series by altering an existing Voucher Type. Alternatively, create a new Voucher Type.
- Select Method of Voucher Numbering as Automatic > Renumber Vouchers option in the latest release.
-
Update the Sync Rule as follows:
- Open the Client/Server Rule> Alter.
- Select the Rule from the List of Rules and set the option Set/Alter Configurations to Yes.
- Under Receive Configurations, set the options Ignore Altered Voucher Type Masters and Ignore Voucher Type Numbering as No and Save the Sync Rule.
This will ensure that the transactions of the newly created voucher type or voucher numbering series are getting synced correctly.
-
If you are using TallyPrime Release 2.1 and foresee any mismatches occurring in the latest release after migration, while syncing data, you can choose to:
- Migrate your data from Release 2.1 to the latest version.
-
After migration, switch the voucher types from Automatic > Retain Original Voucher No. to Automatic > Renumber Vouchers across all locations involved in data syncing.
Once the voucher numbering method is set as Renumber Vouchers in the data, sync becomes a seamless process, similar to how it worked in Release 2.1.

