
View TallyPrime Reports in Browser
TallyPrime Reports in Browser (TRiB) gives you the freedom to view your reports securely from anywhere, on any device, in a browser. All you need is TallyPrime, and a device with a web browser and internet connection.
Anywhere, Any device: You can access TallyPrime reports in browser from anywhere using any device such as, laptop, smartphone, tablet, and so on, with a web browser, and an active internet connection.
Security and Control: You have complete control on who views the reports, and which reports are available to a user. Further, your data will always be in your machine. Whenever a user views a report in a browser, only the data required for that report is fetched from your TallyPrime.
Reports in a web browser: Select the company, then select the report from the list shown once you log in to the Tally portal. The report with the latest data is fetched and displayed. You can drill down to the next levels of the report to get further details. You can change the period of the report as well. Refresh the page to get the updated information.
Download Reports and Invoices: You can open a report and download it in PDF or Excel format. You can drill down up to the voucher level. You can also download invoices and vouchers.
Easy Setup: Update to TallyPrime, connect your company, and allow users to view reports using a browser from anywhere. Note that only users with valid Tally.NET IDs and access to Tally.NET services are allowed to view reports in browser. Your account ID (e-mail ID used to activate your license) is a valid Tally.NET ID with access to Tally.NET services. You can also enable Tally.NET services for other users who need to view reports in browser.
On-demand Reports: Frequently used business reports can be viewed in browsers. More will get added subsequently. To view the list click here.
- Balance Sheet
- Bills Payable
- Bills Receivable
- Cash/Bank Book(s)
- Cash Flow
- Cost Centre Break-up
- Cost Centre Ledger Break-up
- Credit Note Register
- Day Book
- Debit Note Register
- Delivery Note Register
- Funds Flow
- Group Outstanding
- Journal Register
- Ledger Outstanding
- Ledger Voucher
- Movement Analysis – Ledger
- Movement Analysis – Stock Item
- Profit & Loss A/c
- Purchase Orders Book
- Purchase Orders (Due Only)
- Purchase Orders Outstandings – Ledger
- Purchase Orders Outstandings – Stock Item
- Purchase Register
- Ratio Analysis
- Receipt Note Register
- Sales Order Book
- Sales Order (Due Only)
- Sales Orders Outstandings – Ledger
- Sales Orders Outstandings – Stock Item
- Sales Register
- Stock Query
- Stock Summary
- Trial Balance
Get Started with Viewing TallyPrime Reports in Browser
When you upgrade to TallyPrime, your company is enabled by default to allow browser access. You can allow access to Tally.NET IDs to view the reports in browser. You need to connect your companies for users to view TallyPrime reports in browsers.
In this section
Connect Company to view reports in browser
At least one Tally.NET user with access to Tally.NET services should have access to browser reports in order to connect the company.
From Release 6.6.3 onwards, you can connect a company even without enabling the security. While trying to connect the company you can also:
- Give access to browser reports to a user linked to your account and connect the company in a single flow.
- Enter a new e-mail Id to give access and enable Tally.NET services for the same using authorised credentials on the fly.
- If need be, enable the security and give access to browser reports to more users.
You need to have internet connection on the computer where TallyPrime is installed to connect the company.
- Press Alt+K (Company) or click on Company menu from top menu bar > Connect.

Connect company in a single step to select a user or add a new user to give browser access
- In the E-mail ID for Browser Access field, select the Tally.NET user to give access to browser reports from the list of Tally.NET users linked to your account OR select New User to enter a new e-mail Id OR None to not give access to any user.
- TallyPrime will validate, if the selected user has access to Tally.NET services and the specified user (e-mail Id) is a valid Tally.NET user. If they are not valid, a message is displayed to allow you enable the access and create the user with Tally.NET services access by providing your authorised credentials.
- Click Yes to enable or No to continue. The login screen is displayed when you click Yes.
- You can specify your account admin user name and password or any other Id and password with rights to add users to your account to authorise access to Tally.NET services for the user or create Tally.NET user with access to Tally.NET services for the e-mail Id.

- A success message is displayed when access is provided to the selected user or when the new user is created with access to Tally.NET services.
- Press Enter to accept and connect.
This user will get complete access to all features of browser reports such as disconnect a user and so on. When security is disabled, company can connect only for browser access and not for any other Tally.NET services.
Enable security and provide access to more Tally.NET users
- Alt+K (Company) or click on Company menu from top menu bar > Connect > Alt+S (Use Security)
- Set the option Control User Access to Company Data is set to Yes. Provide the administrator details. This login credential is for the company data.

- In the E-mail ID for Browser Access field, select the Tally.NET user to give access to browser reports from the list of Tally.NET users linked to your license OR select New User to enter a new e-mail Id OR None to not give access to any user.
- Set the option Set/alter Browser Access to more users to Yes.
- Press Enter to open the Users for Company screen.
- Select the Security Level as Tally.NET Owner . Click here to know more about creating Security Levels.
- In Username, select the Tally.NET user to give access to browser reports from the list of Tally.NET users linked to your account OR select New User to enter a new e-mail Id.
The Tally.NET users list is displayed in the Username/Tally.NET ID field only when he security level selected is Tally.NET Owner , Tally.NET Auditor or Tally.NET User.
-
- Set the option Allow Browser Access to Yes.
- Similarly specify details of other users, if any.
- Press Enter to accept the details specified.
TallyPrime will validate, if the selected users have access to Tally.NET services or the specified users (e-mail Id) are valid Tally.NET users. If they are not valid, a message is displayed to allow you enable the access or create the users with Tally.NET services access by providing your authorised credentials. Click Yes to enable or No to continue.

-
- Click Yes to display login screen or No to continue. The login screen is displayed when you click Yes.
- You can specify your account admin user name and password or any other Id and password with rights to add users to your account to authorise access to Tally.NET services for the user or create Tally.NET user with access to Tally.NET services for the e-mail Id.
- A success message is displayed when access is provided to the selected user or when the new user is created with access to Tally.NET services.

- Press Enter to accept and connect.
Now that the company is connected, a sign (c) appears against the company name in the List of Selected Companies in the Gateway of Tally.
When an authorised user logs in to the Tally portal, the connected company appears in the List of Companies with the status as Connected.
The connection process fails when there are invalid characters in Company Display Name of the company. TallyPrime displays a message as shown below:
- Click Yes to alter the Company Display Name. A sub screen with the Company Display Name appears allowing you to alter.

The altered Company Display Name is updated in the Contact Details (Alt+K (Company) > Online Access > type or select Contact Details) screen.
View TallyPrime reports from anywhere using browser on mobile/tab
From TallyPrime Release 2.0 onwards, the mobile-responsive design provides a delightful experience of viewing TallyPrime reports in browsers on mobile phones and tablets of all sizes.
The mobile-responsive design ensures that the layout and content of reports adapt to the size of screen on which you are viewing. Therefore, there will be no need to manually adjust or zoom in to view specific details in any report.
Notable features introduced in the mobile-responsive design for reports in browsers
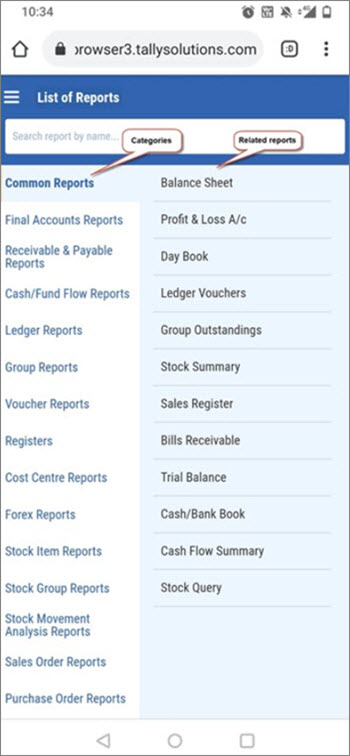
Category and Related Reports
You can view the category on the left-hand side, and when you tap on it, it displays related reports on the right-hand side from which you can select the report that you want to view.
Enhanced date picker for changing period
The latest design comes with an enhanced date picker for changing the period of the report.
Downloading Experience
The new mobile-responsive design brings in intuitiveness in the experience of downloading reports. You can now download reports in the Excel format even if you do not have Microsoft Excel available in the system wherein TallyPrime is installed.
Scale Factor for relevant reports
Using Scale Factor, you can view reports with a specific scale factor – hundred, lakh, million, and others, as per your preference. The facility is provided in reports such as Balance Sheet, Profit & Loss A/c, Group Outstandings, and other reports wherever it is relevant and useful.
Introduction of Show Details
Using Show Details, you can view further details such as Closing Balance in Sales Register. The facility is provided in reports such as Ledger Outstandings, Item Voucher Analysis, and other reports, in which you can use the Show Details option to view additional information based on the context.
View TallyPrime Reports in browsers on mobile phones and tablets
You can view reports in browsers on your small screen device. Follow the steps to view TallyPrime reports in browser.
- Log in to the Tally Solutions website using your Tally.NET ID and Password.
- Open tallysolutions.com on a browser.
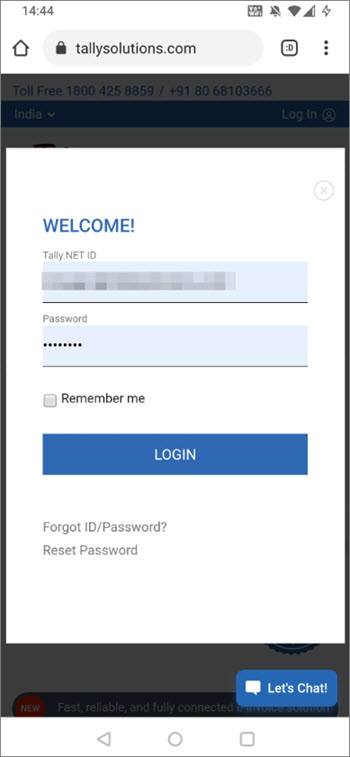
- Tap on Log In.
The Welcome page will appear. - Enter your Tally.NET ID and Password.
If you have forgotten your password or want to reset it, then click here to know how to do it. - ap on LOGIN.
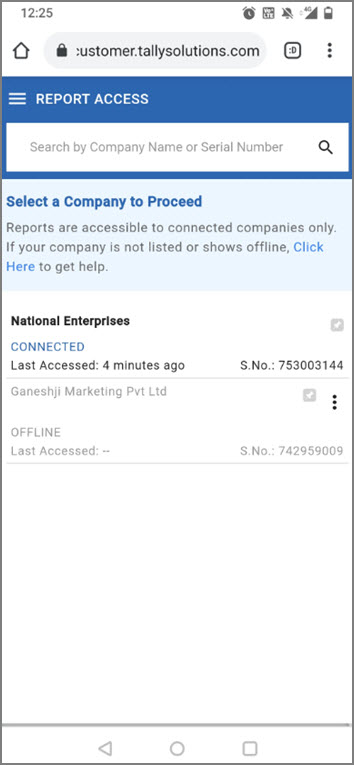
The Reports page will open in which the connected Companies will be listed.
If you have multiple Tally.NET Accounts, then The page with My Tally.NET Account(s) will open. Under My Tally.NET Account(s), tap on the appropriate account after which the Reports page will open. However, if you are already logged in, then tap on your ID at the top right corner. Thereafter, tap on My Accounts to open the page with My Tally.NET Account(s).
- Tap on the Company for which you want to view the reports.
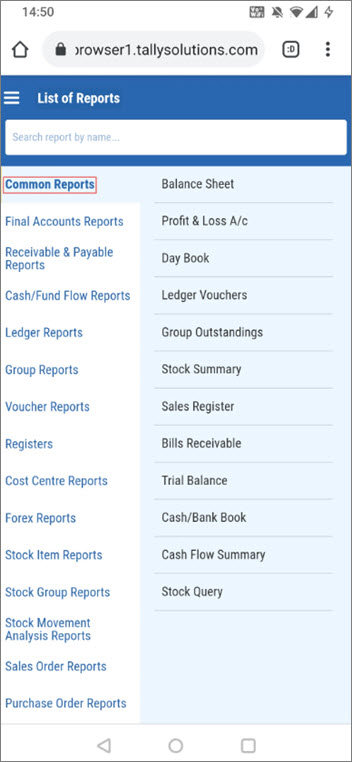
The List of Reports page will open in which you can see the categories on the left-hand side and reports related to that category on the right-hand side. - Navigate to the report you want to view.
- Tap on the category on the left-hand side.
For example, if you want to navigate to Balance Sheet, tap on Common Reports or Final Accounts Report.
By default, Common Reports will be visible on the screen on the List of Reports page.
- Tap on Balance Sheet.
Alternatively, you can directly type Balance Sheet on the search bar and tap on it.

Thereafter, Balance Sheet will open.
If you want to view some other report, then tap on the report title Balance Sheet, and you will be redirected back to the List of Reports page.
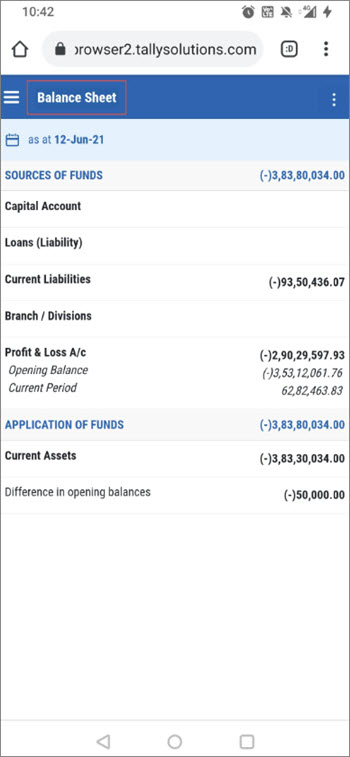
By default, any report appears in the portrait mode. If you want to view it in the landscape mode, then tilt your phone after enabling auto rotate. For Balance Sheet, Profit & Loss, Cash Flow Summary, Funds Flow Summary, and Ratio Analysis, tilting your phone will enable the horizontal view of the report.
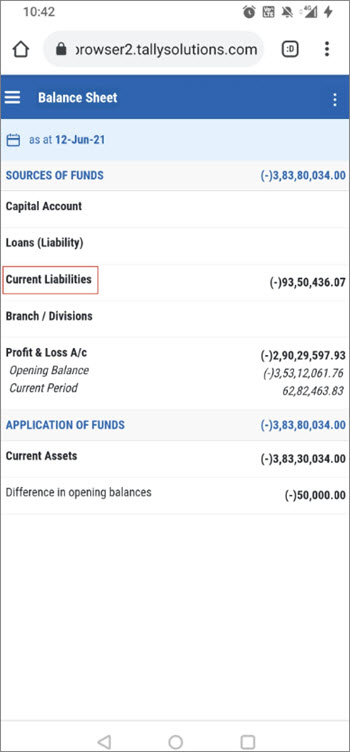
- Tap on the category on the left-hand side.
- Tap on any of the rows under Sources of Funds to drill-down.
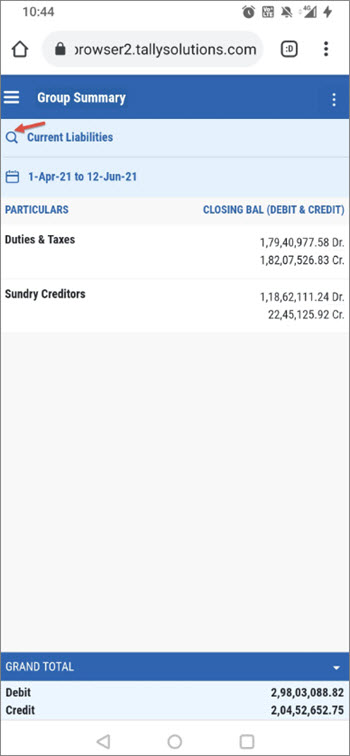
For example, tap on Current Liabilities.
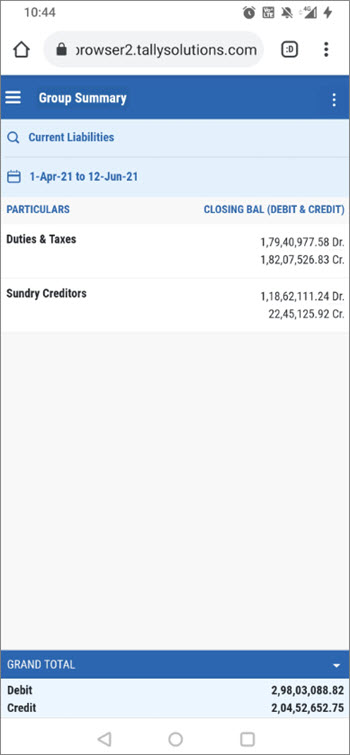
The Group Summary report appears as shown below.
- Download as Excel or PDF, if needed.
- Tap on the settings icon (three dots).
- Tap on Download as Excel or Download as PDF, as per your requirement.
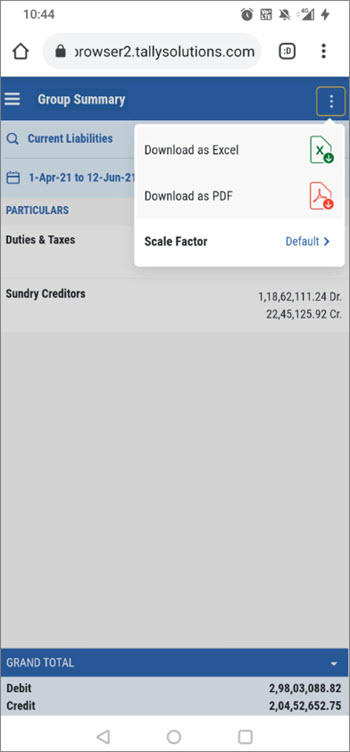
Subsequently, the report will be downloaded or open as Excel or PDF, depending on the operating system (Android or iOS) of your device.
View report for a specific group
You can change the group by using the search box that enables quick access to view report for any other group. Follow the steps given below.
- Navigate to the Group Summary.
If you want to know how to navigate to the Group Summary, then click here. - Open a Group from the Group Summary.
- Tap on the row with the search icon.
- Type to search the group for which you want to view the report and then tap on it.
For example, if you want to view the report for Sundry Creditors, then type to search and then tap on it.
Group Summary with all the ledgers and sub-groups will open.
- Tap on the row with the search icon.
- Tap on any ledger.
The Ledger Monthly Summary report appears as shown below.
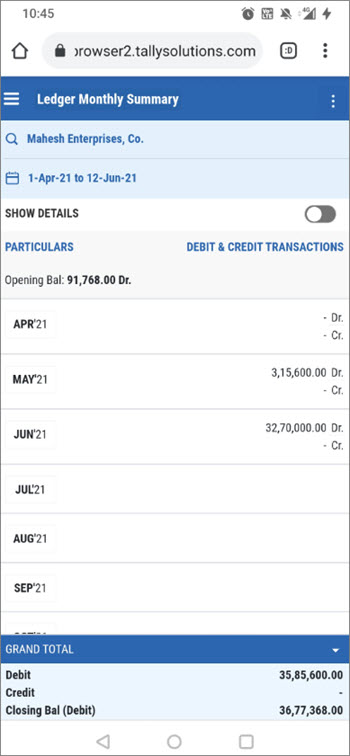
- ap on the icon against Show Details to check the closing balance, if needed.
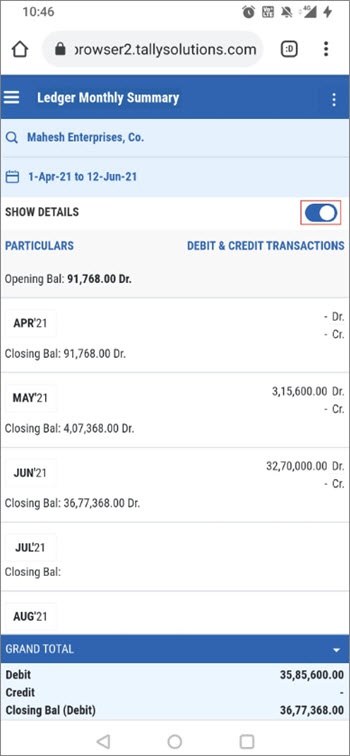
You can tap on the GRAND TOTAL row to collapse it if you wish to view more information on the page. You can tap on it again to expand it.
- Tap on any of the months listed to view the Ledger Vouchers.
The Ledger Vouchers report opens. - Change period to view Ledger Vouchers recorded in some other month.
- Click on the icon provided for the period.
The dashboard to change the dates will expand on the screen. - Tap on FROM, and scroll up or down to change date, month, and year.
Do the same for the TO date.
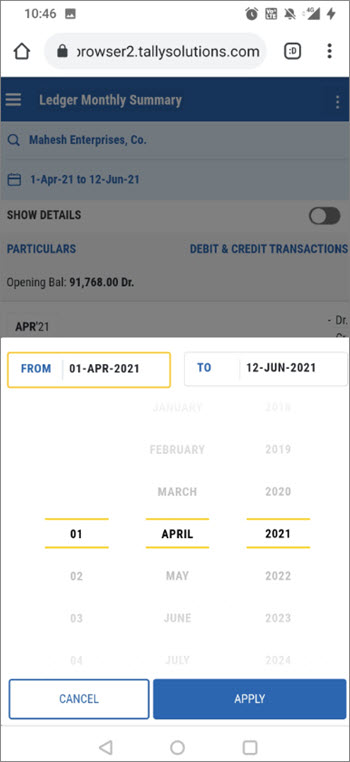
- Tap on APPLY.
If the selected FROM date is more than TO date, then you will see a warning message. Tap on OK and select a TO date that is more than the FROM date. If you do not want to change the period, then tap on CANCEL. The Ledger Vouchers for the period will be displayed.
- Click on the icon provided for the period.
- Tap on any voucher to drill-down.
The Voucher Display page will open. - Tap on the back icon on your phone.
You will be back to the Ledger Vouchers report. - Tap on the report title Ledger Vouchers to go back to the List of Reports page.
In any report, when you tap on the page title or report title; for example, Ledger Vouchers, you will be redirected back to the List of Reports page.
Apply Scale Factor in TallyPrime reports in browsers
The facility of Scale Factor is provided in reports where you can use it to configure the values as per units – hundreds, thousands, lakh, and so on. Follow the steps given below to use Scale Factor in TallyPrime reports in Browsers.
- Tap on Profit & Loss A/c.
Alternatively, you can type Profit & Loss A/c in the search bar and tap on it.
The Profit & Loss A/c report will open. - Apply Scale Factor.
- Tap on the settings icon (three dots).
The icon will pop out three options. - Tap on Scale Factor.
The option will expand. - Tap on a value – Hundreds, Lakhs, or any other, as per your requirement.
You may also tap on #New Number and provide a value for which you want to view the report. - Tap on APPLY.
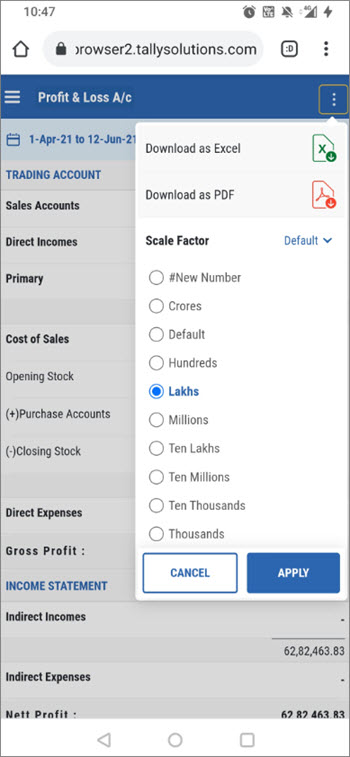
You can tap on CANCEL to view it the way it was previously.
The report after applying Scale Factor appears as show below.
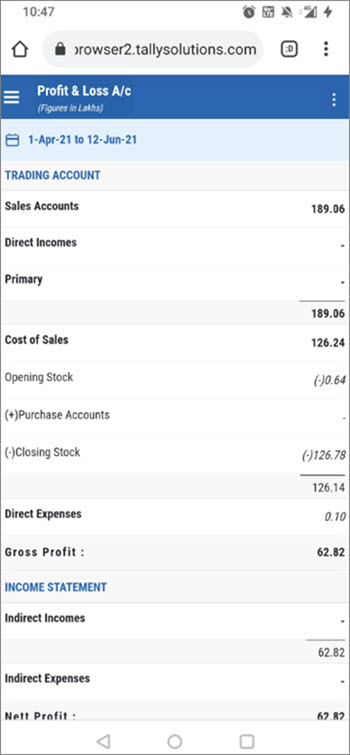
- Tap on the settings icon (three dots).
- Tap on the report title Profit & Loss.
You will be back to the List of Reports.
View Transactions for a previous date in Day Book
Day Book opens for a single date, which is the date of the last transaction recorded in TallyPrime. You can view the transactions of previous date by tapping on the left arrow button. Similarly, you can tap on the right arrow button to view the transactions of the next date.
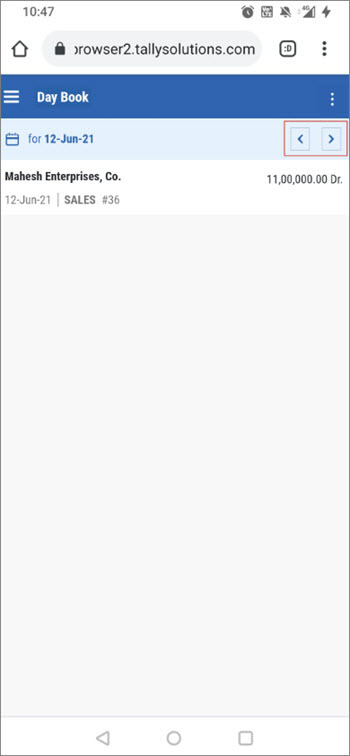
You may want to view Day Book for other dates and change the date by using the icon provided for changing the period. In such a case, make sure that the FROM and TO dates are the same – the date for which you want to view the Day Book.
View reports with multiple sections
Some reports have two or more sections accessible in the form of tabs within the report. You can tap on the tabs to view the sections in the report.
The reports with multiple sections are Sales Orders (Due Only), Purchase Orders (Due Only), Sales Bills Pending, Purchase Bills Pending, Item Movement Analysis, and Stock Query that have multiple subheadings in TallyPrime.
For example, on your browser, you can track transactions for which goods are delivered but order is not received.
Follow the steps to navigate to the report.
- Navigate to Sales Order Reports (Due Only).
- Tap on Sales Order Reports.
- Tap on Sales Orders (Due Only).
Alternatively, you can type Sales Orders (Due Only) on the search bar and tap on it.
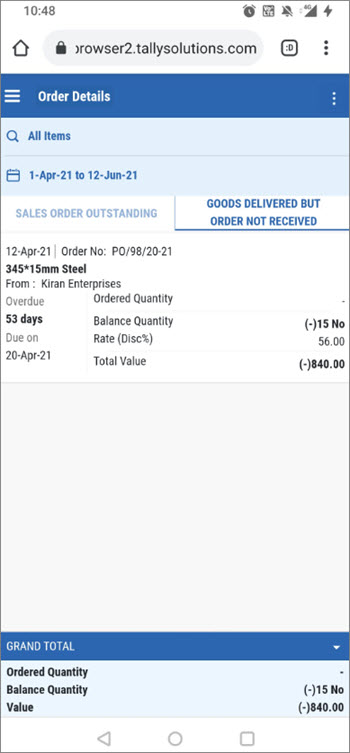
- Now, tap on GOODS DELIVERED BUT ORDER NOT RECEIVED.
You can see the transactions for which goods are delivered but order is not received as shown below.
With the mobile-responsive design of TallyPrime Reports in Browsers, viewing reports has been made intuitive and user-friendly. Using the procedures given in this section, you can browse any report on mobile phones and tablets.
View TallyPrime reports from anywhere using browser on desktop/laptop
- Open www.tallysolutions.com and log in using your Tally.NET ID and password. All the companies that you can access are listed with the status as Connected or Offline under Reports
- Select a connected company. The List of Reports is displayed.
- Select the report that you want to view. A request is sent to TallyPrime, and the selected report is fetched to display in the browser. You can download the report in PDF or Excel formats by clicking
 , and change the report period by clicking
  on the top-right corner of the screen.
When you select the download option, a drop-down list is shown to allow you to select the download format as PDF or Excel.
MS Excel should be installed in the system where TallyPrime is running in order to download in excel format in the browser. The excel file is downloaded in .xlsx format if MS Excel 2007 or later version is installed in the system where TallyPrime is running. It is downloaded in .xls format in case the MS Excel is of the earlier version.
- To get further details of any value, you can drill down up to the voucher level in many reports. You can also download the voucher in PDF or Excel formats (downloads as Excel is available 6.6.2 onwards).
 Use the Back button of the browser to go back to the previous screen. In case you are accessing from a phone, the phone back button does the same.
 - To change the report, you can use
 on the top left of the screen, and click Change Report.

- To change company, you can use on the top left of the screen, to view the List of Companies, and click SELECTED COMPANY.
Manage Access Rights of Users
You can add many Tally.NET users, and allow them to view reports in browser. You can also decide who can access which report.
In this section
- Create Tally.NET IDs
- Manage Security Configurations
- Allow users to view reports in browser
- Create Security Levels to provide limited access to reports
Create Tally.NET IDs
You can create Tally.NET IDs directly on the Tally portal.
- Go to Tally portal, log in using your account administrator’s e-mail ID.
- On the left pane, click Control Centre > User Management > Manage Users.
- In the Manage Users screen, click CREATE USER.
- In the Create New User section, select the required Security Level as Standard User or Owner.
- In the Tally.NET ID field, enter a valid e-mail ID. The password for the Tally.NET ID is sent to the email ID provided.
- Select the option Enable Tally.NET Services to give access to Tally.NET features and browser reports.
- In case you have multiple branches, select the branch for which the user is allowed to access reports in browser.
- Click CREATE.
Tally.NET IDs are created. You need to allow browser access to these users, in TallyPrime, so that they can view reports in browsers.
Manage Security Configuration
A provision is made to help you manage the security settings and user Id configured for browser access while connecting the company for the first time. You can disable security, remove or change the e-mail Id of the user, also add or remove other users from the Users and Passwords screen.
- Alt+K (Company) or click on Company menu from top menu bar > Security.
- Control User Access to Company Data: set this option to Yes or No to enable or disable security for the company data.
- E-mail ID for Browser Access: You can select a different user from the list or add a New User or just remove the access to the current user by selecting None.
- Enable Tally Audit features: You can set this option to Yes to display and print Tally Audit listings and verify transactions.
- Disallow opening in Educational Mode: Set this option to Yes to disallow opening the company data when TallyPrime is in educational mode.
- Add Users after saving Security settings: Set this option to Yes to open the Users for Company screen, where you can manage the other users to whom access to browser/remote access services are provided.
- Press Ctrl+A to accept the changes.
- TallyPrime will validate, if the selected users have access to Tally.NET services or the specified users (e-mail Id) are valid Tally.NET users. If they are not valid, a message is displayed to allow you enable the access or create the users with Tally.NET services access by providing your authorised credentials. Click Yes to enable or No to continue.

- Click Yes to display login screen. The login screen is displayed when you click Yes.
- You can specify your account admin user name and password or any other Id and password with rights to add users to your account to authorise access to Tally.NET services for the user or create Tally.NET user with access to Tally.NET services for the e-mail Id.

- A success message is displayed when access is provided to the selected user or when the new user is created with access to Tally.NET services.
Allow users to view TallyPrime reports in browser
You can allow many users to view TallyPrime reports in browser.
- Alt+K (Company) or click on Company menu from top menu bar > Users and Passwords
- Select the Security Level as Tally.NET Owner, Tally.NET User, or Tally.NET Auditor. You can also create Security Levels, if needed. Click here to know more about creating security levels.
- In Username, select the Tally.NET user to give access to browser reports from the list of Tally.NET users linked to your account OR select New User to enter a new e-mail Id.
The Tally.NET users list is displayed in the Username field only when the security level selected is Tally.NET Owner, Tally.NET Auditor or Tally.NET User.
- Set the option Allow Browser Access to Yes, and accept.
By default, the security level Tally.NET Owner and Tally.NET Auditor provide access to view all the reports available for viewing in browsers. But the security level Tally.NET User has access to only a few reports.
To view the list click here.1. Balance Sheet
2. Bills Payable
3. Bills Receivable
4. Cash Flow
5. Funds Flow
6. Group Outstanding
7. Ledger Outstanding
8. Profit & Loss A/c
9. Ratio Analysis
10. Stock Summary
11. Trial Balance
- In case you need to disallow viewing reports for this company in browsers for a user, set Allow Browser Access to No.
- TallyPrime will validate, if the selected users have access to Tally.NET services or the specified users (e-mail Id) are valid Tally.NET users. If they are not valid, a message is displayed to allow you enable the access or create the users with Tally.NET services access by providing your authorised credentials. Click Yes to enable or No to continue.
- Click Yes to display login screen or No to continue. The login screen is displayed when you click Yes.
- You can specify your account admin user name and password or any other Id and password with rights to add users to your account to authorise access to Tally.NET services for the user or create Tally.NET user with access to Tally.NET services for the e-mail Id.

- A success message is displayed when access is provided to the selected user or when the new user is created with access to Tally.NET services.
These users can view reports in browsers, whenever the companies are connected.
Create Security Levels to provide limited access to reports
You can create multiple Security Levels to manage user access to different reports in TallyPrime. If Tally.NET IDs are added under such Security Levels, you can control who can view which report in browser.
- Alt+K (Company) or click on Company menu from top menu bar > User Roles.
- In the Security Levels screen, move to the end of the entries in List of Security Levels to get a blank row.
- Enter the name for the new security level and press Enter to drill down.

- In the Use Basic Facilities of field, select Tally.NET User.
- Ensure that the option Use Tally.NET Authentication is set to Yes. This will enable you to change the configuration of the Allow Browser Access option while adding a user.
- In the Disallow the following Facilities column, select Full Access from the Type of Access list and press Enter.
- Select the name of the report you want to disallow. For example, if you want to disallow access to Bank Books, select it and press Enter. Full access to Bank Books is disallowed for this security level and for all users added under this security level.
- In the Allow the following Facilities column, select Full Access from the Type of Access list and press Enter.
- Select the name of the reports you want to allow access. For example, if you want to allow access to Ledger Outstanding, then select it and press Enter.
- Similarly, allow access to other reports, Group Outstandings and save.
You have created a new security level with access to all reports available for a Tally.NET User except Bank Books and additionally allowed access to Ledger Outstandings and Group Outstandings. - Add Tally.NET IDs under this Security Level to allow these users to view the limited set of reports in browser. Click here to know more about allowing users to view reports in browser.
Manage Company for Browser Access
You have complete control and flexibility on the company setting for report access, including when the access is needed.
In this section
- Enable/Disable browser access for your Company
- Disconnect Company
- Connectivity Status report in TallyPrime
- Remove names of Offline Companies not used from the list in browser
Enable/Disable browser access for your Company
When you update to TallyPrime, browser access is enabled for the company. However, you can disable it when no users are expected to view the reports.
- Go to F11 (Features) > set Enable Browser Access for Reports to Yes.
- If you need to disable browser access, set the option to No.
In case there are invalid characters in the Company Display Name, TallyPrime displays a message allowing you to alter the Company Display Name.
Company Display Name is valid only when the characters used are printable ASCII characters . Any character outside this is invalid. Some characters are also invisible and thus appear as just extra space. If you are unable to identify why the Company Display Name is invalid, copy paste the Company Display Name from F11->F4 to any online printable ASCII characters checkers like this.
Disconnect Company
When there is no need for users to access reports in browser you can disconnect the company.
- Alt+K (Company) or click on Company menu from top menu bar > Disconnect.
When you disconnect a company in TallyPrime, the status of the company changes to offline on the Tally portal.
Connectivity Status report in TallyPrime
This report gives you details of all the companies connected for Browser Access and Tally.NET Services. This report is active when at least one company is connected.
- Alt+K (Company) or click on Company menu from top menu bar > Connectivity Status.

The Connectivity Status report displays the company name, the Company Display Name, and the status of connection for Browser Access and Tally.NET Services.
Remove names of Offline Companies not used from the list in Browser
When a company is connected for browser access the name of the company continues to be shown in the browser list forever. In case you are not connecting that company anymore the name will continue to appear but with connection status as offline. You would want to remove all such names from the list of companies in the browser which are no more connected and only appear as offline. You can do so using the Remove from the list option.
- Open www.tallysolutions.com and log in using your Tally.NET ID and password. All the companies that you can access are listed with the status as Connected or Offline.
- Click the three dots provided next to the offline company.
- Click the option REMOVE FROM THE LIST.
- A message Are you sure you want to remove the company from the list? to confirm. click Remove.
- A confirmation message is displayed once the company is removed successfully. Click Ok.

