
Sales of Goods and Services
The sale of goods and services refers to the exchange of a product or service for money. The sale of goods involves the transfer of physical items, while the sale of services involves the transfer of intangible items, such as knowledge or expertise. Once the goods or services are sold you need to record those transactions. After recording the transactions, you can print the sales invoice. You can configure your sales voucher and cancel the vouchers, if needed. Any modifications made to the recorded transactions can also be tracked.
Every business involves the sales of goods or services which can be either cash or credit sales. As part of the business practice, you can print the invoice and share it with your customer. In case you have recorded a sale which is incorrect, you can cancel such vouchers.
TallyPrime provides you with the option to record sales of goods and services in different modes. While recording for the sale of goods, you can record such a sale using Item Invoice mode. In Item Invoice mode, you can provide an item, quantity, and rate details. Similarly, you can use the accounting invoice mode if you are selling services. In addition, TallyPrime also has a Voucher mode, which you can use to record both sales of goods and services. What’s more! TallyPrime offers multiple reports that help you to understand the sales performance of your business. The Day Book displays sales for a specific date or period, on the other hand, the Sales Register displays your company’s monthly sales.
In TallyPrime you can use the Edit Log to track all post-transaction changes.
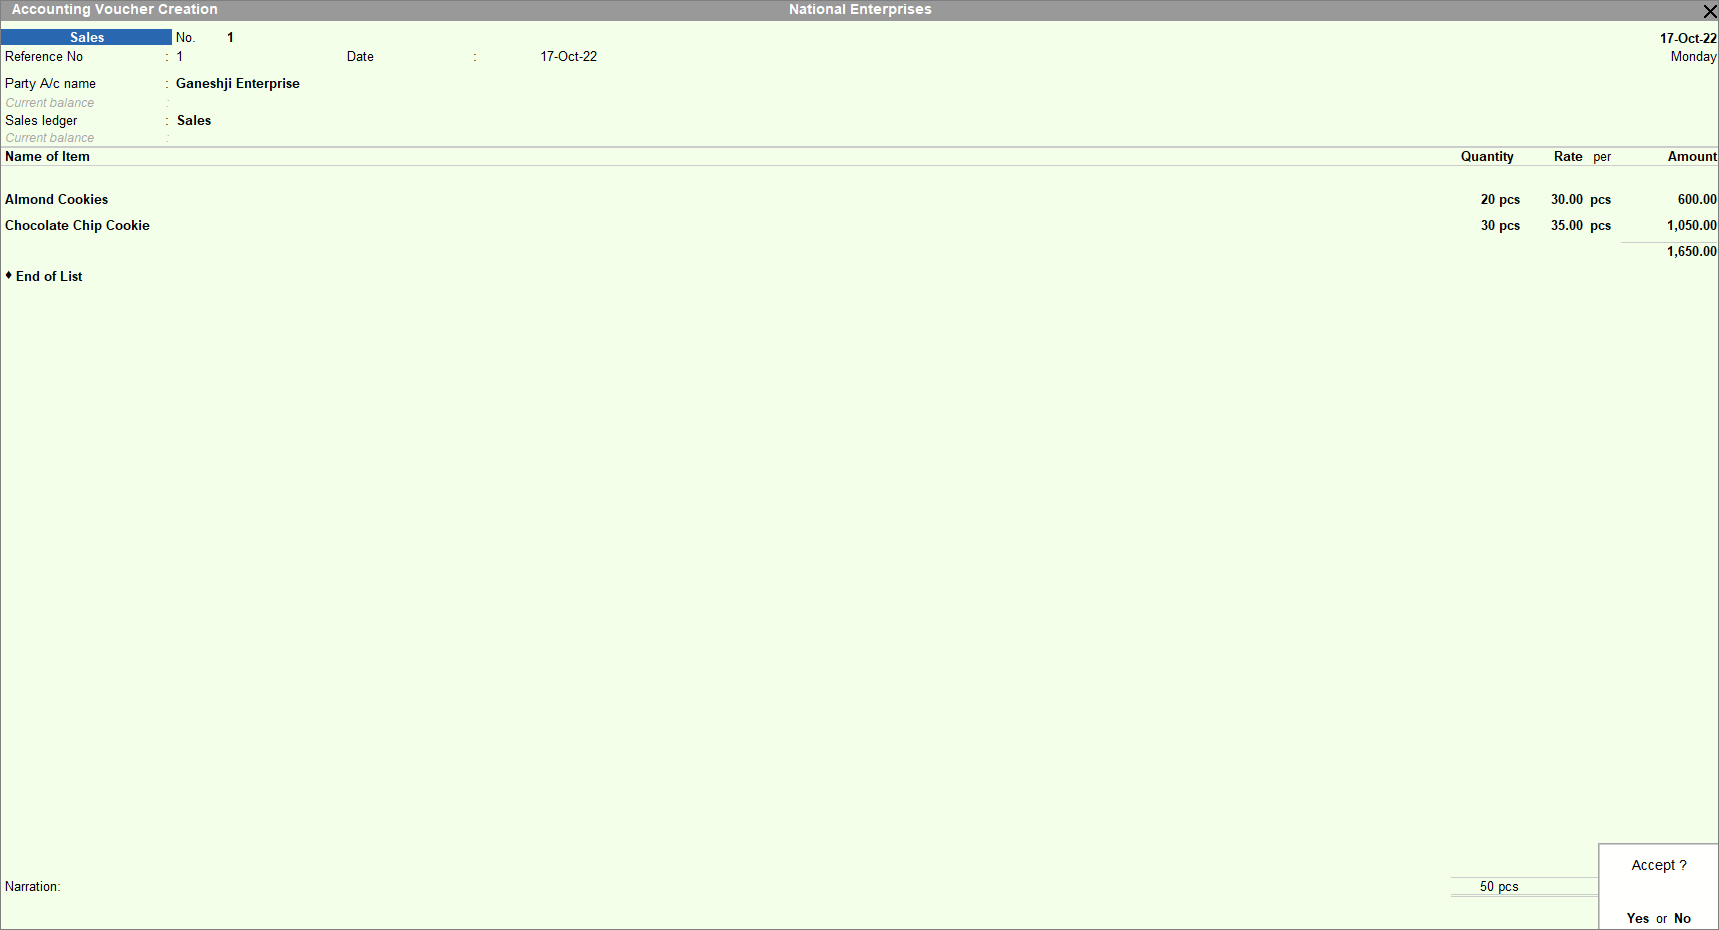
Record Sales of Goods | Item Invoice Mode
When recording the sale of goods, choose cash or bank for cash sales and party ledger for credit sales. In TallyPrime, you can record sales of goods or stock items using the Item Invoice mode and specify the stock item details, quantity, and rate.
- Open the sales voucher in the Item Invoice mode.
- Press Alt+G (Go To) > Create Voucher > press F8 (Sales).
Alternatively, Gateway of Tally > Vouchers > press F8 (Sales). - Press Ctrl+H (Change Mode) > select Item Invoice.
The voucher is in Item Invoice mode if you can see the Name of Item column.
- Press Alt+G (Go To) > Create Voucher > press F8 (Sales).
- Specify the buyer details.
- Party A/c name: Select Cash or Bank for cash sales and the party name for credit sales and press Enter.
You can create the Party A/c on the fly by pressing Alt+C.
The Dispatch Details screen appears. - Dispatch Details: Enter the Dispatch Details, as needed and press Enter.
You can choose to enable the option for Order Details by pressing F12 (Configure).
The Party Details screen appears. - Party Details: You can update the buyer details while recording the transaction and print the same in the invoice.
Your regular customer may need specific details, such as the address with the landmark, alternative contact number, and so on, to appear in the printed invoice. In such cases, create the party account with the required details and select the same party account in the Buyers field.
- As always, you can press Ctrl+A to save and proceed.
- Party A/c name: Select Cash or Bank for cash sales and the party name for credit sales and press Enter.
- In the Sales ledger, select the common sales ledger.
- Provide the stock item details.
- Name of Item: Select the stock item.
- Specify Quantity and Rate.
In case you do not see the required item in the list, you can create the stock item on the fly by pressing Alt+C.
- Provide Narration, if needed, and press Ctrl+A to save the sales voucher.
- Print the invoice.
- In the sales voucher, press Ctrl+P.
Alternatively, press Alt+P (Print) > Current.If you have enabled the option Print voucher after saving, once you record the transaction, it directly takes you to the voucher printing screen where you get the option to Configure. Preview or Print the voucher.
- Press C (Configure) to configure the print options for your invoice, if needed.
- Press I (Preview) to check the invoice before printing, if needed.
- Press P (Print) to print.
- In the sales voucher, press Ctrl+P.
Refer to Print Sales Invoice with Company Logo and Additional Details to know more about the options to print invoices in TallyPrime.
You have recorded a sales voucher in Item Invoice mode and printed it.
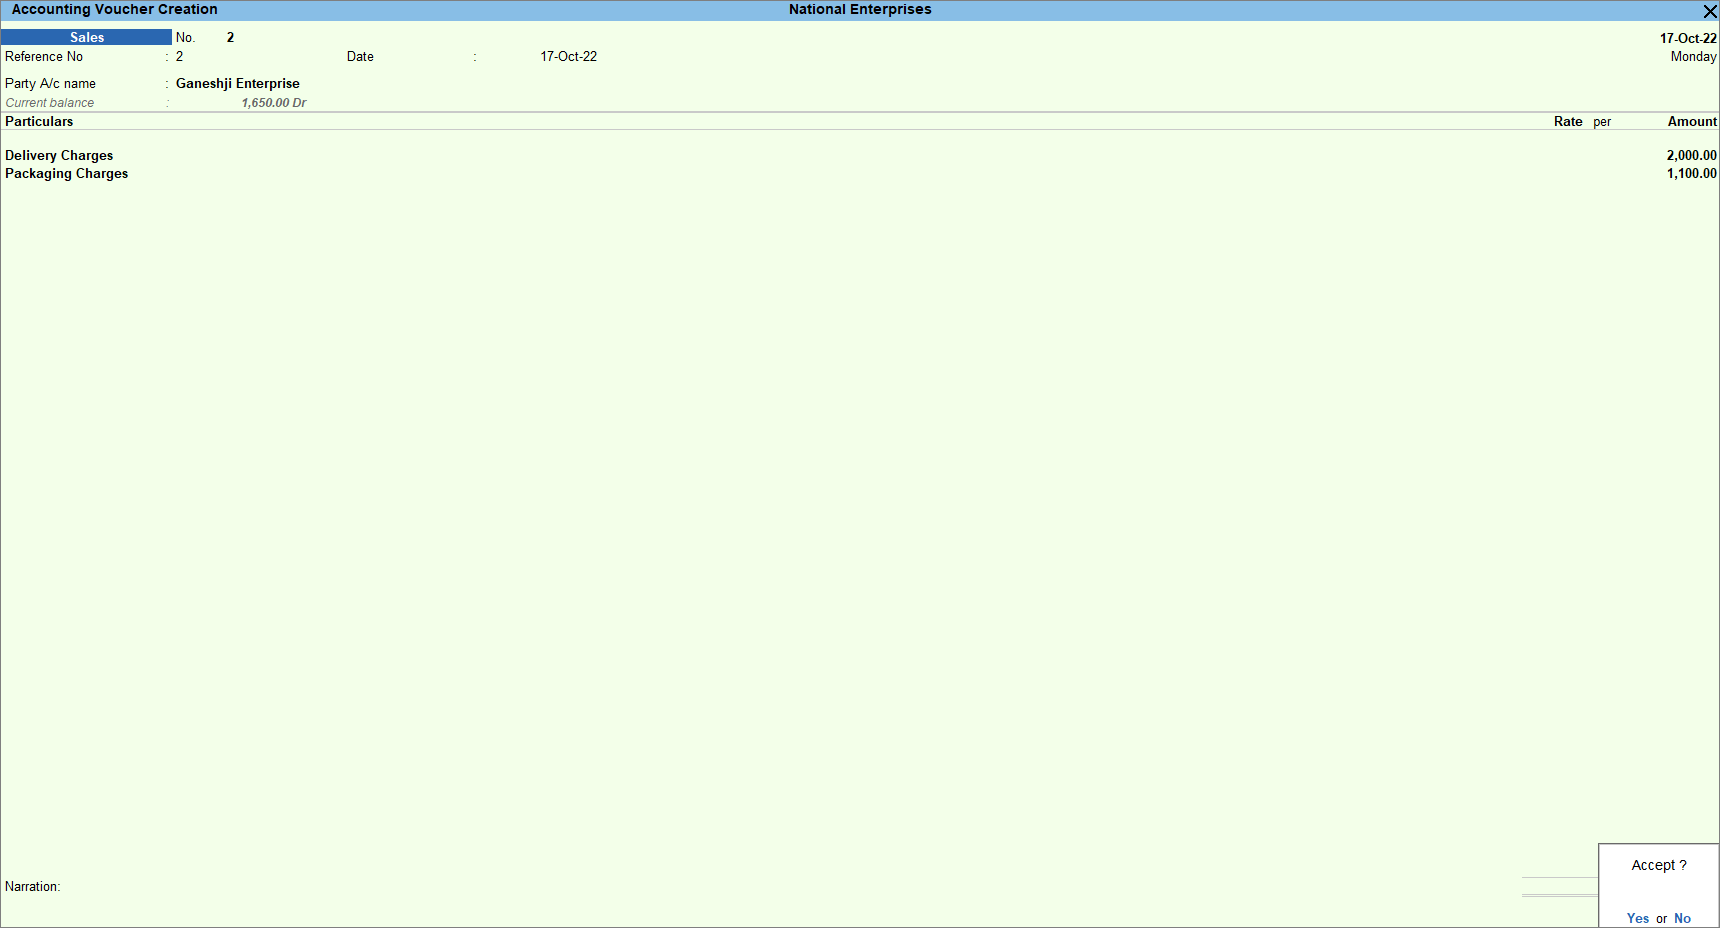
Record Sales of Services | Accounting Invoice Mode
When recording the sale of services, choose cash or bank for cash sales and party ledger for credit sales. In TallyPrime, record sales of services and the total amount using the Accounting Invoice mode. An accounting ledger is not required as there is no stock item to allocate.
- Open the sales voucher in the Accounting Invoice mode.
- Press Alt+G (Go To) > Create Voucher > press F8 (Sales).
Alternatively, Gateway of Tally > Vouchers > press F8 (Sales). - Press Ctrl+H (Change mode) > select Accounting Invoice.
The voucher is in Accounting Invoice mode if you can see the Particulars column.
- Press Alt+G (Go To) > Create Voucher > press F8 (Sales).
- Specify the buyer details.
- Party A/c name: Select Cash or Bank for cash sales and the party name for credit sales and press Enter.
You can create the Party A/c on the fly by pressing Alt+C.
The Dispatch Details screen appears. - Dispatch Details: Enter the Dispatch Details, as needed and press Enter.
You can choose to enable the options for Order Details by pressing F12 (Configure).
The Party Details screen appears. - Party Details: You can update the buyer details while recording the transaction and print the same in the invoice.
Your regular customer may need specific details, such as the address with the landmark, alternative contact number, and so on, to appear in the printed invoice. In such cases, create the party account with the required details and select the same party account in the Buyers field.
- As always, you can press Ctrl+A to save and proceed.
- Party A/c name: Select Cash or Bank for cash sales and the party name for credit sales and press Enter.
-
Provide service details.
-
Particulars: Select the service ledger.
- Specify the Amount.
-
- Provide Narration, if needed, and press Ctrl+A to save the sales voucher.
- Print the invoice.
- In the sales voucher, press Ctrl+P.
Alternatively, press Alt+P (Print) > Current.If you have enabled the option Print voucher after saving, once you record the transaction, it directly takes you to the voucher printing screen where you get the option to Configure. Preview or Print the voucher.
- Press C (Configure) to configure the print options for your invoice, if needed.
- Press I (Preview) to check the invoice before printing, if needed.
- Press P (Print) to print.
- In the sales voucher, press Ctrl+P.
Refer to Print Sales Invoice with Company Logo and Additional Details to know more about the options to print invoices in TallyPrime.
You have recorded a sales voucher in Accounting Invoice mode and printed it.
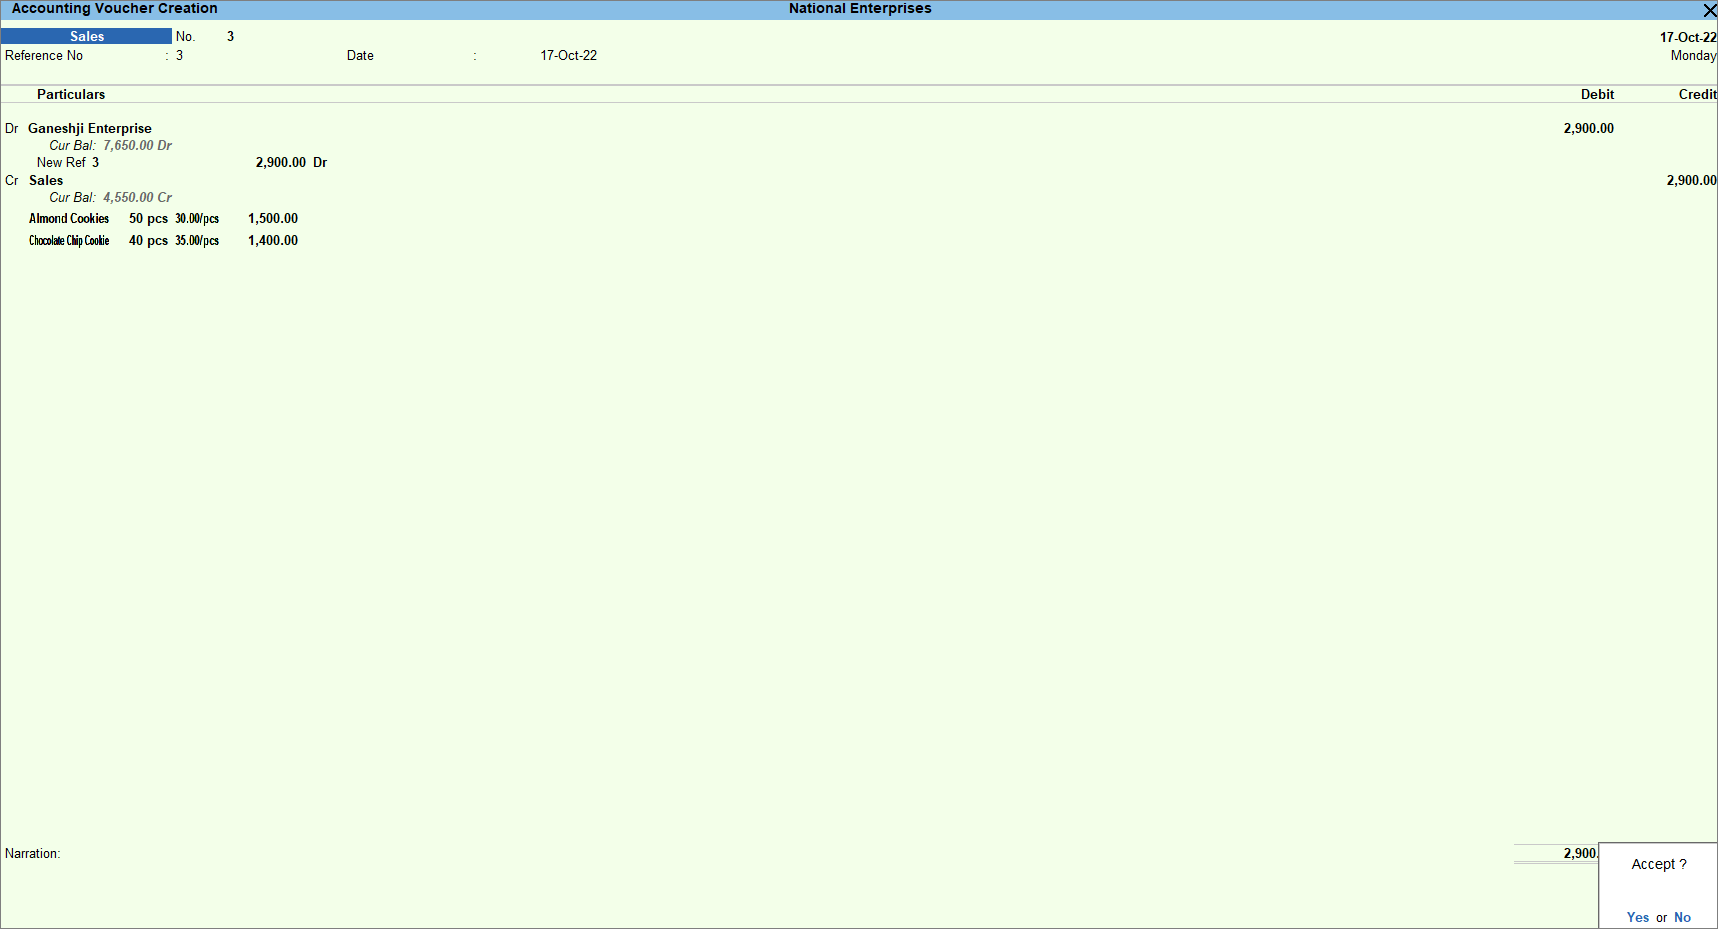
Sales in Double Entry Mode | As Voucher Mode
When recording the sale of goods, choose cash or bank for cash sales and party ledger for credit sales. In double entry mode, you can record all the transactions in terms of debit (Dr) or credit (Cr). You can record the sale of goods and services in As Voucher mode instead of using Item Invoice or Accounting Invoice mode. This mode enables you to record a sale of goods or services as a debit to cash/bank or party account and credit to the sales account with item allocation or service ledger. The Debit column must be equal to the total of the Credit column when you record the transaction in this mode.
- Open the sales voucher in double entry mode.
- Press Alt+G (Go To) > Create Voucher > press F8 (Sales).
Alternatively, Gateway of Tally > Vouchers > press F8 (Sales). - Press Ctrl+H (Change mode) > select As Voucher.
- In the As Voucher mode, you get By and To instead of Dr and Cr.
If you wish to use Dr and Cr, press F12 (Configure) > set Use Cr/Dr instead of To/By during voucher entry to Yes.
Henceforth, whenever you open a sales voucher in the As Voucher mode, you get the Cr and Dr fields instead of By and To until you change this setting in F12 (Configure).
- Press Alt+G (Go To) > Create Voucher > press F8 (Sales).
- Specify the buyer details.
- Mention the party name in the Dr field.
- Dispatch Details: Enter the Dispatch Details, as needed and press Enter.
You can choose to enable the options for Order Details by pressing F12 (Configure).
The Party Details screen appears. - Party Details: You can update the buyer details while recording the transaction and print the same in the invoice.
Your regular customer may need specific details, such as the address with the landmark, alternative contact number, and so on, to appear in the printed invoice. In such cases, create the party account with the required details and select the same party account in the Buyers field.
- As always, press Ctrl+A to save and proceed.
- Select the Sales ledger for the sale of goods or the service ledger for the sale of services in the Cr field.
- Provide the stock item details in the Inventory Allocation screen.
- Name of Item: Select the stock item.
- Specify Quantity and Rate.
In case you do not see the required item in the list, you can create the stock item on the fly by pressing Alt+C.
- Provide Narration, if needed, and press Ctrl+A to save the sales voucher.
- Print the invoice.
- In the sales voucher, press Ctrl+P.
Alternatively, press Alt+P (Print) > Current.If you have enabled the option Print voucher after saving, once you record the transaction, it directly takes you to the voucher printing screen where you get the option to Configure. Preview or Print the voucher
- Press C (Configure) to configure the print options for your invoice, if needed.
- Press I (Preview) to check the invoice before printing, if needed.
- Press P (Print) to print.
- In the sales voucher, press Ctrl+P.
Refer to Print Sales Invoice with Company Logo and Additional Details to know more about the options to print invoices in TallyPrime.
You have recorded a sales voucher in As Voucher mode and printed it.
F12 Configurations for Sales Voucher
|
Configurations |
Descriptions |
|
Provide Buyer details |
Displays the Party Details screen, where you can enter the buyer’s name and mailing details. |
|
Provide Dispatch, Order, and Export details |
You can update the details related to the delivery note, sales order no and export. |
|
Provide Order details |
Displays the section to update the Sales order details, Mode/Terms of payments, Other references and Terms of Delivery. |
|
Provide Export details |
Displays the section with the fields for Export details such as Port of Loading, Port of Discharge, Country to, Shipping Bill No. and so on. |
|
Select common Ledger Account for Item Allocation |
Enable this option if you want to allocate all items to the same ledger. Alternatively, if you want to track the sale of different products through different ledger accounts, then you can disable this option. Using the common ledger for item allocation speeds up the recording of transactions, as you do not have to select the sales ledger every time you select a stock item. |
|
Use Cr/Dr instead of To/By during voucher entry |
In As Voucher mode, you have the option to record transactions using To/By or Dr/Cr. By default, the voucher mode opens with To/By, you can enable this option to use Dr/Cr instead. |
|
Use default Bill-wise details for Bill Allocation. |
Automatically allocates bill numbers as defined in the Voucher Type master. |
|
Provide Additional Descriptions for Ledgers |
Specify any additional description for the ledger during voucher entry. For example, suppose you record all employee conveyance in a single Conveyance ledger. At the time of recording the voucher, you can provide the name of the employee against the conveyance ledger for future reference. |
|
Provide Additional Descriptions for Stock Items |
During the voucher entry process, specify any additional descriptions for the stock item. For example, if you are selling a mobile phone, you can mention the storage capacity of that phone as part of the additional descriptions for the stock item. |
|
Warn on Negative Stock Balance |
When there is insufficient stock during sales entry, a warning message of negative stock with quantity details appears. You can either update the stock first and then record the sale, or you can proceed with the sales entry and adjust the quantity of the item when the stock is updated. |
|
Show Inventory details |
In the As Voucher mode, you can enable this option to view the item details sold along with its rate in the voucher. |
|
Use Voucher No. as Bill |
When allocating bills, you can use the voucher number as the bill reference number. This makes it easier to find the invoices that you need to pay or collect to/from your creditors and debtors. |
|
Modify all fields during |
Modify all fields in the sales invoice. |
|
Provide details to preclose orders |
Pre-close orders partially or completely from the Stock Item Allocation screen. |
|
Select Cost Centre/Class |
Display the cost centre details for any additional ledger. If you need to track any additional ledger such as transportation expenses separately from the stock item or service ledger, you can use cost centres. If you have created a cost centre class, then you can select that as well while recording the voucher. |
|
Show list of Bills for selection |
You can view all the pending lists of bills both for your debtors and creditors if you enable this option. |
|
Show Final Balances for each Bill |
Along with the list of bills, you can also view the final balances of each bill mentioned in the Bill allocation screen. |
|
Show Bill-wise Details |
The bill-wise breakup of pending bills reflects in the voucher if the option is enabled. |
|
Show Bill-wise details in multiple lines |
In the voucher, if you are adjusting multiple bills, then this option shows multiple lines of the bill-wise breakup of pending bills. |
|
Show Cost Centre details |
In As Voucher mode, this option displays the cost centre details in the voucher. |
|
Provide Reference No. |
Specify the Reference No. and Date in the invoice. You can use the voucher number and date as the reference no and date. The same reference no you can use for bill allocation. |
|
Warn on negative Cash Balance |
TallyPrime prompts a warning message during the recording of cash payment if the cash balance becomes negative. This helps you to decide whether to proceed with the entry or not. |
|
Skip the Date field during voucher creation |
The Date field is prefilled with the date of the last transaction, and the cursor skips this field. You can change the date by pressing F2. |
|
Warn when Voucher No. exceeds 16 characters |
TallyPrime prompts a warning message when Voucher No. exceeds 16 characters. This option is used in case of GST, where the voucher number format must not exceed 16 characters. But for non-GST transactions also you can maintain the same format. |
|
Show Turnover from selected Party A/c |
During voucher entry, along with the customer’s current balance, you can also see how much business your customer has given to you. |
|
Show Current Balance of Ledgers |
Display the current account balance of the party ledger. |
|
Show Balances as on Voucher date |
Display the account balance of the party as on the voucher date. If this option is enabled, the party ledger shows the voucher date balance instead of the net account balance. |
|
Show final Ledger Balance |
Display the account balance of the party ledger just below the Party A/c name field. |
|
Consolidate Qty of Stock Items with same rate |
Suppose you have two delivery notes for the same product with the same rate sold to the same customer then by enabling this option, you can consolidate delivery notes and issue one invoice with the quantities merged. |
|
Show Compound Unit based on Rate |
You can record the sale of stock items with the compound unit and use the first set of units for quantity and the second set of units for rate. If you enable this option, the unit for the quantity gets changed to the rate unit. |
|
Show details of Compound Unit |
Display full details of the compound unit in the Quantity field. |
|
Provide Marks or Container No. |
Specify container information for items for export. |
|
Provide No. of Packages |
Specify the number and package type for items for export. |
|
Use default Bank Allocations |
You can enable this option to set the bank allocation details for each receipt or payment. Choose the transaction type and update the Instrument date and it automatically takes the voucher date as the instrument date which you can change manually, if required. |
|
Remove Bank Date while altering Reconciled Voucher |
If you need to alter any voucher after the reconciliation is done, then you can enable this option to remove the Bank date from the reconciled voucher. The bank date is the date when your amount is cleared from the bank. |
|
Calculate Tax on Current Subtotal (else calculations are on inventory total only) |
If you enable this option, then the tax is calculated after including any additional charges like transportation. Otherwise, the tax is calculated on the item total. |
Reports | Know Your Sales
In your business, once the recording of sales of goods and services is done, you may want to see all the transactions on a single screen. TallyPrime provides you with two reports that allow you to view transactions for a specific date, period, or even month. You can refer to different reports on sales, analyse sales data, and make informed decisions for your business.
In this section
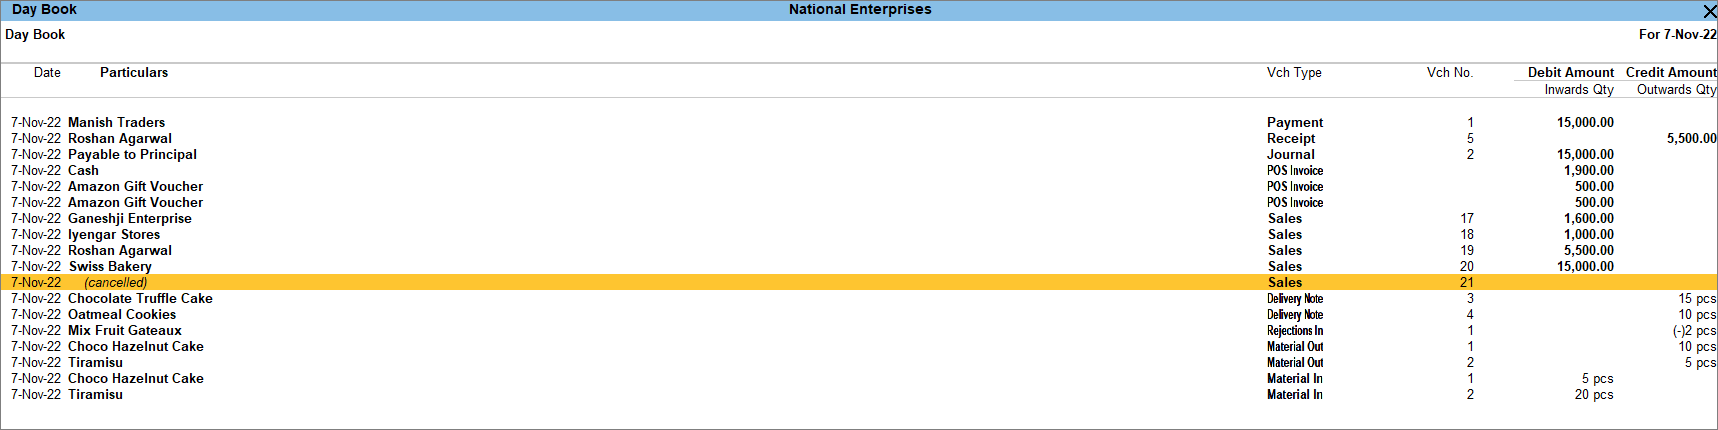
Day Book
This report tracks all your transactions on a day-to-day basis. Additionally, you can filter this report to check all the sales transactions made on a particular day.
- Open Day Book.
Press Alt+G (Go To) > Day Book.
Alternatively, Gateway of Tally > Display More Reports > Day Book.By default, this report displays all the transactions as on the Current Date on the Gateway of Tally screen.
- To view the sales recorded for any given day:
- Press F2 (Date) to change the date.
- Press Alt+F2 to select the period.
- Press F4 (Voucher Type) > select Sales.
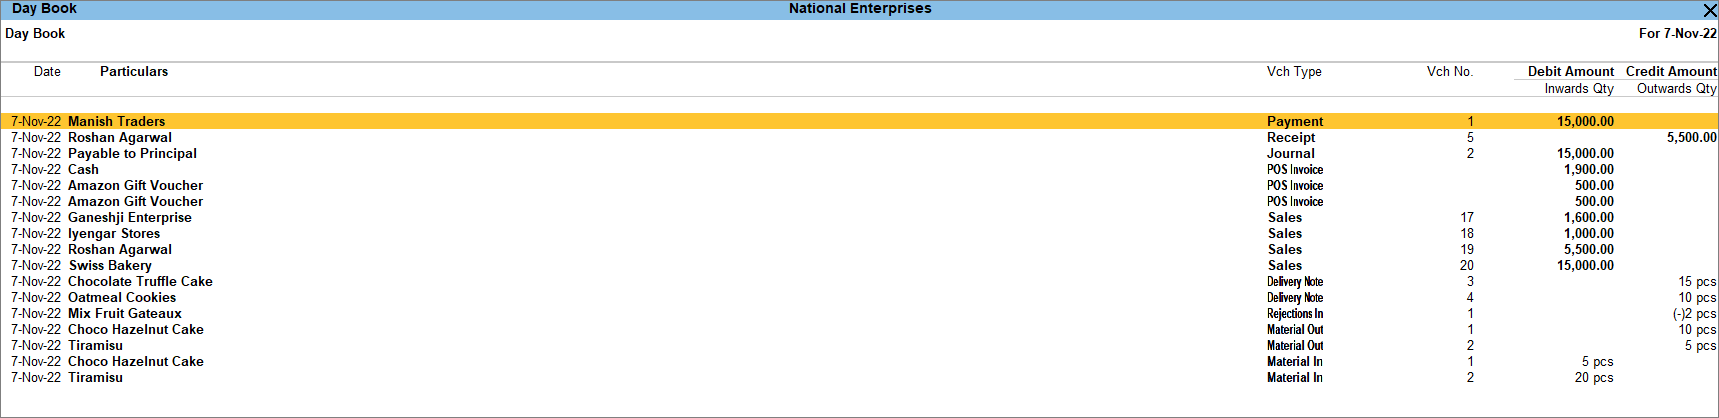
The report lists all the sales transactions recorded on the selected date. For more information, refer to the topic Day Book.
Sales Register
This report provides a comprehensive view of the month-wise sales done in your business. You can drill down from the selected month to view the voucher-wise listing of sales. Further, you can configure the report to view the data for different periods and represent the sales details differently based on your business needs.
- Open Sales Register.
Press Alt+G (Go To) > type or select Sales Register.
Alternatively, go to Gateway of Tally > Display More Reports > Account Books > Sales Register. - Move your cursor up or down to select a month and press Enter to view the sales vouchers recorded in the selected month.
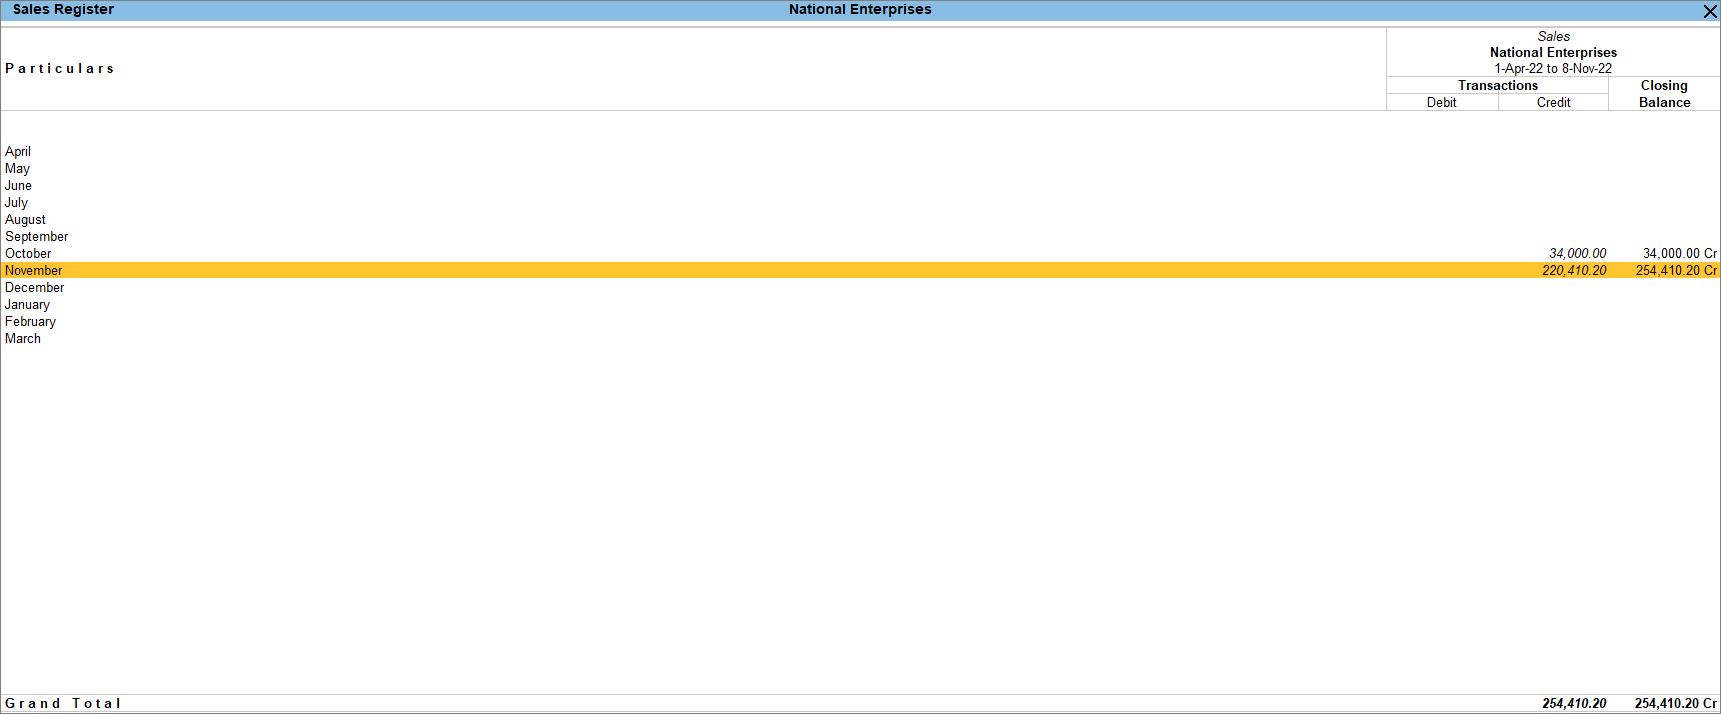
You can also configure your Sales Register as per your business requirement.
- Ctrl+B (Basis of Value): You can configure the values in your report for that instance, based on different business needs.
In Sales Register, you can change the scale factor and select from the List of Scale Factor as per your business requirement. - Ctrl+H (Change View): You can display the details of a report in different views for a specific period.
- Ctrl+L (Save View): You can save the view you have selected and set it as default.
- Alt+C (New Column): You can add new columns to view comparisons between sales and Sales Orders, or Sales and Purchases, and so on.
- Alt+A (Alter Column): You can also alter the columns and select the voucher type for comparison.
- Alt+N (Auto Column): You can also select the auto column from the Column Details list.
- F12 (Configure): You can also configure the Sales Register with the options from F12.
Refer to Reports in TallyPrime to know more.
View Edit Log for Sales
You may want to alter a sales invoice for many reasons, such as adding stock items, giving discounts to a specific customer, and so on. Furthermore, you may need to cancel an invoice due to the cancellation of the order by your customer. Edit Log in TallyPrime helps you track all the activities that affect a sales invoice. This feature is available in TallyPrime Release 2.1, TallyPrime Edit Log Release 2.1, and all later releases.
In the Sales voucher screen, press Alt+Q (Edit Log).
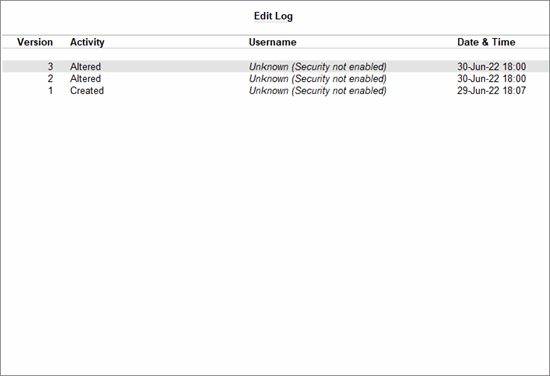
To learn more about viewing Edit Log, refer to the View Edit Log for Transactions section in the Accounting Entry in the TallyPrime topic.
Cancel Sales Voucher
You may need to cancel a sales voucher because the party has cancelled the order, or you have recorded the voucher mistakenly. Therefore, you do not need the voucher anymore.
- Open Day Book for the period.
- Press Alt+G (Go To) > type or select Day Book and Enter.
Alternatively, go to Gateway of Tally > Day Book. - Press Alt+F2 (Period) to change the period, if needed.
- Press Alt+G (Go To) > type or select Day Book and Enter.
- Scroll down to select the required voucher.
If you want to view the details of the voucher before cancelling it, press Enter on the voucher to open it in the alteration mode. - Press Alt+X (Cancel) and then press Y to confirm the cancellation.
You can do it from Day Book or from the Voucher Alteration screen.
In Day Book, the cancelled voucher appears as shown below.
If you want to view all the cancelled vouchers, follow the step below.
In Day Book,
- Press Ctrl+J (Exception Reports).
- Type or select Cancelled Vouchers.
- Press Enter.
You cannot recover a cancelled voucher and cannot use the same voucher number for another voucher.

Faster Data Entry using Voucher Class
TallyPrime facilitates faster data entry methods to reduce errors using Voucher Class.
Refer to the section Voucher Class in the topic Voucher Types in TallyPrime for more details.

