
Cheque Payment, Printing and Configuration in TallyPrime
You can make payments through cheques by printing them directly from TallyPrime, either using a pre-printed cheque or a custom format. You just need to configure your bank ledgers with the cheque range and cheque format for printing at the time of payment. While recording the payment voucher you can print the cheque, and also update the cheque details in the voucher. You can print cheques for withdrawing cash from the bank too. You can view the list of cheques issued from the Cheque Printing Report and track the cheques from the Cheque Register.
Cheque is a common method of payment and is also considered to be the safest mode of payment. You can stop the payment in case you change your decision to pay. Also, if the cheque is crossed it cannot be encashed over the counter and has to be deposited in the bank account of the person whose name is written on the cheque. You can also issue Post-dated cheques, which gives you more time to plan your finances better as the cheque encashment will happen at a later point in time.
In TallyPrime, you have the flexibility to choose from the predefined cheque format provided by different banks. You can use the cheque format as is or you can alter and update the dimensions as per your requirement. If the bank you are dealing with does not provide a predefined cheque format then you can use the custom defined format and update the dimensions. You can print the cheques for payment to parties directly from the payment voucher and also include the cheque details in the voucher. Apart from payment to parties you can print cheques for withdrawing cash from the bank.
With TallyPrime, you can view the list of cheques that were issued and print the cheques either one at a time when recording payment vouchers or in one go from the Cheque Printing Report. You can track your cheques to see the number of available cheques you are holding and if required you can use available cheques to print them Blank without the amount from the Cheque Register. TallyPrime provides effective cheque management systems by allowing the creation of multiple chequebooks in Bank Ledger creation and Cheque Register.
Setup for Cheque Printing
You can print the cheques for payment at the time of recording the payment entry. In order to do so, you need to enable cheque range and cheque formats in your bank ledger. Since each bank maintains a unique design of cheques, depending on the bank you select you will have predefined formats that you can alter as per your requirement. You also have blank formats called user-defined which you can alter and update with the required dimensions for the cheque. Once the cheque format is updated with the dimensions of your chequebook, you can tear the cheque leaf and print the cheque. In TallyPrime, you can disable the company name at the time of printing the cheque if the cheques are already pre-printed with the details. If you are printing a cheque for a large amount, you can print the amount in the cheque in lakhs/millions.
In this section
- Enable cheque range and cheque format in bank ledger
- Alter predefined cheque format for printing with required dimensions
- Alter user-defined cheque format to add a specific format
- Print amount in lakhs/millions on cheques
- Disable company name in the pre-printed cheques
Enable bank ledger with cheque range and cheque format
While creating the bank ledger you can add the cheque range that you are going to use for making payments from that particular bank. Once you add the cheque range, it automatically assigns the cheque number for your payments based on the last cheque number used. By configuring the cheque range in the bank ledger, you can track the cheque numbers that are assigned to the payments made along with the unassigned cheques that are kept on hold. You can change the cheque number manually in case the cheque leaf got printed wrongly or you want to keep the next cheque on hold.
![]()
- Select the bank ledger.
- Press Alt+G (Go To) > Alter Master > type or select Ledger > and press Enter.
Alternatively, Gateway of Tally > Alter > type or select Ledger > and press Enter. - Select the bank ledger. For example, Kotak Mahindra Bank.
- Press Alt+G (Go To) > Alter Master > type or select Ledger > and press Enter.
- Set the Cheque book range under Bank Configuration.
- Enable Set/Alter range for Cheque Books.
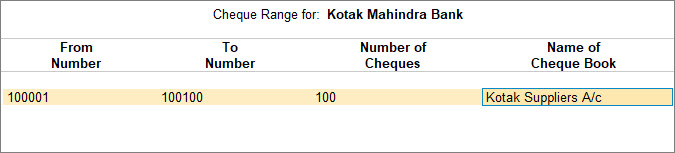
- In the Cheque Book Management screen, enter the cheque number in the fields From Number and To Number. The Number of Cheques appears automatically.
Alternatively, you can enter the From Number and the Number of Cheques. The To Number will appear automatically. - Enter the Name of Cheque Book and press Enter.
- Set Cheque Printing under Bank Configuration.
- Set Enable Cheque Printing to Yes.
- Enable Set/Alter Cheque Printing configuration.
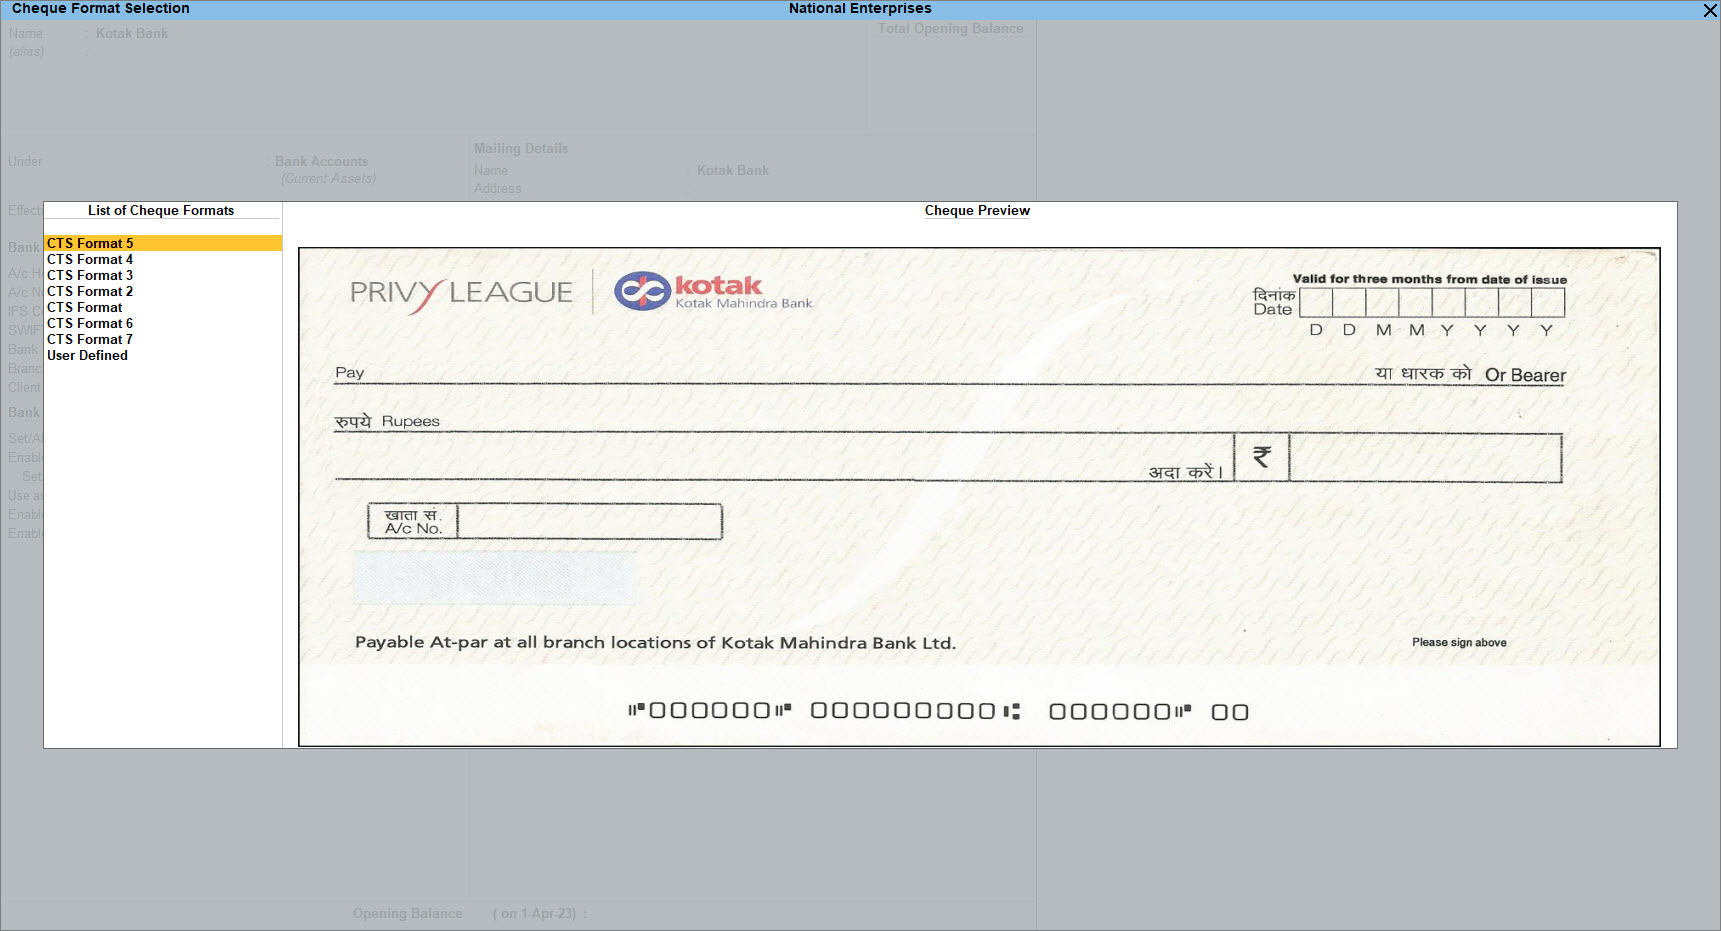
- In the Cheque Format Selection screen, you can view all the cheque formats supported for the bank selected in the Bank name field.
- Select the Cheque Format and press Enter to view/modify the pre-configured dimensions.
- Print the Sample Cheque.
- Press Ctrl+P (Print) > P (Print) to print and I (Preview) to preview the settings. The Sample Cheque Printing screen appears.
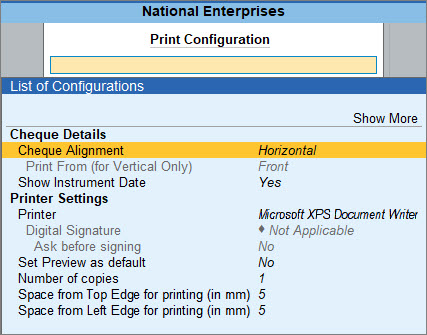
- Press C (Configure) and set the Cheque Alignment.
You can select any one of the options mentioned below for Cheque Alignment.- Horizontal: This option prints the cheque horizontally (oriented as landscape).
- Vertical-Centre: This option prints the cheque vertically at the centre of the cheque leaf.
- Vertical-Left: This option prints the cheque vertically on the left-hand side of the cheque leaf.
- Vertical-Right: This option prints the cheque vertically on the right-hand side of the cheque leaf.
-
Press Esc and press I (Preview) to generate the preview
-
Press Esc to return to the Cheque Dimension screen.
- As always, press Ctrl+A to accept the screen.
Once the bank ledger is configured with the cheque range and cheque format, you can print the cheques immediately after the payment voucher is recorded.
Alter predefined cheque formats for printing with required dimensions
TallyPrime provides you with a List of Cheque Formats given by the specific banks, from which you can select the desired format while printing the cheques. While printing the cheque if you see that the predefined cheque formats are not as per your cheque dimensions, then as a one-time set up you can alter the predefined cheque format as per your requirement.
![]()
- Select the Bank ledger.
- Press Alt+G (Go To) > Alter Master > type or select Ledger > and press Enter.
Alternatively, Gateway of Tally > Alter > type or select Ledger > and press Enter. - Select the bank ledger. For example, Kotak Mahindra Bank.
- Press Alt+G (Go To) > Alter Master > type or select Ledger > and press Enter.
- Under Bank Configuration, set Enable Cheque Printing to Yes and Enable Set/Alter Cheque Printing configuration.
The Cheque Format Selection screen appears as shown below:
- Update the cheque dimensions.
- Select the required format from the list and press Enter. The Cheque Dimensions screen appears.
- Enter the cheque dimensions manually or press Alt+B (Copy From) to copy the predefined dimensions from the List of Cheque Formats.
- Press Ctrl+A to accept the Cheque Dimensions screen to view the Sample Cheque Printing screen.
- Accept the screen. As always, you can press Ctrl+A to save.
Once you alter the predefined cheque format and set the cheque dimensions as per your business need as a one-time requirement, you can print the cheque with the set dimensions.
To know more about the list of banks that support pre-defined cheque formats, click here.
Alter user-defined cheque format to add a specific format
Apart from the predefined cheque format TallyPrime also provides you with a User Defined format. The User Defined format is blank so that you can alter and add the dimensions as per your requirement. You can alter the User Defined format if the predefined format does not meet your requirement for cheque printing or the predefined format is not available for your bank. Going forward you can use the same format to print the cheque leaves for payment.
![]()
- Select the Bank ledger.
- Press Alt+G (Go To) > Alter Master > type or select Ledger > and press Enter.
Alternatively, Gateway of Tally > Alter > type or select Ledger > and press Enter. - Select the bank ledger. For example, Kotak Mahindra Bank.
- Press Alt+G (Go To) > Alter Master > type or select Ledger > and press Enter.
- Under Bank Configuration, set Enable Cheque Printing to Yes and Enable Set/Alter Cheque Printing configuration.
The Cheque Format Selection screen appears. - Select User Defined from the List of Cheque Formats or press Alt+L (User Defined) to define the cheque dimensions in the Cheque Dimensions screen.
The Cheque Dimensions screen appears.
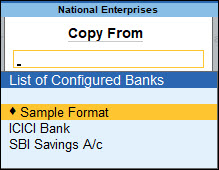
- Press Alt+B (Copy From), if you have defined cheque dimensions for other banks.
Select the format of the required bank from the List of Configured Banks.
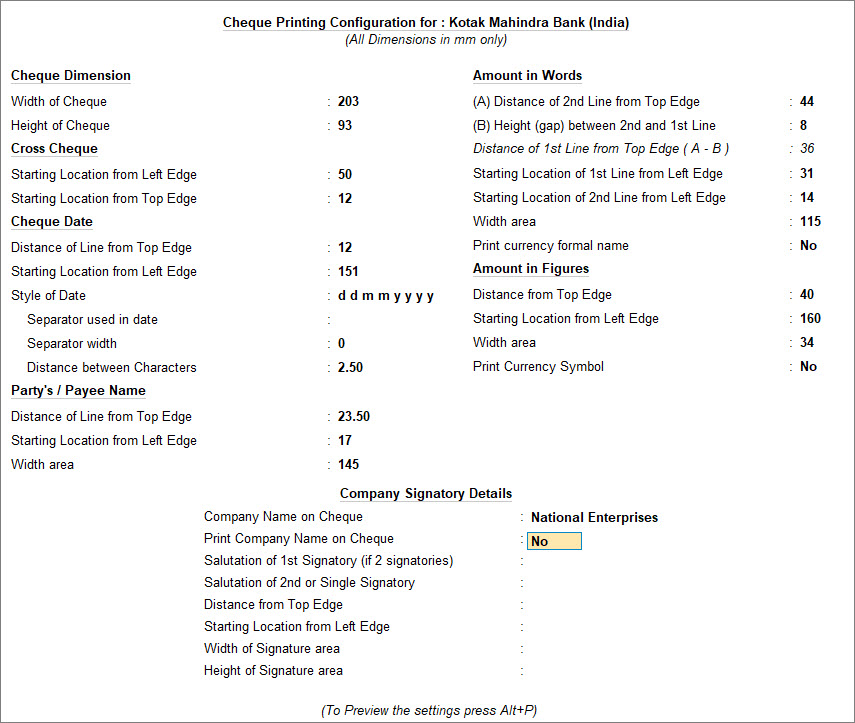
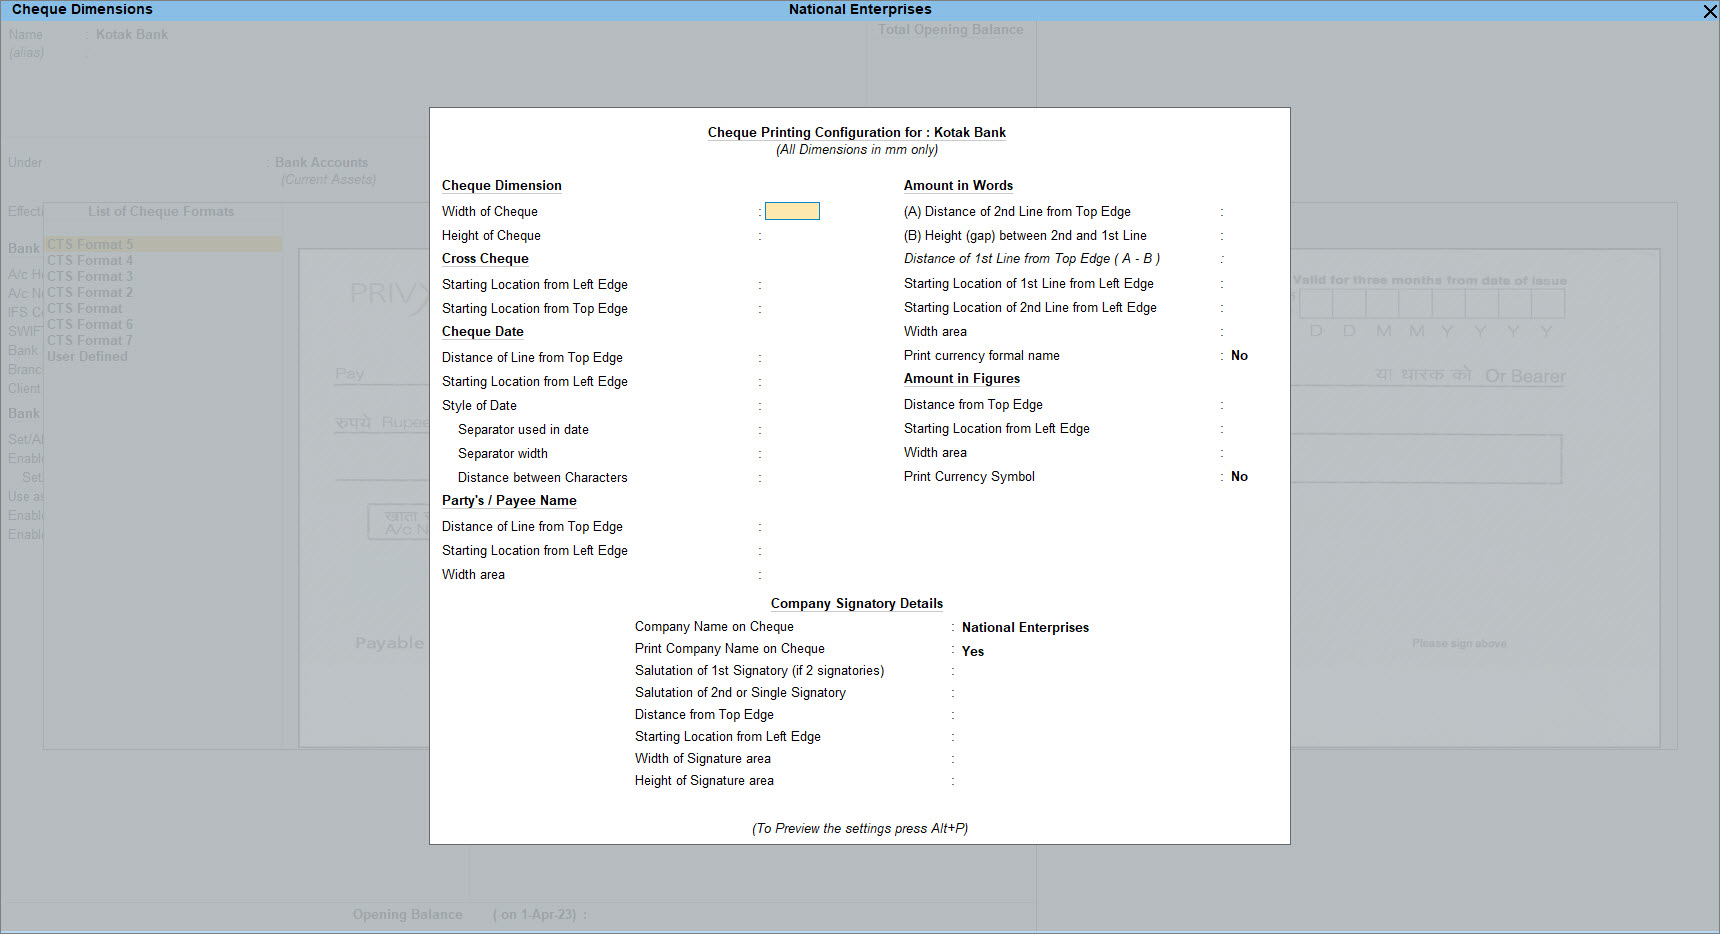
In the Cheque Dimension screen, update the details as per your requirement, as shown below:
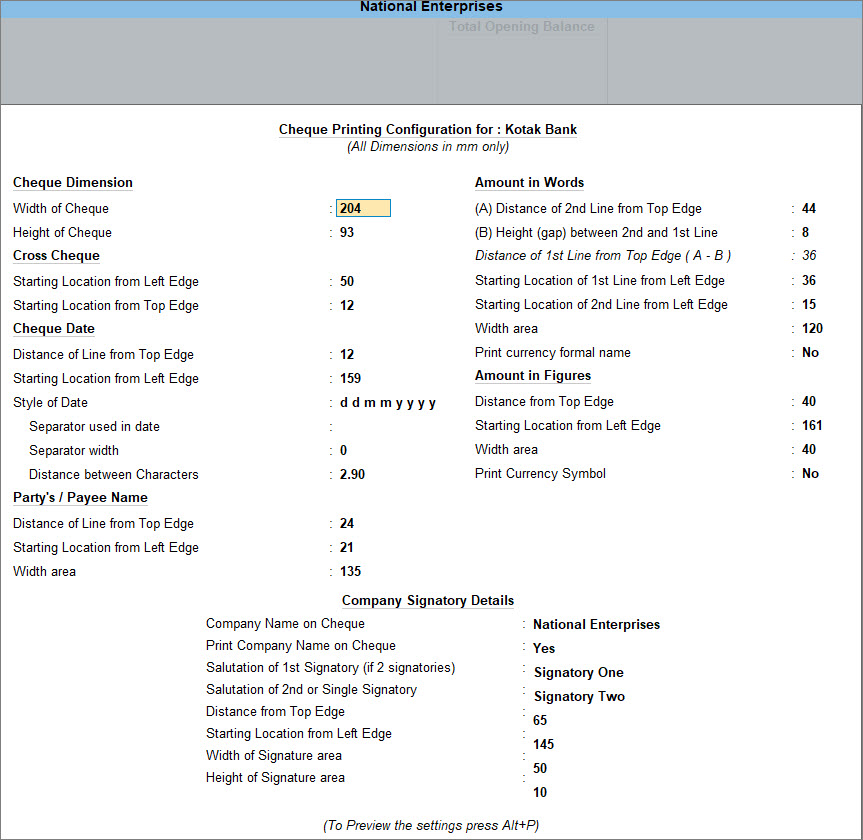
In the Cheque Printing Configuration screen, no field other than salutations should be blank.
- Press Enter to accept the Cheque Dimensions screen.
- Accept the screen. As always, you can press Ctrl+A to save.
After you have added the required dimensions in the User Defined format of a cheque, you can print the cheques using the format.
Print amount in lakhs/millions on cheques
You can print the value in the cheque in lakh/million, by changing the settings for display of amounts.
![]()
- Press Alt+K (Company) > select Alter.
- Select the company from List of Companies to view the Company Alteration screen.
- Press F12 (Configure) > set Provide Additional Base Currency details as Yes, to enable additional base currency options.
- Set the option Show amount in millions? to Yes to view the amounts in millions in the book as well as print it on cheques.
For example, once the option is set to yes, you can see the amount as 1,000,000 instead of 10,00,000. - Accept the screen. As always, you can press Ctrl+A to save.
During cheque printing, the amount will now be printed in millions.
Disable company name in the pre-printed cheques
In the case of pre-printed cheques with the company name, you can disable printing the company name again from the cheque printing configuration.
![]()
- Select the Bank ledger.
- Press Alt+G (Go To) > Alter Master > type or select Ledger > and press Enter.
Alternatively, Gateway of Tally > Alter > type or select Ledger > and press Enter. - Select the bank ledger. For example, Kotak Mahindra Bank.
- Press Alt+G (Go To) > Alter Master > type or select Ledger > and press Enter.
- Set Cheque Printing under Bank Configuration.
- Enable Set/Alter Cheque Printing configuration, to view the Cheque Format Selection screen.
- Select the required format from the List of Cheque Formats, to view the Cheque Dimensions screen.
- Print the cheque without the company name.
- In the Cheque Dimensions screen, set Print Company Name on Cheque to No under Company Signatory Details.
- Accept the screen. As always, you can press Ctrl+A to save.
Now you can print the pre-printed cheques with other details without overlapping the company name.
Print a Cheque to Withdraw Cash
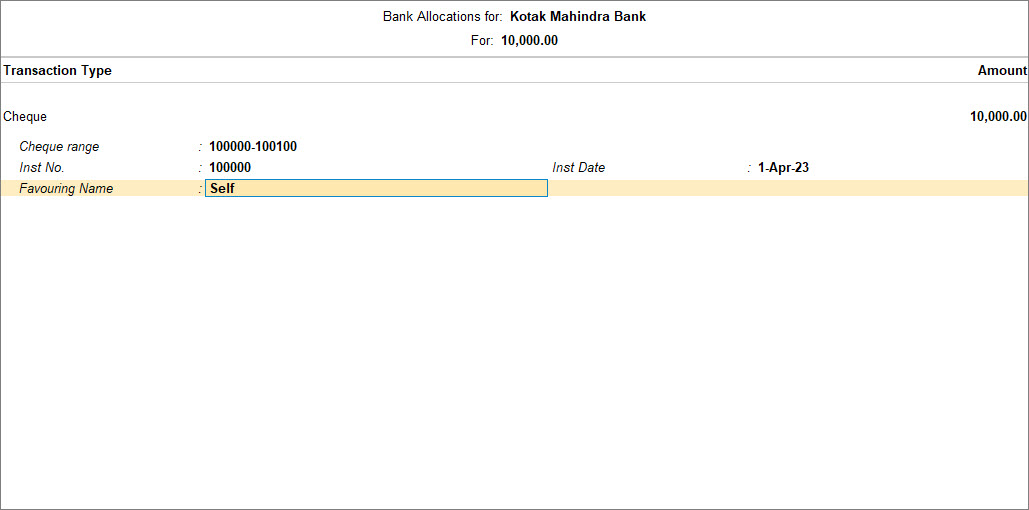
If you want to withdraw money from the bank through a cheque, then you can print a cheque after passing a contra entry in the books. In the Favouring Name field in the Bank Allocations screen, you can mention Self or the name of the person who is going to the bank. You can print the cheque as non-crossed and mention Self or the name of the person who is going to the bank to withdraw cash.
![]()
- Record the Contra entry.
- Press Alt+G (Go To) > Create Voucher > press F4 (Contra).
Alternatively, Gateway of Tally > Vouchers > press F4 (Contra). - Credit the Bank account and enter the amount.
- Press Enter to go to the Bank Allocations screen.
- Press F12 (Configure) > set Show favouring name as Yes, to enter Self as the Favouring name.
The Bank Allocations screen appears as shown below:
- Press Ctrl+A to accept and return to the Accounting Voucher Creation screen.
- Debit the Cash account.
- Press Alt+G (Go To) > Create Voucher > press F4 (Contra).
- Press Ctrl+A to accept the screen.
The Cheque Printing screen appears. - Print the cheque.
- In the Cheque Printing screen, press C (Configure) to set the print settings, if any.
- Press P (Print) to print the self-cheque.
You can print a cheque in your name and withdraw money from the bank.
Print Cheque from Payment Voucher
In TallyPrime, while recording the payment voucher, you can also print the cheque for that payment immediately once the payment voucher is saved.
![]()
- Record the Payment voucher.
- Press Alt+G (Go To) > Create Voucher > press F5 (Payment) and press Enter.
Alternatively, Gateway of Tally > Vouchers > press F5 (Payment) > and press Enter. - Debit the party ledger and enter the Amount and give the bill reference details, if any.
- Credit the bank ledger for which the cheque printing is enabled and enter the Amount and press Enter.
The Bank Allocations screen appears. - Enter the cheque number in the Inst. no. field and the date in the Inst. date.
The voucher date is displayed by default. - Press Ctrl+A to save the Bank Allocations Screen.
- Press Alt+G (Go To) > Create Voucher > press F5 (Payment) and press Enter.
- As always, press Ctrl+A to save the payment voucher.
The Cheque Printing screen appears.
- Press I (Preview) to preview and P (Print) to print.
You can now directly print the cheques once the payment voucher is recorded.
Print Cheque Details in Payment Voucher
While recording the payment voucher, if you want to mention the cheque details through which the payment is made then you can configure the print settings to include such details in the voucher.
![]()
- Record the payment voucher.
- Press Alt+G (Go To) > Create Voucher > press F5 (Payment) and press Enter.
Alternatively, Gateway of Tally > Vouchers > press F5 (Payment) > and press Enter. - Debit the party ledger and credit the bank ledger.
- Press Alt+G (Go To) > Create Voucher > press F5 (Payment) and press Enter.
- As always, press Ctrl+A to save the payment voucher.
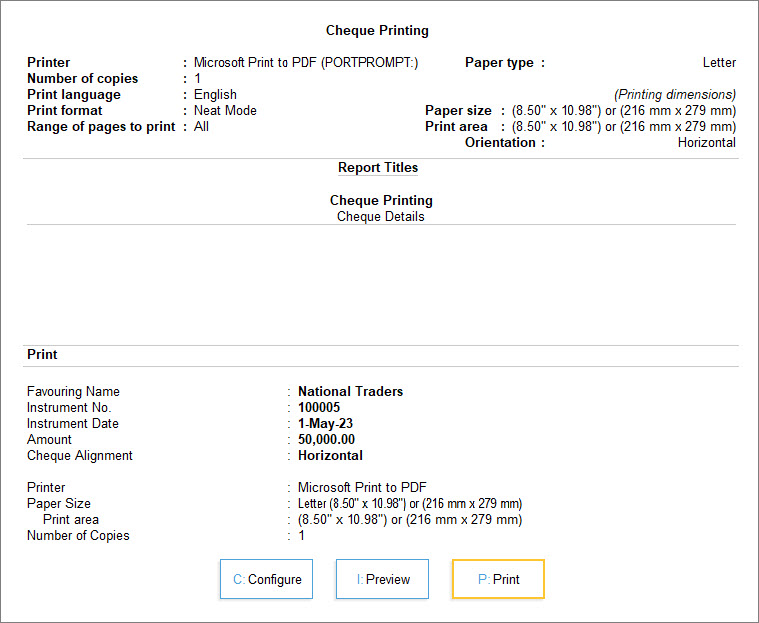
The Cheque Printing screen appears. - Print the payment voucher with cheque details.
- Press C (Configure) > Set Show Bank Transaction Details to Yes to print the bank transaction details in the payment voucher.
- Press I (Preview) to preview and P (Print) to print.
- Press C (Configure) > Set Show Bank Transaction Details to Yes to print the bank transaction details in the payment voucher.
After the configurations are done in the print settings, you can print the cheque number details along with the bank name from which the payment is made. The cheque details remain saved in the voucher and can be reprinted if required.
Update Instrument Date while Issuing Cheques
If you do not want the voucher date to be your cheque date, you can print your cheque keeping the date field blank. You also have the option to update the cheque date as per your required date by configuring your cheque printing setting.
Since the validity of the cheque is for 3 months, TallyPrime provides you with the flexibility to print the cheque with the date field blank and fill it as and when you are issuing the cheque.
![]()
- Select the Bank ledger.
- Press Alt+G (Go To) > Alter Master > type or select Ledger > and press Enter.
Alternatively, Gateway of Tally > Alter > type or select Ledger > and press Enter. - Select the bank ledger. For example, Kotak Mahindra Bank.
- Press Alt+G (Go To) > Alter Master > type or select Ledger > and press Enter.
- Set Cheque Printing under Bank Configuration.
- Enable Set/Alter Cheque Printing configuration, to view the Cheque Format Selection screen.
- Select the required format from the List of Cheque Formats, to view the Cheque Dimensions screen.
- Print cheques without the Instrument Date.
- Press Ctrl+P (Print) to view the Sample Cheque Printing and press C (Configure).
The Sample Cheque Printing screen appears. - Set Show Instrument Date to No.
- Press Ctrl+P (Print) to view the Sample Cheque Printing and press C (Configure).
- Accept the screen. As always, you can press Ctrl+A to save.
You can update the cheque date as required at the time of issuing the cheque.
View List of All Cheques to be Printed from Cheque Printing Report
The Cheque Printing report in TallyPrime provides you with the facility to view the list of all cheques issued. By default, it shows the list of cheques pending for printing for the month when the last transaction was recorded. However, you can configure the report to include the printed cheques and also view the complete list of cheques issued by changing the period. From the Cheque Printing report, you can select the cheques and print the selected cheques or you can print all the cheques at once. If the bank ledger is not configured for cheque printing then on selecting that bank ledger you can see the message that the bank is not configured for cheque printing in the header.
In this section
- View list of cheques pending for printing
- Print selected cheques
- Print all bank cheques at once
- Bank ledger not configured for cheque printing
View list of cheques pending for printing
The cheque printing report by default displays the list of pending cheques which are not yet printed. However, you can also include already printed cheques and view the complete list.
![]()
- Press Alt+G (Go To) > type or select Cheque Printing > and press Enter.
Alternatively, Gateway of Tally > Banking > Cheque Printing > and press Enter.
The Select Bank screen displaying the List of Banks appears, as shown below:
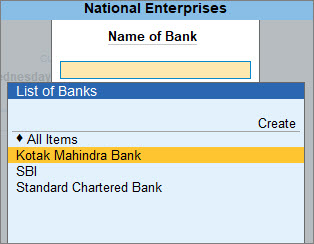
- Select All Items or the required Bank account from the List of Banks and press Enter.
The list of cheques pending for printing appears.

- Press F8 (Incl Printed) or Ctrl+B (Basis of Values) to display all the cheques.

You can also customise Cheque Printing and view it as required.
- Ctrl+B (Basis of Values): You can select the Scale Factor as required and view the amounts in Hundreds, Thousand and so on.
- Ctrl+H (Change View): You can view Related Reports such as Cheque Register.
- Ctrl+J (Exception Reports): You can view Optional Vouchers and Post-Dated Vouchers.
Optional Vouchers: If you want to hold on to a cheque number for a future transaction then you can record that transaction as an Optional voucher and view that voucher from Exception Reports.
Post-Dated Vouchers: If you issued a post-dated cheque for payment, then you can record that transaction as post-dated voucher and view that voucher from Exception Reports. - Alt+B (Alter Ledger): Allows you to alter Bank ledger and enable cheque printing in the Bank ledger.
- Alt+H (Alter Chq Details): Allows you to edit/update the Favouring Name, Instrument No. and Instrument Date columns.
You can also include Favouring Name from F12 (Configure).
Print selected cheques
From the list of displayed cheques, if you want to print a particular cheque or cheques and give the cheque to your supplier then you can select the cheques and print them.
![]()
- Select the bank for printing the cheques.
- Press Alt+G (Go To) > type or select Cheque Printing > and press Enter.
Alternatively, Gateway of Tally > Banking > Cheque Printing > and press Enter. - Select All Items or required Bank account from List of Banks to view the Cheque Printing screen.
- Press the spacebar to select the required row(s).
- Press Alt+G (Go To) > type or select Cheque Printing > and press Enter.
-
Print the cheques.
- Press Ctrl+P (Print) to view the Cheque Printing Print screen.
- Press P (Print) to print. Only the selected cheques will be printed.
Once you select the cheque for printing, only the selected cheques get printed.
Print all bank cheques at once
If you don’t have a specific cheque to be printed, then you can print all the cheques at once after all the payment vouchers are recorded. Before printing the cheques make sure that the list of cheques you are printing excludes the printed cheques.
![]()
- Select the bank for printing the cheques.
- Press Alt+G (Go To) > type or select Cheque Printing and press Enter.
Alternatively, Gateway of Tally > Banking > Cheque Printing and press Enter. - Select the required bank from the List of Banks in the Select Bank screen.
- Press Alt+G (Go To) > type or select Cheque Printing and press Enter.
- Print the cheques.
- Press Ctrl+P (Print) to print.
- Set the option Print Cheque to Yes in the Cheque Printing screen and press Enter.
- Press P (Print) to cheque print.
- Press Esc. The Cheque Printing screen appears with Cheque Details for the next cheque.
You can print all the cheques at once and issue them at the time of making payment.
Bank ledger not configured for cheque printing
If the bank ledger you have selected is not configured for cheque printing, then in the Cheque Printing screen the header shows Bank not configured for Cheque Printing.
![]()
- Select the bank ledger which is not configured for cheque printing.
The Cheque Printing screen shows Bank not configured for Cheque Printing in the header. - Press Alt+B (Alter Ledger) to alter the respective Bank ledger and enable cheque printing in the Bank ledger.

Once the cheque printing is enabled, you can see the list of pending cheques for printing.
View, Search, Track Your Cheque Details from Cheque Register
You can view and search for the details of your cheques, set cheque ranges and track cheque statuses – all from the Cheque Register report. Also, find details of post-dated cheques and cheques issued in different periods as per your business needs. It also allows users to keep track of post-dated cheques.
In this section
- View and track your cheques with Cheque Register
- Update the status of the Available Cheques as Blank and print
View and track your cheques with Cheque Register
You can view the Cheque Register to see the details such as Available cheques, Unreconciled or Reconciled cheques, Blank or Cancelled cheques and so on. Along with that, you can also manage your cheques such as doing a quick search among the list of cheques or assigning a cheque range if no cheque range is assigned in the bank ledger and so on.
![]()
- Press Alt+G (Go To) > type or select Cheque Register and press Enter.
Alternatively, Gateway of Tally > Banking > Cheque Register and press Enter.

You can view the Cheque Register report and manage the cheques by altering the configurations from the various options provided by TallyPrime.
- F8 (Cheque Status): You can select the status of the cheques from the list provided and view only the list of cheques for that status.
- Ctrl+B (Basis of Values): This option helps you to enable Include Not in Range cheques so that you can also view the cheques for which the cheque range is not yet set. Apart from that you can also select Ignore completed Cheque Ranges.
- Ctrl+J (Exception Reports): You can view the Post-Dated Summary from this option.
- Alt+B (Alter Chq Book): If you have multiple chequebooks for a single bank, then you can press Alt+B to alter the chequebook.
- Alt+Q (Quick Search): This option helps you to filter and search for a cheque quickly by using the cheque number, bank name, or party name.
- Alt+R (Reconcile): For all the unreconciled cheque details you can directly go to the Bank Reconciliation screen and perform the reconciliation from this option.
- In the Bank-wise Register screen, select the bank, and press Alt+R (Reconcile) to reconcile the unreconciled cheques in that bank.
- In the Cheque Range Register screen, select the cheque range, and press Alt+R (Reconcile) to reconcile the unreconciled cheques in that range.
View cheques Bank-wise
Get a consolidated view of all your cheques from the default bank-wise screen of the Cheque Register report.
- Available Cheques – View the cheques available if you have set a cheque range while creating in your bank ledger.
- Alternatively, set a cheque range by pressing Alt+B (Alter Chq Book) > Cheque Book Management.
- Unreconciled and Reconciled – Drill down into these columns to view the cheque details, including the related payment details.
- Blank and Cancelled – Drill down to view details of all your blank and cancelled cheques.
- Issue a blank cheque to your party from this report.
- Cancel an available cheque or a cheque that is already issued.
- Out of Period: Displays the number of cheques that do not belong to the current period chosen. The cheques may be
- Issued in the previous financial year
- Post-dated and not part of the current financial year
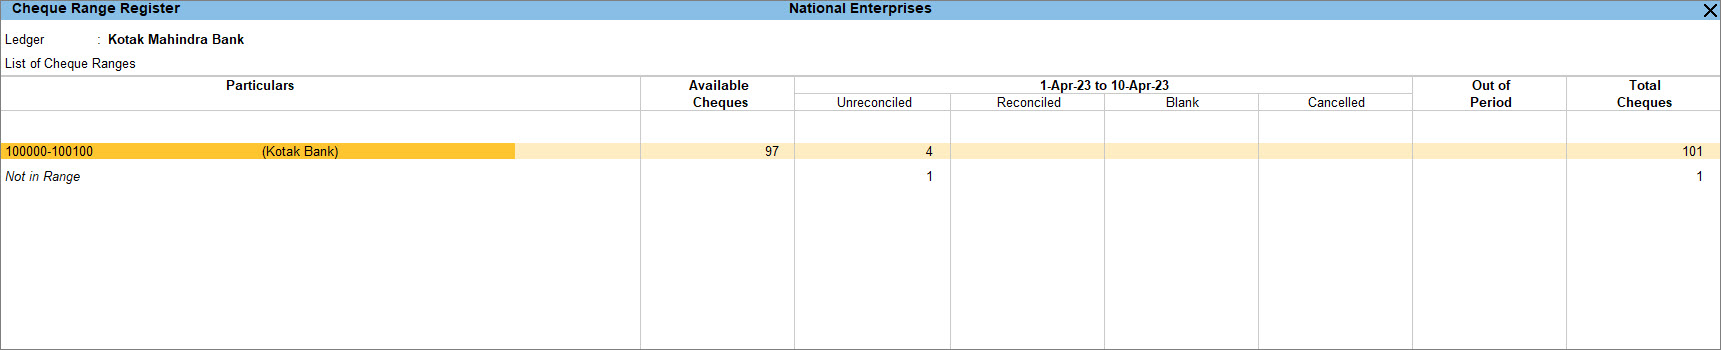
View cheques Range-wise
View cheques based on the different cheque ranges you have set, depending on the business requirements. For example, you can set cheque ranges for cheques to be issued from different departments or for cheques to be issued to different parties.
- Drill down from the Cheque Register report to view all the cheque ranges in the Cheque Range Register screen.
- F4 (Bank): You can toggle between banks from this option.
- F8 (Transactions): You can view the cheque details on the Instrument Wise screen for each cheque range.
- F4 (Cheque Range): You can toggle between different cheque ranges.
- Not in range: Drill down to view details of the cheques that are issued but not set as part of any cheque range.
Update the status of the Available Cheques as Blank and print
You can alter the status of Available cheques as Blank cheques from the Cheque Register. Once the cheque status is altered to Blank, you will be redirected to the payment voucher marked as Blank Cheque. You can record the payment voucher with all the details and leave the amount column blank. After you have recorded the payment voucher you can view the list of blank cheques in the Cheque Register.
![]()
- In the Cheque Register screen, select the total number of Available Cheques with respect to your bank ledger and drill down to the Instrument Wise screen.
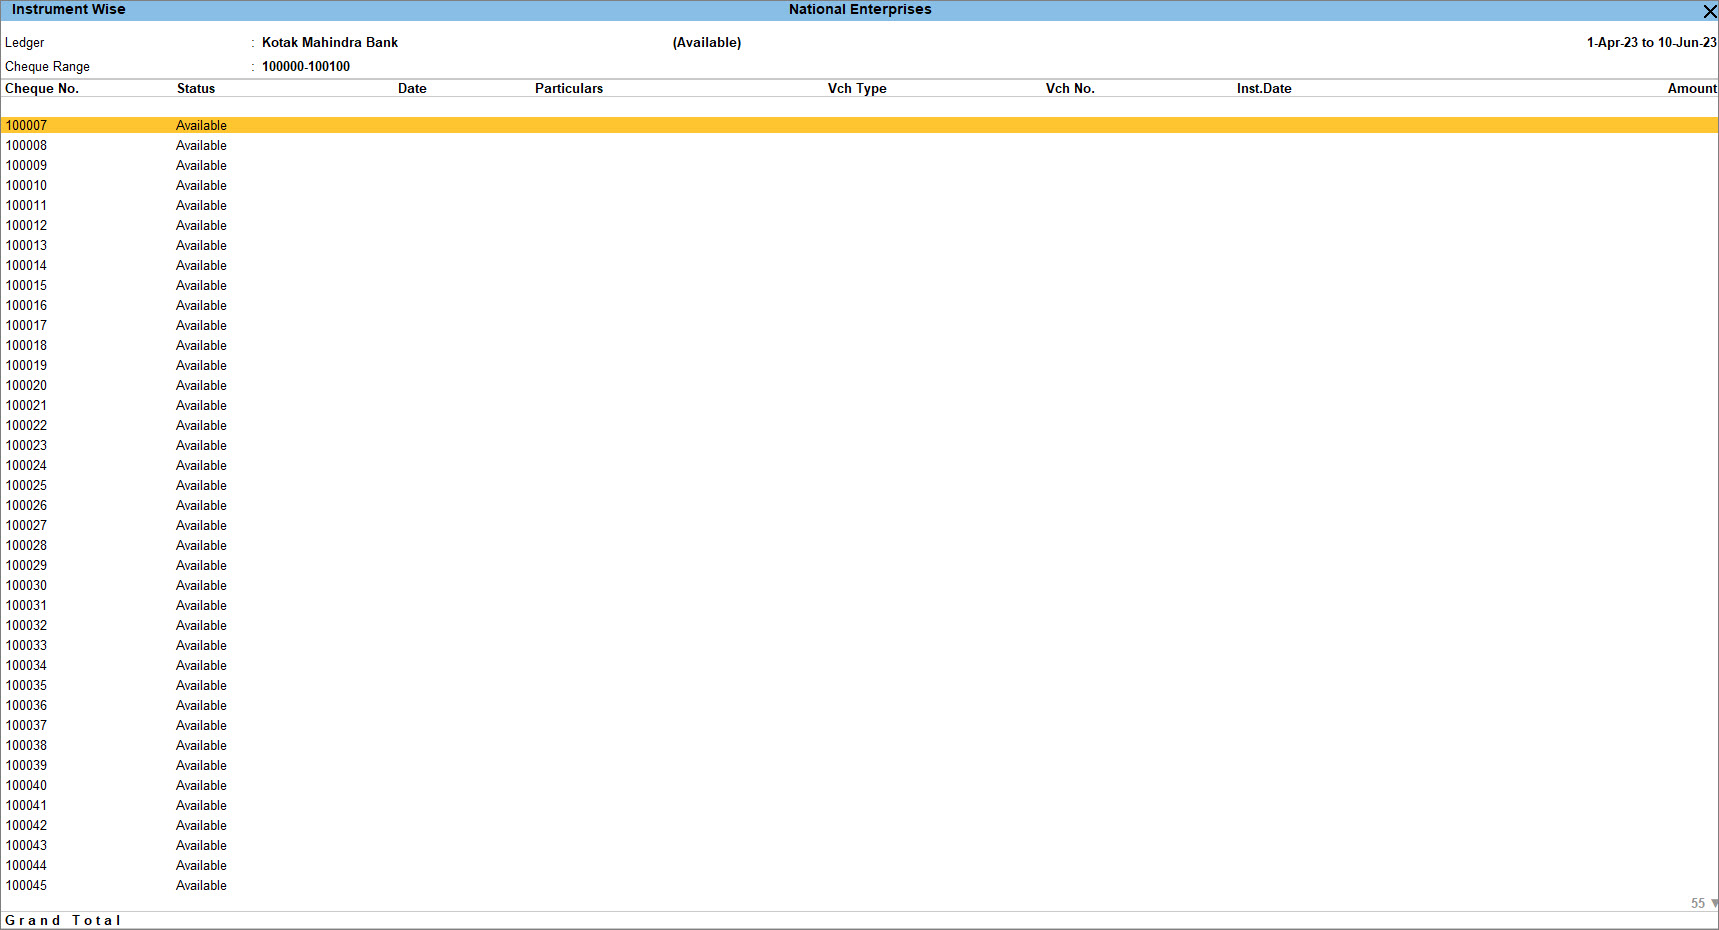
- Select any cheque by pressing Spacebar.
- Press Alt+S (Alter Status) to change the status of the cheque.
- Select Blank Cheque under Cheque Status to update the status of the cheque from Available to Blank.
Ensure that you have enabled the Allow zero-valued transactions option in the Payment voucher type to update the cheque’s status to Blank.
Allow zero-valued transactions
To enable Allow zero-valued transactions,
- In the Voucher Type Alteration screen for Payment, enable Allow zero-valued transactions.
After you alter the cheque status from Available to Blank, you will be redirected to the payment voucher.
Record a Payment voucher with the Party’s name entered and the amount field blank
Record the payment voucher with the party name and leave the amount column blank.
- Record the Payment voucher.
- Select the Ledger Account from the List of Ledgers Accounts under Particulars. For example, National Traders.
- Press Enter to skip all the fields. The Bank Allocations screen appears, with the Instruments details pre-filled, as shown below:
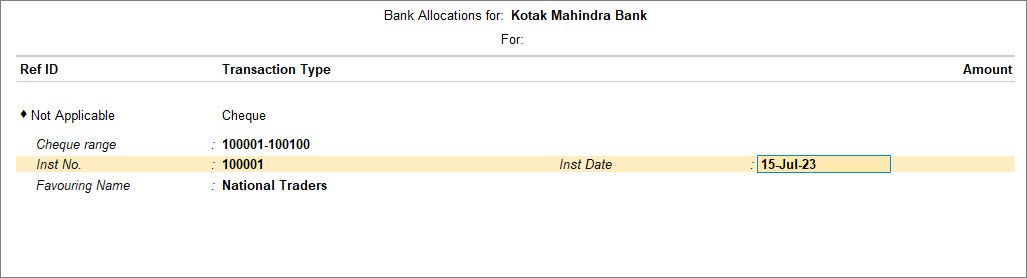
- Press Enter to accept all the details in the Bank Allocations screen. The Voucher Creation screen reappears.
- Press Enter or Y to accept the voucher. As always, you can press Ctrl+A to save.
The Cheque Printing sub-screen appears.
- Print the cheque.
- Press I (Preview) to view the print preview of the blank cheque, if needed.
- Press Esc twice to come back to the Instrument Wise screen. The status of the Cheque No. 100001 is now updated to Blank Cheque.
The Payment Voucher Creation screen appears with the Bank Name prefilled in the Account field and marked as Blank Cheque.
View Blank Cheque in Cheque Register
You can view the Blank Cheque under the Blank column in Cheque Register. You can drill down further to view the Instrument Wise screen and drill down to view the Accounting Voucher Alteration screen if you need to make changes to the voucher.
To view the Blank Cheque in the Cheque Register,
- Drill down from the Blank column to the Instrument Wise screen.
You can observe that the status of Cheque No. 100001 now appears as a Blank Cheque.

You can convert the Blank Cheque to a normal cheque by drilling down to the Amount field in the Voucher Alteration screen and entering the value.

