You can install Tally.Server 9 from the downloads page on the Tally website. Alternatively, you can install the application using the CD installer.
Tally.Server 9 is compatible with Windows XP SP2 64-bit, XP SP3 32-bit, or higher versions of the Windows operating system.
Recommended system requirements:
|
Particulars |
Recommended Configuration |
|
Processor |
Intel Core2Duo and above or equivalent |
|
RAM |
For a 32-bit operating system: 2 GB or more |
|
For a 64-bit operating system: 4 GB or more |
|
|
Hard disk |
30 MB free space to install the application |
|
Monitor resolution |
1024 x 768 or higher |
|
Operating system |
Microsoft Windows XP SP2 (64-bit), MS Windows XP SP3 (32-bit), or later |
|
Connectivity |
Continuous connection to the internet |
A new customer of Tally.ERP 9 with Tally.Server 9 will need two installers - Tally.ERP 9 Series A Release 5.X installer and Tally.Server 9 Release 5.X installer.
To install Tally.Server 9
1. Double-click the installer icon to open the Tally.Server 9 Installer.
2. Select the required installation folder path if you do not want to install Tally.Server 9 at the default location.
3. Click Advanced to alter the default settings.
4. Click Check Latest to check the latest version of Tally.Server 9 that is available. The Install Now option in the Tally website, by default, installs the latest version of the application.
5. Click Install Latest to install the latest version. Alternatively, click Install to install the version that you have downloaded.
Note : Tally.Server 9 Series A Release 5.0 is compatible with Tally.ERP 9 Series A Release 5.0. You can install Tally.Server 9 in a different machine, if required. However, it is recommended that you install it in the machine where Tally.ERP 9 Gold License is installed.
To alter the default settings
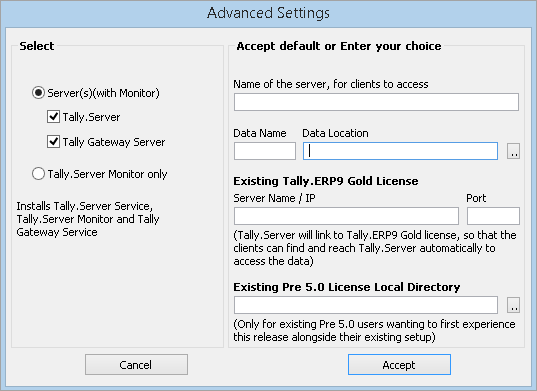
1. Click Advanced in the installation wizard, to view the Advanced Settings screen.
The Advanced Settings screen appears as shown below:

2. Select Server(s)(with Monitor) to install Tally.Server 9 Service and Tally.Server 9 Monitor .
Note : By default, in the Name of the Server , for clients to access field, the system name is the Tally.Server name (data server). Any name can be given to identify Tally.Server (data server).
3. Enter the Data Name .
4. Select the Data Location from the system.
o Existing Tally.ERP 9 Gold license users can enter the gateway server name/IP, and port number of Tally.ERP 9 Series A Release 5.0 Gold edition. Using this, Tally.Server (data server) will connect to Tally.ERP 9 Gold license. Hence, Tally.ERP 9 clients can find and use the data server service automatically.
o Users who are using 4.91 or older releases, and want to experience Tally.Server 9 Series A Release 5.0, enter the existing license file path in the Existing Pre 5.0 License Local Directory field.
5. Select Tally.Server Monitor only to install only the Tally.Server Monitor.
6. Enter the Server Name/IP and Port .
7. Click Accept .
The Tally.Server Monitor can be installed in a different machine separately.
Users who are using Tally.ERP 9 Series A Release 4.91 or lower have to upgrade to Tally.ERP 9 Series A Release 5.0 before installing Tally.Server 9 Series A Release 5.0.
When Tally.Server 9 is installed, the following components/files will be installed:
● tssvc.exe : This is Tally.Server 9 service that provides the Data Server Service.
● tssvc.ini : This is the configuration file for Tally.Server 9 server.
● tallyserver.exe : This is the Tally.Server Monitor application.
● tallyserver.ini : This is the configuration file for Tally.Server Monitor application.
● tallygatewayserver.exe : This is the Tally Gateway Server application.
● tallygateway.ini : This is the configuration file for Tally Gateway Server application.
● Setup.exe : This is the Uninstall/Upgrade application. It will uninstall Tally.Server 9, Tally Gateway Server, and Tally.Server 9 Monitor.