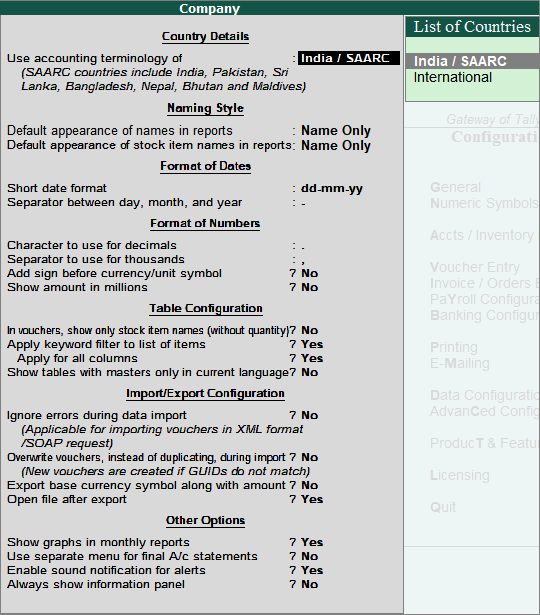
You can configure Country Details, Style of Names, Style of Dates, Numbers and many other details in the General configuration screen.
Go to Gateway of Tally > F12 > General .

● Use Accounting Terminology of : Select India/SAARC or International .
● Default appearance of names in reports : By default, the appearance of ledger name is set to Name Only . You can change it as required.
● Default appearance of stock item names in reports : By default, appearance of stock item name is set to Name Only . You can change it as required.
● Short date format : By default, date format is dd-mm-yy. You can change the date format by selecting from the list.
● Separate between day, month, and year : By Default, hyphen (‘-‘) is the separator. You can change it as required.
● Character to use for decimals : You can specify a character for the decimal point.
● Separator to use for thousands : You can specify a character as the separator.
● Add sign before currency/unit symbol : If the option is set it to Yes , a Negative sign will appear before the currency symbol, e.g. (-)₹ 20. If the option is set it to No , a Negative sign will be placed after the currency symbol, for example, ₹(-)20.
● Show amount in millions : If the same option provided under Base Currency Information of company creation/alteration screen is:
o Set to Yes , then you set this option to Yes to view the numbers in Millions.
o Set to No , then you set this option to No the view the numbers in Lakhs.
Note: If you change any configuration under Style of Dates and Configuration of numbers, you need to restart the application for those changes to take effect.
● In vouchers, show only stock item names (without quantity) : Set this to Yes, to view only the stock item name in the List of Stock Items during voucher entry.
● Apply keyword filter to list of items : Set this option to Yes , to reduce the list to the extent of matching keywords entered. Then select the required details from the reduced List of Tables based on the full or partial search keywords, like Company name, Ledger name, Item name and so on.
● Apply for all columns : Set this option to Yes , to apply the keyword filter to all columns displayed in the List of Table . If the option is set it to No , it will search only in the first column of the table.
Note: The option Apply for all columns appears only when the option Apply keyword filter to list of items is enabled.
● Show tables with masters only in current language : Set this option to:
o Yes , to view the masters only in English language while recording transactions.
o No , to view the masters created with aliases in all languages while recording transactions.
● Ignore errors during data import : By default, this option is set to No . If you set this option to Yes, data will get imported even if it has errors. This is applicable only for import of files in XML format.
● Overwrite vouchers, instead of duplicating, during import : By default, this option is set to No . Set it to Yes to overwrite the existing vouchers while importing data instead of duplicating the same.
● Export base currency symbol along with amount : Enable it to export the currency symbol along with amount in XML format.
● Open file after export : Enable it to view the folder or file to which the data is exported, immediately after completing the export process.
● Show graphs in monthly reports : By default this option is set to Yes. The reports are configured to display the Graphs in accordance with the numeric information. The graphs will not be displayed in the reports if this option is set to No .
● Use separate menu for final A/c statements : By default, this option is set to No . Set this option to Yes , to view a separate menu for Final Accounts on Gateway of Tally . Under this menu, Balance Sheet, Profit & Loss A/c, Cash Flow, Funds Flow and Ratio analysis options are available.
● Enable sound notification for alerts : Set this option to Yes , to turn on an audio alert which will beep whenever a transaction has been saved or discarded.
● Always show information panel : Set this option to Yes , to view the Information Panel in all the screens or reports. You can hide this panel by clicking the Ctrl+N [x] close button.