Voucher Classes are used to automate accounting allocations in transactions. It is a table for predefining the entries to make invoice entry a simple task. This is useful in sales invoicing where the nominal ledger accounts to be credited for each item of sale is defined once.
During voucher entry, the accounting credits for items sold are done automatically. Additional accounting entries like tax, freight, and other charges, can be predefined to be carried out untouched during actual invoicing.
Voucher Classes are available for all major voucher types like Contra, Payment, Receipt, Journal, Sales, Credit Note, Purchases, Debit Note, Sales Order, Purchase Order, Delivery Note, Stock Journal and Payroll.
On this page
Voucher Class for Debit Notes and Credit Notes
Voucher Classes for Payment, Receipt and Contra Vouchers
Voucher classes for Credit Notes are similar to sales invoices except for one important inclusion. You can set the class for interest entries to enable adjustment of interest payable. If the Interest option is selected, the other sales invoice-like options will not be available. A separate class may to be created for entries like Sales Returns. Since Sales and Purchase Invoice classes have already been dealt with, we shall not elaborate on this behavior anymore.
Debit Note classes can be set for interest entries only. Classes for other entries are not available as the invoice mode of entry is not possible for Debit Notes.
The primary intention of using classes for payment, receipt and contra vouchers is to enable data input in single entry or list mode rather than in Tally's traditional double entry mode.
Let us take an example of a Payment Voucher .
In this section
Record Payment using voucher class
You can either alter the existing Payment Voucher Type or create a new voucher type based on your requirements.
● Go to Gateway of Tally > Accounts Info > Voucher Types > A lter > Payment .
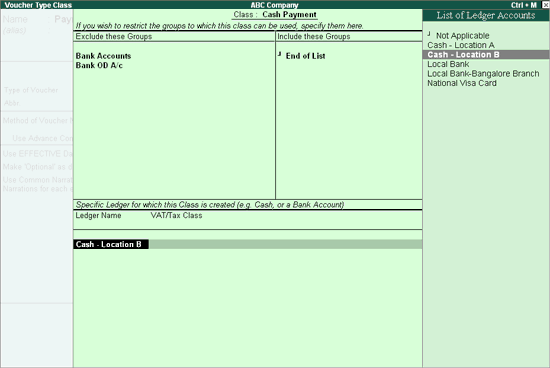
● Take the cursor to the Name of Class field. Give a name to the class say Cash Payment. You can create more than one class.

● Exclude these Groups and Include these Groups : Using this option, you can select only those groups pertaining to the Class, which makes the entry simpler.
● Ledger Name : Selecting the ledger account that will be used to pay out the money will eliminate the need to select it during entry. In this case, it is Cash Account. While passing the payment voucher, the Cash-Location B account will be automatically selected. You may even select 'Not Applicable'. The purpose of selecting 'Not Applicable' will be, to permit Single Entry mode and at the same time retaining the option of selecting the account during entry.
Note: Exclude or Include Groups are irrelevant when you specify a Ledger Name for which the class is created. They are useful when you select Not Applicable .
Select Accounting vouchers from Gateway of Tally . Press F5: Payment . You have to select a class or Not Applicable , if no class is desired for this entry. If Cost Centre Class has been set, it can also be selected.

The entry will be made as follows:
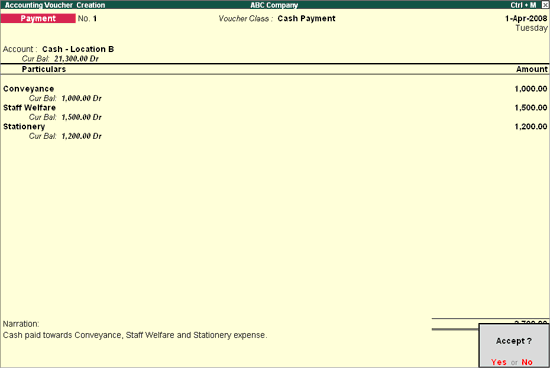
The Voucher Class is Cash Payment . Once the voucher class is selected, the Cash Ledger is automatically selected and you need to select only the Ledgers which are to be debited. Please note that the entry is not done in the regular Dr/Cr format. Data entry in Tally.ERP 9 is very rapid.
Purchase Voucher Classes are templates where you can restrict accounts to be used in entries as well as automate accounting entries for items and expenses. You can either alter the existing Purchase Voucher Type or create a new voucher type based on the requirements.
In this section
Record Purchases using voucher class
1. Go to Gateway of Tally > Accounts Info. > Voucher Type > Alter > Purchase .
2. Give a name to the class under Name of Class, for example, Purchase Class . You can create more than one class. (Make sure that Enter Purchases in Invoice Format in F11 : Features is enabled to create class). Create the Class as shown below:
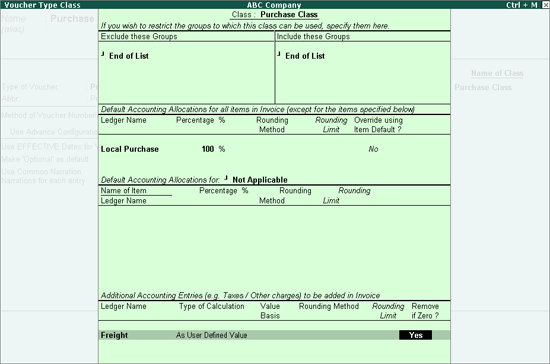
In Default Accounting Allocations for each Item in Invoice (except for the items specified below) section
3. Select the Purchase Ledger – Local Purchases . All the stock items that will be entered in the voucher using this class, except for those specified in the Default Accounting Allocations for section, will be automatically allocated to Local Purchases . Of course, the stock item record remains as it is and can be viewed separately.
4. Specify 100% in Percentage field.
5. Set Override using Item Defaults? to No .
6. Default Accounting Allocations : Set Default Accounting Allocations to Not Applicable (Refer to Voucher Class - Allocation of Stock Item for the usages of this option).
7. Save the details.
1. Record Purchase by passing a Purchase entry using the voucher Class.
2. Go to Gateway of Tally > Accounting Vouchers > F9 : Purchase .
3. Select the Class.

4. Select the Supplier Account .
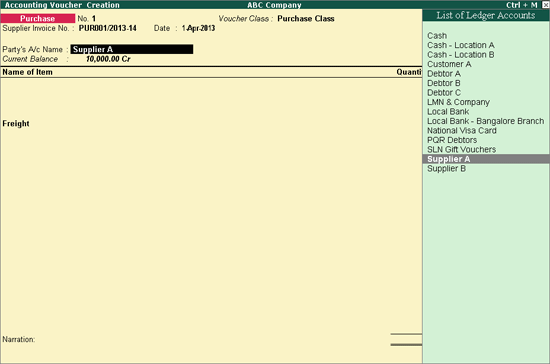
You will observe that the Ledger Accounts grouped under Sundry Debtors are also listed as you have not specified any condition to exclude Sundry Debtors Group. If you have specified Sundry Debtors under Exclude option, then Tally would have displayed the Ledgers excluding those Ledgers grouped under Sundry Debtors.
Please note that the Freight Ledger is automatically displayed and the user has to only specify the value.
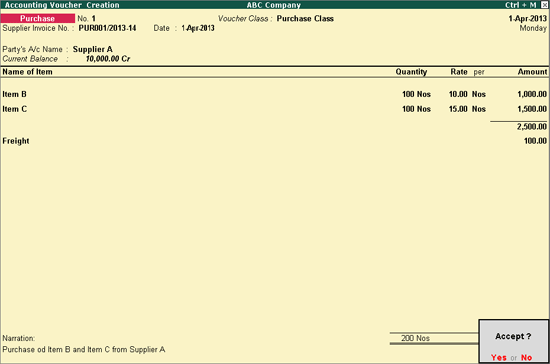
Once you select Item B , specify the Quantity and Rate , the value will be automatically calculated and the cursor will directly move to the Name of Item field instead of popping up the Accounting Allocations for screen.
Payroll Voucher Classes are templates where you can restrict accounts to be used in entries as well as automate payroll entries. You can either alter the existing payroll voucher type or create a new voucher type based on requirements.
In this section
Record Payroll Voucher using Voucher Class
1. Go to Gateway of Tally > Accounts Info. > Voucher Type > Alter > Payroll .
2. Enter a name to the class to be created under Name of Class in the Voucher Type Alteration screen. You can create more than one class.
Note: Enable the option, Maintain payroll in F11: Features to create a class.
The Voucher Type Class screen appears as shown below:
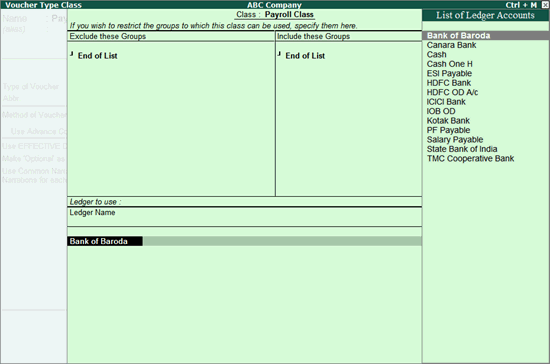
3. Select the ledger name.
1. Go to Gateway of Tally > Payroll Vouchers > F4 : Payroll .
2. S ele c t the c la s s from Voucher Class List as shown below:

3. Press Alt+A to auto fill payroll and the Payroll Auto Fill screen appears with class.
OR
4. Go to Gateway of Tally > Payroll Vouchers . The Payroll Voucher Creation screen is displayed with the bank ledger by default.
5. Press Alt+A to auto fill payroll details. The Payroll Auto Fill screen appears with class as shown below:
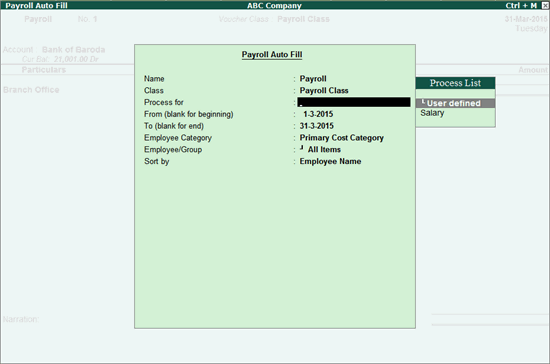
6. E nter the required details.
7. Enter the bank allocation details as shown below:
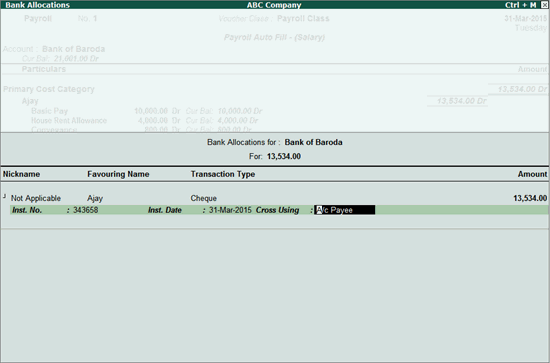
The filled screen appears as shown below:
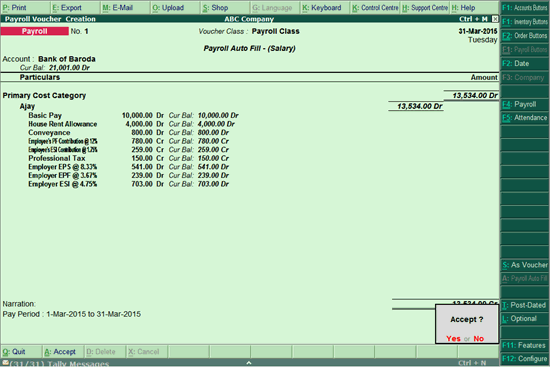
8. Save the transaction.