You can enable or activate payroll in Tally.ERP 9 from the Cost/Profit Centres Management section under F1: Accounting Features in F11: Features . You can then enable the statutory features provided for Payroll from F11 > F3 features.
On this page
Enable statutory features of payroll
1. Go to Gateway of Tally > F11: Features > F1: Accounting Features .
2. Tab down to Cost/Profit Centres Management section.
3. Set the option Maintain payroll to Yes.
4. Set the option Maintain more than one payroll or cost category to Yes , to allocate employee cost by creating separate employee categories.
Note: You can enable the option Maintain more than one payroll or cost category to Yes , where parallel allocation of employee cost/cost centre is required.
5. Press Enter to accept and save, and return to the Gateway of Tally screen.
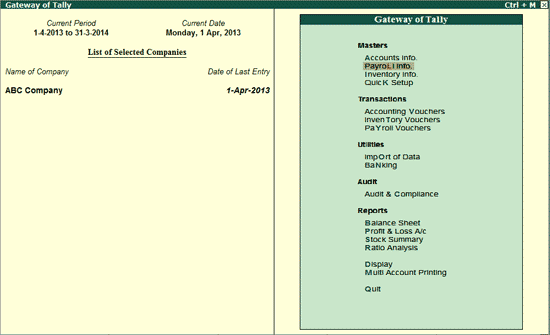
The Gateway of Tally screen appears as shown below:
To use the Provident Fund, Employee State Insurance (ESI), National Pension Scheme (NPS), Income Tax and Professional Tax features for Indian Payroll, you must enable Statutory Features for Payroll.
Note: The Payroll Statutory Features are available only for India. For other countries, this option is not available.
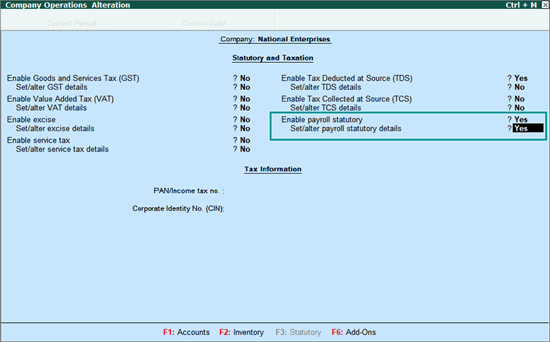
1. Go to Gateway of Tally > F11: Features > F3: Statutory & Taxation .
Note: In Release 6.5.5, you can enable the payroll statutory features for a company located in Ladakh .
2. Set Enable payroll statutory to Yes .
3. Enable the option Set/alter payroll statutory details . Enter the relevant details.
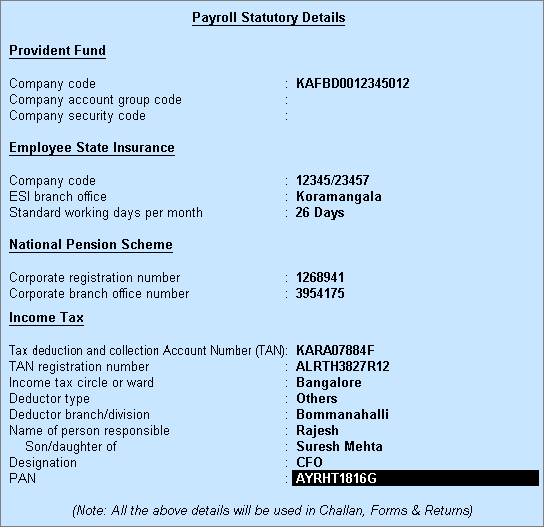
In the Provident Fund section,
1. Enter Company Code as allotted by the PF department.
2. Enter Company Account Group Code as specified by the PF department.
3. Enter Company Security Code as specified by the PF department.
In the Employee State Insurance section,
1. Enter Company Code as allotted by the Employee State Insurance Corporation (ESIC).
2. Enter the name of the ESI Branch Office.
3. In the Standard Working Days (per month) field, enter the number of days to be considered for the calculation of daily wages, and monthly gross amount for ESI benefits. If this field is left blank, the system considers the Calendar Period as the basis for calculation.
Note: ESI Eligibility Amount is specified in the Stat file.
In National Pension Scheme section,
1. Specify the Corporate Registration Number as allotted by the Central Recordkeeping Agency (CRA) during registration.
2. Specify the Corporate Branch Office Number allotted by the Central Recordkeeping Agency (CRA) during registration.
In the Income Tax section,
1. Specify the 10 digit TAN assigned to the employer in Tax deduction and collection Account Number (TAN) .
2. Specify the TAN registration number .
3. Specify the name of the Income Tax Circle/Ward , to which the employer is associated.
4. Select the Deductor Type as:
o Government for central or state government companies.
o Others for other companies.
5. Enter the name of Deductor branch/division .
6. Enter the Name of Person Responsible for TDS deduction in the company.
7. Enter the father's name of the person who is responsible for TDS deduction in the company, in the field Son/Daughter of .
8. Specify the official Designation of the person who is responsible for TDS deduction in the company.
9. Specify the PAN .
Press Enter to accept and save.
You can use the Payroll Configuration screen to configure some basic aspects of Payroll.
1. Go to Gateway of Tally > F12: Configure > Payroll Configuration .
2. Set the option Add notes for employees to Yes to enter any additional information about the employee in the Employee Creation/Alteration screen.
3. Set the option Show statutory details (for India/ SAARC companies only) to Yes to enter the PF, ESI, NPS and Employee PAN details in the Employee Creation screen, and print the same information in the employee pay slip.
Note: For International Companies, the option Show Statutory Details will allow to capture only the Employee’s Income Tax Number in the Employee Creation screen.
4. Set the options Provide passport and visa details and Provide contract details to Yes to capture and display the following information in the Expat Reports:
● The employee's Passport Number , Passport Expiry date , Visa Number , and Visa Expiry date .
● The employee's Contract Start and Expiry dates in the Employee Master .
5. Set the option Show resigned/retired employees to No , to avoid displaying the names of resigned employees in the attendance and payroll vouchers.
6. Set the option Show employee display name to Yes , if the payroll reports need to include a different name for the employee, while printing.
Note: This option is useful when the company has multiple employees who have the same name.
You can configure additional printing preferences using the Payroll Print Configuration screen.
You can use the Payroll Print Configuration screen to configure the message to be included while printing the Payment Advice and the Pay Slip .
1. Go to Gateway of Tally > F12: Configure > Printing > Payroll . The Payroll Print Configuration screen appears as shown below:

2. Alter the pre-filled content in the Information in Payment Advice field, if required. It will be printed in the Payment Advice sheet.
3. Enter required information in the Pay Slip Note field, to be displayed instead of the Authorised Signatory details in the Pay Slip .
4. Enter the required Pay Slip Message to be included in all printed payslips. For example , in the month of January you may include the message Happy New Year!
5. Press Enter to accept.
Note: The Payroll Print Configurations are not company specific, and the changes made will be applicable to all the companies loaded.