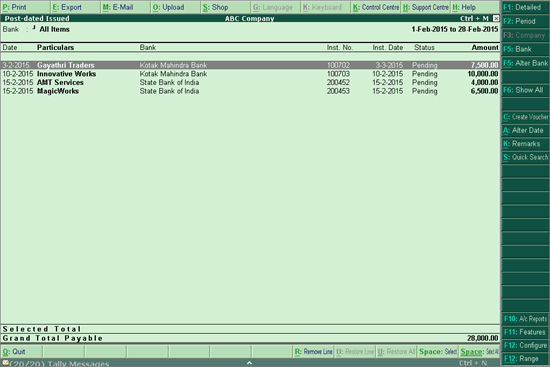
The Post-dated Issued report in Tally.ERP 9 displays particulars of all the post-dated cheques issued to vendors and suppliers against business transactions.
On this page
1. Go to Gateway of Tally > Banking > Post-dated Summary .
2. Select the required Bank or All Items , and press Enter .
3. Place the cursor on the Amount and Count values displayed under the Issued column, and press Enter . The Post-dated Issued report appears as shown:

The report displays information as follows:
● Date : This column displays the date provided in the voucher while recording the post-dated transaction in Tally.ERP 9.
● Particulars : This column displays the name of the party ledger that has been used to record the transaction.
● Bank : This column displays the name of the bank whose cheque has been issued.
● Inst. No. : This column displays the instrument number entered in the Bank Allocations screen while recording the transaction.
● Inst. Date : This column displays the instrument date entered in the Bank Allocations screen while recording the transaction. That is, the date provided on the face of the cheque.
● Status : This column indicates if the current status of the cheque. There are two types of status for a cheque:
o Regularized , if the date of the cheque is equal or more than the Date of Last Entry indicated in the Gateway of Tally.
o Pending , when the cheque date is lesser than the Date of Last Entry .
● Amount : This column displays the value of the post-dated cheque issued.
|
Button |
Key Combination |
Usage |
Reports |
|
F1: Detailed |
Alt+F1 |
To view the bill details for the transactions displayed |
Post-dated Summary, Post-dated Transactions, Post-dated Received, Post-dated Issued |
|
F2: Period |
F2 |
To change the period of the report |
Post-dated Summary, Post-dated Transactions, Post-dated Received, Post-dated Issued |
|
F4: Ledger |
F4 |
To change the ledger for which the report is being displayed |
Transactions, Post-dated Received, Post-dated Issued |
|
F5: Alter Bank |
Alt+F5 |
To change the bank ledger that has been selected for the transaction. Place the cursor on the required voucher entry, and press Spacebar to select the same. Click the button to change the bank selected for the voucher |
Post-dated Transactions, Post-dated Received, Post-dated Issued |
|
F6: Show All |
F6 |
To view both Regularized and Pending transactions; the report displays only those transaction with the status Pending, by default |
Post-dated Transactions, Post-dated Received, Post-dated Issued |
|
C: Create Voucher |
Alt+C |
To create a Post-dated Payment/Receipt voucher |
Post-dated Received, Post-dated Issued |
|
A: Alter Date |
Alt+A |
To change the date of the voucher. Select the transaction using Spacebar, and click the button |
Post-dated Transactions, Post-dated Received, Post-dated Issued |
|
K: Remarks |
Alt+K |
To provide remarks for a transaction. Select the transaction using Spacebar, and click the button |
Post-dated Transactions, Post-dated Received, Post-dated Issued |
|
S: Quick Search |
Alt+S |
To filter for a specific transaction, using the instrument number, voucher date, bank name, party name, or amount |
Post-dated Transactions, Post-dated Received, Post-dated Issued |
|
F10: Acc Rep |
F10 |
To view other accounting reports in Tally.ERP 9 like Balance Sheet, Day Book, etc. |
Post-dated Transactions, Post-dated Received, Post-dated Issued |
|
F11: Features |
F11 |
To navigate to the Company Features screen and enable/disable the available options, for the company |
Post-dated Summary, Post-dated Transactions, Post-dated Received, Post-dated Issued |
|
F12: Configure |
F12 |
To configure the report to include or exclude specific information |
Post-dated Received, Post-dated Issued |
|
F12: Range |
Alt+F12 |
To filter for specific transactions based on the Amount, Bank, Instrument Date, etc. |
Post-dated Received, Post-dated Issued |
T he F12: Configure options available for this report are as shown:

● Show received from/payment to : Set this option to Yes to view the name of the payee. This is the name provided in the Favouring Name field of the Bank Allocations screen.
● Show PDC Notes : Set this option to Yes to view the remarks provided using the K : Enter Notes button .
● Show issue/receipt date : Set this option to Yes to view the date on which the cheque was issued. This is the date provided in PDC Issue Date field of the Bank Allocations screen.