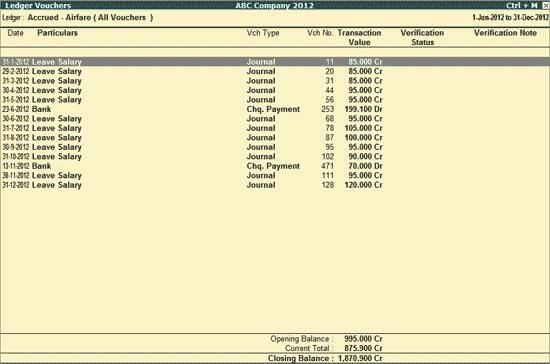
While verifying the balances, the user may need to check the vouchers belonging to any of the ledgers.
On this page
View the Ledger Vouchers report for Verification of Balances
Button options in the Ledger Vouchers report for Verification of Balances
1. Go to Gateway of Tally > Analysis & Verification > Verification of Balances .
2. Select the Amount field for the required Group.
3. Drill down by pressing Enter on the Group Amount field or a Subgroup Amount field and then Ledger name.

Note: While generating the Ledger Vouchers report for the Cash Ledger , the Daily Breakup can be viewed by pressing F6 : Dly Brk-up button provided.
● F1 : Detailed : Click F1 : Detailed or press Alt+F1 to viewed the detailed Ledger Vouchers report.
● F2: Period : Click F2 : Period or press F2 to change the selected period.
● F4: Ledger : Click F4 : Ledger or press F4 to view the Ledger Vouchers for a different Ledger.
● F9 : Verify : Click F9 : Verify or press Alt+F9 to verify the selected Vouchers. For more details on verification refer Verification Status .
Note: The F9 : Verify button will be highlighted when one or more Vouchers are selected for verification using Spacebar .
● Ctrl+F10: Remove Verify : Click Ctrl+F10 : Remove Verify or press Ctrl+F10 to change the status for the selected vouchers as not verified (blank).
● S : Set Manual Sampling : Click S : Set Manual Sampling or press Alt+S to mark the selected Vouchers (using spacebar) as sampled. The manual sampling method will get applied to all such Vouchers and they will appear under the sampled column on the dashboard.
● D : Delete Manual Sampling : Click D : Delete Manual Sampling or press Alt+D to delete the Manual sampling method already applied for the selected Vouchers (using the spacebar).
● W : Working Note : Click W : Working Note or press Alt+W to specify the working note details at Company or Group or Ledger or Voucher level. The details provided in working note will be captured in Working Paper along with the details of User Name , Working Note Date and Time , Status , Note and so on.
● Ctrl+W: Wkg Paper : To view the Working Paper during analysis, click Ctrl+W : Wkg Paper or press Ctrl+W . The details displayed in Working Paper will be relevant to report from where it is triggered. For more details on Working Paper refer the topic Working Paper .
● I : Other Info : Click I : Other Info or press Alt+I to view the other Ledger Information like if its a Related Party and the details of the Sampling Method applied.
● F10: Acc Reports : Click F10 : Acc Reports or press F10 to navigate to the default Accounting Reports.
● F10: Analysis Report s: Click F10 : Analysis Reports or press Alt+F10 to navigate to the other Analysis Reports.
● F12 : Range : Click F12 : Range or press Alt+F12 to use the Range Filter option to search the specific vouchers from the list of Ledger Vouchers displayed.
● Ctrl+F12 : Value: Click Ctrl+F12 : Value button or press Ctrl+F12 to filter the vouchers and calculate the balances as per the specified conditions.
● Ctrl+F: Find Verification Note : This option is used to filter for Vouchers based on the Verification Note given to them.
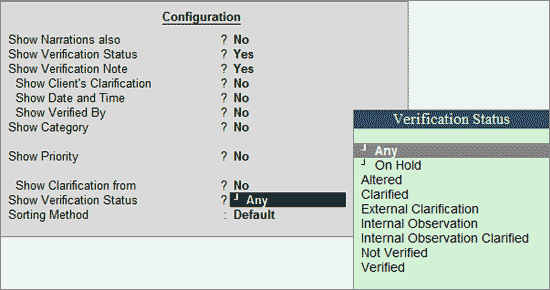
Click F12 : Configure or press F12 to change the default display.
● Show Narrations also : Set this option to Yes to show the Narrations as entered at the time of voucher entry.
● Show Verification Status : Set this option to Yes to show the analysis status selected by the user.
Note: If this option is set to No , then the F9 : Verify button will be disabled.
● Show Verification Note : Set this options to Yes to show the verification Note as entered by the user.
● Show Client’s Clarification : Set this option to Yes to view the Clarification provided by the Client for the vouchers with Verification Status as Clarified .
● Show Date and Time : Set this option to Yes to view the Analysis Date and Time.
● Show Verified By : Set this option to Yes to view the person who has performed verification of the vouchers.
● Show Category : Set this option to Yes to view the Category of Clarification alongside the Vouchers.
● Show Category of option will appear when the Show Category option is set to Yes . The list of Categories include All Items, Authorization, High Value, Not Connected to Business, Supporting.
● Show Priority : Set this option to Yes to view the Priority of the clarification required (High/Medium/Low).
● Show Clarification from : Set this option to Yes to view the user who has provided clarification, if any, for the Vouchers.
● Show Verification Status : Select any Verification Status and the vouchers that have been marked with the chosen verification status will be filtered and displayed (Any, On Hold, Altered, Clarified, External Clarification, Internal Observation, Internal Observation Clarified, Not Verified, Verified).

● Sorting Method : Select the required sorting method for the transactions from the list of Sorting Methods.