Bank ledgers contain relevant information about a bank that you use to make or receive payments. You can provide information such as Bank name, Account no., IFS code, and address while creating bank ledgers.
To create a bank ledger
1. Go to Gateway of Tally > Accounts Info. > Ledgers > Create.
2. Enter the Name of the bank for the bank ledger.
3. Select Bank Account from the List of Groups , in the Under field.
Note: The Books Beginning date is pre-filled in Effective Date for Reconciliation field.
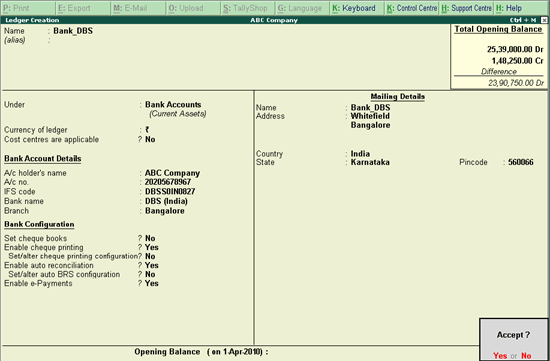
4. Provide the following details in Bank Accounts details :
o A/C holder's name - It prefills the company name; however, you can alter this name by pressing Backspace .
o A/c no. - Provide the account number of your bank.
o IFS code - Provide the IFS code for your bank.
Note: If the IFS code in incorrect, the system prompts the warning message "Invalid IFS Code. The IFS Code must contain 4 alphabets, followed by 0 and 6 numbers/alphabets. For example, KKBK0000434."
o Bank name - Select the bank name from the List of Banks .
The Ledger Creation screen appears as shown below:

Note : The List of Banks is displayed only when TSS and internet connectivity is available . Additionally, the Bank Configuration displays options that are applicable for the bank you select.
5. Under Bank Configuration:
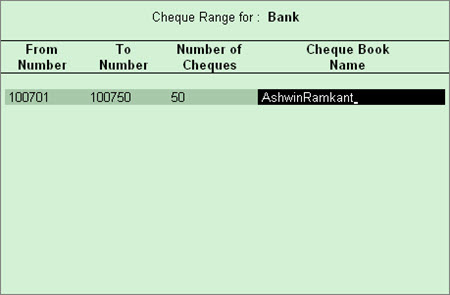
o Enable Set cheque books. Enter the details of the cheque range in the Cheque Book Management screen as shown below:

Note: You can set cheque ranges from the Cheque Register report as well.
o Enable Set cheque printing configuration? to Yes. Refer to the topic Setting Up Cheque Printing Configuration in Bank Ledger for more details.
Note : In case the cheque printing feature is not enabled in F11: Accounting Features the error message - Enable Cheque Printing from F11 Accounting Features will be displayed while setting the option - Set/Alter Cheque Printing Configuration to Yes in the bank ledger master.
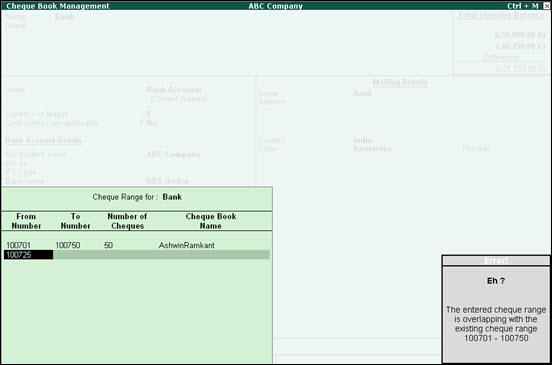
One bank ledger may have multiple cheque books. If you enter a cheque number that already exists in another cheque range, the error message The entered cheque range is overlapping with the existing cheque range is displayed , as shown below:

● Enter the correct cheque numbers and press Enter to navigate to the Ledger Creation screen.
● Set Enable auto reconciliation to Yes to reconcile the bank accounts by importing the bank statements.
● Enabling Set/alter auto BRS configuration opens the Location of Bank Statements screen. Specify the path for Location and Location of imported bank statements as shown below:

● Enable e-Payments: This option is applicable only for banks supported for electronic modes of payment. The following banks are supported for e-payments capability:
o DBS Bank - India
o Standard Chartered Bank - India
o Standard Chartered Bank - UAE
o YES BANK - India
o ICICI Bank - India
o Kotak Mahindra Bank
o HDFC Bank
Upon selecting one of the banks from the above list, the e-payments capability is enabled by default.
6. Enter the Name , Address , State and Pincode i n the Mailing Details section.
7. Press Enter or Y to accept and save the party ledger.