You need to create a VAT ledger in order to account for transaction on which VAT is applicable. The VAT ledger can be selected while passing the transaction.
To create a common VAT ledger
1. Go to Gateway of Tally > Accounts Info. > Ledgers > Create .
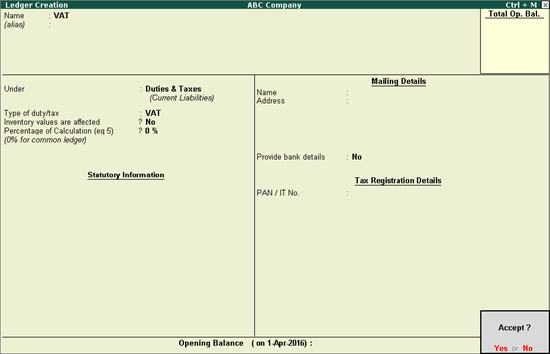
2. Enter the Name of the VAT ledger.
3. Select Duties & Taxes in the Under field.
4. Select Type of duty/tax as VAT .
5. Press Enter to skip the Percentage of Calculation field.
Note : To create a VAT ledger with a specific rate, enter the tax rate in Percentage of Calculation field.
The Ledger Creation screen appears as shown below:

6. Press Enter to save.
Similarly, you can create a CST ledger under Duties & Taxes by selecting CST as the Type of duty/tax .
Reference of tax credit available on purchase of capital goods can be provided in the VAT ledger master. This reference can then be selected in journal voucher to avail the tax credit.
To provide tax credit details in VAT ledger
1. Click F12: Configure in Ledger Creation screen.
2. Set the option Provide ITC on capital goods? to Yes .
3. Press Ctrl+A to accept and return.
4. Select Duties & Taxes in the Under field.
5. Set the Type of duty/tax to VAT .
6. Enable the option Set/alter ITC details? (displayed under Tax Registration Details section).
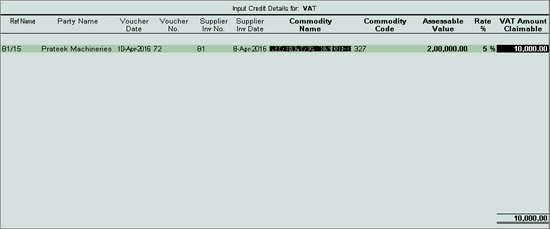
7. Enter the references of tax credit in ITC on Capital Goods screen.
The ITC on Capital Goods screen appears as shown below:

8. Press Ctrl+A to accept and return to the Ledger Creation screen.
To create a tax ledger grouped under Current Assets
1. Go to Gateway of Tally > Accounts Info. > Ledgers > Create .
2. Enter the Name of the VAT ledger.
3. Select Current Assets or Current Liabilities in the Under field.
4. Click F12: Configure .
o Enable the option Allow creation of tax ledgers under other groups?
o Press Ctrl+A to accept the Master Configuration screen.
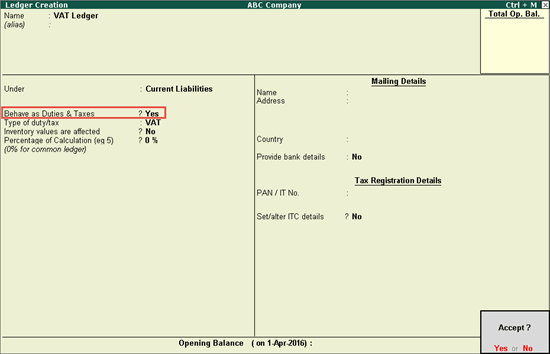
5. Enable the option Behave as Duties & Taxes? .
6. Select Type of duty/tax as VAT .
7. Enter the VAT rate in Percentage of Calculation field, if rate specific VAT ledger has to be created. The Ledger Creation screen appears as shown below:

8. Press Enter to save.