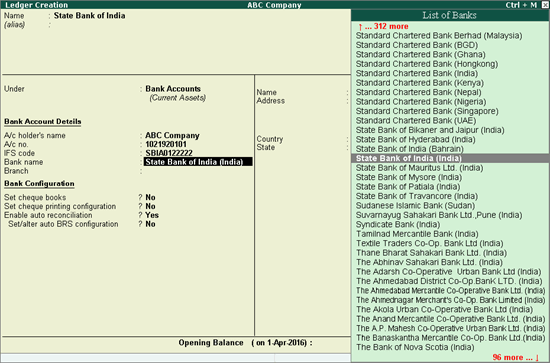
You can configure the cheque printing options in the bank ledger master. A list of ready-to-use cheque formats of various banks are provided, which can be used as is. You can also define custom cheque formats as per your requirements.
To configure the bank ledger for cheque printing
1. Go to Gateway of Tally > Accounts Info. > Ledgers > Create.
2. Select Bank Accounts in the Under field.
3. Enter the A/c holder's name.
4. Enter the A/c No.
5. Enter the IFS code of the bank branch.
6. Select the Bank name from the List of Banks as shown below:

7. Enter the Branch name.
8. Enable the option Set cheque books? if you want to enter the cheque book details.
9. Enable the option Set cheque printing configuration? to Yes. In the Cheque Format Selection screen, you can either select a predefined format or create a custom format.
10. Select/create the required cheque printing format, preview the print format of the cheque, and press Ctrl+A to accept the Ledger Creation screen.
To select a predefined format in the Cheque Format Selection screen
1. Enable the option Set cheque printing configuration? to Yes in the bank Ledger Creation screen.
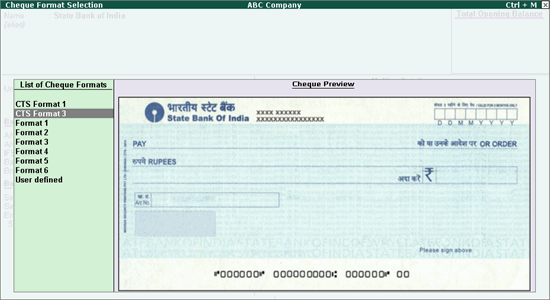
2. Press the arrow keys to view the cheque formats and select the required format as shown below:
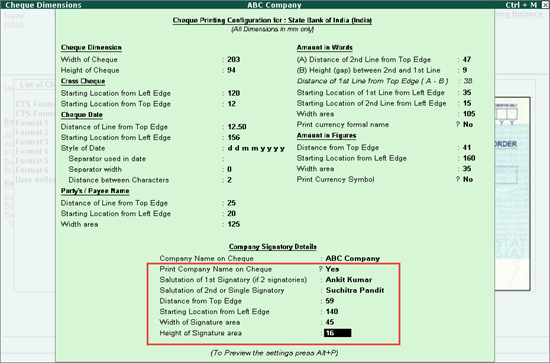
3. Press Enter to view the Cheque Dimensions screen and enter the details of the company signatory as shown below:
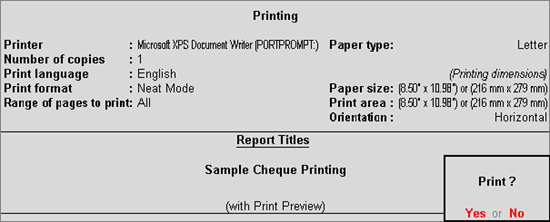
4. Press Enter to view the Sample Cheque Printing screen.
5. Click I: With Preview to preview the format before printing. The Sample Cheque Printing screen appears as shown below:
6. Press Enter. The preview of the cheque format appears as shown below:
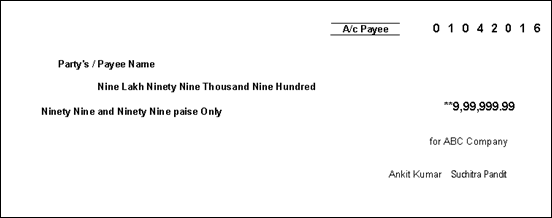
7. Press Esc to return to the bank Ledger Creation screen.
8. Press Ctrl+A to accept the bank ledger.
To create a custom format for a cheque in the Cheque Format Selection screen
1. Enable the option Set cheque printing configuration in the bank Ledger Creation screen.
2. Select User defined from the List of Cheque Formats in the Cheque Format Selection screen, as shown below:
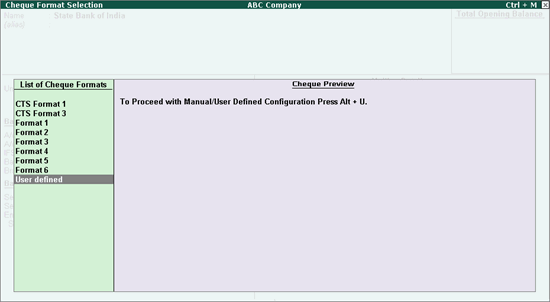
3. Press Enter to view the Cheque Dimensions screen. You can either enter the required cheque dimensions or copy them from the available formats.
Note: You can also click U: User defined to directly open the Cheque Dimensions screen.
To copy the cheque dimensions
o Press Ctrl+C to view the List of Configured Banks as shown below:

Note: The List of Configured Banks displays the names of only those bank ledgers for which the cheque format is already selected or custom defined.
o Select the required bank ledger or the Sample Format. On selecting the bank, the cheque format defined for that bank ledger gets prefilled in the Cheque Dimensions screen as shown below:
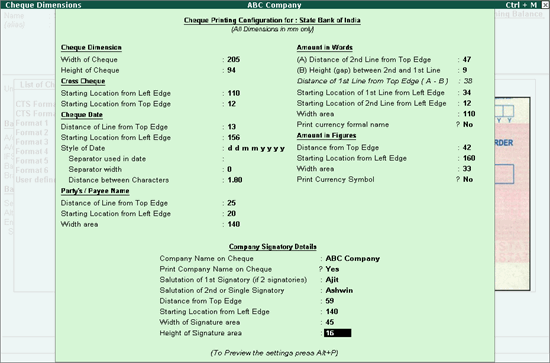
4. Press Ctrl+A to accept the configurations of the Cheque Dimension screen and view the Sample Cheque Printing screen.
5. Press Enter to preview the cheque format.
6. Press Esc to return to the bank Ledger Creation screen.
7. Press Ctrl+A to accept the bank Ledger Creation screen.