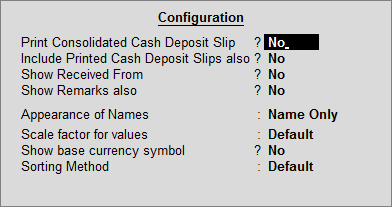
You can configure the Cash Deposit Slip screen based on your requirements.
To configure Cash Deposit Slip
1. Go to Gateway of Tally > Banking > Deposit Slip > Cash Deposit Slip.
2. Select the required bank account from the List of Bank displayed in the Select Bank screen and press Enter.
3. Press F12: Configure, the Configuration screen is displayed as shown.

● Print Consolidated Cash Deposit Slip: Enable this option, to print one consolidated Cash Deposit Slip for all selected transaction. By default, this is set to No.
● Include Printed Cash Deposit Slips also: Enable this option to view all the transactions for a given period, even if Cash Deposit Slip has been printed for them.
Note: This option will work in accordance with the F6: Show All option in the Button Bar.
● Show Received From: Enable this option to view from whom the cash is received.
● Show Remarks also: Enable this option to view the remarks entered in the Contra voucher. A Remarks column will appear in the Cash Deposit Slip screen. By default, this option is set to No.
● Appearance of Name: In the Cash Deposit Slip screen, you can choose the Display Style of the name under Particulars column; Alias (Name), Alias Only, Name (Alias) or Name Only, using this option.
● Scale factor for values: You can choose to view the Value in the Amount column based on different factors – Crores, Hundreds, Lakhs, Millions, Ten Lakhs, Ten Millions, Ten Thousands, and Thousands.
● Show base currency symbol: Enable this option to display the base currency symbol in Cash Deposit Slip.
● Sorting Method: List of transactions can be sorted by user by selecting any of the Sorting Methods from the list. The transactions can be sorted in ascending or descending order based on – Amount-wise, Date, Instrument Date, Instrument Number, Party-wise. By default, the transactions are sorted in ascending order based on Date.
Printing Cash Deposit Slip Report