You can record a payment transaction by creating a post-dated voucher. You need to select the T: Post-Dated option in the voucher creation screen and then record the entries.
To create a post-dated voucher
1. Go to Gateway of Tally > Accounting Vouchers > Payment.
2. In the Voucher Creation screen, click T: Post-Dated. The voucher will be marked with the words Post-Dated as shown below:

3. Click F2: Date and provide the date of the cheque.
4. Select a bank account in the Account field.
5. Under Particulars, select the ledger of the party to whom the post-dated cheque has been issued.
6. Provide the Amount and Bill-wise Details for the payment.
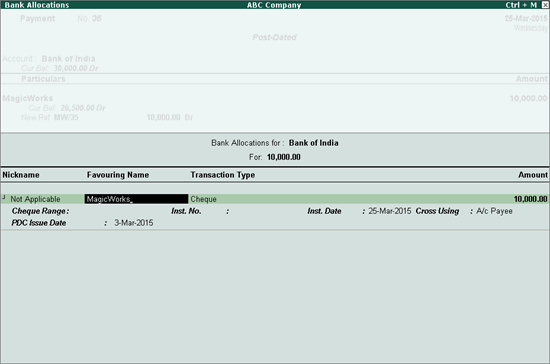
7. Press Enter. The Bank Allocations screen appears as shown below:

8. Fill in the required details. A new field, PDC Issue Date, will be available in the screen. This field is available for post-dated transactions only. Fill in the date on which the post-dated cheque was issued to the party. By default, the system date is captured.
9. Press Enter to save the bank details. The Voucher Creation screen appears. Provide Narration if required.
The completed Voucher Creation screen appears as shown below:

10. Press Y or Enter to accept.
Note: Receipt and Contra entries can also be recorded for post-dated cheques using the same procedure as above. The procedure uses the Payment Voucher for illustrative purposes.