The Pending Purchase Bills report displays all the Receipt Notes for which the Bills are not received
To view the Pending Purchase Bills report
1. Go to Gateway of Tally > Analysis & Verification > Data Analysis > Pending Documents > Goods Received but Bills not Received.
o Select the required party and press Enter.

The Pending Purchase Bills report includes:
● Date: Displays the date of entry of Receipt Note.
● Tracking Number: Displays the Tracking Number as entered in the Receipt Note.
● Ordered Quantity: Displays the ordered Quantity of each Stock Item as mentioned in each Purchase Order.
● Pending Quantity: Displays the balance Quantity of each Stock Item.
● Rate: Displays the rate for each Stock Item.
● Due On: Displays the due date as mentioned in the Purchase Order for the delivery of the Stock items. The Due Date can be different for each Stock Item.
● Value: Displays the cumulative value (total Amount) of the Pending Stock Items for each Purchase Order.
● Verification Status: Displays the Verification Status selected by the user.
● Verification Note: Displays the Verification Note entered by the user.
Note: The details for the Ordered Quantity, Pending Quantity, Rate and Due on dates will be displayed only in the detailed mode.
Click F1: Detailed button or press Alt+F1 to view the detailed Pending Purchase Bills report including the Stock Item details.
Click F2: Period or press F2 to change the period to view the pending Purchase Bills during the selected period.
Click F5: Ledger or press on F5 to change the selected party to view the Pending Purchase Bills for the selected Party.
Click F8: Show Ledger or press F8 to display the Ledger Vouchers report for the selected Ledger.
Click F9: Verify or press Alt+F9 to verify the selected Vouchers. For more details on verification refer Verification Status.
Note: The F9: Verify button will be highlighted when one or more Vouchers is/are selected for Auditing using the spacebar key.
Click Ctrl+F10: Remove Verify or press Ctrl+F10 to change the Verify Status for the selected Vouchers as Not Verified (blank).
Click W: Working Note or press Alt+W to specify the working note details at Company or Group or Ledger or Voucher level. The details provided in working note will be captured in Working Paper along with the details of User Name, Working Note Date & Time, Status, Note and so on.
To view the Working Paper during Analysis, click Ctrl+W: Wkg Paper or press Ctrl+W. The details displayed in Working Paper will be relevant to the report from where it is triggered.
Click on F9: Inv Reports or press F9 to navigate to the default Inventory Reports.
Click F10: Acc Reports or press F10 to navigate to the default Accounting Reports.
Click F10: Analysis Reports or press Alt+F10 to navigate to the other Analysis Reports.
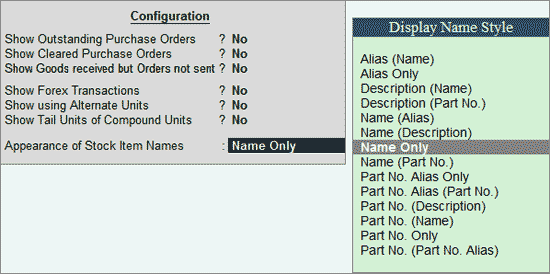
Click F12: Configure or press F12 to modify the default display for the above report.

● Show Outstanding Purchase Orders: Set this option to Yes to view the Purchase Orders which are pending even after the due date.
● Show Cleared Purchase Orders: Set this option to Yes to view the Cleared Purchase Orders for the selected Party.
● Show Goods received but Orders not sent: Set this option to Yes to view the display the Orders for which Receipt Note is entered but Bills are not received.
● Show Forex Transactions: Set this option to Yes to display only the orders involving the multi-currency.
● Show using Alternate Units: Set this option to Yes to display the order details in Alternate Unit of Measurement defined for the Stock Item.
● Show Tail Units of Compound Units: Set this option to Yes to display the order details in Tale unit of compound units defined for the Stock Item.
● Appearance of Stock Items: Select the appropriate Display Name Style from the list for stock Items.