You can create a single ledger with multiple addresses and record their statutory details thus avoiding creation of ledgers for each location. This can be done by configuring the use of multiple addresses in the required party ledger and specifying the different addresses. The address required can be selected from the defined addresses during transaction entry.
To use multiple addresses for ledgers
1. Go to Gateway of Tally > Accounts Info > Ledgers > Create. The Ledger Creation screen appears.
2. Click F12: Configure. The Master Configuration screen appears.
3. Set the option Use MULTIPLE Addresses to Yes.

4. Click Enter to save the configuration and go to the Ledger Creation screen.
Note: The option Use Multiple Addresses can also be enabled from Gateway of Tally > F12: Configure > Accts / Inventory Info.
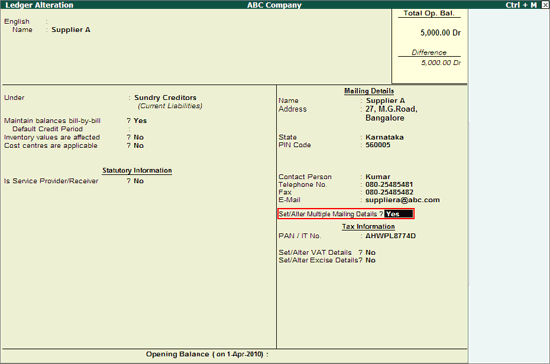
5. Type the name of the Party in the Name field (E.g. Supplier A).
6. Select the group from the List of Groups (E.g. Sundry Creditors).
7. Set the option Set/Alter Multiple Mailing Details to Yes.

8. Press Enter.
9. The Address Type screen for the ledger being created appears.
10. Type the name of the Party’s Location (E.g. Supplier A WH-1).

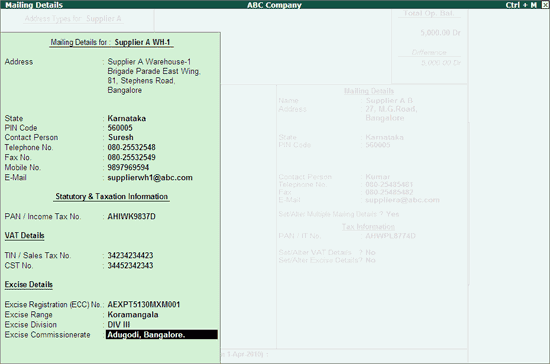
11. Press Enter. The Mailing Details screen appears.
12. Enter the Mailing Name, Address, State, PIN Code, and the Statutory & Taxation Information in the respective fields provided. The filled Mailing Details screen appears as shown:

13. Press Enter, the Address Type screen appears.
14. Enter another Address Type name to create the required Mailing Details.
15. Press Enter, the Ledger Creation screen appears.
16. Press Ctrl+A to save the ledger.
To select an address type in transactions
1. Go to Gateway of Tally > Accounting Vouchers > F9: Purchase.
2. Select the required Date, type the Supplier Invoice No. and Date.
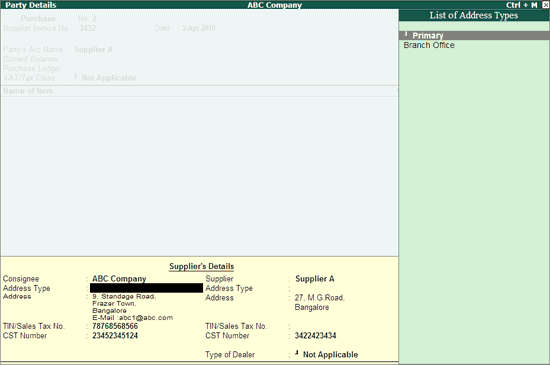
3. Select the party ledger in the field Party's A/c Name. The Supplier's Details screen displays the Primary Address.
4. In the Address Type field of Consignee, select the required address type of the Company (E.g. Branch Office) as shown:

5. Press Enter.
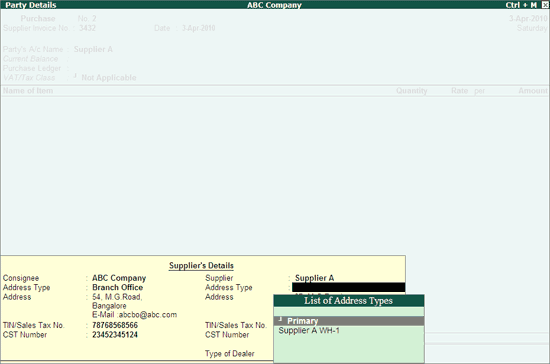
6. In the Address type field of Supplier, select the required Address Type.

7. Press Enter.
Note: Enable the option Allow Separate Buyer and Consignee Names in F12: Configure to enter Consignee details.
8. The Supplier’s Details screen after selecting the required Address Type appears as shown:

9. Press Enter.
10. Select the Purchase ledger.
11. Select the Item, Quantity, and Rate.
12. Press Enter.
13. Press Ctrl+A to save the transaction.