Synchronisation rule on the client company defines your data synchronisation preferences. The client rule sets options for synchronising all masters and transactions.
Client rules are set as:
To set the client rule for master
Go to Gateway of Tally > Import of Data > Synchronisation > Client Rules > Create.
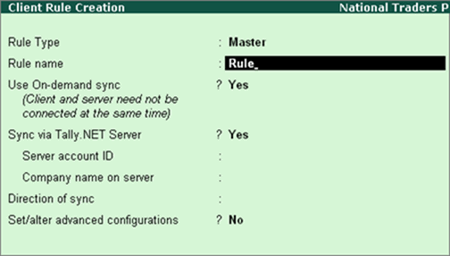
The Client Rule Creation screen appears as shown below:

Select Rule Type as Master.
Enter the Rule name.
Set Use On-demand sync? to Yes to synchronise data on-demand.
Set Sync via Tally.NET Server? to Yes. This option is skipped when you choose online synchronisation.
Enter the Server account ID, and the Company name on server.
Select Direction of sync as Receive Data or Send Data to receive/send masters from the client company.
Enable Set/alter advanced configurations? to change advanced configuration for sync rule in client company. The advanced configurations are separately set for Receive Data and Send Data options.
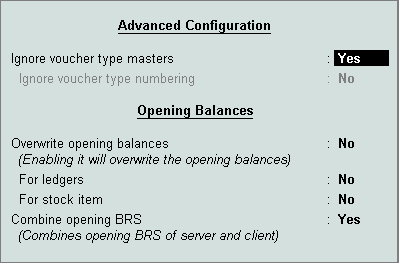
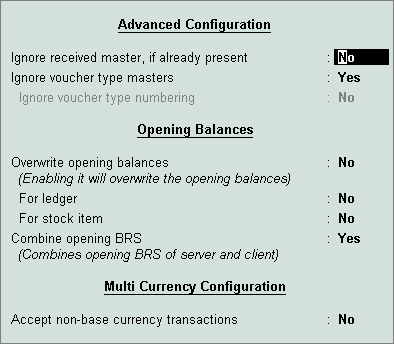
The Advanced Configuration screen for Receive Data appears as shown below:
To define the advanced configuration
Set Ignore voucher type masters to Yes to ignore changes in voucher types made at the server company.
Set Ignore voucher type numbering to Yes to ignore voucher numbering, and related configurations. Set this option to No to overwrite voucher numbering configuration.
Set Overwrite opening balances to Yes/No, as required.
Set Combine opening BRS to Yes to combine the opening BRS of server and client company.
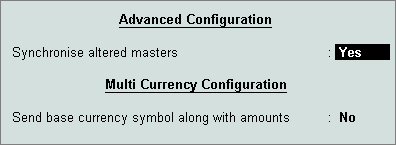
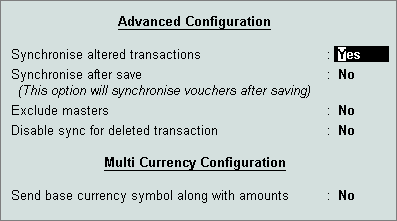
The Advanced Configuration screen for Send Data appears as shown below:
To define the advanced configuration
Set Synchronise altered masters? to Yes to synchronise changes to masters, post synchronisation.
Set Send base currency symbol along with amounts? to Yes to send the base currency symbol to server company.
To set the client rule for transaction
Go to Gateway of Tally > Import of Data > Synchronisation > Client Rules > Create.
The Client Rule Creation screen appears as shown below:
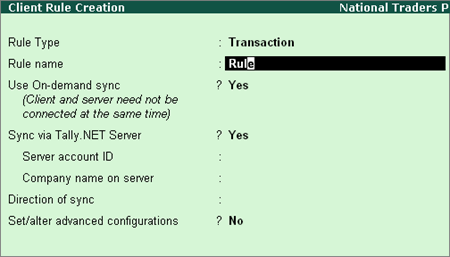
Select Rule Type as Transaction.
Enter the Rule name.
Set Use On-demand sync? to Yes to synchronise data on-demand.
Set Sync via Tally.NET Server? to Yes/No, as required. This option is skipped when you choose online synchronisation.
Enter the Server account ID, and the Company name on server.
Note: Enter your Tally.NET Server account ID, and the company name on server company for connecting to Tally.NET Server. This step is not required if you choose to synchronise data online, using a private network.
Select Direction of sync as Both, Receive Data or Send Data to allow receiving or sending transactions from the client company.
Enable Set/alter advanced configuration? for the client rule to create or change advanced configuration on the client company. You can set the advanced configuration for Receive Data, Send Data, or Both.
Set Ignore received master, if already present? to Yes to stop receiving masters that are already present.
Set Ignore voucher type masters? to Yes to ignore changes in voucher types made at the server company.
Set Ignore voucher type numbering? to Yes to ignore voucher numbering and related configurations. Set this option to No to overwrite voucher numbering configuration.
Set Overwrite opening balances? to Yes/No, as required.
Select Combine opening BRS? to Yes to combine the opening BRS of server, and client company.
Enable the option Accept non-base currency transactions? to synchronise transactions that are not in the same base currency.
To define the advanced configuration
Set Synchronise altered transactions? to Yes to synchronise changes to transactions made post synchronisation.
Set Synchronise after save? to Yes to synchronise transactions that have been saved.
Set Exclude masters while sending? to Yes to exclude dependant masters along with transactions.
Set Enable sync for deleted transaction? to Yes to synchronise deleted vouchers.
Set Send base currency symbol along with amounts? to Yes to send the base currency symbol to server company.
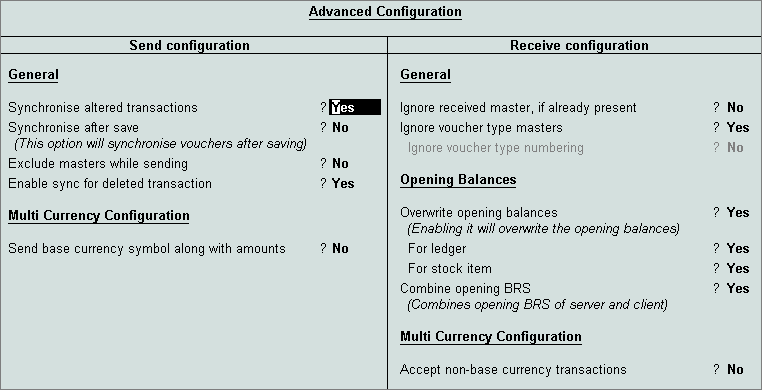
The options are explained in Advanced Configuration for Receive Data and Advanced Configuration for Send Data.
After creating a sync rule, you have to perform synchronisation to send the rule to the Tally.NET Server.
To send sync rule
Go to Gateway of Tally > Import of Data > Synchronisation.
Select Synchronise All to send all rules.
Select Synchronise Selected to send selected rule.
Press Enter to start synchronisation to send the rule.
For more details, see Synchronising Data.
To alter sync rule
Go to Gateway of Tally > Import of Data > Synchronisation > Client Rules/Server Rules > Alter.
Select the rule from the List of Rules.
Alter the details, and Accept the screen.
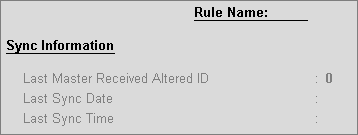
Access the Rule Info. for masters and transactions by pressing Alter on the right button bar.
The Rule Info screen appears as shown below:
You can Import/Export Snapshots using buttons on the right bar.
To know more, see Import Snapshot and Export Snapshot.
When data is migrated, the sync rules get automatically migrated to another version of Tally.ERP 9. Post migration of sync rules:
In the Rule Info screen for masters, Last Master Sent/Received Alter ID is 0. This field is updated on synchronising data.
In the Rule Info screen for transactions, Last Transaction Sent/Received Alter ID is 0. This field is updated on synchronising data.