To enter the VAT details
1. Select the Type of Dealer from the Type of Dealer list.
2. Enter the VAT TIN No. The VAT Details screen appears as shown below:

3. Press Enter to save.
On this page:
VAT details - Configuration Option
To create a supplier ledger
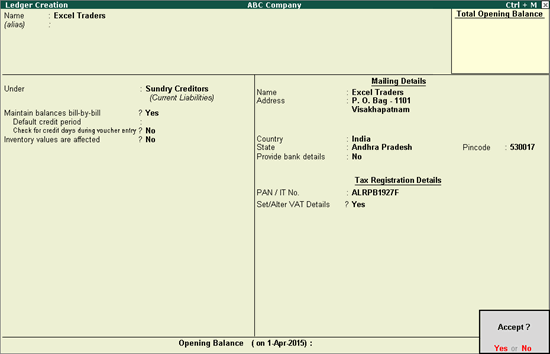
1. Go to Gateway of Tally > Accounts Info. > Ledgers > Create.
2. Enter the Name of the supplier ledger.
3. Select Sundry Creditors as the group name, in the Under field.
4. Set Maintain balances bill-by-bill? to Yes.
5. Enter the Default credit period, if any.
6. Set Check for credit days during voucher entry? to Yes, if required.
7. Enter the Mailing Details.
8. Select the required Country.
9. Select the required State.
10. Enter the Pincode.
11. Specify the bank details in the field Provide bank details, if required.
12. Enter the PAN/IT No.
13. Enable the option Set/Alter VAT Details? and enter the VAT details.
The Ledger Creation screen appears as shown below:

14. Press Enter to save.
To create a customer ledger
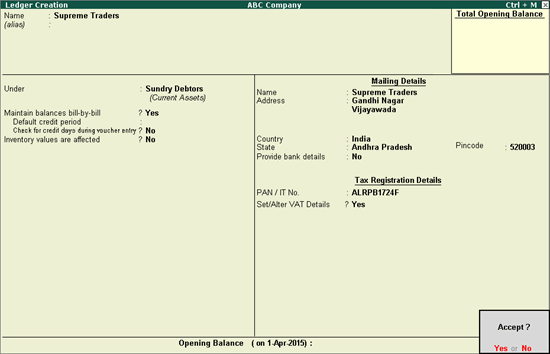
1. Go to Gateway of Tally > Accounts Info. > Ledgers > Create.
2. Enter the Name of the customer ledger.
3. Select Sundry Debtors as the group name in the Under field.
4. Set Maintain balances bill-by-bill? to Yes.
5. Enter the Default credit period, if any.
6. Set Check for credit days during voucher entry to Yes, if required.
7. Enter the Mailing Details.
8. Select the required Country.
9. Select the required State.
10. Enter the PIN Code.
11. Provide bank details, if required.
12. Enter the PAN/IT No.
13. Enable the option Set/Alter VAT Details?, and enter the VAT details.
The Ledger Creation screen appears as shown below:

14. Press Enter to save.
Note: For interstate transactions, you can create ledgers for suppliers and customers belonging to other states.
To configure VAT details
1. Click F12: Configure in VAT Details screen.
2. Enter the CST No. in VAT Details screen.
3. Enter the Import/Export Code.
4. Select the Type of Exemption.
5. Enter the registration number and date.
Note: The option Sales/purchases against Form C? appears in the VAT Details screen if the State selected is other than Andhra Pradesh. The selection is retained for the option Is against C Form? in the Party Details screen, while recording transactions.
6. Press Ctrl+A to accept.