In the stock item master, enable the MRP feature for the stock item and enter the MRP to be printed. In the invoice select the stock item enabled for MRP and configure the print settings to display the MRP column in the invoice.
To enable the MRP feature
1. Go to Gateway of Tally > Inventory Info. > Stock Items > Create/Alter.
2. Click F12: Configure in Stock Item Creation screen.
3. Enable the option Allow MRP/Marginal for stock items and accept the Master Configuration screen
To enable the stock item for printing MRP
1. Enable the option Set/alter MRP details to Yes in Stock Item Creation/Alteration screen.
2. Enter the MRP Rate in MRP Details screen.
3. Press Enter to save.
Note: VAT gets calculated on MRP if the options in stock item master are set as shown below:
§ Set/alter VAT Details is set to Yes.
§ Calculate VAT on MRP is set to Yes.
Ensure MRP is enabled only for print and not for VAT calculation. If VAT is being calculated on MRP, set the option Calculate VAT on MRP to No.
To display the MRP in sales invoice printout
1. Go to Gateway of Tally > Accounting Vouchers > F8: Sales.
2. Select the party ledger in the field Party's A/c Name.
3. Select the Sales Ledger.
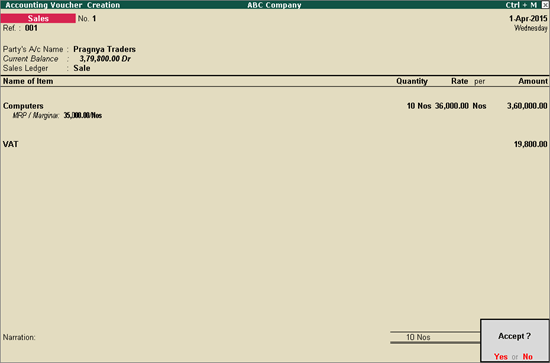
4. Select the stock item enabled to print the MRP. Enter Quantity and Rate.
5. Select the VAT ledger.
The sales invoice appears as shown below:

6. Press Enter to save.
To print MRP column in invoice
1. Press Page Up key to view the sales invoice.
2. Click P: Print to print. In the Voucher Configuration screen,
o Click F12: Configure.
o Press F12 and set the option Print MRP/Marginal Column to Yes.
o Press Ctrl+A to accept the advanced configurations.
o Press Ctrl+A to accept the standard configurations.
3. Press Enter the print the sales invoice.
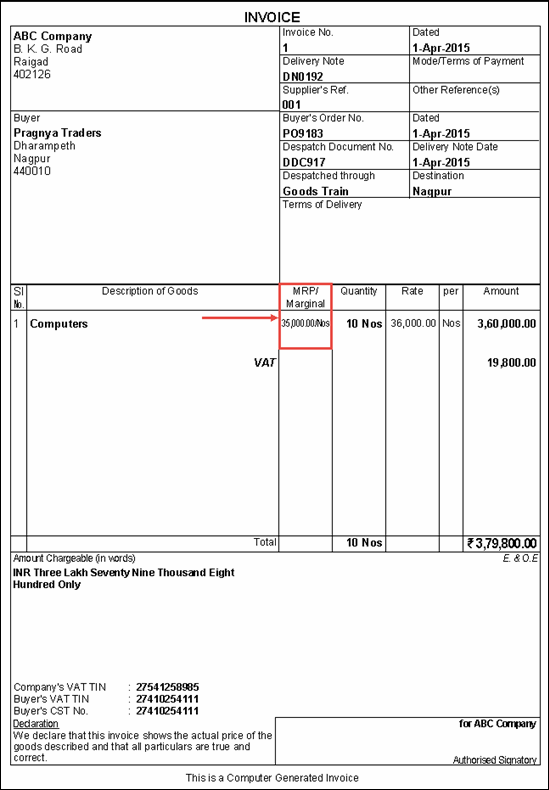
The MRP/Marginal column appears in the invoice printout.
