The Account/Site Administrator can configure or surrender a site belonging to an account. The configuration set can be created for each site by the Account/Site administrator. Further, the Account administrator can allow or restrain the site administrator or user from making any changes to the configuration set locally.
In the Control Centre screen under Licensing and Configuration,
Select License Management
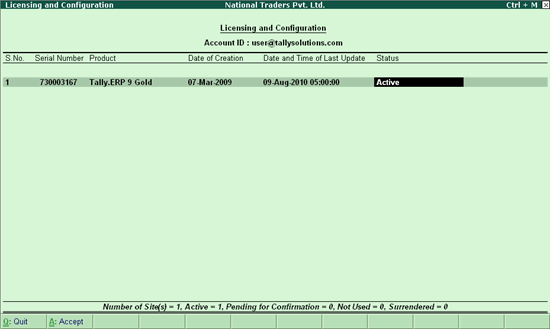
The Licensing and Configuration screen appears as shown:

The Licensing and Configuration screen displays the information related to each site/license serial number, the date on which the site was created, Date and Time of Last Update, and the product linked
To change the site name, type the required site name in the Site ID field and press Enter to provide the Site Details in the Site Profile form as shown:
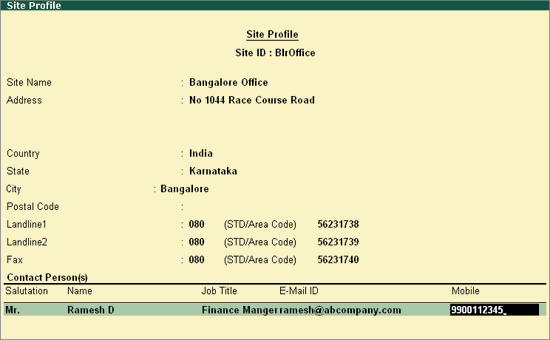
By default, the Site Administrator’s E-Mail ID appears in E-Mail ID of Site Administrator field. Type the required E-Mail ID in this field, if you need to change it.
Note: By default, the Account Administrator is authorized to change the E-Mail ID of the Site Administrator.
The current state of a Site is displayed in the Status field. You can select the required status from the Status list.
Active is displayed when the site status is in operational mode
Surrender is displayed when the site is surrendered
Confirm: select this status to validate the activation of a site
Note: In case a site is not confirmed within 15 days from the date of activation, it will be treated as rejected.
Pending for Confirmation: is displayed when the site is awaiting confirmation by the account administrator
Reject: select this option to decline the validation of an activated site.
In case the Account Administrator rejects or declines the confirmation of a site, you can once again activate the site using the option Activation of an Additional Site for your organisation.
Similarly, the account administrator can provide the site details, change the E-Mail ID of the Site Administrator or change the status for other sites within the account.
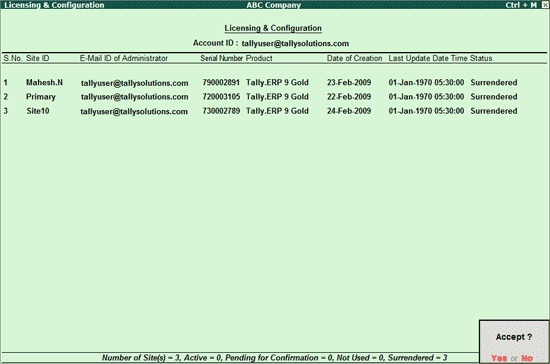
The completed Licensing and Configuration screen appears as follows:
F1: Detailed
Press Alt+F1 for a detailed view of the screen. This will display all details of the user that has been defined in Site Profile screen.
F3: Group By
Press F3 to group information based on the Product (Tally.ERP 9, Tally.Server 9, etc.) or Serial Number.

F6: Show Config
Press F6 to view the General Configuration and TDL Configuration set for the respective Site.
F12: Configuration
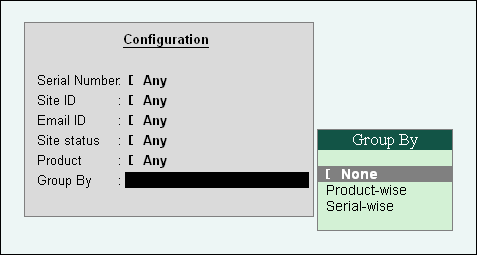
The following options can be used to configure Licensing & Configuration screen:
Serial Number - Select a Serial Number to view the Licensing & Configuration details for that Serial Number
Site ID - Select a Site ID to view the Licensing & Configuration details for that Site ID
Email ID - Select an Email ID to view the Licensing & Configuration details for that Email ID
Site status - Use this option to view Licensing & Configuration based on the Status of the Sites - Active, Surrendered, etc.
Product - Select a particular product to view product-wise Licensing & Configuration details
Group By - This option servers the same purpose as F3: Group By - the report will display information by categorising them based on the Products or Serial Numbers
Note: 1. Only one F12: Configure option can be used at a time to configure the report.
2. Once the Account administrator confirms the activation of a site, the status Active & Surrender are available.
3.To reactivate a Site you have to follow the reactivation process discussed in Licensing.
To Create Configuration set for a Site
In the Licensing and Configuration screen
Click on F6: Show Config or press F6
The General Config and TDL Config fields appear
In the General Config field, press Alt+C to create configuration
The General Configuration Management screen appears
Enter the required configuration name in Name of Configuration field. The configuration parameters are saved with the configuration name provided in the account.
Set Set client/server configuration? to Yes to create a fresh set of configuration.
In Tally is Acting as field, select the required behaviour from the list of Client/Server list. Tally.ERP 9 will act as Server/Client/Both based on the parameter selected.
Set Enable ODBC Server to Yes, when you want to transfer data from any third party application to Tally.ERP 9 or Vice Versa.
Enter the required port number in Port field.
Set Can be overridden locally to Yes, when you want the above parameters to changed / modified by the site administrator locally.
In Disallow Request section
Specify the required Server Name/ IP Address/URL in From field to deny a request from the Server/IP Address/URL.
Similarly, specify the required Server Name/ IP Address/URL in To field to deny a request to Server/IP Address/URL
In Allow Request section
Specify the required Server Name/ IP Address/URL in From field to allow a request from the Server/IP Address/URL.
Similarly, specify the required Server Name/ IP Address/URL in To field to allow a request to Server/IP Address/URL.
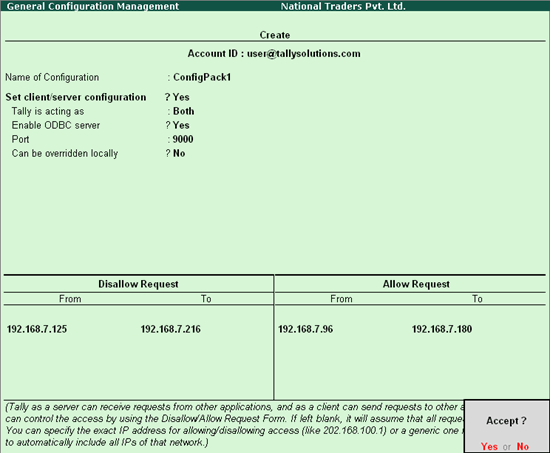
Accept to save the General Configuration
Select the specified configuration package in the General Configuration field.
In the TDL Config field, press Alt + C to create a TDL configuration pack
The TDL Configuration Management screen appears
Specify the required configuration name in the Name of Configuration field.
Set Allow Local TDLs to Yes, incase you want the user to load and execute local TDL’s.
In Specify account TDLs for loading, select the required TDL from the List of Account TDLs. The required account TDLs are included by logging to your account from www.tallysolutions.com.
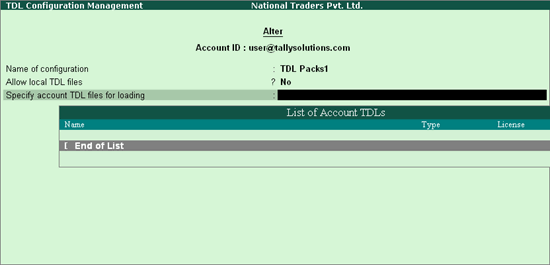
Accept to create the required TDL Configuration Package.
The Completed Configuration package for respective serial number is appears as shown:
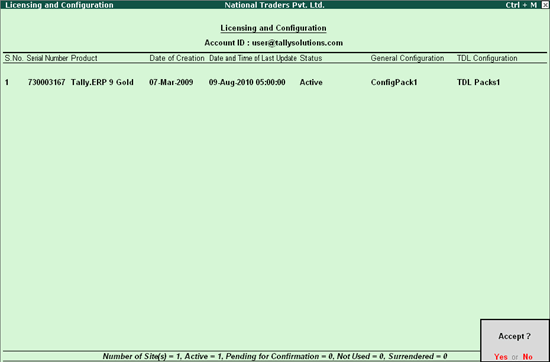
Accept to create configuration package for your Account.
Note: When Tally.ERP 9 is started after including/updating the Accounts TDL under TDL Config, it will prompt with a message during heart beat 'Account TDLs are updated. Please restart your Tally.ERP 9 for the changes to take effect'. Restart Tally.ERP 9 for the effect to take place.
For an immediate effect of Accounts TDL, you may start Tally.ERP 9 and Update license.
In the Licensing and Configuration screen
Click F9: General Config or press F9.
The Select Item screen appears.
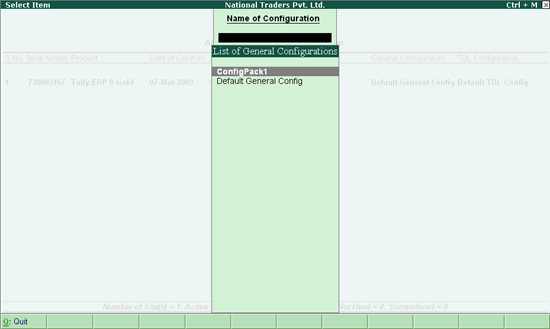
Select the required configuration from the List of General Configurations.
The General Configuration Management screen appears
You can make the required changes to the parameters in the General Configuration Management screen and save the changed parameters.
In the Licensing and Configuration screen
Click F8: TDL Config or press F8.
The Select Item screen appears.
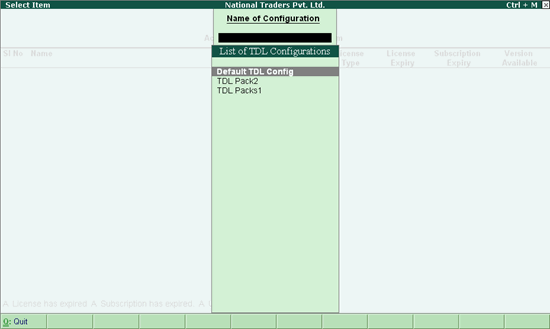
Select the required configuration from the List of TDL Configurations.
The Configuration Management screen appears
You can make the required changes to the parameters in the General Configuration Management screen and save the changed parameters.
The Licensing and Configuration screen also displays information on the following:
Total Number of Site(s),
Number of Active Sites
Site Pending for Confirmation
Number of Sites Not User
Number of Sites Surrendered.