You can enable cheque printing configuration in the bank ledger creation screen.
Ensure that Enable cheque printing? is set to Yes in Accounting Features (F11 > F1).
To enable cheque printing in bank ledger
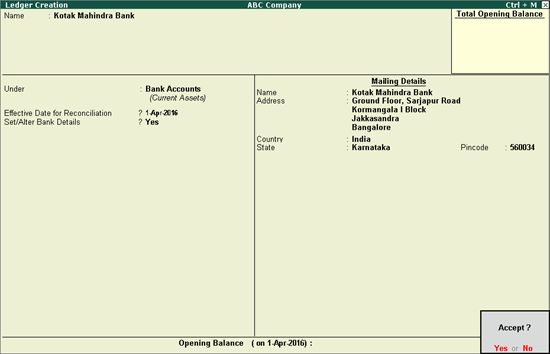
1. Create a bank ledger. The completed Ledger Creation screen appears as shown below:
2. Enable the option Set/Alter Bank Details? The Bank Details screen appears as shown below:

o Select the bank name in the field Select your Bank? from the List of Banks. This list is displayed only when TSS is active and internet connectivity is available.
o Enable the option Set Cheque Books? to specify cheque range details.
o Enable the option Set Cheque Printing Configuration? The cheque formats are displayed in the Cheque Format Selection screen, as shown below:
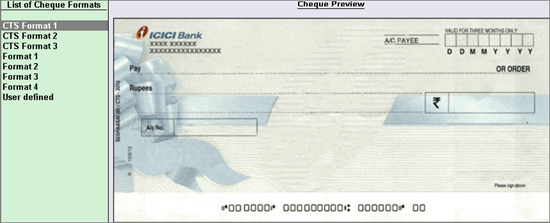
Note: You can choose the formats by comparing the physical cheque leaves, and by previewing the output. To view their respective Cheque Dimensions, press Enter on any of the available formats.
You can also set the cheque format manually using the option User defined.
o Set the option Activate Auto Reconciliation? to Yes, if required.
o Set the option Enable e-Payments to Yes, if required.
o Provide Account Details, as required.
o Press Enter to save.
Note: When the format for the selected bank is not available, the sample format or the dimensions configured for another bank can be copied.
1. Press Alt+U in Cheque Format Selection screen.
2. Press Ctrl+C. The Select Configured Bank screen with List of Configured Banks appears as shown below:
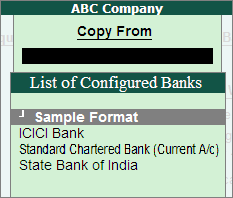
3. Select the format of the required bank from the list. The cheque printing configuration details is pre-filled with the dimensions of the selected cheque format.
Note: In the Cheque Printing Configuration screen, no field other than salutations should be blank.
4. Press Enter to print the cheque in the selected format.