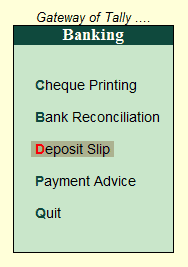
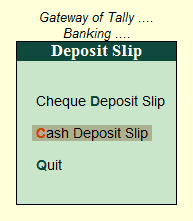
Any cash received has to be deposited in the bank with relevant Cash Deposit Slip attached. Tally.ERP 9 allows users to generate cash deposit slip for depositing cash into a bank on any particular date. The Cash Deposit Slip option in the Banking menu is used to generate cash deposit slips, bank-wise.
The Cash Deposit Slip provided in Tally.ERP 9 has all the contents of cash deposit slip – Account Number, Account Holder Name, Bank Name, Branch Name (information is fetched automatically from Bank ledger), Company’s Telephone Number, (information is fetched automatically from Company Creation screen), and Cash Denomination Details (information is fetched automatically from Contra voucher), so that user will not have to manually enter all the details.
Printing Cash Deposit Slip / Deposit Cash Slip Report
To access Cash Deposit Slip screen,
Go to Gateway of Tally > Banking > Deposit Slip > Cash Deposit Slip.


List of Bank will be displayed in the Select Bank screen as shown:
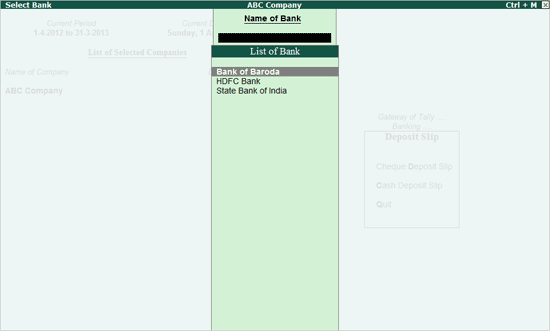
Select the required Bank account from the list for whose transaction you want to print Cash Deposit Slip and press Enter.
The Cash Deposit Slip screen of the selected Bank is displayed as shown:
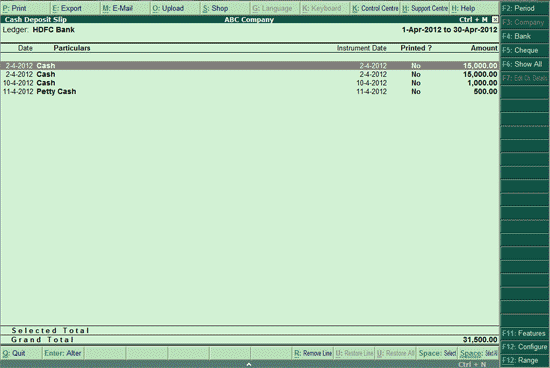
Note: The Cash Deposit Slip screen displays only those transactions which have Cash as Transaction Type allocated in the Bank Allocation screen in the Contra voucher entry.
Select required row from the Cash Deposit Slip list and press Enter to open the voucher in alteration mode.
F2: Period is used to view cash transactions for a particular period.
F4: Bank is used to toggle between the banks from the same screen. This will reduce navigation time.
F5: Cheques allows user to view transactions for which Cheques/DDs have been received (for the same Bank), and print Cheque Deposit Slip for the same.
F6: Show All allows user to view the transactions for which cash deposit slips haven’t been printed or to view all transactions for that bank for the period mentioned.
F12: Range allows user to filter Cash Deposit Slip screen. User may filter the transactions based on the Amount, Date, Bank Date, Instrument Date, etc. as shown:
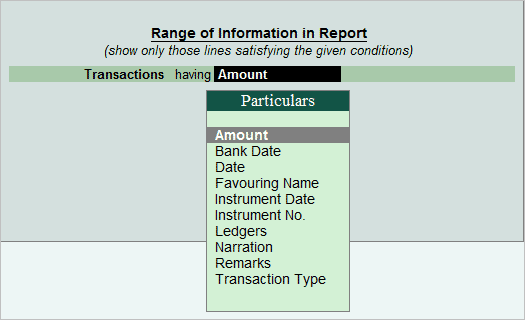
This is a useful tool, as it makes the process of finding particular transactions fast, easy and simple.
Cash Deposit Slip can be printed for all or just selected transactions.
Cash Deposit Slip Report can be printed for all the transactions for the selected period
Printing Cash Deposit Slip
To Print the Cash Deposit Slip,
Go to Gateway of Tally > Banking > Deposit Slip > Cash Deposit Slip
Select the required Bank account from List of Bank.
The Cash Deposit Slip screen displays the list of transactions for the bank selected.
To print Cash Deposit Slip for selected transactions,
Press Spacebar to select required transaction(s).
Click Print or Press Alt+P.
The Printing Cash Deposit Slip screen appears.
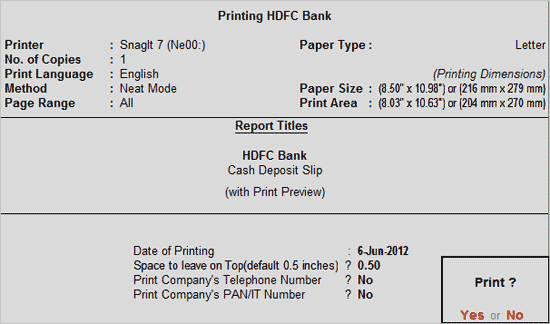
Date of Printing: The date that has to be printed on the Cash Deposit Slip has to be specified in this field. By default, the current system date is displayed. Usually, this date will be the date on which the actual deposit of the cash into the bank will be made.
Space to leave on Top (default 0.5 inches): This is the space between the top of the page and the Title (First Line on the page). User can specify the dimension as per requirement.
Print Company's Telephone Number: Set this option to Yes to print the Company's Telephone Number. The Telephone Number specified in the Company Creation screen will be captured.
Print Company’s PAN/IT Number: The PAN or IT Number specified in the F11: Features (F3: Statutory & Taxation) will be captured. By default, this option is set to No.
Click on Yes or Press Y or Enter to Accept.
A new screen will appear where Cash Denomination details can be specified for individual transaction, as shown:
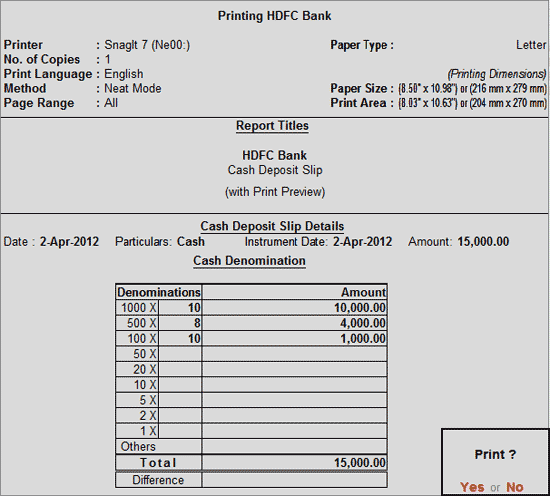
By default, it will take the cash denominations specified in the Contra voucher. If the Cash Denominations are different during actual cash deposit in bank, click on No or press N or Esc and enter the Cash Denomination details.
Accept to print.
The Cash Deposit Slip is displayed as shown:
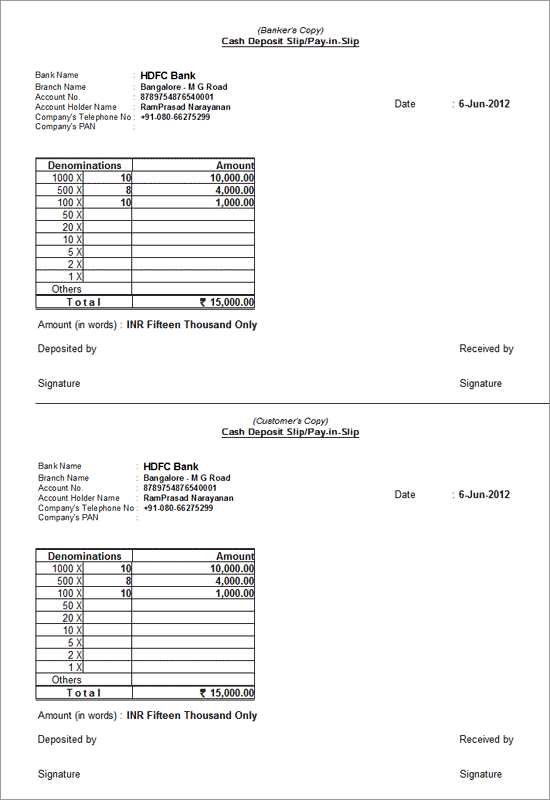
Note: If A/c Holder Name is not mentioned in the Bank ledger master, then the name of the company as mentioned in the Company Creation screen will be printed as Account Holder Name of the Cash Deposit Slip.
The Cash Deposit Slip for the first transaction will be printed.
For the next transaction selected, a new Cash Denomination details screen will appear. User can specify the details and print the Cash Deposit Slip.
A separate Cash Deposit Slip will be printed for all the selected transactions.
To print Cash Deposit Slips for all transactions,
Click Print or Press Alt+P.
The Printing Cash Deposit Slip screen appears.
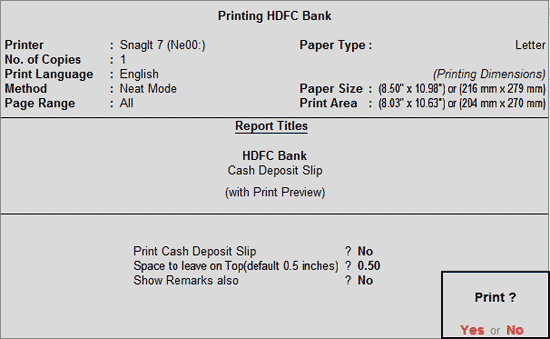
Click No or Press N or Esc to set the other options as follows:
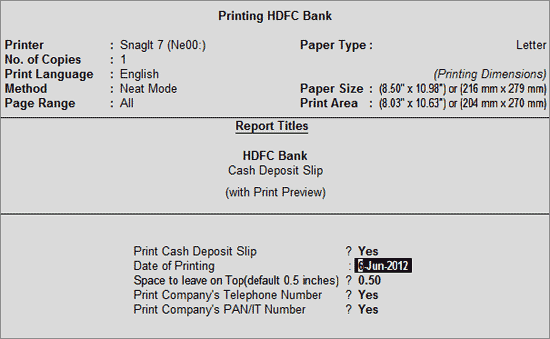
Print Cash Deposit Slip: When all the transactions are selected for printing, user can print a report of the Cash Deposit Slip by setting this option to No. By default, this option is set to No.
Date of Printing: By default, the current date is displayed. Specify the date to be printed in the Cash Deposit Slip. This date should be the date on which the actual deposit of the cash in the bank will be made.
Space to leave on Top (default 0.5 inches): This is the space between the top of the page and the Title (First Line on the page). User can specify the dimension as per requirement.
Print Company's Telephone Number: Set this option to Yes to print the Company's Telephone Number. The Telephone Number specified in the Company Creation screen will be captured.
Print Company’s PAN/IT Number: The PAN or IT Number specified in the F11: Features (F3: Statutory & Taxation) will be captured.
Click on Yes or Press Y or Enter to Accept.
A new screen will appear where Cash Denomination details can be specified for individual transaction, as shown:
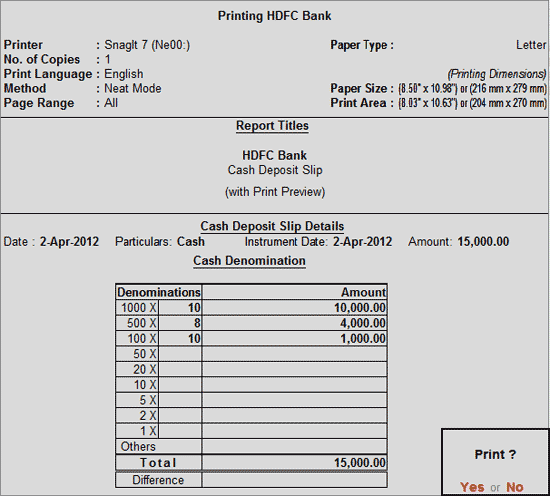
By default, it will take the cash denominations specified in the Contra voucher. If the Cash Denominations are different during actual cash deposit in bank, click on No or press N or Esc and enter the Cash Denomination details.
Accept to print.
The Cash Deposit Slip is displayed as shown:
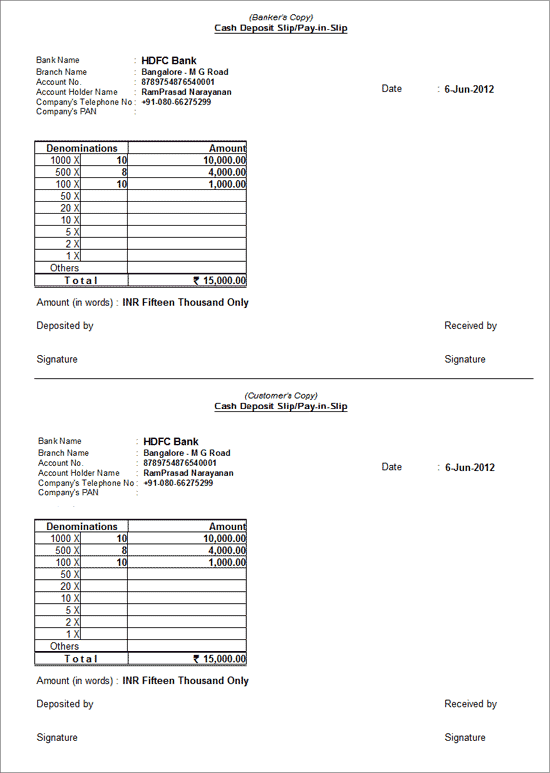
The Cash Deposit Slip for the first transaction will be printed.
For the Next transaction selected, a new Cash Denomination details screen will appear. User can specify the details and print the Cash Deposit Slip.
A separate Cash Deposit Slip will be printed for all the transactions.
Note: 1. If the option Print Consolidated Cash Deposit Slip is set to Yes, then a blank Cash Denomination details screen is displayed and a combined Cash Deposit Slip is printed for all the transactions selected.
2. On filling in the details in this screen and pressing Enter at the end, a notification is displayed – Details entered here will not get updated in the vouchers.
To Print the Cash Deposit Slip Report,
Go to Gateway of Tally > Banking > Deposit Slip > Cash Deposit Slip.
Select required Bank account from List of Bank.
Click Print or Press Alt+P.
The Printing Cash Deposit Slip screen appears.

Click No or Press N or Esc to set the other options as follows:
Print Cash Deposit Slip: Set this option to No to print the Cash Deposit Slip report.
Space to leave on Top (default 0.5 inches): This is the space between the top of the page to the Title (First Line on the page). User can specify the dimension as per requirement.
Show Remarks also: Set this option to Yes to display the Remarks in the report.
Accept to Print.
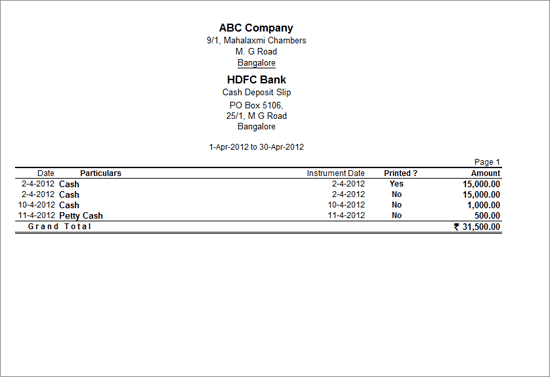
The Cash Deposit Slip Report is displayed as shown:
User may configure the Cash Deposit Slip screen based on requirements.
To configure,
Press F12: Configure, the Configuration screen is displayed as shown.
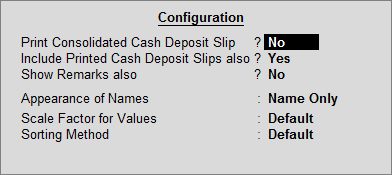
This option, when enabled, is used to print a single Cash Deposit Slip for all selected transaction. By default, this is set to No. Set this option to Yes, to generate a Consolidated Cash Deposit Slip of the selected transactions.
To view all the transactions for a given period, even if Cash Deposit Slip has been printed for them, this option can be set to Yes.
Note: This option will work in accordance with the F6: Show All option in the Button Bar.
To view the remarks entered in the Contra voucher, set this option to Yes. A Remarks column will appear in the Cash Deposit Slip screen. By default, this is set to No.
In the Cash Deposit Slip screen, user can choose the Display Style of the name under Particulars column; Alias (Name), Alias Only, Name (Alias) or Name Only, using this option.
User can choose to view the Value in the Amount column based on different factors – Crores, Hundreds, Lakhs, Millions, Ten Lakhs, Ten Millions, Ten Thousands, and Thousands.
List of transactions can be sorted by user by selecting any of the Sorting Methods from the list. The transactions can be sorted in ascending or descending order based on – Amount-wise, Date, Instrument Date, Instrument Number, Party-wise. By default, the transactions are sorted in ascending order based on Date.