Ensure that in F11: Features > F1: Accounting Features the feature - Enable Cheque Printing is set to Yes.
Go to Gateway of Tally > Accounts Info. > Create
Enter the name of the bank ledger as ICICI Bank and select the group as Bank Accounts. Set the effective date for reconciliation as 1-4-2012.
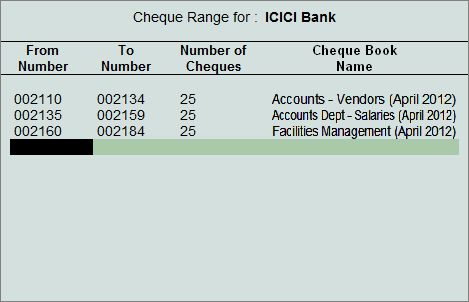
Set the option - Set/Alter Cheque Book to Yes to provide the details pertaining to from and to number and total count of cheque leaves along with the book name. Alternatively, after entering the From Number, if the Number of Cheques are specified, the To Number appears automatically.
Consider the example of accounts department which issues cheques to various stake holders. Book name helps in tracking the number of cheque books used by a particular department.

One bank ledger may have multiple Cheque Books. If user enters cheque number which already exists in another Cheque Range, Tally.ERP 9 will throw an error message – The entered cheque range is overlapping with the existing cheque range.
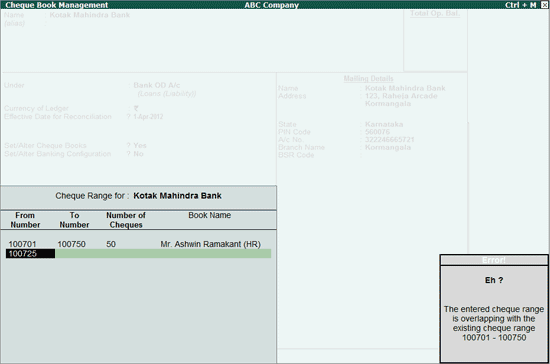
Enter the correct cheque numbers and press Enter to navigate to the Ledger Creation screen.
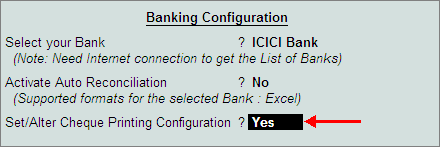
The option - Set/Alter Banking Configuration will be displayed by default. Set this option to Yes to view the Banking Configuration screen.
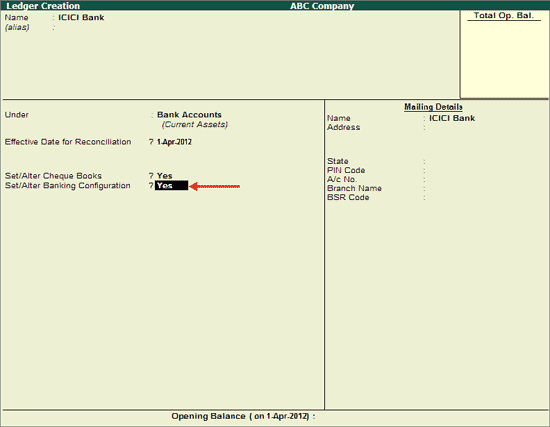
In the Banking Configuration screen provide details as given below:
In Select your Bank field, the list of banks get displayed only when there is active Tally.NET subscription and internet connectivity. Choose ICICI Bank from List of Banks.
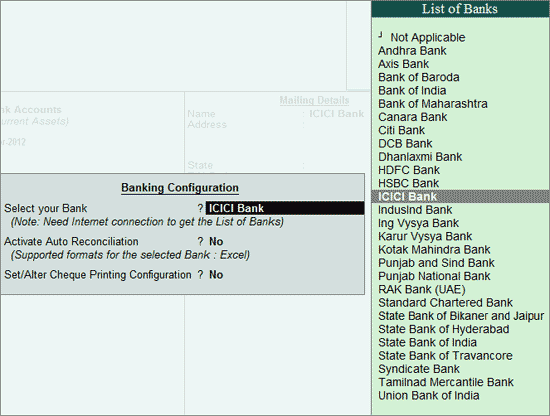
Note: If the Tally.NET subscription has expired on April 30, 2012, the list of banks supported till then will be displayed. The banks added to the list after this date will not appear for selection. For viewing the complete list of banks supported for cheque printing configuration, there should be active Tally.NET subscription and internet connectivity.
Set Activate Auto Reconciliation to Yes/No as per requirement. On enabling this option, the facility to reconcile the books of accounts by importing the bank statements will be made available. Also the entries which are present in Bank statement and not in books of accounts (e.g., bank charges deducted from the account) can be added using the auto-fill feature.
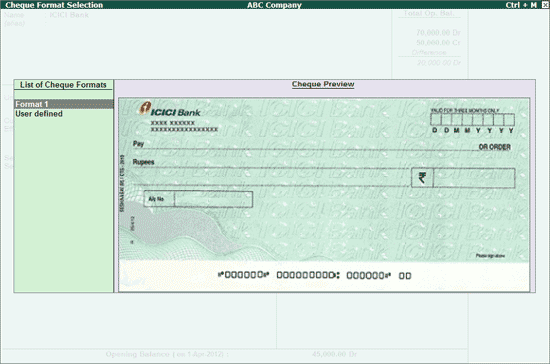
Set the option - Set/Alter Cheque Printing Configuration to Yes. Based on the bank chosen in Select Your Bank field, the cheque formats (1 or more depending on the bank selected) will be displayed.
From the formats displayed for the selected bank, users can choose the formats by comparing with the physical cheque leaves and preview the output. After selecting the format, press Enter to accept it. The parameters defined for it gets pre-filled in the Cheque Printing Configuration screen.
Note: Here the cheque printing configurations can be either pre-filled with the available formats or set manually.
The filled dimensions of Cheque Printing Configuration appears as shown:
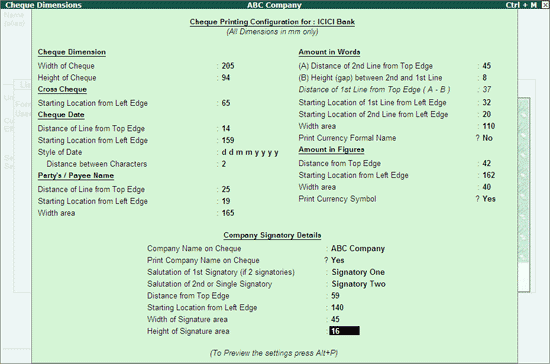
To Print/Preview the settings click Print button or press Alt+P. Accept the screen.
On accepting the Cheque Printing Configuration screen, the Cheque Printing screen appears allowing user to print the sample cheque. Depending on the printer being used for printing the cheques the orientation can be selected.
Press S: Select Printer button to select the printer and the paper size. Select the paper size as A4.
In the Sample Cheque Printing screen, press N: Orientation button (Alt+N) to select the orientation. The orientations - Vertical and Horizontal gets listed.

On selecting Vertical - centre/left/right the cheque gets printed in vertically (oriented as portrait). Using these options, the cheque can be printed by setting the orientation to:
Vertical Left: On inserting the paper in the printer tray, the cheque gets printed vertically on the left hand side of the paper.
Vertical Centre: On inserting the paper in the printer tray, the cheque gets printed vertically at the centre of the paper.
Vertical Right: On inserting the paper in the printer tray, the cheque gets printed vertically on the right hand side of the paper.
Additionally for printing the cheque face up or face down with vertical orientation, the field - Print From (for Vertical Only) gets displayed. Depending on the printer, the front or rear can be selected.
Front: In printers which print face up select Front.
Rear: For printers which print face down place the paper in reverse order and select Rear.
On selecting Horizontal the cheque gets printed horizontally (oriented as landscape).
After selecting the orientation, accept the sample cheque printing screen to preview the cheque (for preview mode, select I: With Preview button (Alt+I).
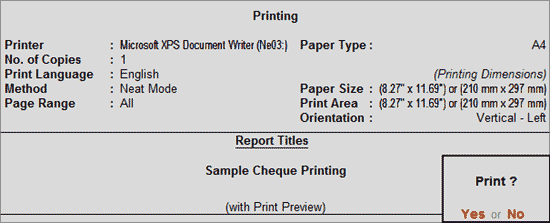
Accept the Sample Cheque Printing screen to generate the preview of the cheque.
Using the configuration provided for overall adjustment:
The cheque dimensions pre-configured on selecting the cheque format can be adjusted such that the overall dimensions get shifted by the required 'mm' from top and left edge of cheque.
While printing the cheque, date field can be left blank if it is not required to be printed.
From the Sample Cheque Printing screen, click on F12: Configure button and change/retain the dimensions in 'mm' as per requirement.
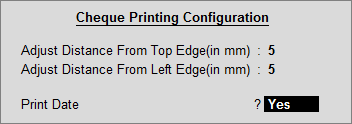
Adjust Distance From Top Edge (in mm): To adjust the distance from top edge such that the overall measurements defined in Cheque Dimensions screen get shifted as per the 'mm' entered here.
Adjust Distance From Left Edge (in mm): To adjust the distance from left edge such that the overall measurements defined in Cheque Dimensions screen get shifted as per the 'mm' entered here.
Print Date: By default the date gets printed on the cheque. If the date is not to be printed on the cheque set this field to No.
Accept the configuration and print the cheque. The adjustments done for overall adjustment using F12: Configuration of cheque printing screen does not affect the settings of Cheque Dimensions pre-configured for the selected cheque format.
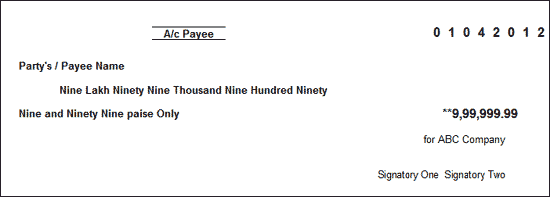
After viewing the sample cheque press Esc key to view the cheque dimension screen. Accept the configurations to return to the ledger creation screen.
In the bank ledger master, select the State and enter the address details, PIN Code, Account number, branch name and BSR Code under Mailing Details screen.
The dimensions can be set manually in the Cheque Format Selection screen by selecting User Defined or pressing Ctrl+U.
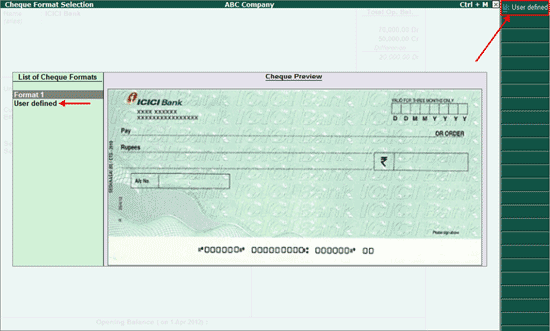
The configurations can be entered manually when:
Of more than one format specified by the bank, two are provided in Tally.ERP 9 but the third format is required for printing the cheque.
or
A message regarding the unavailability of cheque format for the selected bank is displayed.
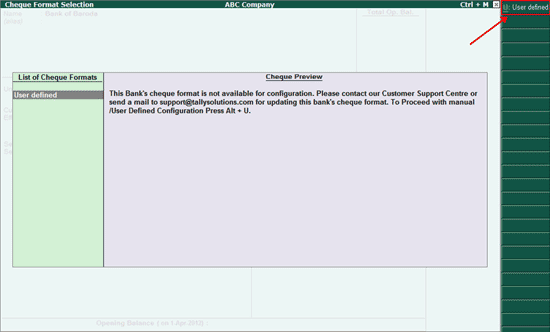
or
System is not connected to the Internet.
In case where the format for the selected bank is not available, the sample format or the dimensions configured for another bank can be copied. To copy the dimensions,
Cick on User Defined button in Cheque Format Selection screen
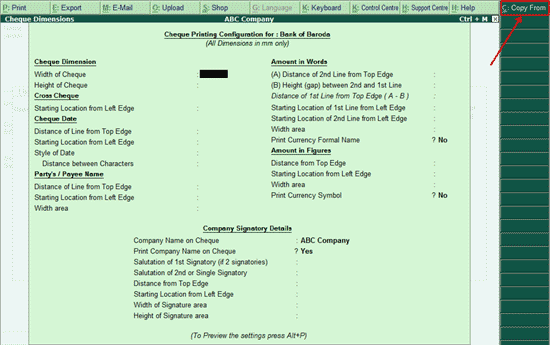
Click Ctrl+C: Copy From or press Ctrl+C
The Select Configured Bank screen with List of Configured Banks appears as shown:
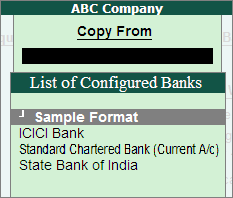
Select the Sample Format or the format of the required Bank from the list.
The cheque printing configuration fields will be pre-filled with the dimensions of the selected format.
Note: In the Cheque Printing Configuration form, any field other than salutations cannot be left blank. Also if inappropriate figures are entered, users will be prompted with appropriate messages at various fields to control the configuration.
Once the configurations are manually entered, the sample cheque can be generated. After viewing the sample cheque press Esc key to return to ledger creation screen and enter the mailing details.
In the ledger creation screen, enter the name of the bank ledger as Axis Bank and select the group as Bank Accounts. Set the effective date for reconciliation as 1-4-2012. Set the option - Set/Alter Banking Configuration to Yes to view the Banking Configuration screen.
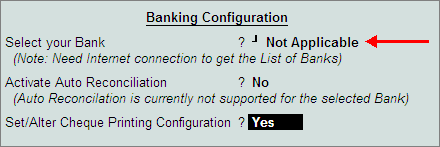
During offline ledger creation (without internet connectivity), the list of banks will not appear for selection in Select Your Bank field, hence it needs to be set to Not Applicable. Also the cursor will skip the option - Activate Auto Reconciliation. Set the option - Set/Alter Cheque Printing Configurations to Yes.
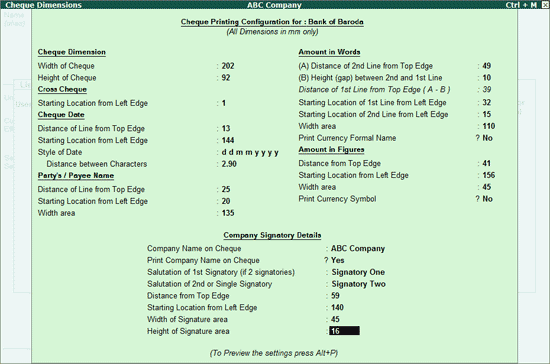
Enter the cheque dimensions manually or click the Copy From button (Ctrl+C) to copy the predefined dimensions of either the sample format or the dimensions set for other banks. The Cheque Dimension screen appears as shown:
Accept the Cheque Dimensions screen to view the Sample Cheque Printing screen. Click Yes to generate the preview and then return to ledger master. If the preview is not required to be generated select No to return to ledger master.