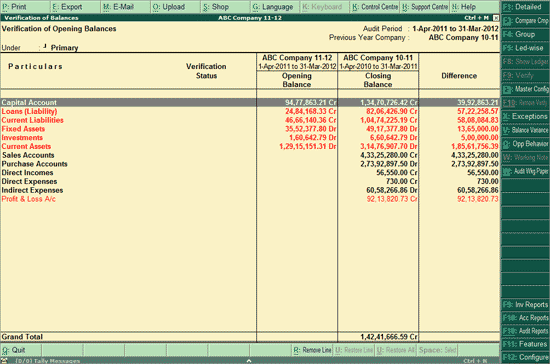
Verification of Opening Balances report will help the user to check and fix the Opening Balance differences between different Groups/Subgroups/Ledgers when the Current Year and Previous Year company data are available as separate companies on Tally.ERP 9.
By default this report will show Opening Balance differences between different Groups/Subgroups/Ledgers of Non Revenue type. The user can include Revenue type of Groups/Subgroups/ Ledgers for verification by F12: Configuration.
To view the Verification of Opening Balances report,
Go to Gateway of Tally > Audit & Compliance > Audit & Analysis > Verification of Balances
If previous year company is not loaded, click on Ctrl+F3: Compare Cmp or press Ctrl+F3 keys to load the Company that contains the data for the year prior to Audit period
Click on Ctrl+V: Verf of Op. Bal or press Ctrl+V
Verification of Opening Balances report appears:

Place the cursor on any of the Groups displayed, and press Enter to view the Verification of Opening Balances report for that Group:
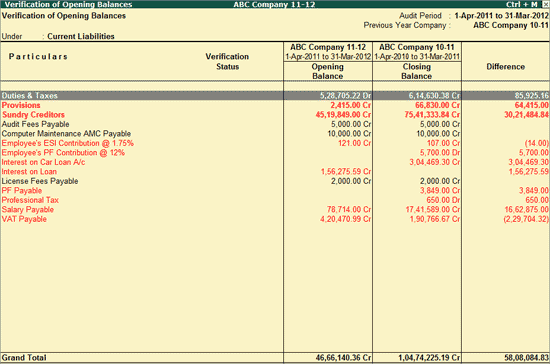
Note: Where the previous year company is loaded, Verification of Opening Balances report appears by default
The Auditor can further drill down to Subgroups and Ledgers by pressing Enter on the required Groups from the above screen. The information can also be viewed in detail by clicking on F1: Detailed or pressing Alt+ F1 keys from the above report.
The detailed report will be displayed as shown:
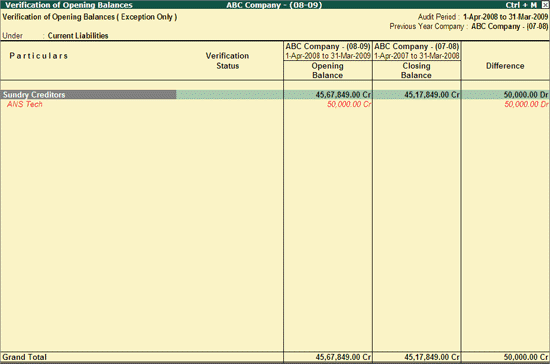
To fix the differences in the Opening Balances, the Auditor can press Ctrl+Enter on the respective Ledger and change the Opening Balance details.
Click on Ctrl+F3: Compare Cmp or press Ctrl+F3 keys to load the Company that contains the data for the year prior to Audit period.
Click on F4: Group or press F4 to view the Verification of Opening Balances report for a particular Group.
To view the Ledger wise report for Verification of Opening Balances click on F5: Led-wise pr press F5.
F9: Verify
Click on F9: Verify or press F9 key to mark any ledger as Verified or On hold.
Note: The facility to mark a Ledgers as Verified is provided only for those Ledgers which are present in the Audit Year.
Click on Ctrl+F9: Master Config or press Ctrl+F9 keys to identify the parties as MSME, Related Party, Periodic Payments and Receipts and apply Sampling methods for Auditing.
Click on X: Exceptions or press Alt+X to view the exceptional items only.
Click on V: Balance Variance or press Alt+V to view the Ledger Balance Variance report.
Ctrl+O: Opp Behaviour
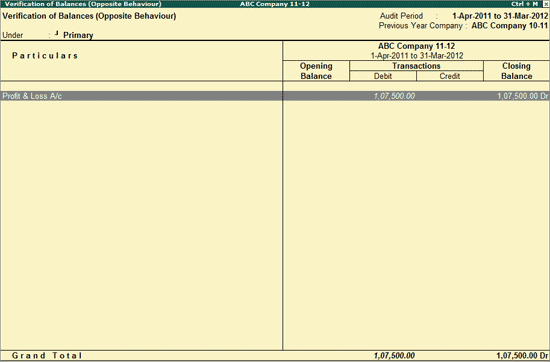
To view the Groups which have balances of the opposite nature, that is, if a Group that should normally have, say, a Debit balance has a Credit balance, click on Ctrl+O: Opp Behaviour or press Ctrl+O.
The Verification of Balances (Opposite Behaviour) appears:
Click on
W: Working Note or press
Alt+W keys to specify the
working note details at Company or Group or Ledger level. The details
provided in working note will be captured in Audit Working Paper along
with the details of User Name, Working
Note Date & Time, Status, Note etc.
In Working Note Details screen
Details for: In this field select the level for which Working Note to be entered.
Company: On selection of Company as the Level cursor will move to Working Note field to enter the details.
Group: On selection of group based on the ledger selected, displays the list of Groups for defining the working note
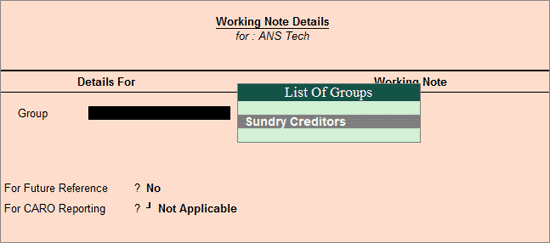
Ledger: Selection of level - Ledger, application will default the ledger for which the working note is entered.

Working Note: In this field enter the working note details
For CARO Reporting?:Choose the clause applicable to the Working Note from the list of CARO Clauses displayed. Working Notes tagged with CARO Clauses will appear in the CARO Working Paper.
For Future Reference?: By default this option will be set to No. Set the option to Yes, to carry the Working Note forward to the next audit period. That is, the Working Note details will be displayed in Audit Working Paper of Current as well as Next Audit Period.
To view the Audit Working Paper during Auditing, click on Ctrl+W: Audit Wkg Paper or press Ctrl+W keys. The details displayed in Audit Working Paper will be relevant to report from where it is triggered.

For more details on Working Paper refer the topic Audit Working Paper
Other button options in this report are similar to Verification of Balances report.
F12: Configure
Click on F12: Configure or press F12 to change the default display.
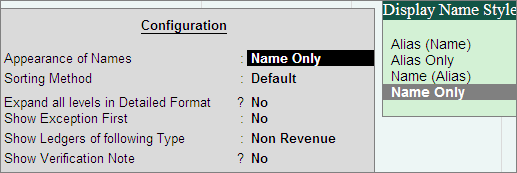
Appearance of Names: Select the appropriate appearance Name for the Groups
Sorting Method: Select the required sorting method for the transactions from the list of Sorting Methods.
Expand all levels in Detailed Format: Set this option to Yes to expand all level - Groups, Sub-groups and Ledgers in detailed format.
Show Exception First: Set this option to Yes to show all the exceptions in the top of the Group/Ledger Listing.
Show Ledgers of Following Type: In this field select the appropriate ledger Type - Non Revenue or Revenue or All Items to configure the report respectively.
Show Verification Note: Set this option to Yes to display the verification note entered by the Auditor.