The Central Board of Excise and Customs has issued a notification making e-filing mandatory for assessees with effect form 1-4-2010. As per the Notification, all the registered Excise Manufacturers who have paid total duty of rupees ten lakhs or more including the amount of duty paid by utilization of CENVAT credit in the preceding financial year to file the monthly return, electronically under sub-rule (1) of Rule 12 of the Central Excise Rules, 2002.
To assist and manage e-filing, Central Board of Excise & Customs has set up an e-governance portal – Automation of Central Excise and Service Tax (ACES) [http://aces.gov.in]
Currently, ACES application allows filing Monthly/Quarterly Return for the Registered Manufacturers online who are accessing the ACES site through PCs / Internet Browsers.
To make E- filing easy for the Excise Manufacturers to file returns in Automation Of Central Excise And Service Tax (ACES), department has given the options of off line filing using Excel utility or XML schema.
Note: XML Schema is a language for describing the structure and constraining the contents of XML documents
Assessees who are not maintaining the records in computerised system, can down load the Excel utility and enter the details manually, validate and upload the Excel utility.
Assessees who have computerized systems in place and can generate their return from their existing application, department has given the process to prepare return in XML format validate and upload the ER 1 return. Benefits of using the XML schema is that if user is having huge data to upload instead of entering manually they can use their application for generating XML schema.
Meeting all the requirements of E-Returns, Tally.ERP 9 now provides the option to generate monthly return with a click of a button.
For generating E-Returns from Tally.ERP9, let us take the example of ABC Company which is registered as per Excise Rules and engaged in Manufacturing.
To generate ER 1 E-Returns
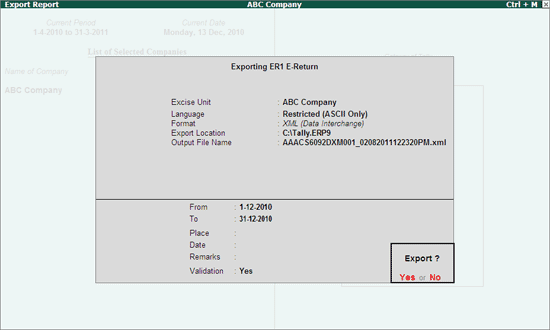
Go to Gateway of Tally > Display > Statutory Reports > Excise Reports > Manufacturer > E-Return > Press Enter to view Exporting ER 1 E-Return screen
Exporting ER 1E-Return screen appears as shown

Press Backspace to provide Returns Period, Place, Date of generating E-Returns and other details
Excise Unit: As Tally.ERP 9 allows creating and maintaining accounts of multiple units in a single company and allows to generate Excise Unit-wise e-returns. Excise Unit field is provided to select the Excise unit for which E-Return to be generated. Example: ABC Company.
Language: Language is fixed to Restricted (ASCII Only) and the application will not allow to move the cursor to change the language.
Format: Format is fixed to XML (Data Interchange). Currently, the ACES application supports the uploading of E-Returns generated in XML format from computerised systems. Hence, the XML (Data Interchange) is defaulted and application does not allow to change the export format.
Export Location: By default, it displays the path where Tally.ERP 9 is installed. In Export Location field enter the details of the path to where the XML file to be exported.
Note: Ensure a copy of ACES_ER1.xsd file is copied to the folder (Tally.ERP 9 folder) to which the E-Return is getting exported. ACES_ER1.xsd file is required because on exporting the XML E-Return from Tally.ERP 9, the ACES_ER1.xsd validates the data structure of the E-Returns generated automatically.
If the ER1 E-Return generated form Tally.ERP 9 is not validated ACES_ER1.xsd, while uploading such ER1 E-Returns ACES application displays the error & will not allow to upload the file.
Output File Name: Tally.ERP 9 by default displays the Output File Name in the Format as specified under E-Return Requirements.
The E-Return Requirement has clearly indicated that the E-Return File Format should - 15 Digit ECC Number_ Month Date Year Hour Minutes Seconds AM/PM.xml
Example: AAACS6092DXM001_02042011122546PM.xml
Note: Tally.ERP 9 allows the user to change the Output File Name while generating the e-return in XML format.
But to upload the E-Returns, assessee has to follow the file name structure as specified under E-Returns Requirement. If the File name structure is different then, the ACES application will not allow the Assessee to upload the Returns.
From: In this field enter the period (31-12-2010) from where the return to be generated.
To: In this field enter the till (31-12-2010) date to generate the return
Note: By default the period in From and To date field will be displayed based on the last date of the entry in the books of accounts.
Place: In this field enter the place of generating the return
Date: In this field enter the Date on which e-Return is generated
Remarks: In this field enter the details as MonthlyReturn for 31-12-2010 to 31-12-2010
Note: From and To period, Place, Date and Remarks are Mandatory fields. If the Assessee generates the returns without or incomplete details, the e-return generated will show the errors for the missing details.
Validation: This field will be displayed in Exporting ER1 E-Return screen only when the HSN code defined in Tariff Classification is not correct, If the finished goods cleared (sold) have Negative Stock, Stock Items without valid Reporting UOM and Excise sales recorded with Notification Number but the Notification Type is not defined.
By default, Validation option will be set to Yes. Press Enter to view the E-Return Validation Screen
E- Return Validation screen appears as shown
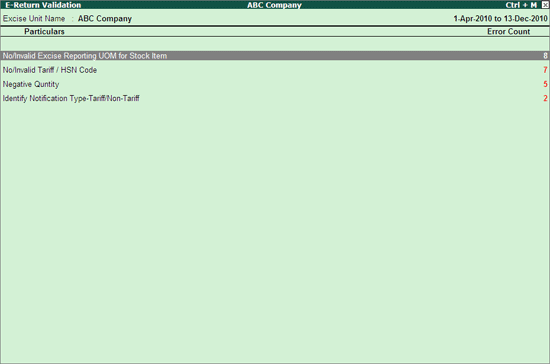
E- Return Validation screen displays the Type of Error with the Error Count. To rectify the error, select the error type and press Enter.
Under Central Excise Tariff Act, for every excise stock item Unit of Quantity is defined. Example: Unit of Quantity is U for Numbers
The act also makes it clear that all the reports relating to stock items are required to be indicated with the relevant Unit of Quantity as specified under Central Excise Tariff Act. It even applies to E-Returns. In Tally.ERP 9 Unit of Quantity is termed as Reporting UOM.
In case, the users are not using the Defined Unit of Quantity as Reporting UOM for the stock items then it is must to assign the appropriate Unit of Quantity to generate E-Returns. If there are any differences in the Unit of Quantity defined in the item master then the application will show the discrepancies for validation till such mistakes are corrected.
Note: In Tally.ERP 9, while creating the stock item application gives the option to define the Base Unit and Reporting UOM.
As per Central Excise Act, in all the reports relating to stock items are required to be indicated with the relevant Unit of Quantity as specified under Central Excise Tariff Act. All the reports will display the Stock item details based on the reporting UOM selected
Following are the Unit of Quantity defined under Central Excise Tariff Act
Unit of Quantity |
Description |
1KKWH |
1000 Kilowatt Hours |
C/K |
Carats |
CM |
Centimetre |
CM3 |
Cubic Centimetre |
G |
Grams |
GI F/S |
Gram of Fissile Isotopes |
KG |
Kilograms |
KL |
Kilolitre |
L |
Litre |
M |
Metre |
M2 |
Square Metre |
M3 |
Cubic Metre |
MM |
Millimetre |
MT |
Metric Tonnes |
PA |
Number of Pairs |
Q |
Quintal |
T |
Ton |
TU |
Thousand in Nos |
U |
Numbers |
Excise Reporting UOM can be updated from
Excise Reporting UOM Validation
Stock Item Alteration
Reporting UOM
1. Excise Reporting UOM Validation
From Excise Reporting UOM Validation screen update (assign) the stock items with appropriate reporting UOM where the reporting UOM defined for the stock items is not the Unit of Quantity defined under Central Excise Tariff Act.
Select No/Invalid Excise Reporting UOM for Stock Item and press Enter to view Excise Reporting UOM Validation screen
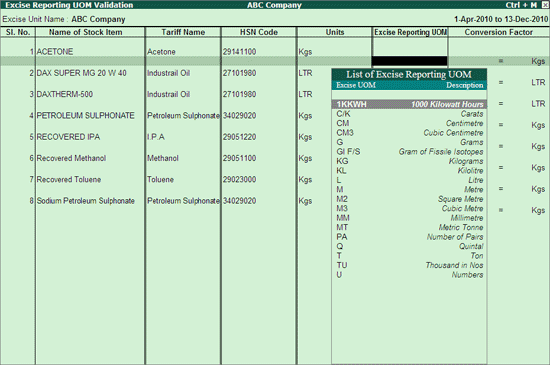
Excise Reporting UOM Validation screen displays the details of Name of Stock Item,Tariff Name, HSN Code and Units.
In Excise Reporting UOM Validation screen specify the appropriate Excise Reporting UOM to each single item. If the Reporting UOM selected is different than the Units (Base Unit) cursor will move to Conversion Factor section to define the conversion factor.
The completed Excise Reporting UOM Validation screen appears as shown
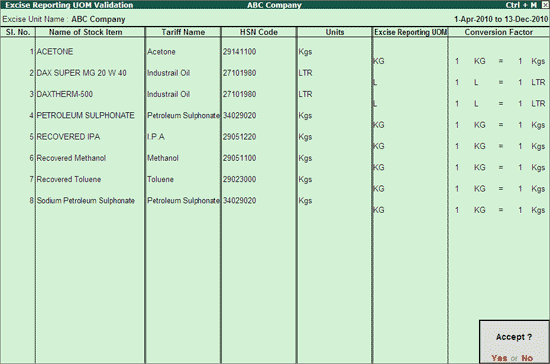
Note: From Excise Reporting UOM Validation screen the Excise Reporting UOM and Conversion Factor has to be specified for each stock item.
Excise Reporting UOM Validation screen displays the items with the stock Item Type - Finished Goods for which transactions (manufacturing Journal/ Excise Sales) are recorded.
2. Stock Item Alteration (Update Single Stock Item)
In this method Reporting UOM is updated one stock item at a time by identifying the stock items which have the reporting UOM which is not the Unit of Quantity as defined under Central Excise Tariff Act.
To understand how to update single stock item, let us take the example of stock item which have the Reporting UOM as LTR. In ABC Company the stock items to which the Unit of measurement - LTR is used, the applicable Unit of Quantity is L.
To update the stock item,
Go to Gateway of Tally > Inventory info. > Stock Items > Alter (Single Stock Item) > select DAX SUPER MG 20 W 40 from the List of Stock Items
To define the Reporting UOM
Tab down to Set/Alter Excise Details field and set the option to Yes.

Press Enter to view Excise Details screen
In Excise Details screen
In Reporting UOM filed application prompts to select applicable UOM from the Units list. Select L from the list.
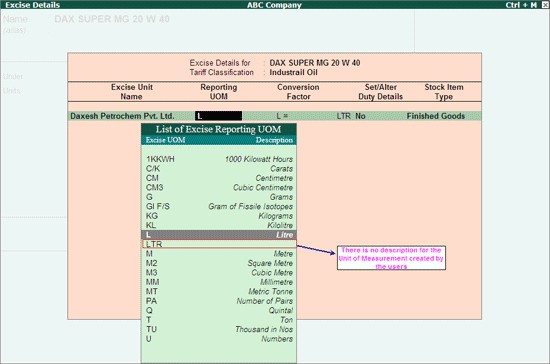
Press Enter. If the Reporting UOM selected is different than the Units (Base Unit) cursor will move to Conversion Factor section to define the conversion factor.

Note: The List of Excise Reporting UOM displays the details of existing Reporting UOM, Excise UOM and Description.
The existing Reporting UOM created by the users will also be available under the Reporting UOM list without any description. The existing Reporting UOM once replaced with the actual Reporting UOM will disappear from the list and will not be available for selection.
Reporting UOM defined for the stock item will be considered as Unit of Quantity for all the Excise Reports including E-Returns.
Retain the other settings.
Press Enter to save Excise Details and Stock Item Alteration.
3. Reporting UOM (Update Multiple Stock Items)
In case of companies which have many stock items for which the Reporting UOM is different than Unit of Quantity defined under Central Excise Tariff Act and doesn't want to define the Reporting UOM to each item then user can use multi stock Reporting UOM alteration option- Reporting UOM available in Tally.ERP 9
To update Reporting UOM for multiple Stock Items,
Go to Gateway of Tally > Inventory Info. > Update Excise Info. > Reporting UOM
Select the required Excise Unit (if multiple Units are available)
Tally.ERP 9 allows to update Reporting UOM to stock items in three ways
Excise Unit - wise
Tariff - wise
Base Units - wise
i. Excise Unit - wise
Excise Unit-wise update allows to define the reporting UOM to all the excise Stock items of the Excise Unit.
To update reporting UOM, In Select Excise Unit screen
Name of Excise Unit: If company has more than one excise unit select the appropriate Excise Unit from the List of Excise Units to update the Reporting UOM to the stock items belonging to the excise unit selected. if in the company has only one excise unit then that excise Unit name will be displayed by default.
Name of Tariff: Select Any from the list
Name of Base Units: Select Any from the list and press enter to view Update Excise Reporting UOM screen
Note: Here Name of Tariff and Name of Base Units are set Any, because ABC Company wants to view all the excise stock items of the excise unit.
The Update Excise Reporting UOM screen is displayed as shown:
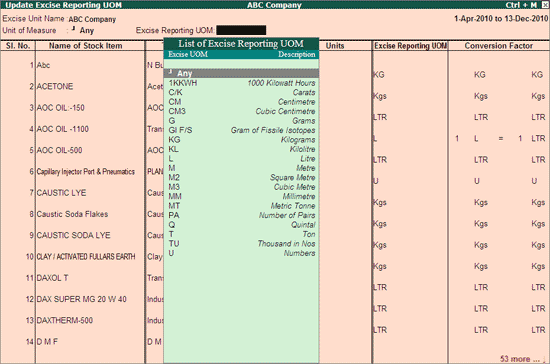
Observe, the Update Excise Reporting UOM screen displays all the stock items created under the Excise Unit - ABC company.
In real business scenario an excise manufacturer may be dealing in excise stock items having same reporting UOM or different reporting UOM’s.
If all the items created in the excise unit have single Reporting UOM then, in Excise Reporting UOM field select the applicable Excise UOM from the List of Excise Reporting UOM.
Example: For all the excise Items of ABC company Unit of Quantity is KG then select KG in Excise Reporting UOM field. On selection of Excise Reporting UOM the same will be dipalyed for all the items.
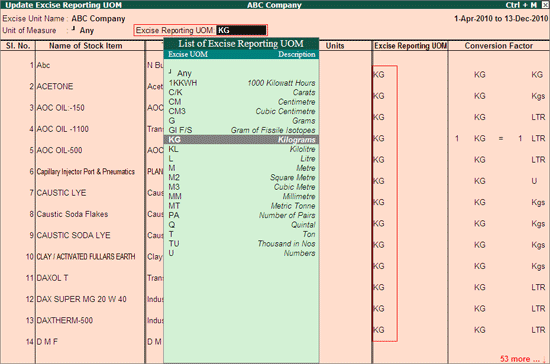
Define the Conversion factor if the Base unit is different than the Excise Reporting UOM and save the changes.
On accepting Update Excise Reporting UOM screen, The unit of measurement KG will be updated as the Reporting UOM to all the Excise Items.
If the stock Items created in the excise unit have different Reporting UOM then, in Excise Reporting UOM field select Any from the List of Excise Reporting UOM. Update Excise Reporting UOM only to those stock items where ever there is discrepancy and retain the Reporting UOM of other items intact.
To define the Reporting UOM for other Stock items press Enter, the cursor will move to Excise Reporting UOM column, select the stock item and define the Reporting UOM and Conversion Factor.
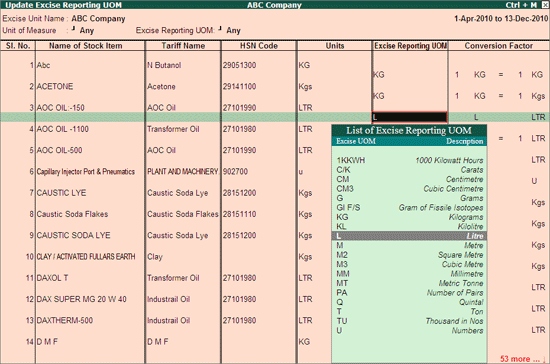
Similarly, user can select other stock items to define the Excise Reporting UOM & Conversion Factor. After alteration of Excise Reporting UOM press Ctrl + A (short cut key to save the changes) or press Enter till you reach Accept Yes or No option to save the changes.
ii. Tariff - wise
Tariff - wise update allows to define the Excise Reporting UOM to the excise Stock items grouped under the specific Tariff Classification.
To update Excise Reporting UOM, In Select Excise Unit screen
Name of Excise Unit: If company has more than one excise unit select the appropriate Excise Unit from the List of Excise Units to update the Reporting UOM to the stock items belonging to the excise unit selected. if in the company has only one excise unit then that excise unit name will be displayed by default.
Name of Tariff: To update the Reporting UOM of stock items created under specific Tariff Classification select the Tariff classification from the List of Tariff Classifications. E.g ABC Company wants to update the Reporting UOM of the stock items created under the tariff Classification - Industrial Oil
Name of Base Units: Select Any from the list and press enter to view Update Excise Reporting UOM screen

Update Excise Reporting UOM screen appears as shown
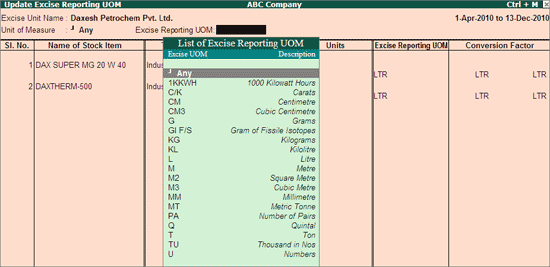
In Update Excise Reporting UOM screen, application displays only those stock items which are grouped under the Tariff classification for which the report is viewed.
If all the items grouped under the tariff classification have single Reporting UOM then, in Excise Reporting UOM field select the applicable Excise UOM from the List of Excise Reporting UOM.
Example: For all the excise Items grouped under the Tariff Classification - Industrial Oil Unit of Quantity is L (Litre) then select L in Excise Reporting UOM field and define the Conversion Factor. Press Ctrl + A (short cut key to save the changes) or press Enter till you reach Accept Yes or No option.

If the stock Items grouped under the tariff classification - Industrial Oil have different Reporting UOM then, in Excise Reporting UOM field select Any from List of Excise Reporting UOM. Update Reporting UOM only to those stock items where ever there is discrepancy and retain the Reporting UOM of other items intact.
To define the Reporting UOM to Stock item press Enter cursor will move to Reporting UOM column, select the stock item and define the Reporting UOM.

Press Ctrl + A (short cut key to save the changes) or press Enter till you reach Accept Yes or No option to save the changes.
Similarly, user can select to update Reporting UOM to stock items grouped under other Tariff Classifications.
iii. Base Unit-wise
Base Unit-wise update allows to define the reporting UOM to the excise Stock items grouped under the specific Base Unit.
To update reporting UOM, In Select Excise Unit screen
Name of Excise Unit: If company has more than one excise unit select the appropriate Excise Unit from the List of Excise Units to update the Reporting UOM to the stock items belonging to the excise unit selected. if in the company has only one excise unit then that excise unit name will be displayed by default.
Name of Tariff: Select Any from the List of Tariff Classifications.
Name of Base Units: To update the Reporting UOM of stock items with specific base unit, select the Base Unit from the Units list. E.g. ABC Company wants to update the Reporting UOM of the stock items with base unit - Kgs.

Press Enter to view Update Excise Reporting UOM screen
The Update Excise Reporting UOM screen appears as shown

In Update Excise Reporting UOM screen, application displays only those stock items with the base unit Kgs.
If all the items with specific existing Reporting UOM have same Excise Reporting UOM applicable then, in Excise Reporting UOM field select the appropriate Excise UOM from the List of Excise Reporting UOM.
Example: For all the excise Items with existing Reporting UOM as Kgs, the applicable Excise UOM is KG (kilogram). Select KG in Excise Reporting UOM field and specify the conversion factor to each item. Press Ctrl + A (short cut key to save the changes) or press Enter till you reach Accept Yes or No option.
If the stock Items with specific existing Reporting UOM have different Reporting UOM applicable then, in Excise Reporting UOM field select Any from List of Excise Reporting UOM. Update Reporting UOM only for those stock items where ever there is discrepancy and retain the Reporting UOM of other items intact.
To define the Reporting UOM for other Stock items press Enter, the cursor will move to Excise Reporting UOM column, select the stock item and define the Reporting UOM.
Press Ctrl + A (short cut key to save the changes) or press Enter till you reach Accept Yes or No option to save the changes.
Similarly, user can select to update Reporting UOM for stock items with other Base Units.
Each and every goods manufactured or produced have to be classified for finding out the rate of duty applicable. Accordingly, Central Excise Tariff Act 1985 classifies all the goods under 91 chapters and specific code is assigned to each item. This code is called Tariff Classification code, which consists of 8 digits.
If the HSN Code specified in the Tariff Classification is less than 8 digits, such Tariff Classifications will be displayed for validation
Select No/Invalid Tariff/HSN Code and press Enter to view Tariff /HSN Code Validation screen

Tariff /HSN Code Validation report displays the details of Name of Tariff, HSN Code and b.
Remarks displays the reason why the Tariff classification to be validated. In the above screen the HSN code defined for the Tariff classification contains 6 digits where as the HSN Code should of 8 digits.
Remark will be displayed for all those Tariff classification where the HSN Code is less/more than 8 digits. Correct the HSN code by specifying the correct 8 digit code. Once the correction is made, application will not display the remarks.
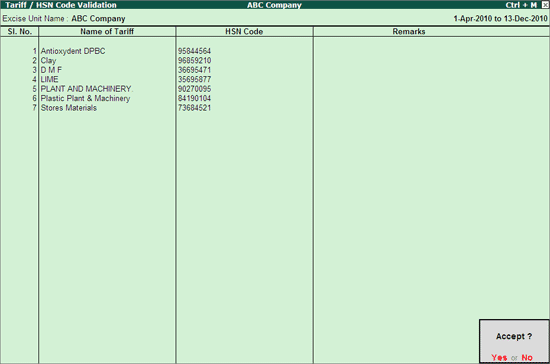
Note: Tally.ERP 9 looks only for 8 digits/numbers and ignores the dot or space between the numbers.
Press Enter to accept the Tariff/HSN Code Validation. On accepting the Tariff/HSN Code validation, E-Return Validation screen will not display the Type of Error - No/Invalid Tariff/HSN Code and the corresponding Error Count.
In a Manufacturing industry the Finished goods stock will be available for sale only when those goods are manufactured. In Tally.ERP 9 the manufacture of goods are accounted through Manufacturing Journal or Excise Stock journal
If the excise stock items created and identified as Finished Goods are sold without recording the manufacturing journal or Excise Stock Journal then in excise reports - Daily Stock Register and Form ER 1 the Closing Balance of Stock item will be displayed as Negative Stock.
While generating ER 1 E-Return if there are any stock items (Finished Goods) with negative stock such stock items will be displayed in Negative Quantity Validation screen with the remarks as Record Manufacturing Journal indicating that Manufacturing Journal is not recorded to account the manufacture of stock.
Select Negative Quantity and press Enter to view Negative Quantity Validation screen
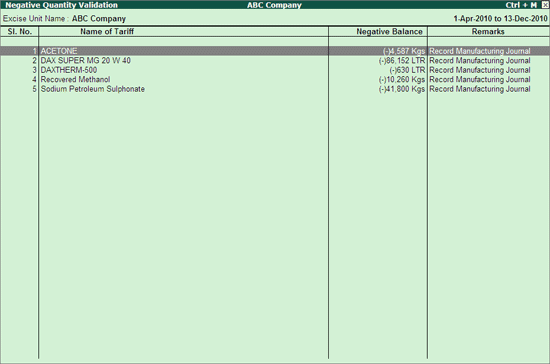
To correct the negative quantity record a Manufacturing Journal or Excise Stock Journal for the items displayed as Negative Stock.
Check Daily Stock Register to know when the Excise Stock has become Negative and accordingly record the manufacturing Jounral in appropriate period.
As per the E-Return requirement when the same finished goods are cleared locally as well as exported then the details of clearances have to be captured separately based on the Notification Type - whether under Tariff or Non-Tariff Notification
Tariff Notification - Tariff notification are issued to make amendments to excise tariff act i.e. to make amendments to duty rates. The rate can be either exempted or concessional rate.
Non-Tariff Notification - NT notification are issued to make amendments or to give effect to any provisions of excise rules i.e. to specify or amend any procedural matters.
For identification of Notification Type, Tally.ERP 9 will display all the Excise Sales in which Notification Number is specified/entered
Select Identify Notification Type - Tariff/Non-Tariff and press Enter to view Identify Notification Type screen

The Identify Notification Type screen displays the Date, Particulars, Voucher Type, Voucher Number and Notification Number of the Sales Invoices.
To identify the Notification Type for a transaction select the transaction and pres Enter to view the Sales Invoice.
In Excise Sales invoice, a new field Notification Type has been provided. Go to Notification Type field and select the appropriate Notification Type from the List.
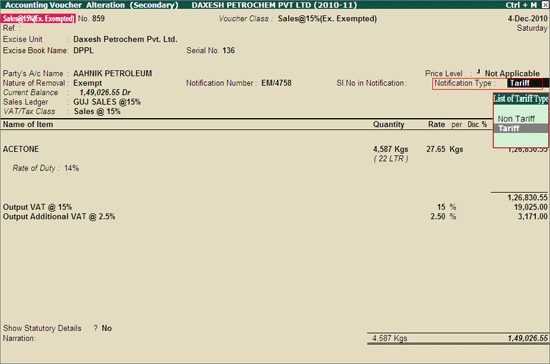
Press Enter to accept the Voucher alteration.
On selecting the Notification Type, excise sales invoice will not be displayed to identify Notification Type screen.
After all the validations, E-Return Validation screen will not display the Type of Error and the corresponding Error Count.
The completed Exporting ER 1 E-Return screen is displayed as shown:
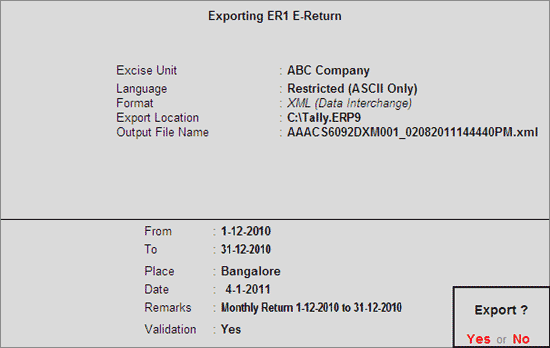
Press Enter to export the Return.
Note: Before generating E-Return ensure that all the transaction details are properly captured in Form ER 1
Tally.ERP 9 allows to configure the E-Returns. To configure press F12: Configure from Exporting ER 1 E-Return screen to view Configuration screen.
Configuration screen displays 3 configuration options
* Show Excise Duty Amount Round Off: By default, this option will be set to Yes because, the ER 1 E-Return Requirement has clearly stated that all the duty amount has to rounded off to the nearest Rupee.
* Round Off Quantity to Two decimals: By default this option will be set to Yes because the ER 1 E-return requirements has clearly stated that Quantity can be in Decimals.
* Nil Return: By default this option will be set to No. Set this option to Yes if you want to generate Nil Return for a month in which there are transaction carried out but wants to pay the duty of the previous period with penalty or interest.

If the user generates E-Returns by setting the option Show Excise Duty Amount Round Off to No, the ACES application will not allow the Assessee to upload the Returns.
The exported file will be placed in the Tally.ERP 9 Directory with the file name as specified above and ready for upload.
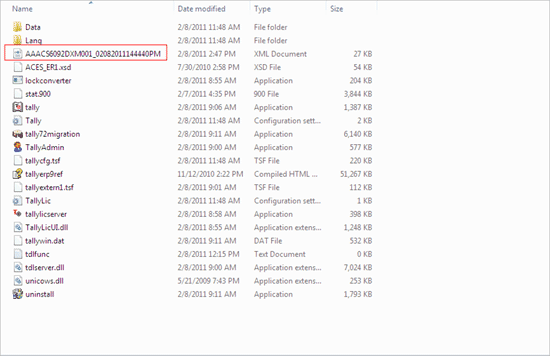
Note: Users can verify the correctness of the E-Returns generated from Tally.ERP 9. The Excise department has provided a XSD file using which the xml has to be validated and then uploaded to the department website.
XSD stands for XML Schema Definition. XSD specifies how to formally describe the elements in an XML document. This description can be used to verify that each item in the XML document adheres to the description of the element in which the content is to be placed.
There are various tools available on net that can be downloaded for validating an XML against the XSD file. For ex. EditiX 2010, Stylus studio..etc. EditiX 2010 is a freeware
To compare the data structure of file generated from Tally.ERP 9 to the data structure provided by the Excise Department .
* Copy ACES_DLR.xsd file into Tally.ERP 9 folder
* Open the Returns generated form Tally.ERP 9 in any of the XML validation tools like EditiX 2010, StylusStudio etc. (tool which is used to check the correctness of the XML files)
* Click on the option Validate, the tool compares the structure to ACES_DLR.xsd file available in Tally.ERP9 folder and gives the Output as Valid (If there are no errors) or will displays the errors found in the document.