To configure the Server Company for Synchronisation, follow the steps shown below:
Go to Gateway of Tally > F12: Configure > Advanced Configuration
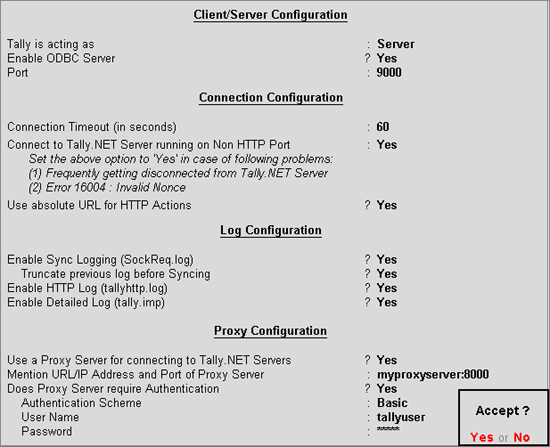
In the Advanced Configuration screen,
Set the option Tally is acting as to Server to run Tally.ERP 9 as Synchronisation Server
Specify the required port number (e.g. 9009) in the Port field
Set the duration in seconds for Connection Timeout (in seconds). The server disconnects when it does not receive any response from the client within the specified duration
Set Connect to Tally.NET Servers running on Non-HTTP Port to Yes to avoid frequent disconnection from Tally.NET or when receiving the error 16004 - frequently
Set Use absolute URL for HTTP Actions to Yes to enable the proxy server to communicate the complete URL, by default this option is set to No
Set the option Enable Sync Logging (SockReq.log) to Yes, to generate a Log file which contains information about the synchronized vouchers. This file resides in the folder where Tally.ERP 9 is installed
Set the option Truncate previous log before Syncing to Yes, to overwrite the contents of the current log file generated earlier
Set the option Enable HTTP Log (tallyhttp.log) to Yes to login all SOAP and HTTP Post request/response in the log file residing in the default Tally.ERP9 folder
Set the option Enable Detailed Log (tally.imp) to Yes to generate Tally.imp log file containing details of the operation
Set Use a Proxy Server for connecting to Tally.NET Servers to Yes when you are connected to the Internet through the proxy server
Provide details in the Mention URL/IP Address and Port of Proxy Server field
Set Does Proxy Server require Authentication to Yes to verify the user name and password
Set the Authentication Scheme to Basic
Enter the required User Name
Enter the Password
Press Enter to save setting for synchronisation server
For the above changes to take effect, Tally.ERP 9 will prompt you to restart the application as shown:
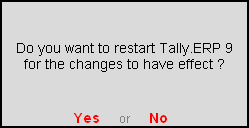
Click Yes or press Y to restart Tally.ERP 9 on the Server computer
Tally.ERP 9 will restart and in the Information Panel you can see that it is configured as the Sync Server as shown below.
