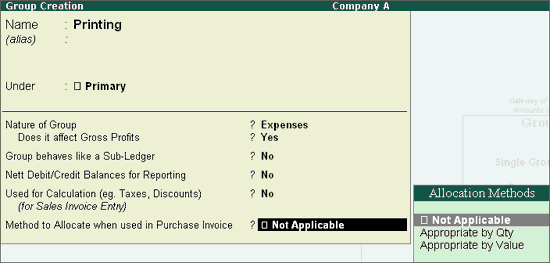
This section deals with the additional fields you would input during creation of Group, you will be able to configure the information to your requirements like Group behaves like sub-ledger, Nett Debit/Credit Balances for Reporting, Used for Calculation and Method to allocate when used in purchase invoice.
Go to Gateway of Tally > Accounts Info > Groups > Create under Single Group > select F12 configure (Group Configuration) and enable Allow Advanced entries in Masters under Accounts Masters.


If a group (e.g Printing) is created under Primary, you must select the appropriate option from the list whether it is an asset, liability, income or expenses. If you select an income or expenses you should specify whether it will affect the gross profits or not by suitably setting the option Does it affect Gross Profits? to Yes/No.
If the option is selected as Yes, the Group will appear under Trading Account and if the option is selected as No, the Group will appear under Profit & Loss Account.
You can use this concept when you wish to segregate your profits into Operative Profit and Net Profit. This helps you when you want to consider other revenue accounts in addition to Direct instead of Gross and Net Profit.
Normally, Tally.ERP 9 calculates Gross Profit using Opening Stock, Purchase Accounts, Direct Expenses, Sales Accounts, Direct Incomes and Closing Stock only. To make other accounts contribute to this, without classifying under these reserved heads, set this option to Yes.
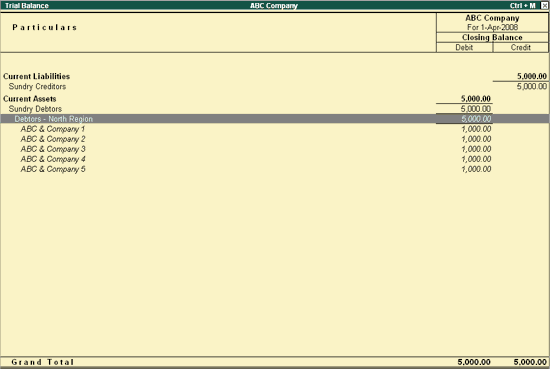
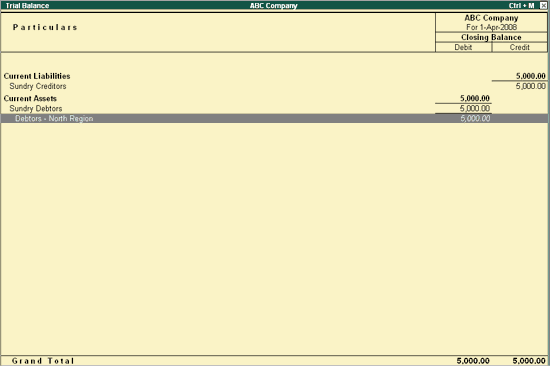
This option will allow such Groups to behave as defined in the Master to act as equal to the behavior of Ledger.
When Group behaves like sub-ledger is set to No, the same will display all the Ledgers grouped under the same in detailed mode.

When the Group behaves like sub-ledger is set to Yes, the same will not display the Ledgers grouped under the same in detailed mode.

The same is helpful in reports when there is a large number of Ledgers under any Group.
Setting this option to Yes will display either the net debit or credit balance in the report (whichever is higher). If this is set to No, both debit and credit balances will be displayed in the report.
Set this option to Yes if ledgers under this group would have percentages for discounts/taxes to be used in invoice entry. This gets reflected while passing voucher entry in Invoice mode and for automatic calculations.
Select the appropriate allocation method from the list. This is used to allocate the expense of the Item in the ratio of the quantity or value.
Buttons in Group Creation Screen with advanced usage:

|
Button |
Shortcut Keys |
Behaviour |
|
L: Ledgers |
Ctrl+L |
Navigate to Ledger Creation screen |
|
S: Cst Cat |
Ctrl+S |
Navigate to Cost Category Creation screen |
|
C: Cst Ctr |
Ctrl+C |
Navigate to Cost Centre Creation screen |
|
O:Employee Groups |
Ctrl+O |
Navigate to Employee Groups Creation screen |
|
E: Pay Heads |
Ctrl+E |
Navigate to Pay Head Creation screen |
|
P: Employee |
Ctrl+P |
Navigate to Employee Creation screen |
|
T: Attd Type |
Ctrl+T |
Navigate to Attendance/Production Type Creation screen |
|
U: Units |
Ctrl+U |
Navigate Unit Creation screen |
|
B: Budget |
Ctrl+B |
Navigate to Budget Creation screen |
|
V: Vch Types |
Ctrl+V |
Navigate to Voucher Type Creation screen |
The default buttons available are Ledgers and Voucher Types and the rest of the options displayed based on the features enabled in F11:F1: Accounting features.
Note: F12: Configuration changes affect all companies and changes made in F11:Features affect only the current company.