|
On this page
|
A voucher is a primary document that contains all the information regarding a transaction. To begin with, it is necessary to understand the classification of vouchers and their structure. Voucher and Invoice Customisation will be dealt with later in this Topic.
For every transaction in Tally, you can make use of an appropriate voucher to enter all the required details. Vouchers are broadly classified into three types:
● Accounting Vouchers
● Inventory Vouchers
● Accounting-cum-Inventory Vouchers
Accounting Vouchers imply recording transactions which require only the accounting details that do not have any impact on the inventory. Receipt, Payment, Contra and Journal Vouchers are all Accounting Vouchers.
Note: These transactions affect only the Accounting Reports.
In cases where the option Inventory Values are affected? (which is used for Journal/Payment/ Receipt entries) is set to Yes in the Ledger Master, the entries made will also accept the stock items. However, this is not a standard business practice. Entries of this sort, are usually reflected in the Inventory Reports.
Inventory Vouchers imply the recording of transactions which require details pertaining only to the inventory and do not have any impact on accounts. Stock Journal and Physical Stock Vouchers are both Inventory Vouchers.
Note : These transactions do not affect the Accounting Reports, except when the Closing Stock value is computed and the option of ‘Integrate Accounts and Inventory’ is set to YES in F11:Accounting/Inventory Features.
Accounting-cum-Inventory Vouchers are transactions containing details pertaining to Accounts as well as Inventory. Purchase Order, Receipt Note, Rejection In, Debit Note, Purchase, Sales Order, Delivery Note, Rejection Out, Credit Note, Sales, etc. are all Accounting-cum-Inventory Vouchers.
Note: Purchase Orders, Receipt Notes, Rejection Ins, Sales Orders, Delivery Notes and Rejection Outs only affect the Inventory Reports whereas Debit Notes, Purchase Notes, Credit Notes and Sales affect the Accounting as well as Inventory Reports, if the Tracking Number is set to ‘Not Applicable’, else it affects only the Accounting Reports.
A Voucher Object stores two types of information: Base Information and Actual Entries.
Base Information consists of base methods like Voucher Number, Date, Reference, Narration and so on, which are common to all the voucher types.
Actual Entries are the entries pertaining to Accounts and Inventory.
The following six collections have been introduced to handle transactions based on the three types of vouchers explained earlier. They are:
● Ledger Entries
● Inventory Entries
● All Ledger Entries
● All Inventory Entries
● Inventory Entries In
● Inventory Entries Out
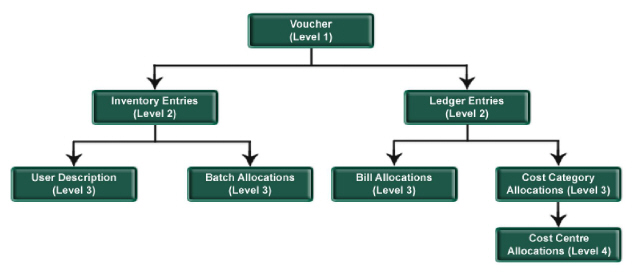
The hierarchy of Voucher Objects is as shown below:
The base entries of a Voucher are Date, Voucher Type, Voucher Number, etc.
The first level consists of two basic collections, namely Ledger Entries and Inventory Entries. Each Ledger Entry Object has its own Base Methods like Ledger Name, Amount, Bill Allocation Collection and Cost Category Allocation Collection. Each Cost Category Allocation Object in turn, contains its own Methods, which are Name, Amount and a Cost Centre Allocation Collection.
Accounting Vouchers use collections of the following type:
● Ledger Entries
● All Ledger Entries
Inventory Vouchers use collections of the following type:
● Inventory Entries
● All Inventory Entries
● Inventory Entries In
● Inventory Entries Out
Accounting-cum-Inventory Vouchers use collections of the following type:
● Ledger Entries
● All Ledger Entries
● Inven t ory Entries
● All Inventory Entri e s
A user usually enters transactions in a voucher and prints it in the default format provided. However, there may be instances, when the user would want to have it printed in a format other than the default one provided in Tally. In such circumstances, the user may have to get it customised according to the company needs.
In cases where there is a requirement for customisation, adhere to the following steps:
1. Analyse the format required by the company to judge whether
● The requirement can be met with the default format with some minor changes.
OR
● A new format needs to be designed
2. Check whether any additional input fields are required. If required, add the appropriate UDFs at relevant places.
3. Identify the definitions that need to be altered to suit the user requirements.
Note: In this chapter, we would be referring input screens as Vouchers and print screens as Invoice.
Let’s consider the following examples to understand the concept of Voucher Customisation.
Problem Statement
A Company named ‘ABC Company Ltd’ needs the Cheque No., Date and Bank Name printed on a Payment/Receipt Voucher and Receipt. There should also be an option of whether the Cheque details are to be printed or not.
Solution
Step 1: Add additional fields to capture the Bank Name, Cheque Number and Cheque Date. For this, the following UDFs are created.
[System : UDF]
BankName : String : 1000
NarrWOCh : String : 1001
ChequeNumber : Number : 1000
ChqDate : Date : 1000
The UDFs mentioned above are used in the existing Part VCH Narration .
[#Part : VCH Narration]
;;Modify the Narration Part to add the details
Add : Option : BankDet VCH Narration : @@IsPayment OR @@IsReceipt
Add : Option : BankDet VCH NarrationRcpt : @@ReceiptAfterSave
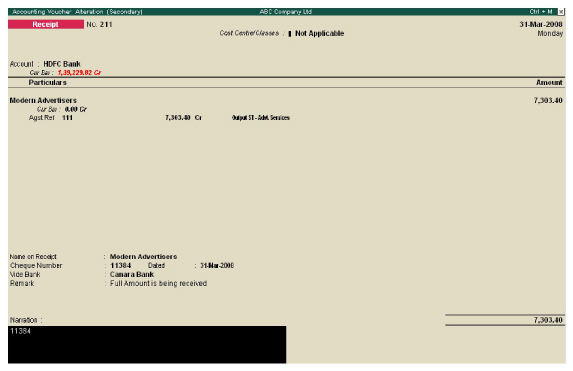
On entering the required details, the screen of the Receipt Voucher looks as follows:
Step 2: The Configuration screen of Receipt and Payment Voucher is altered to add a new option.
In this, the existing Parts Payment Print Config and Receipt Print Config have been altered.
;; Payment Config Changes
[#Part : Payment Print Config]
Add : Lines : Before : PPRVchNarr : PPR ChqDetails
;; Receipt Config Changes
[#Part : Receipt Print Config]
Add : Lines : After : PPRWithCost : PPR ChqDetails
Step 3: The existing Field PPR Narr and Part PPRBottomDetails are altered to get the required Receipt/Payment Voucher.
[#Field : PPR Narr]
Option : PPR Narr Rct Pymt
[#Part : PPRBottomDetails]
Option : PPRBottomDetails Rct Pymt : (@@IsPayment OR @@IsReceipt) AND ##PPRChqInfo
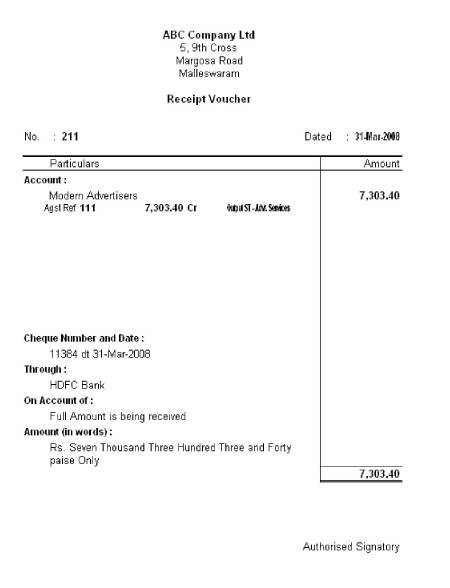
The print out of a Customised Receipt Voucher is as follows:
Step 4: The existing Field PRCT Thru is altered to get the required Receipt/Payment Voucher.
[#Field : PRCT Thru]
Option : PRCT Thru Rct Pymt : @@IsReceipt
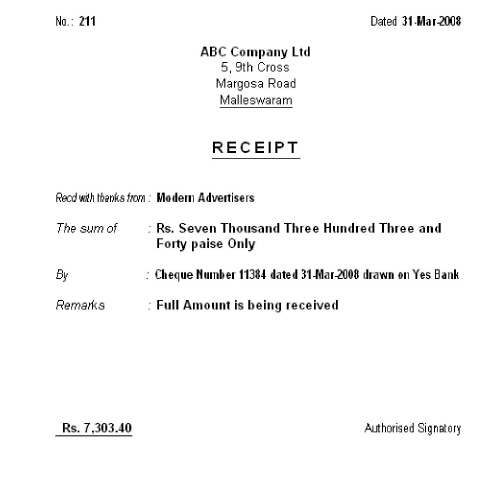
The print out of a Customised Receipt is as shown:
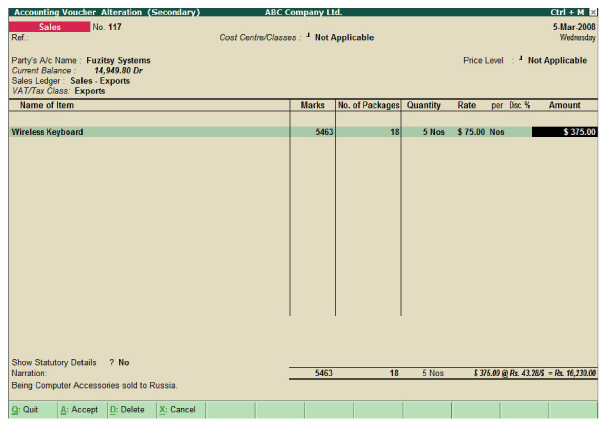
Problem Statement
Consider adding columns for Marks and Number of Packages to Sales Voucher, instead of lines which are already available by default in Tally.
Solution
To add a column in the Invoice screen, you should know:
● The position in which you have to add a field
● The number of lines to be altered to incorporate the new field
● The type of UDF required for the field (if required)
The steps to be followed are listed below:
● Firstly, identify the lines that have to be altered to add the required fields.
● Check the field name in the column title and the details of lines in the inventory entries made. Similarly, check the ledger entries collection including batch allocations, total and subtotal lines. Check all the lines that may be effected in the invoice portion.
● Add the field in all the lines found.
The following lines are to be altered to achieve the required modification:
;; Invoice Column Headings1 without class
[Line : EI ColumnOne]
;; Invoice Column Headings2 with class
[Line : EI ColumnTwo]
;; Invoice Inventory Entries without Class
[Line : EI InvInfo]
;; alternate quantity details line
[Line : STKVCH AltUnits]
;; Invoice Inventory Entries with Class
[Line : CI InvInfo]
;; are added at the form level
[Form : Export Invoice]
The following screen shows two input fields added or relocated in the Inventory Entries details:
Refer to the sample code for the same.
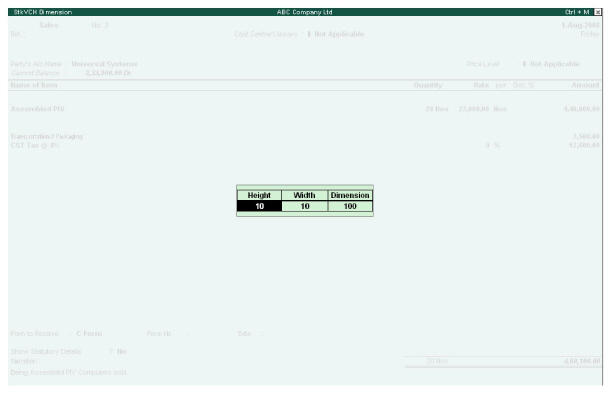
Problem Statement
Consider adding a Subform for a stock item to enter the Height and Width. The dimension is calculated on basis of the Height and Width entered, and the same is reflected in the Quantity field.
Solution
To add a Subform, one should know:
● The field at which a Subform needs to be called, with or without any condition.
● How to define a Subform Report and its components.
● Whether the Subform would effect the main screen from which it was called, with any modifications.
Care should be taken to consider all situations, while addressing similar requirements, such as with or without activation of Actual and Billed Quantity, with or without Batch wise screen, etc.
The following lines are to be altered to achieve the required modification:
[#Field : VCHACC StockItem]
Add : SubForm : At Beginning : StkVCH Dimension : NOT $$IsEnd : $StockItemName
Refer to the sample code for the same.
Problem Statement
Altering an existing Discount column that would change the default working of Tally.
Solution
To achieve this, first change the default Discount column from Percentage to Amount. The changes that should be done in the default Tally screen are:
● Reformat Discount at Price level
[#Field : MPSDiscountTitle]
Set as : "Discount Amt"
● Reformat Discount at Inventory Entries not to show the Percent sign
[#Field : VCH Discount]
Delete : Format
Add : Format : "NoPercent,NoZero"
● Reformat Discount at Batch Allocations not to show the Percent sign
[#Field : V CHBATCH Discount]
Delete : F ormat
Add : F ormat : "NoPerc e nt,NoZero"
● Change the valuation accordingly in VCH Value
;; To change the Invoice Value field when there are no Batch Allocations
[#Field : VCH Value]
ResetVal : if (@@NoBaseUnits OR $$IsEmpty:$BilledQty) then $$Value else (($Rate * $BilledQty) - $Discount)
● Change the formula by which the discount is calculated
;; Recalculate the following Formula rest will be taken care by Tally
[System : Formula]
CalcedAmt : ($Rate * $BilledQty) - $BatchDiscount
NrmlAmount : ($BilledQty * $Rate) - $BatchDiscount
Invoice Customisation can broadly be classified into two categories based on the requirement:
● Invoice Customisation – User defined format
● Invoice Customisation – Modifications to default format
A totally new Invoice format needs to be developed in this category, after which it can be enabled in the following two different ways:
● Adding new format along with the default format
● Replacing the existing format with a new one
Adding a new format along with the default format
To create a new format of invoice by modifying the existing Form Sales Color in addition to the default ‘Print’ Report code. This manner of Customisation begins with the following code snippet:
[#Form : Sales Color]
Add : Print : Sales Invoice
[Report : Sales Invoice]
Form : Sales Invoice
Object : Voucher
In this code snippet, the default ‘Print’ Report is deleted, the Report Sales Invoice is added and the Object Voucher is associated to it. However, in the previous example, it was not necessary to associate the ‘Voucher’ Object, since it was already associated in the default Report ‘Printed Invoice’.
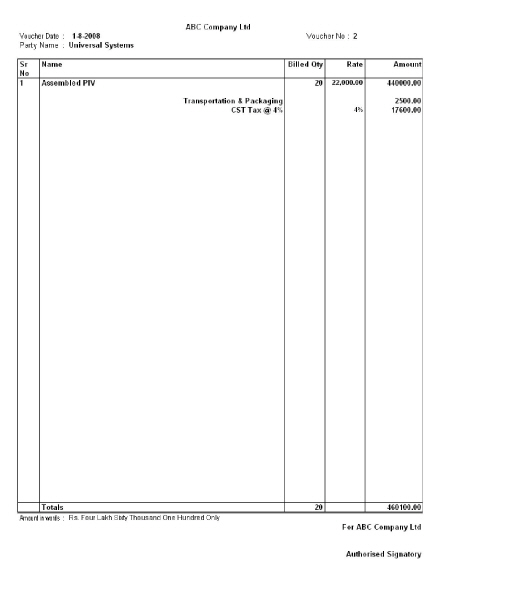
Problem Statement
ABC Company Ltd. requires a Sales Invoice which in turn requires the following format in addition to the default Sales Invoice.

Replacing the existing format with a new one
By default, the basic formats provided for Commercial Invoice Printing are:
● Normal Invoice, i.e., Comprehensive Invoice
● Simple Invoice, i.e., Simple Printed Invoice
The Comprehensive Invoice and Simple Printed Invoice are two optional forms which are executed on the basis of satisfying a given condition. The default option available for print is the Comprehensive Invoice.
A Simple Invoice is printed if the option Print in Simple Format is set to Yes in F12 : Configuration. On the other hand, a Comprenhensive Invoice is printed only if the user opts for a ‘Neat’ Format mode of printing, and the option mentioned above is set to No.
Problem Statement
ABC Company Ltd. requires a Sales Invoice which in turn requires the following format for both a Normal Invoice as well as a Simple Invoice.
Solution
Step 1: Default Forms for a Comprehensive Invoice and Simple Printed Invoice are modified with an optional Form.
[#Form : Comprehensive Invoice]
Add : Option : My Invoice : @@IsSales
[#Form : Simple Printed Invoice]
Add : Option : My Invoice : @@IsSales
Step 2:The Parts and Page Breaks of the default Form are deleted and new Parts are added.
To begin with, the Invoice is classified into three parts: Top Part, Body Part and Bottom Part. These Parts can be further divided into any number of Parts according to the user’s requirement.
[!Form : My Invoice]
Delete : Parts
Delete : Bottom Parts
Delete : PageBreak
Space Top : 0
Space Bottom : 0
Space Left : 0
Space Right : 0
Add : Part : My Invoice Top Part
Add : Part : My Invoice Body Part
Add : Bottom Part : My Invoice Bottom Part
There may be a requirement in an Invoice customisation which is similar to the default Tally format with some minor changes. In such cases, one can just alter the default definitions as required.
Problem Statement
A Company ABC Company Ltd. requires an Invoice with its Terms and Conditions as shown:

Solution
Step 1: The default configuration Part IPCFG Right is altered to add the Line.
[#Part : IPCFG Right]
Add : Lines : GlobalWithTerms
Step 2: The default Part EXPINV ExciseDetails is altered to cater to the requirement.
[#Part : EXPINV ExciseDetails]
Delete : Lines : EXPINV ExciseRange, EXPINV ExciseRangeAddr, EXPINV ExciseDiv, EXPINV ExciseDivAddr, +
EXPINV ExciseSerial, EXPINV InvoiceTime, EXPINV RemovalTime
Add : Lines : EXPINV SubTitle, EXPINV ExciseDetails
Repeat : EXPINV ExciseDetails : Global Terms
Local : Field : EXPINV SubTitle : Info : "Terms & Conditions :"
Local : Field : EXPINV SubTitle : Border : Thin Bottom
Local : Line : EXPINV SubTitle : Space Bottom : 1
Invisible : NOT @@IsInvoice OR NOT ##ShowWithTerms
Problem Statement
Sorting Inventory Entries as per user requirement.
Solution
The Inventory Entries of an invoice are printed in the order in which they are entered. This order can be changed as per user requirement. The sorting can be done in either ascending or descending order in terms of the item name, stock group, stock category, units of measure, rate, value, and so on. To denote the descending order, attach ‘—’ sign to it.
To change the order of the default invoice:
● Define a Collection of inventory entries in the desired sorted order
[Collection : Sorted Inventory Entries]
Type : Inventory Entries : Voucher
Sort : Default : -$Parent : StockItem:$StockItemName, $StockItemName
Note the Part in which the statement ‘repeat Line of Inventory entries’ is mentioned in the DefTDL and Change this Part to ‘repeat the Line with the new Collection defined’.
[#Part : EXPINV InvInfo]
Repeat : EXPINV InvDetails : Sorted Inventory Entries
;; End-of-Code
Learning Outcome
Vouchers are broadly classified into three types:
● Accounting Vouchers
● Inventory Vouchers
● Accounting-cum-Inventory Vouchers
● Voucher Objects store two types of information - Base Information and Actual Entries.