Some of the commonly asked questions about data sharing in windows are answered here.
You can share folders in Windows Vista, Windows 7 and Windows Server 2008 Standard Operating Systems.
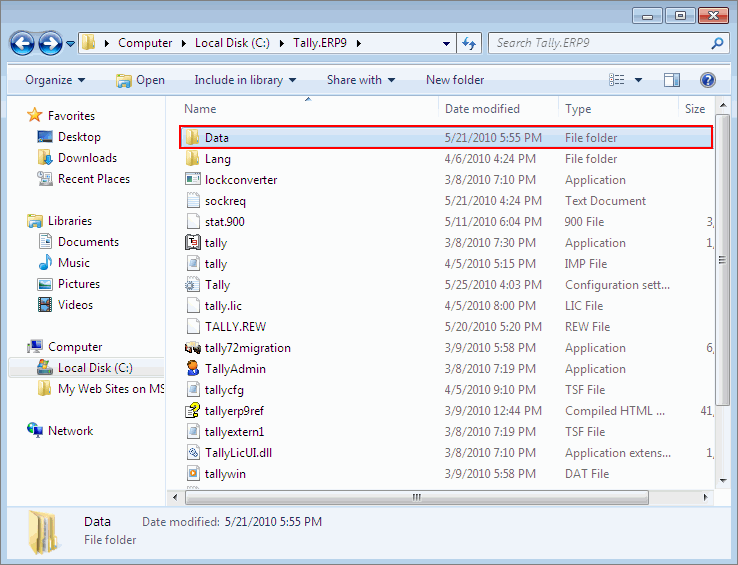
1. Select the required folder. For example, the D ata folder available in the default application folder.(C:\Tally.ERP9).
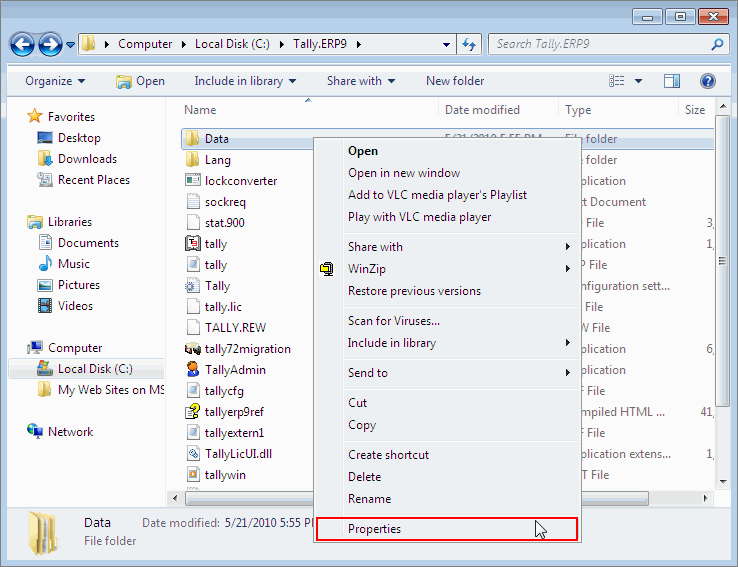
2. Right-click and select Properties.
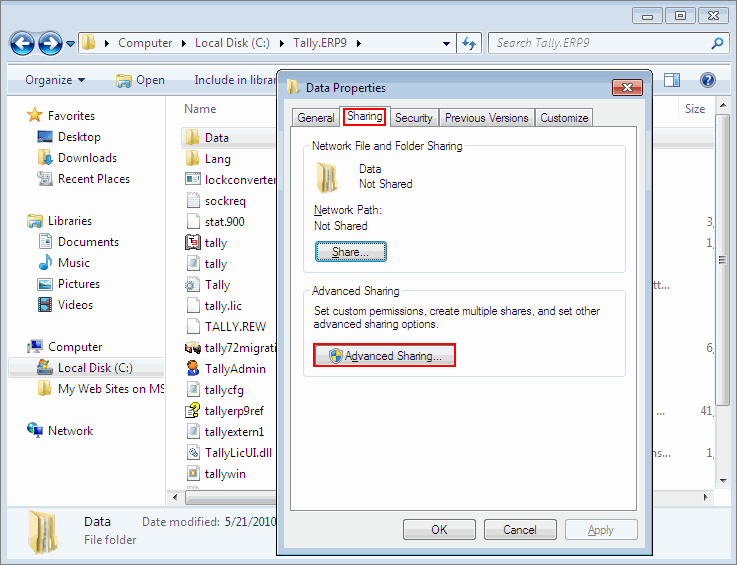
3. The Data Properties window opens.
4. Click Sharing tab .
5. Click Advanced Sharing .
6. The Advanced Sharing window opens and check the option Share this folder .
7. Click Permissions.
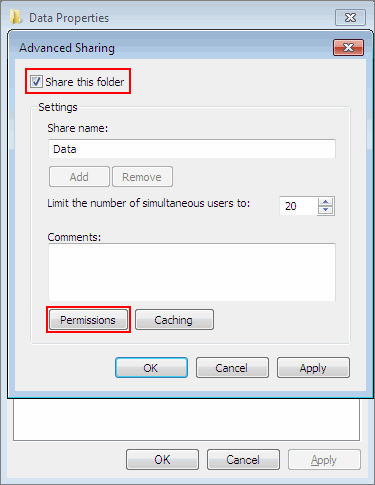
8. Permission for Data window opens.
9. Select the Group or User Name from the Group or user names list under Share Permissions.
10. Set the required permission for the selected Group or user names by checking Allow or Deny various accesses displayed:
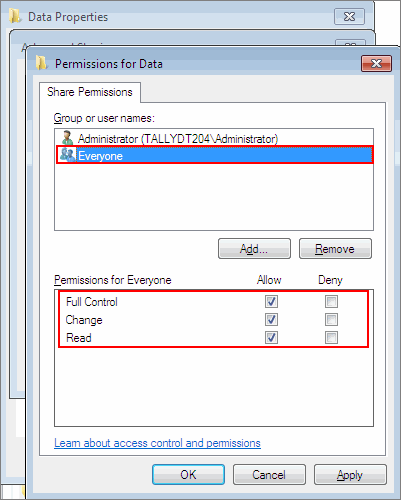
Note : Click Add to include Groups or Users to the list of Groups or user names.
11. Click OK .
12. The Advanced Sharing window appears.
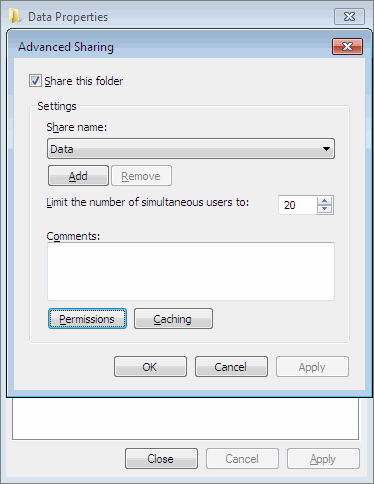
13. Click OK to share the selected folder.
14. In the Data Properties window click Close.
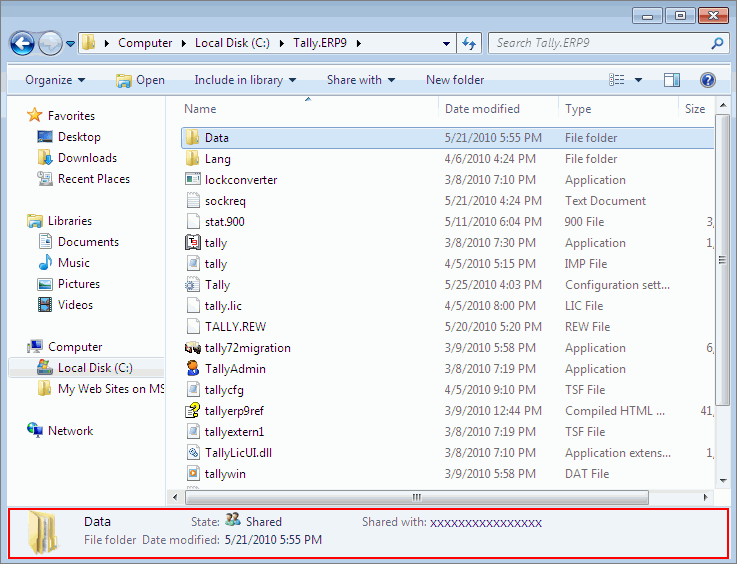
15. On clicking the Data folder in explorer window the detailed information related to the folder is displayed.
In order to secure a computer and its resources, you must consider the rights that users will have. You can secure a computer or multiple computers by granting users or groups with specific permissions. You can help secure an object, such as a file or folder, by assigning permissions to allow users or groups to perform specific actions on the respective object.
1. Right click the folder and select Properties .
2. The Data Properties window opens.
3. Click Security tab.
4. Select the required Group/User Name from the list of Group or user names and click OK .
5. In case, you want to change permissions for the selected Group/User Name, click Edit .
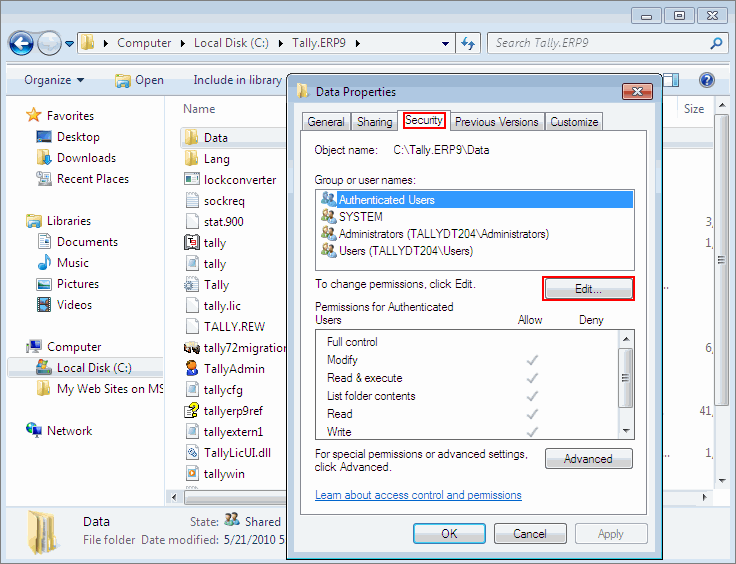
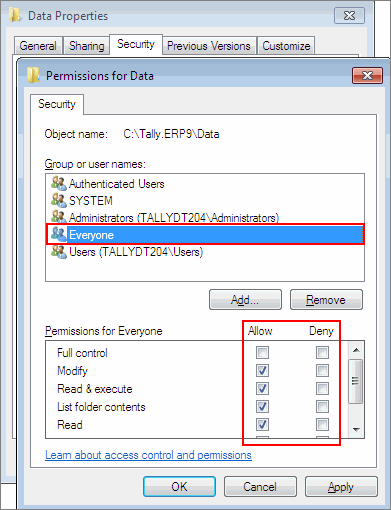
6. Permissions for Data window opens
7. Select the required Group/user name and set the required permissions.
You may also Add a Group/User Name and set the required permissions.
● Click Add.
● Select Users or Groups window opens
● Type the user / group name under Enter the object names to select, as shown:
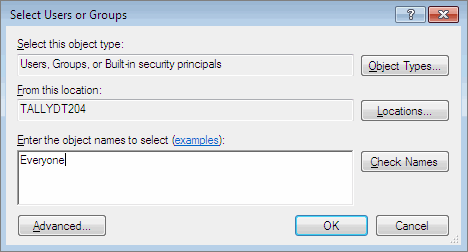
● Click Check Names to confirm the availability of the object name.
Note: Check Name locates all matching or similar object names listed in the Enter the object names to select box by using the selected object types and directory location.
● Click OK .
● Permissions for Data window appears listing the newly added object.
● Set the Permissions.
● Click Apply .
● Click OK to set the Security for a selected folder.
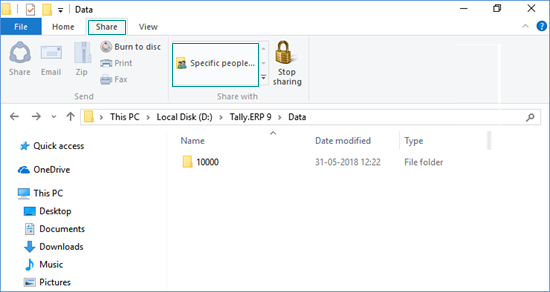
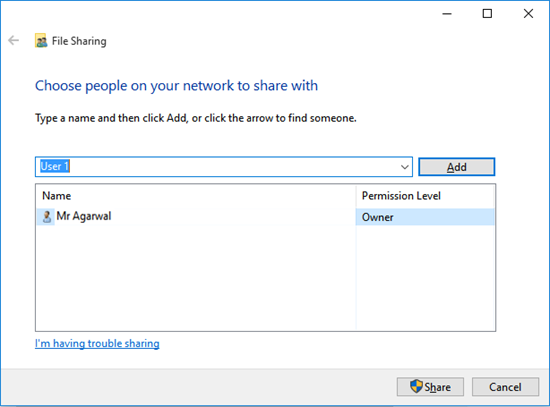
On a Windows 10 computer, you can share your company data with multiple users by following this simple procedure.
To share data in Windows 10
1. Open the folder on your computer where data is stored.
2. Click Share > Specific people .
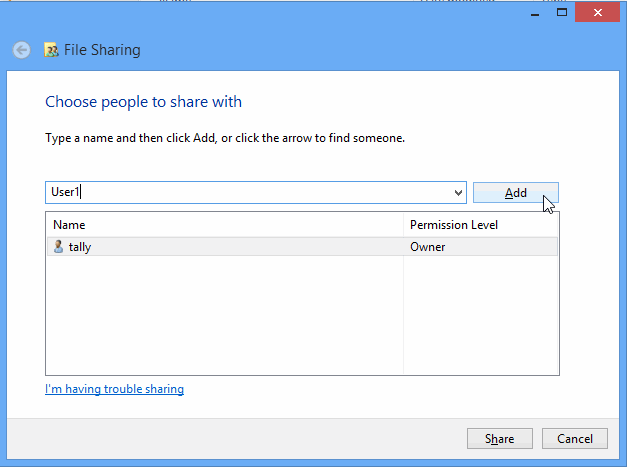
3. In the File Sharing window, enter the name of the user and click Add .
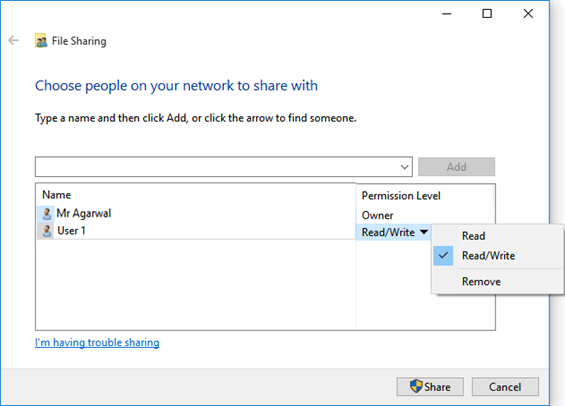
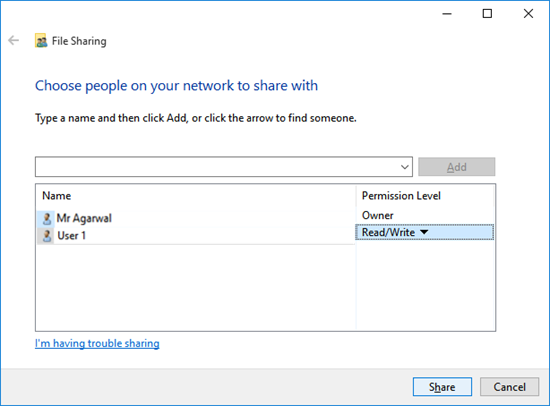
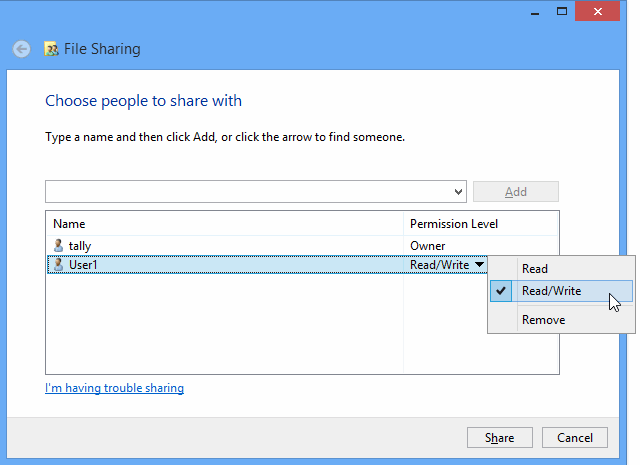
4. Set the Permission Level . For sharing company data, it is recommended that you provide Read/Write access.
5. Click Share .
6. Click Done .
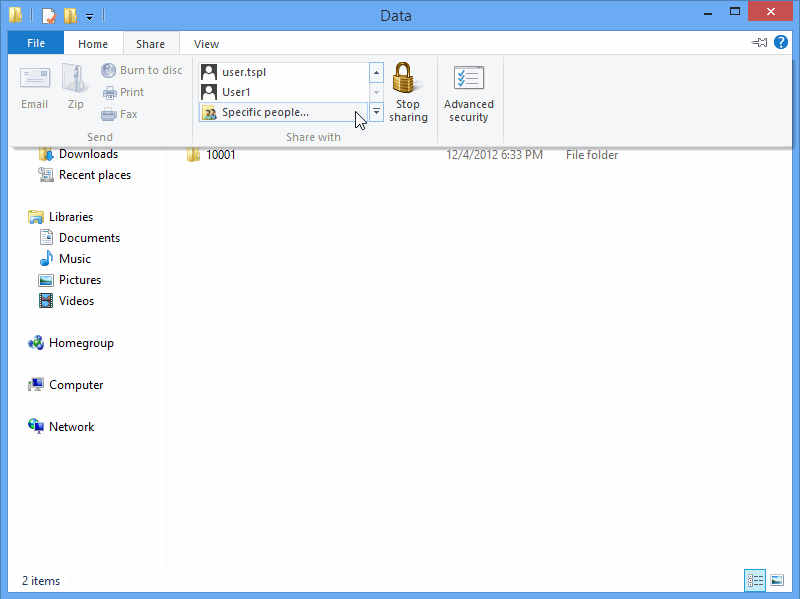
You can share Tally.ERP 9’s data folder in Windows 8.
1. Navigate to the data folder and double-click it.
2. Click the Share tab , and click Specific People .
3. In the file sharing window that opens, enter the name of the user and click Add .
4. Select the level of access, usually for Tally, the data folder has to be given Read/Write access.
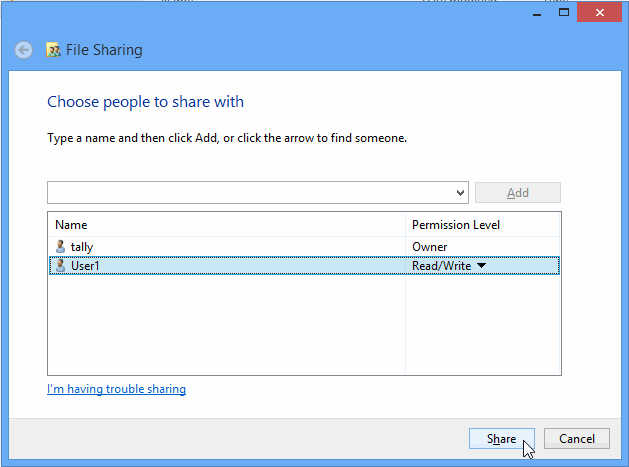
5. Click Share .
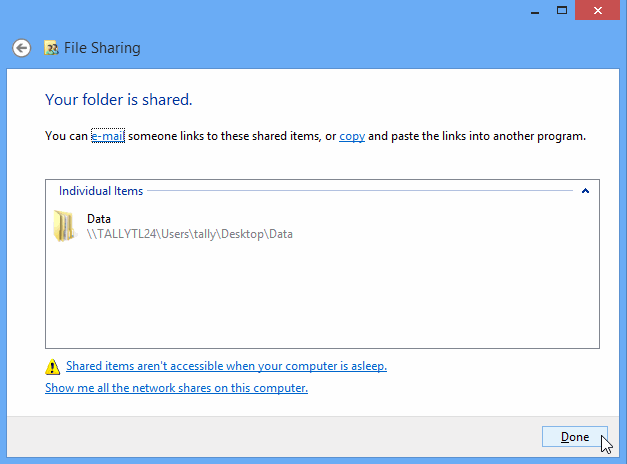
6. Click Done .
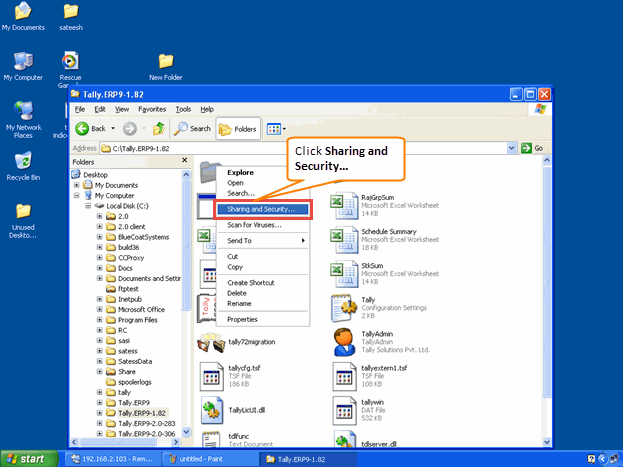
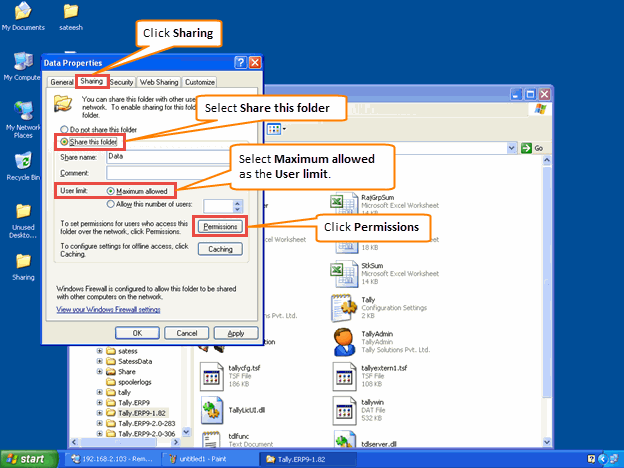
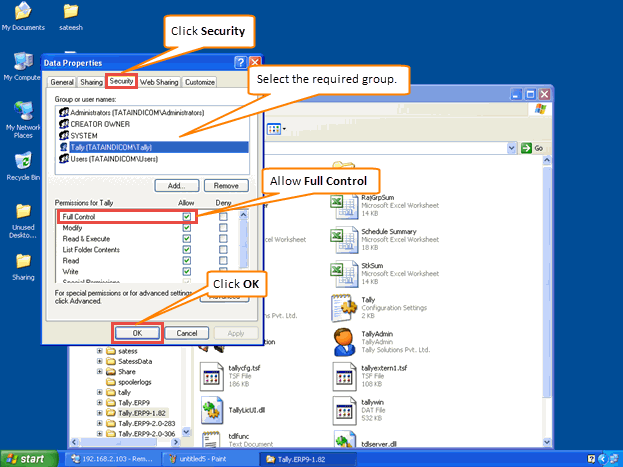
You can share data through various modes today. You can share data in your Local Area Network in Windows XP using the Windows interface itself. This way, you can share data of any size.
1. Right-click on the respective data folder.
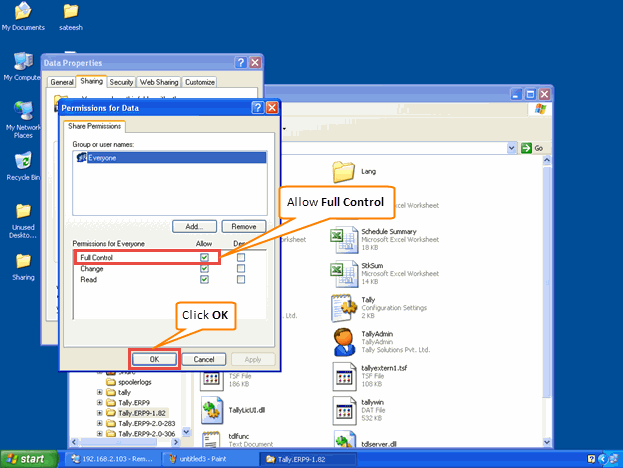
Note: You can provide the required permissions to the user by selecting the required permissions. To provide Full Permission , select Full Permission , as shown above.
On a Windows 10 computer, you can share your company data with multiple users by following this simple procedure.
To share data in Windows 10
1. Open the folder on your computer where data is stored.
2. Click Share > Specific people .
3. In the File Sharing window, enter the name of the user and click Add .
4. Set the Permission Level . For sharing company data, it is recommended that you provide Read/Write access.
5. Click Share .
6. Click Done .
SMB Stands for "Server Message Block." SMB is a network protocol used by Windows-based computers that allows systems within the same network to share files. It allows computers connected to the same network or domain to access files from other local computers as easily as if they were on the computer's local hard drive.
Not only does SMB allow computers to share files, but it also enables computers to share printers and even serial ports from other computers within the network. For example, a computer connected to a Windows network could print a document on a printer connected to another computer on the network, as long as both machines support the SMB protocol.
Though SMB was originally developed for Windows, it can also be used by other platforms, including Unix and Mac OS X , using a software implementation called Samba . By using Samba instructions, Mac, Windows, and Unix computers can share the same files, folders, and printers.
SMB Versions
There are several different versions of SMB used by Windows operating systems:
● CIFS – The ancient version of SMB that was part of Microsoft Windows NT 4.0 in 1996. SMB1 supersedes this version.
● SMB 1.0 (or SMB1) – The version used in Windows 2000, Windows XP, Windows Server 2003 and Windows Server 2003 R2
● SMB 2.0 (or SMB2) – The version used in Windows Vista (SP1 or later) and Windows Server 2008
● SMB 2.1 (or SMB2.1) – The version used in Windows 7 and Windows Server 2008 R2
● SMB 3.0 (or SMB3) – The version used in Windows 8 and Windows Server 2012
Here’s a table to help you understand what version you will end up using, depending on what Windows version is running as the SMB client and what version of Windows is running as the SMB server:
Client / Server OS |
Windows 8
|
Windows 7
|
Windows Vista
|
Previous versions
|
Windows 8
|
SMB 3.0 |
SMB 2.1 |
SMB 2.0 |
SMB 1.0 |
Windows 7
|
SMB 2.1 |
SMB 2.1 |
SMB 2.0 |
SMB 1.0 |
Windows Vista
|
SMB 2.0 |
SMB 2.0 |
SMB 2.0 |
SMB 1.0 |
Previous versions
|
SMB 1.0 |
SMB 1.0 |
SMB 1.0 |
SMB 1.0 |
Here’s a very short summary of what changed with each version of SMB:
1. From SMB 1.0 to SMB 2.0 - The first major redesign of SMB
● Increased file sharing scalability
● Improved Performance
o Request Compounding
o Asynchronous Operations
o Larger reads/writes
● More Secure and Robust
o Small command set
o Signing now uses HMAC SHA-256 instead of MD5
o SMB2 durability
2. From SMB 2.0 to SMB 2.1
● File leasing improvements
● Large MTU support
● BranchCache
3. From SMB 2.1 to SMB 3.0
● Availability
o SMB Transparent Failover
o SMB Witness
o SMB Multichannel
● Performance
o SMB Scale-Out
o SMB Direct (SMB 3.0 over RDMA)
o SMB Multichannel
o Directory Leasing
o BranchCache V2
● Backup
o VSS for Remote File Shares
● Security
o SMB Encryption using AES-CCM (Optional)
o Signing now uses AES-CMAC
● Management
o SMB PowerShell
o Improved Performance Counters
o Improved Eventing
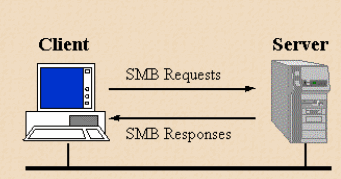
The diagram shows the way in which SMB works. Clients connect to servers using TCP/IP. Servers make file systems and other resources (printers, mailslots, named pipes, APIs) available to clients on the network. Client computers may have their own hard disks, but they also want access to the shared file systems and printers on the servers.
Clients connect to servers using TCP/IP (protocol). Once they have established a connection, clients can then send commands (SMBs) to the server that allow them to access shares, open files, read and write files, and generally do all the sort of things that you want to do with a file system. However, in the case of SMB, these things are done over the network.
The following table will explain how SMB creates Impact on Performance. The version of SMB used for file sharing is determined during the SMB session negotiation. If both the client and server support SMB 2.0, then SMB 2.0 is selected during the initial negotiation. Otherwise SMB 1.0 used for preserving backwards compatibility.
Below test was conducted to check the effect on performance.
Client |
Server |
SMB Negotiated Version |
Effect on performance |
Win XP |
Win 7/win 2008 server |
SMB1 |
No effect |
Win 7, Win 2008 server, win xp |
Win XP |
SMB1 |
No effect |
Win 7, winxp |
Win 2008 server/win 7 |
SMB2, SMB1 |
Performance effected when first communication is between smb2 to smb2. Performance not effected when first communication is between smb1 and smb1. |
Test 1: Test using Notepad
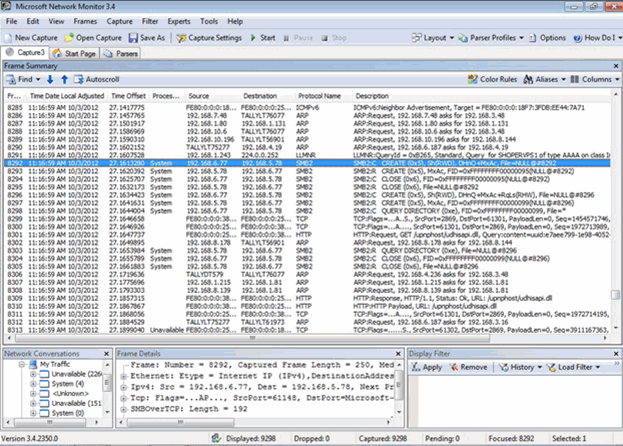
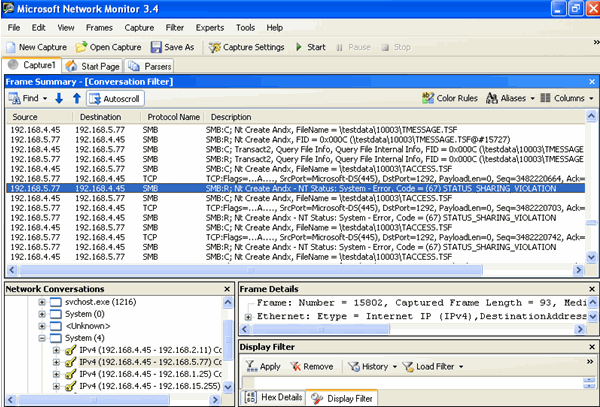
Testing was done by creating a notepad in the shared folder on Win 2008 server. Here the communication happens through smb2 protocol. This can be observed using the Microsoft Network Monitor. (See the highlighted line).
After creating the notepad from Windows 7 try to delete the same from Win XP machine immediately(less than few seconds). On trying to delete, system prompts error message as shown below.
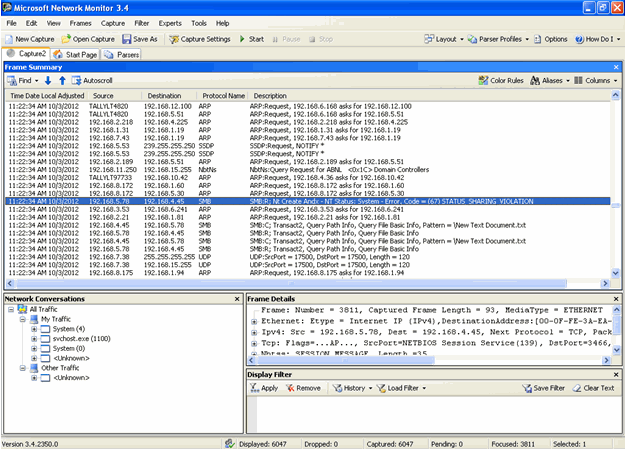
The same can also be observed using the Network monitor, where it shows a Sharing Violation. (See the highlighted line).
1. Client (Windows 7) sends Request to server to Create File via SMB2 (check in Fig 1)
2. Server Responses to allow creation for client via SMB2
3. After Creation, Client (windows 7) sends request to close SMB2 for the new file created. To sends this request there is a time delay.
4. During this delay, if another request comes from SMB1 for accessing the same file then sharing violation error shown. If it is same version of SMB, then able to access the file.
When higher version named pipe is not closed and if request comes from lower version then sharing violation occurs. When lower version client is continuously attempting to access the file then sharing violation happens multiple times. This ultimately impacts the performance of client.
Test 2: Select Company > Display Company Login Screen in Tally.
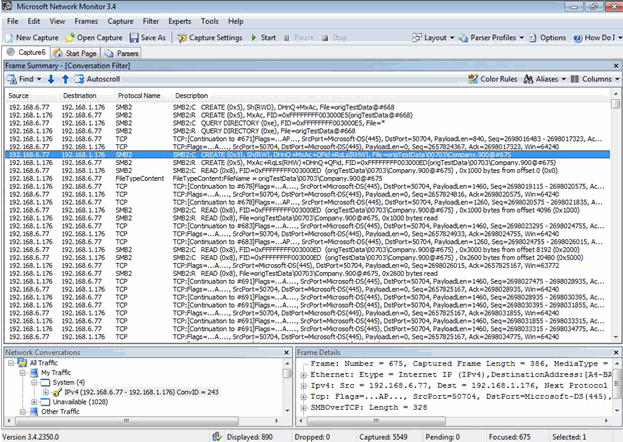
Testing was done by sharing Tally data folder on win 2008 server. Tally application was opened on window 7 and company was selected to display the Login Screen. During this process the SMB2 protocol is used to communicate with the windows server 2008 machine.
Then the same data was accessed by WinXP via SMB Protocol. From the Win XP client, to display the Login screen of the same Company, it is taking time.
In the Network Monitor, it is continuously showing sharing violation in TAccess.tsf file.
1. Client (Windows 7) sends Request to server to Create TAccess.tsf File via SMB2
2. Server Responses to allow creation for client via SMB2
3. After Creation, Client (windows 7) sends request to close SMB2 for TAccess.tsf file. To sends this request there is a time delay.
4. During this delay time, Windows XP sends request to server for creation of TAccess.tsf file. Since SMB2 namedpipe is not closed for TAccess.tsf file in Windows 7 client, it is showing sharing violation in WinXP client.
Tally Application in WinXP client will wait until it gains access to the TAccess.tsf file. This wait time impacts performance.
From the tests, we can conclude that in a sharing environment, the performance will be impacted when data server is in higher SMB version and Clients are in both higher and lower SMB Versions.
Option 1
● Data Server – SMB1 Version OS
● Clients – (SMB 1 or higher Version OS)
● As Data server is in SMB1, communication will happen in SMB1 only.
Option 2
● Data Server – SMB2 Version OS
● Clients – (SMB 2 or higher Version OS)
● As Data Server is in SMB2, Communication will happen in SMB2 Only.
Option 3
● Data Server – SMB3 Version OS
● Clients – (SMB 3 or higher Version OS)
● As Data Server is in SMB3, Communication will happen in SMB3 Only.